
BizTalk ESB 异常处理 - 消费 WCF 服务 - 第二部分
5.00/5 (1投票)
通过 BizTalk ESB Toolkit 消费 WCF 服务时进行异常管理 - 第二部分。
引言
在上一篇文章中,我介绍了一种使用 ESB Toolkit 在消费 WCF 服务时处理异常的方法。那是一种仅限路由方案。今天我想展示另一种方法,它结合了路由和编排。
问题 – 捕获异常
让我再次描述我遇到的问题。我正在使用 ESB Toolkit 从 BizTalk 消费 WCF 服务。当发生异常时,我无法优雅地处理错误。实际上,在我不加干预的情况下,完整的错误信息会被传递回我的服务消费者。
解决问题
我能识别出的解决该问题的三种方法是:
- 回到使用编排
- 使用路由和编排的混合解决方案
- 深入 WCF 堆栈,强制 WCF 适配器按我想要的方式工作。
今天我将关注第二种选择。关于 WCF 堆栈选项,请参阅本系列第一部分。
解决方案 – 通用编排
在我最初接触 ESB Toolkit 时,我一直在查看它附带的示例。特别是,我深入研究了 Scatter-Gather 示例,并发现了一个编排,它完成了我们今天将要研究的许多工作。它使用调用路由的解析器将消息 Scatter 到其他服务。所以,从这个例子中,我想,让我看看我是否可以编写一个通用的路由处理编排,我可以在任何地方使用。事实证明,你可以。
我就是这样构建解决方案的……
第一步 – 辅助类
我构建了一个 MessageFactory 辅助类,用于在我们编排中捕获异常时创建 SOAP Fault。它使用第一部分中的 ResponseBodyWriter 类来构建 SOAP Fault。方法如下:
//Prepare to use our body writer to create a message
StringBuilder stringBuilder = new StringBuilder();

//Create the SOAP Fault body
using (XmlWriter xmlWriter = XmlWriter.Create(stringBuilder))
{
    using (XmlDictionaryWriter xmlDictionaryWriter =
                    XmlDictionaryWriter.CreateDictionaryWriter(xmlWriter))
    {
        //Create an instance of our body writer
        ResponseBodyWriter bodyWriter = new ResponseBodyWriter("soap:Client",
                                                               faultString,
                                                               action,
                                                               errorMessage,
                                                               exception);

        Trace.WriteLine("[ESB MessageFactory] Creating SOAP Fault");

        //Execute the body writer
        bodyWriter.WriteBodyContents(xmlDictionaryWriter);

        //Flush the stream
        xmlDictionaryWriter.Flush();
    }
}

XmlDocument xmlDocument = new XmlDocument();
xmlDocument.LoadXml(stringBuilder.ToString());

return xmlDocument;
这个辅助类还有一个方法,可以为我们提升消息属性。我们主要使用它来确保在从编排发送消息时提升消息类型。我们使用标准的 XMLReceive 管道来完成这项工作,正如 Ronald Lokers 在此处的文章中所述。
// See http://ronaldlokers.blogspot.co.nz/2012/04/promoting-messagetype-property-on.html
public static void PromoteMessageProperties(XLANGMessage message)
{
    Trace.WriteLine("[ESB MessageFactory] Promoting message properties");

    //Use the XMLReceive pipeline to promote the messaeg properties.
    //The property we are most interested in is the Message Type
    ReceivePipelineOutputMessages pipelineMessages = XLANGPipelineManager.ExecuteReceivePipeline(
                typeof(Microsoft.BizTalk.DefaultPipelines.XMLReceive),
                message);

    //Force the pipeline to act
    pipelineMessages.MoveNext();
    pipelineMessages.GetCurrent(message);
}
第二步 – 创建编排
注意:我的示例使用 BizTalk 2009、Visual Studio 2008 和 ESB Toolkit 2.0 构建。
编排概述
该编排从消息框中获取一条消息,并从消息的上下文属性中加载关联的路由。从路由中,它查找当前路由服务的所有解析器。它循环遍历每个解析器,执行其操作,直到没有更多解析器或发生错误。
我使用的逻辑是基于最后一个解析器操作产生一个结果消息。因此,为了让第一个解析器工作,我将传入的消息复制到我的临时结果消息中。转换步骤之后也使用了这个概念。我不喜欢这样做消息复制,因为它增加了重复消息的开销和所有相关的性能问题。然而,这是为了获得通用解决方案而付出的代价。
1 – 添加引用
您需要在程序集中添加以下引用:
- Microsoft.XLANGs.Pipeline
- Microsoft.Practices.ESB.Adapter
- Microsoft.Practices.ESB.ExceptionHandling
- Microsoft.Practices.ESB.ExceptionHandling.Schemas.Faults
- Microsoft.Practices.ESB.Itinerary
- Microsoft.Practices.ESB.Itinerary.PipelineComponents
- Microsoft.Practices.ESB.Itinerary.Schemas
- Microsoft.Practices.ESB.PipelineComponents
- Microsoft.Practices.ESB.Resolver
- Microsoft.Practices.ESB.Transform
2 – 消息和变量
这是我使用的消息:
|
消息名称 |
类型 |
用途 |
|
mInboundMessage |
Microsoft.XLANGs.BaseTypes.Any |
收到的原始消息 |
|
mOutboundMessage |
Microsoft.XLANGs.BaseTypes.Any |
返回给路由的最终消息 |
|
mSendMessage |
Microsoft.XLANGs.BaseTypes.Any |
发送到子服务中的消息 |
|
mReplyMessage |
Microsoft.XLANGs.BaseTypes.Any |
子服务的响应消息 |
这些是我的变量:
|
变量名 |
类型 |
用途 |
|
vItinerary |
Microsoft.Practices.ESB.Itinerary.SerializableItineraryWrapper |
保存路由 |
|
vItineraryStep |
Microsoft.Practices.ESB.Itinerary.SerializableItineraryStepWrapper |
保存当前路由中的服务/步骤 |
|
vResolvers |
Microsoft.Practices.ESB.Itinerary.ResolverCollection |
保存当前步骤中的所有解析器 |
|
vResolver |
System.String |
当前正在执行的解析器 |
|
vResolverDictionary |
Microsoft.Practices.ESB.Resolver.ResolverDictionary |
来自解析器的设置 |
|
vResolverNumber |
System.Int32 |
用于循环 |
|
vTransformType |
System.String |
用于转换消息 |
|
vMapCLRType |
System.Type |
|
|
vTransportType |
System.String |
用于消息路由 |
|
vTransportLocation |
System.String |
3 – 接收-发送端口和形状
该编排具有单个接收-发送端口,其接收和发送消息类型均为 Microsoft.XLANGs.BaseTypes.Any。它是一个直接端口,因此它使用消息框接收消息。
注意:编排中的所有消息都是 xs:any 类型,因为这意味着该编排可以通用并处理任何类型的消息。
4 – 接收形状
接收形状有一个筛选器表达式,以便它能从消息框中抓取正确的消息。以下是我使用的:
(Microsoft.Practices.ESB.Itinerary.Schemas.ServiceName == "ProcessItinerary") &&
(Microsoft.Practices.ESB.Itinerary.Schemas.ServiceType == "Orchestration") &&
(Microsoft.Practices.ESB.Itinerary.Schemas.ServiceState == "Pending") &&
(Microsoft.Practices.ESB.Itinerary.Schemas.IsRequestResponse == true)
注意: ServiceName 在路由中配置,通过从下拉列表中选择服务。下拉列表是从 esb.config 文件填充的。因此,您在 esb.config 文件中使用的名称必须与上面的筛选器值相同。
编排的开头看起来是这样的:

5 – 加载路由步骤
当我们收到消息后,我们加载随消息一起发送到上下文属性中的路由。方法如下:
vItinerary = new Microsoft.Practices.ESB.Itinerary.SerializableItineraryWrapper();
vItineraryStep = new Microsoft.Practices.ESB.Itinerary.SerializableItineraryStepWrapper();

// Get the itinerary and itinerary step
vItinerary.Itinerary = Microsoft.Practices.ESB.Itinerary.ItineraryOMFactory.Create(mInboundMessage);
vItineraryStep.ItineraryStep = vItinerary.Itinerary.GetItineraryStep(mInboundMessage);
6 – 获取所有解析器
从路由步骤中,我们获取所有解析器:
// Retrieve the Resolvers associated with the itinerary step
vResolvers = vItineraryStep.ItineraryStep.ResolverCollection;
vResolverNumber = 0;
这些步骤看起来是这样的:

注意:如果没有解析器,我会抛出一个异常,稍后该异常会被转换为 SOAP Fault。
7 – 创建我们的第一个结果消息
我们创建传入消息的副本,以便稍后可以运行我们的第一个解析器。
// Create a temporary reply message from the inbound message
//  - we do this to ensure we have a valid message in the next
//    transform stage
mReplyMessage = mInboundMessage;
mReplyMessage(*) = mInboundMessage(*);
8 – 执行解析器
然后我们循环遍历每个解析器并执行其任务。第一步是解析解析器并获取其设置。方法如下:
// Get the current resolver
vResolver = vResolvers.Current;
vResolverNumber = vResolverNumber + 1;

// Pass the resolver configuration to the Resolver manager for resolution
vResolverDictionary = Microsoft.Practices.ESB.Resolver.ResolverMgr.Resolve(mInboundMessage, vResolver);

// Set transform properties
vTransformType = vResolverDictionary.Item("Resolver.TransformType");

// Set transport properties
vTransportLocation = vResolverDictionary.Item("Resolver.TransportLocation");
vTransportType = vResolverDictionary.Item("Resolver.TransportType");

9 – 执行转换
如果解析器具有转换类型,则执行转换:
// Retrieve map type from resolution structure
vMapCLRType = System.Type.GetType(vTransformType);

// Use XLANG transform keyword to execute the map
//  -we transform the message we got from the last resolver
transform(mSendMessage) = vMapCLRType(mReplyMessage);
mSendMessage(*) = mReplyMessage(*);
![]()
注意:我将转换结果复制到回复消息中,以便下一个解析器可以使用。
10 – 路由消息
当传输类型和位置已知时,我们将消息发送到子服务。
// Create the send message
//  - we use the message we got from the last resolver
mSendMessage = mReplyMessage;
mSendMessage(*) = mReplyMessage(*);

// Use the resolver to set the endpoint properties
Microsoft.Practices.ESB.Adapter.AdapterMgr.SetEndpoint(vResolverDictionary, mSendMessage);

// Promote the message type
ESB.ExceptionHandling.ServiceModel.MessageFactory.PromoteMessageProperties(mSendMessage);

// Set delivery port address
SendMessage(Microsoft.XLANGs.BaseTypes.Address) = vTransportLocation;
SendMessage(Microsoft.XLANGs.BaseTypes.TransportType) = vTransportType;

11 – 发送端口详细信息
我们使用动态请求-响应端口发送消息并接收响应。这样,端口就可以由路由配置。
12 – 推进路由
当没有更多解析器需要处理时,我们创建最终结果消息并推进路由到下一个服务。方法如下:
// Copy the last reply message to the outbound message
mOutboundMessage = mReplyMessage;
mOutboundMessage(*) = mReplyMessage(*);

// Set message propertes so that the message is not picked up by the
//  orchestration again
mOutboundMessage(Microsoft.Practices.ESB.Itinerary.Schemas.IsRequestResponse) = mInboundMessage(Microsoft.Practices.ESB.Itinerary.Schemas.IsRequestResponse);
mOutboundMessage(Microsoft.Practices.ESB.Itinerary.Schemas.ServiceName) = mInboundMessage(Microsoft.Practices.ESB.Itinerary.Schemas.ServiceName);
mOutboundMessage(Microsoft.Practices.ESB.Itinerary.Schemas.ServiceType) = mInboundMessage(Microsoft.Practices.ESB.Itinerary.Schemas.ServiceType);
mOutboundMessage(Microsoft.Practices.ESB.Itinerary.Schemas.ServiceState) = "Complete";

// Promote all message properties
ESB.ExceptionHandling.ServiceModel.MessageFactory.PromoteMessageProperties(mOutboundMessage);

//Call the Itinerary helper to advance to the next step
vItinerary.Itinerary.Advance(mOutboundMessage, vItineraryStep.ItineraryStep);
vItinerary.Itinerary.Write(mOutboundMessage);

13 – 返回响应
最后一步是将响应消息返回到消息框,以便由下一个路由服务处理。
14 – 异常处理程序
为了捕获异常,我使用了一个带有异常处理程序的范围。在异常处理程序中,我使用上面提到的消息辅助类,从异常创建 SOAP Fault 消息。
// End the loop to stop processing any other resolvers
vResolverNumber = vResolvers.Count;

// Build Soap Fault message
mReplyMessage = ESB.ExceptionHandling.ServiceModel.MessageFactory.CreateSoapFaultMessage(exSoapException);
mReplyMessage(*) = mInboundMessage(*);

第三步 – 部署编排
要部署,只需编译程序集,将其添加到 GAC,然后部署到 BizTalk。在 BizTalk 控制台中配置发送端口以使用标准的 XMLTransmit 和 XMLReceive。它不会执行路由中的任何步骤,因此请勿使用任何 ESB Toolkit 管道。
现在,为了使编排可供 ESB Toolkit 和 Visual Studio 使用,请打开 esb.config 文件并添加一个新的路由服务,如下所示。您可以在此处找到 esb.config 文件:
%Program Files%\Microsoft BizTalk ESB Toolkit 2.0\esb.config
<configuration>
    <!-- ... -->
    <esb>
        <!-- ... -->
        <itineraryServices>
            <!-- ... -->
            <itineraryService id="{your own GUID>}" name="{service name}"
                         type="{Full type name of orchestration}"
                         scope="Orchestration"
                         stage="None" />
            <!-- ... -->
        </itineraryServices>
        <!-- ... -->
    </esb>
    <!-- ... -->
</configuration>这是我为我的示例使用的:<itineraryService
id="3CCA3815-E5F3-47a7-B864-7644E1A39087"
name="ProcessItinerary"
type="ESB.ExceptionHandling.ProcessItinerary, ESB.ExceptionHandling,
Version=1.0.0.0, Culture=neutral, PublicKeyToken=a496c9267b296339"
scope="Orchestration"
stage="None" /> 请记住重新启动 IIS 和所有 BizTalk 主机以拾取配置更改。
第四步 – 构建您的路由
我从第一部分中获取了路由,并将其更改为使用我的编排而不是 off-ramp。它现在的样子如下。更改在于我们有一个编排扩展器,带有一个解析器,该解析器将为我们路由消息。
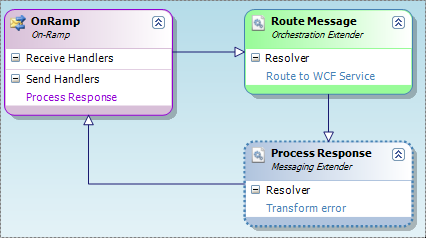
“路由到 WCF 服务”解析器已配置为使用 WCF-WSHttp 传输类型。以下是我使用的设置。您可以像我的客户一样使用 BRE,但在此示例中我使用的是静态配置:
|
属性 |
值 |
|
解析器实现 |
静态解析器扩展 |
|
消息交换模式 |
双向 |
|
传输名称 |
WCF-WSHttp |
|
传输位置 |
http://nowhere/nowhere.svc |
|
操作 |
动作 |
|
目标命名空间 |
http://namespace.org |
|
终结点配置 |
CloseTimeout=00:00:10&OpenTimeout=00:00:10&SecurityMode=None&SendTimeout=00:00:10 |
我将终结点超时设置得较低,以便我可以测试编排,而无需等待默认超时错误发生。
一旦有了您的路由,您就可以像往常一样部署它,然后就可以进行测试了。
第五步 – 测试
我一直使用 soapUI 来测试我的服务,我得到的结果如下。它的格式是我的响应模式,因为我的路由的最后一步为我转换了我的编排生成的 SOAP Fault。
<ns0:Response xmlns:ns0="http://ESB.ExceptionHandling.ResponseMessage">
    <ResponseElement1>An unexpected error occured</ResponseElement1>
    <ResponseElement2>System.TimeoutException: The HTTP request to 'http://nowhere/nowhere.svc' has exceeded the allotted timeout of 00:00:09.9950000. The time allotted to this operation may have been a portion of a longer timeout.</ResponseElement2>
    <ResponseElement3/>
</ns0:Response>注意:目前我的示例会在 BizTalk 中留下挂起的 a message。我过去已经克服了这个问题,但还没有时间来解决这个错误。当我解决后,我会更新示例。
关注点
ESB Toolkit 的强大之处不仅在于 BizTalk 管道。它还可以毫不费力地扩展到编排。
唯一的缺点是编排会大量复制消息,这会带来性能影响。
然而,我使用这个通用编排创建了不消费其他服务但仅为我转换消息的服务。通过构建合适的路由,我可以非常快速地完成这项工作,部署也非常简单。
历史
版本 1.0
版本 1.1 - 清理表格以便于阅读