
使用 Windows Azure 在 iPhone 和 Palm Pré 上使用 OneNote
4.96/5 (37投票s)
了解如何同步 Windows Azure 上的 OneNote 笔记本,并从您的 iPhone 或 Palm Pré 访问它。
摘要
本文将展示如何使用 OneNote API 和 Azure Blob Storage 同步 Windows Azure 上的 OneNote。然后,您将学习如何开发一个 ASP.NET 应用程序,以便从 iPhone 访问它,以及一个 WebOS 应用程序,以便从 Palm Pré© 访问它。
引言:为什么选择 OneNote?
几个月前,我考虑了两个我使用最多的应用程序。由于我现在更多地扮演经理角色而不是全职开发人员,Outlook 首先浮现在我的脑海中。当然,每个人都有一个电子邮件地址,所以您应该有一个,并且当您拥有 Exchange Server 时,Outlook 是必不可少的。在 Outlook 之后,我每天使用的第二个应用程序是 OneNote。
OneNote 是我最喜欢的应用程序。它允许我存储和组织所有内容:想法、会议报告、待办事项、收藏链接等。所以我拥有不少于四个笔记本,每个笔记本都有许多分区和数十页。

当然,能够随身携带所有这些信息将是极好的。Exchange 已经可以从大多数现有的智能手机访问,所以您可以随时随地访问您的邮箱。相反,目前还没有现成的解决方案可以同步 OneNote 并至少作为阅读器在您的智能手机上使用它。微软几年前发布了 OneNote Mobile 客户端,但它不太有用,因为它需要 ActiveSync USB 同步,并且只能在 Windows Mobile 手机上运行。Office 2010 应该会普及 Office 在其他智能手机上的使用,但目前关于 OneNote 移动功能的细节很少。
这就是为什么我选择让 OneNote 适应智能手机运行。
功能概述
我的需求是从智能手机永久访问我的 OneNote 笔记本。在开始这个项目时,“我的智能手机”是指 iPhone 3G,而在项目结束时,它指的是 Palm Pré©。因此,这两个终端都支持。
OneNote 将所有内容本地存储在您的硬盘驱动器上。当然,从任何地方访问 OneNote 都需要将内容同步到一个共享位置。除了互联网,还有什么可以存储共享内容?因此,我自然而然地选择了将 OneNote 同步到“云端”,更具体地说,是同步到 Windows Azure。
这是该过程的功能概述。

它再简单不过了,不是吗?
Rino 详细架构
上图是过程的概述。下一张图是用于实现此过程的组件的架构概述。

该过程使用五个任务
- 检测 OneNote 中的更改
- 将 OneNote 内容提取为 XML
- 将 OneNote 内容放入 Azure 存储 Blob
- 通过 iPhone 上的 Safari 查看 Blob 内容
- 通过 Palm Pré© 应用程序查看 Blob 内容
接下来的几段将详细描述所有这些任务及其实现。作为对 Microsoft Bing 团队的致敬,我选择将我的应用程序命名为“Rino”,意为“Rino Is Not OneNote”(Rino 不是 OneNote):-)
检测 OneNote 中的更改
托盘图标应用程序
为确保我们的 Azure 存储与 OneNote 内容始终同步,我们需要在 PC 上有一个始终运行的代理。此代理是隐藏在 Windows 托盘中的 WinForms .NET 应用程序。

在 WinForms 中创建一个 Windows 托盘应用程序就像在主窗口中包含一个 NotifyIcon 控件一样简单。
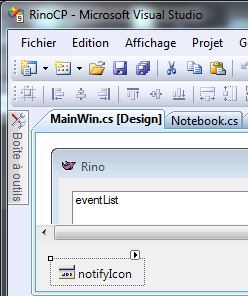
然后,您只需在最小化时隐藏窗口,并在双击托盘图标时显示窗口。
private void MainWin_Resize(object sender, EventArgs e)
{
    if (WindowState == FormWindowState.Minimized)
        Hide();
}

private void notifyIcon_DoubleClick(object sender, EventArgs e)
{
    Show();
    WindowState = FormWindowState.Normal;
}
监视 OneNote 目录
由于 OneNote API 没有唯一的方法来通知页面更新,我选择改为查找文件更改。OneNote 将笔记本存储在扩展名为 .one 的文件中。这些文件通常位于您的文档目录中。为了方便查找所有文件的位置,我会在 OneNote 维护的一个名为 OpenNoteBooks 的注册表项中查找。未分类笔记部分可能位于其他位置,因此我需要读取另一个注册表项。
private const string regNotebooksKey =
  "Software\\Microsoft\\Office\\12.0\\OneNote\\OpenNotebooks";
private const string unfiledNotebookKey =
  "Software\\Microsoft\\Office\\12.0\\OneNote\\Options\\Paths";
private const string unfiledValueName = "UnfiledNotesSection";

public static List<string> GetNotebookPaths()
{
    List<string> paths = new List<string>();

    RegistryKey openNotebooks = Registry.CurrentUser.OpenSubKey(regNotebooksKey);
    if (openNotebooks == null)
        return paths;

    string[] names = openNotebooks.GetValueNames();
    foreach (string key in names)
        paths.Add(openNotebooks.GetValue(key) as string);

    openNotebooks.Close();

    RegistryKey unfiledNotebook = Registry.CurrentUser.OpenSubKey(unfiledNotebookKey);
    if (unfiledNotebook == null)
        return paths;

    string unfiledValue = (string)unfiledNotebook.GetValue(unfiledValueName);
    FileInfo unfiledNotebookFile = new FileInfo(unfiledValue);
    paths.Add(unfiledNotebookFile.DirectoryName);

    unfiledNotebook.Close();

    return paths;
}
最后,为了检测这些目录中的更改,我需要为每个目录创建一个 FileSystemWatcher。
private void WatchDirectory(string path)
{
    FileSystemWatcher watcher = new FileSystemWatcher();
    watcher.Path = path;
    watcher.NotifyFilter = NotifyFilters.LastWrite;
    watcher.EnableRaisingEvents = true;
    watcher.SynchronizingObject = this;
    watcher.Changed += new FileSystemEventHandler(OnFileChanged);
}


private void OnFileChanged(object source, FileSystemEventArgs e)
{
    Trace(">\"{0}\" changed", e.Name);

    RequestComparison();
}
将 OneNote 内容提取为 XML
OneNote API 概述
借助 Microsoft.Office.Interop.OneNote 命名空间,OneNote 允许开发人员以编程方式检索和更新笔记本。为此要使用的基类是 ApplicationClass。
ApplicationClass 提供了大多数所需功能的方法
namespace Microsoft.Office.Interop.OneNote
{
    public class ApplicationClass : IApplication, Application
    {
        public virtual void CloseNotebook(string bstrNotebookID);
        public virtual void CreateNewPage(string bstrSectionID,
                       out string pbstrPageID, NewPageStyle npsNewPageStyle);
        public virtual void DeleteHierarchy(string bstrObjectID,
                       DateTime dateExpectedLastModified);
        public virtual void DeletePageContent(string bstrPageID,
                       string bstrObjectID, DateTime dateExpectedLastModified);
        public virtual void FindMeta(string bstrStartNodeID,
                       string bstrSearchStringName, out string pbstrHierarchyXmlOut,
                       bool fIncludeUnindexedPages);
        public virtual void FindPages(string bstrStartNodeID, string bstrSearchString,
                       out string pbstrHierarchyXmlOut,
                       bool fIncludeUnindexedPages, bool fDisplay);
        public virtual void GetBinaryPageContent(string bstrPageID,
                       string bstrCallbackID, out string pbstrBinaryObjectB64Out);
        public virtual void GetHierarchy(string bstrStartNodeID,
                       HierarchyScope hsScope, out string pbstrHierarchyXmlOut);
        public virtual void GetHierarchyParent(string bstrObjectID, out string pbstrParentID);
        public virtual void GetHyperlinkToObject(string bstrHierarchyID,
                       string bstrPageContentObjectID, out string pbstrHyperlinkOut);
        public virtual void GetPageContent(string bstrPageID,
                       out string pbstrPageXmlOut, PageInfo pageInfoToExport);
        public virtual void GetSpecialLocation(SpecialLocation slToGet,
                       out string pbstrSpecialLocationPath);
        public virtual void NavigateTo(string bstrHierarchyObjectID,
                       string bstrObjectID, bool fNewWindow);
        public virtual void OpenHierarchy(string bstrPath, string bstrRelativeToObjectID,
                       out string pbstrObjectID, CreateFileType cftIfNotExist);
        public virtual void OpenPackage(string bstrPathPackage,
                       string bstrPathDest, out string pbstrPathOut);
        public virtual void Publish(string bstrHierarchyID, string bstrTargetFilePath,
                       PublishFormat pfPublishFormat, string bstrCLSIDofExporter);
        public virtual void UpdateHierarchy(string bstrChangesXmlIn);
        public virtual void UpdatePageContent(string bstrPageChangesXmlIn,
                            DateTime dateExpectedLastModified);
    }
}
由于我需要提取笔记本内容,我首先使用 GetHierarchy 方法,该方法返回一个 XML 文档,其中包含有关已打开笔记本的所有信息和内容。
OneNote.ApplicationClass onApp = new OneNote.ApplicationClass();
string xml;

onApp.GetHierarchy(null, OneNote.HierarchyScope.hsPages, out xml);
XDocument document = XDocument.Parse(xml);
OneNote 对象
OneNote 中的内容分布在三个对象类别中:笔记本、分区和页面。
Notebook是 OneNote 对象的第一个级别。笔记本存储在 .one 文件中。在 OneNote 用户界面上,笔记本可以通过左侧的按钮进行处理。一个笔记本包含一个或多个分区。Section是第二个级别。在用户界面上,分区是屏幕顶部的表页。分区有一个特殊的颜色,每个页面都使用该颜色。一个分区包含一个或多个页面。Page是最低级别。页面包含文本、图像、链接、嵌入的文件等。
所有这些对象都可以通过 API 提取。Ilya Koulchin 提供的一个名为 OMSpy 的好工具允许您浏览所有这些层次结构。

.NET 对象
为了简化这些对象的内存管理,我将它们映射到一些等效的 .NET 类。这是完整的层次结构。

Notebook 和 Page 对象被分成两个类,以便在 Azure 请求期间进行延迟加载。还添加了一个 User 类来保存所有笔记本。
映射通过一些 LINQ to XML 请求完成,类似于此请求
XDocument document = XDocument.Parse(xml);

var notebooks = (from notebook in document.Descendants(XNameNotebook)
             where notebook.Attribute("ID").Value == header.ID
             select new Notebook
             {
                 ID = notebook.Attribute("ID").Value,
                 Name = notebook.Attribute("name").Value,
                 Nickname = notebook.Attribute("nickname").Value,
                 Color = notebook.Attribute("color").Value,
                 Sections = LoadSections(notebook, out date),
                 LastModifiedTime =
                   Convert.ToDateTime(notebook.Attribute("lastModifiedTime").Value)
             }
             );
将 OneNote 内容放入 Azure 存储 Blob
Azure 存储结构
Windows Azure 既是托管 Web/后台服务的平台,也是存储平台。Azure 存储提供三种存储信息的方式:Blob、表和队列。
Blob 允许存储大量数据(最多 50 GB),而表将每个字段的大小限制为 64 KB。由于 OneNote 页面可能包含图像,其大小可能超过 64 KB,因此我决定将内容存储在 Azure Blob 中。
更具体地说,Rino 应用程序将 OneNote 内容同步到三个 Blob 容器:一个用于用户,一个用于笔记本,一个用于页面。这是这些容器在 Richard Blewett 的优秀 BlobExplorer 工具中的屏幕截图。

Azure 存储 API
可以使用专用的 REST API 请求 Azure 存储。但是,Windows Azure SDK 包含一些示例,提供了一组 .NET 类来封装大多数 Azure 存储功能。我在这里选择调用 StorageClient 示例中的方法。
借助此示例,这是将对象保存到 Blob 的源代码
private static bool SaveObject(BlobContainer container, string name, object o, Type t)
{
    try
    {
        MemoryStream stream = new MemoryStream();
        DataContractSerializer serializer = new DataContractSerializer(t);
        serializer.WriteObject(stream, o);
        stream.Position = 0;

        container.CreateBlob(new BlobProperties(name), new BlobContents(stream), true);

        stream.Close();

        return true;
    }
    catch (StorageException)
    {
        return false;
    }
    catch (WebException)
    {
        return false;
    }
}
如您所见,SaveObject 方法将要保存的 .NET 对象(User、Page 或 Notebook)作为参数,并将其序列化到流中。然后,整个流内容 just 存储在一个新的 Azure Blob 中。
相反,这是 LoadObject 的源代码。当然,我只需要反序列化先前存储的 Blob 内容。
private static object LoadObject(BlobContainer container, string name, Type t)
{
    try
    {
        BlobContents contents = new BlobContents(new MemoryStream());
        BlobProperties properties = container.GetBlob(name, contents, false);
        if (properties.Name != name)
            return null;

        DataContractSerializer serializer = new DataContractSerializer(t);
        Stream stream = contents.AsStream;
        stream.Position = 0;
        object o = serializer.ReadObject(stream);

        stream.Close();

        return o;
    }
    catch (StorageException se)
    {
        if (se.StatusCode == HttpStatusCode.NotFound)
            return null;
        else
            throw se;
    }
}
仅在需要时同步
每个类(User、Notebook、Page)都包含一个 LastModifiedTime 属性。因此,每次笔记本发生更改时,Rino 托盘应用程序都会对每个分区进行比较,然后对每个页面进行比较,只保存已更新的页面。最后,会进行检查以删除不再出现在笔记本中的页面。这是该算法的一部分
public void UpdateSection(Section machineSection, Notebook azureNotebook, bool forceUpdate)
{
    // Compute last Azure update
    DateTime lastAzureUpdate = DateTime.MinValue;
    if (azureUser != null)
        lastAzureUpdate = azureUser.LastModifiedTime;

    // Check each page
    List<string> processed = new List<string>();
    foreach (PageHeader machinePage in machineSection.Pages)
    {
        // Page updated in OneNote since last update in Azure ?
        if (forceUpdate || machinePage.LastModifiedTime > lastAzureUpdate)
        {
            // Yes, update page in Azure
            UpdatePage(machinePage);
        }
        processed.Add(machinePage.ID);
    }

    // Check the Section in Azure
    if (azureNotebook != null)
    {
        // Look for this section since the last Azure update
        foreach (Section azureSection in azureNotebook.Sections)
        {
            // Check if its the right section
            if (azureSection.ID != machineSection.ID)
                continue;

            // Check each Page
            foreach (PageHeader pageAzure in azureSection.Pages)
            {
                // Page already processed previously ?
                if (!processed.Contains(pageAzure.ID))
                {
                    // No, the Section need to be deleted in Azure
                    DeletePage(pageAzure);
                }
            }
        }
    }
}
WCF REST 服务
由于 OneNote 内容存储在 Azure Blob 存储中,现在是时候将这些对象暴露给外部了。我选择将其公开为 REST 服务,以便每个对象都可以通过单个 HTTP 请求创建/更新/删除。
得益于 .NET Framework 3.5 中最近的 WCF 升级,使用少量属性在 .NET 中编写 REST 服务非常容易。
这是由 Azure 托管的 Rino WCF REST 服务的一部分
[AspNetCompatibilityRequirements(RequirementsMode =
              AspNetCompatibilityRequirementsMode.Allowed),
 ServiceBehavior(IncludeExceptionDetailInFaults = true)]
[ServiceContract]
public class Service
{
    [WebInvoke(Method = "PUT", UriTemplate = "notebooks/{notebookid}")]
    [OperationContract]
    bool PutNotebook(string notebookid, Notebook notebook)
    {
        return AzureStorage.SaveNotebook(notebook);
    }


    [WebGet(UriTemplate = "notebooks/{notebookid}",
               ResponseFormat = WebMessageFormat.Json)]
    [OperationContract]
    public Notebook GetNotebook(string notebookid)
    {
        Notebook notebook = AzureStorage.LoadNotebook(notebookid);
        if (notebook != null)
            return notebook;

        WebOperationContext.Current.OutgoingResponse.SetStatusAsNotFound();
        return null;
    }

    [WebInvoke(Method = "DELETE", UriTemplate = "notebooks/{notebookid}")]
    [OperationContract]
    bool DeleteNotebook(string notebookid)
    {
        return AzureStorage.DeleteNotebook(notebookid);
    }
    ...
}
REST 服务只是一个带有 ServiceContract 属性的 .NET 类。要公开的每个方法都由一个 OperationContract 属性和一个 WebGet/WebInvoke 属性(用于 HTTP GET 或 HTTP PUT)标识,该属性给出调用该方法的 URL 模板。使用 WebMessageFormat.Json 值,我指示 WCF 将 .NET 对象反序列化为等效的 JSON 对象。
因此,我现在拥有了从外部访问 OneNote 内容的后台。
通过 iPhone 查看 Blob 内容
关于 iPhone 开发
当您想到 iPhone 开发时,您可能会想到:Objective C、Cocoa、AppStore... 老实说,我对 Apple 技术或 MacOS 完全不熟悉。而且,无论您使用哪种技术,如果您没有 Mac,就无法开发 iPhone 应用程序!
但是,如果您想避免购买 Mac、避免学习 Objective C 以及避免复杂的 AppStore 验证流程,您可以使用... Safari 来编写您的 iPhone 应用程序。Safari 包含 WebKit 扩展,这些扩展为您的 Web 应用程序提供了 iPhone 的外观和感觉。此外,URL 快捷方式可以成为 iPhone 桌面上的图标,为您的用户提供集成体验。这就是为什么许多 iPhone 应用程序(包括 iPhone 预装应用程序)仅仅是 Web 应用程序。
那么,为什么不使用 ASP.NET 开发 iPhone 应用程序呢?Rino iPhone 应用程序只是一个托管在 Azure Web Role 中的 ASP.NET 应用程序。
因此,请注意我们不需要使用 WCF 服务。
iUI 和 ASP.NET
iUI 是一个不错的框架,它包含用于开发 iPhone Webapp 的 JavaScript 库、CSS 和图像。将 iUI 集成到 ASP.NET 中非常简单:您只需将 iUI 目录包含在 ASP.NET 项目中即可。这就是我访问 iPhone 上的 OneNote 所做的。
这是主窗口的源代码
<%@ Page Language="C#" AutoEventWireup="true"
  CodeBehind="nbooks.aspx.cs" Inherits="Rino.iphone.nbooks" %>

<%@ Register src="iphonelist.ascx"
      tagname="iphonelist" tagprefix="uc1" %>

<!DOCTYPE html PUBLIC "-//W3C//DTD XHTML 1.0 Transitional//EN"
   "http://www.w3.org/TR/xhtml1/DTD/xhtml1-transitional.dtd">

<html xmlns="http://www.w3.org/1999/xhtml" >
<head runat="server">
    <title>Rino</title>

    <meta name="viewport" content="width=320;
           initial-scale=1.0; maximum-scale=1.0; user-scalable=0;"/>
    <link rel="apple-touch-icon" href="rino-icon.png" />
    <meta name="apple-touch-fullscreen" content="YES" />
    <meta name="apple-mobile-web-app-capable" content="yes" />

    <style type="text/css"
        media="screen">@import "iui/iui.css";</style>
    <script type="application/x-javascript"
        src="iui/iui.js"></script>

</head>
<body>
    <div class="toolbar">
        <h1 id="pageTitle"></h1>
        <a id="backButton" class="button" href="#"></a>
    </div>
    <uc1:iphonelist id="home" selected="true"
       title="Notebooks" runat="server" />
</body>
</html>
这是一个标准的 WebForm,除了
- 使用了一些标签(
meta和link)向 Safari 提供有关页面外观的信息。 - 包含了 iUI 的样式表和 JavaScript 框架。
div标签向 Safari 提供有关标准 iPhone 工具栏外观的信息。
最后,在 WebForm 中使用了一个名为 iPhoneList 的自定义控件。Rino iPhone 应用程序的所有屏幕都以相同的方式构建。
iPhoneList
以下图片是应用程序在 iPhone 上运行的屏幕截图。这里只缺少一个屏幕:分区页面列表。


但是,正如您所看到的,应用程序的大部分内容都可以归结为 iPhone 列表。这就是 iPhoneList 自定义控件的用途。
这是该控件的主要部分,包括渲染函数。
public partial class iPhoneList : System.Web.UI.UserControl
{
    private class ListItem
    {
        public string text;
        public string color;
        public string link;
    }

    public bool selected { get; set; }
    public string title { get; set; }
    private List<ListItem> Items;

    protected override void Render(HtmlTextWriter writer)
    {
        writer.Write("<ul id='" + ID + "' title='" +
                     HttpUtility.HtmlEncode(title) + "'");
        if (selected)
            writer.Write(" selected='true'");
        writer.Write(">");

        foreach (ListItem item in Items)
        {
            writer.Write("<li");
            if (item.color != null)
                writer.Write(" style='background:" + item.color + "'");
            writer.Write(">");

            if (item.link != null)
                writer.Write("<a href='" + item.link + "'>");
            writer.Write(HttpUtility.HtmlEncode(item.text));
            if (item.link != null)
                writer.Write("</a>");

            writer.Write("</li>");
        }

        writer.Write("</ul>");
    }
    ...
}
iPhoneList 自定义控件仅渲染一个 HTML UL 标签。项目由一个名为 ListItem 的特定类描述,以包含一些特定属性,例如笔记本/分区的颜色。
填充每个列表非常简单:我只需要从 Azure 存储加载每个对象来填充列表。
这是填充笔记本屏幕的源代码
protected void Page_Load(object sender, EventArgs e)
{
string notebookid = Request.QueryString["notebookid"];
if (notebookid == null)
{
content.AddItem("No notebook");
return;
}
Notebook notebook = AzureStorage.LoadNotebook(notebookid);
if (notebook == null)
{
content.AddItem("Notebook don't exist");
return;
}
content.title = notebook.Nickname;
foreach (Section section in notebook.Sections)
{
string url = String.Format("section.aspx?notebookid={0}§ionid={1}",
notebook.ID, section.ID);
content.AddItem(section.Name, section.Color, url);
}
}
通过 Palm Pré© 查看 Blob 内容
关于 Palm Pré© 开发
Palm Pré© 是一个非常酷的终端,包含一个非常酷的操作系统:webOS。“webOS”意味着整个 OS 都建立在 Web 的概念之上,因此每个 webOS 应用程序仅仅是几个 HTML 5 页面和一堆 JavaScript。Palm webOS SDK 包含一些生成和打包应用程序的实用工具,以及一个基于 VirtualBox 的模拟器,该模拟器可以在 Windows、Linux 或 MacOS 上运行。
webOS 没有集成开发环境。但是,由于 webOS 应用程序仅仅是 HTML 5 和 JavaScript,您可以完全使用 Visual Studio 作为开发环境。因此,我创建了一个虚拟 DLL 项目,并将其复制/剪切到 webOS 应用程序所需的目录中。这是项目的完整视图

webOS 应用程序基于 JavaScript Mojo 框架构建,并遵循 MVC 模型。因此,视图与进程和数据分离。每个页面都是一个视图,处理该页面的 JavaScript 代码位于控制器中。
webOS 屏幕
与 iPhone 应用程序一样,Rino webOS 应用程序也非常简单:它仅仅是包含列表(用于笔记本、分区或页面)的屏幕。


这是笔记本视图的 HTML 文件
<div id="Div1">
    <div class="palm-header center" id="main-hdr">
      Notebooks
    </div>
</div>
<div style="margin-top:40pt; margin-left:0pt; margin-right:0pt" class="palm-list">
    <div x-mojo-element="List" id="notebooksListWgt" ></div>
    <div  style="margin-top:120pt; margin-left:70pt;
      margin-right:0pt" x-mojo-element="Spinner"
      id="waitingWgt" class="spinnerClass"></div>
</div>
webOS 应用程序中的控件称为小部件。它们在 HTML 文件的一个 div 标签中描述。在这里,您可以看到标题和两个控件:最重要的部分是列表(见下文),另一个是仅在加载过程中显示的加载指示器控件。
描述列表小部件还需要另外两个 HTML 文件
<div class="palm-list">#{-listElements}</div>

<div class="palm-row" x-mojo-tap-highlight="momentary"
              x-mojo-gesture="Mojo.Gesture.HorizontalDrag">
        <div class="palm-row-wrapper">
            <div id="sectionName" class="title truncating-text"
                  style="background:#{Color}">#{Name}</div>
        </div>
</div>
第一个文件描述列表,第二个文件描述行模板。正如我们即将看到的,两者都提供绑定信息以将数据链接到视图。
最后,这是控制器中用于显示屏幕及其小部件的 JavaScript 代码。您可以通过 setupWidget 函数看到每个小部件的设置。
NotebookViewAssistant.prototype.setup = function() {
    $("main-hdr").innerHTML = this.notebook.Nickname;

    this.controller.setupWidget("sectionListWgt",
        this.sectionAttr = {
            itemTemplate: "notebookView/sectionRowTemplate",
            listTemplate: "notebookView/sectionListTemplate",
            swipeToDelete: false,
            renderLimit: 40,
            reorderable: false
        },
        this.sectionModel = {
            items: []
        }
    );
    this.controller.setupWidget("waitingWgt",
         this.attributes = {
             spinnerSize: 'large'
         },
         this.model = {
             spinning: true
         }
    );

    this.controller.listen("sectionListWgt", Mojo.Event.listTap,
        this.viewSection.bindAsEventListener(this));

    this.LoadNotebook(this.notebook.ID);
};
webOS 绑定到 JSON 对象
现在让我们看看如何用笔记本的内容填充列表。
这是一个两步过程
- 调用 WCF REST 服务。
- 将结果绑定到列表。
调用 WCF REST 服务是通过 AJAX 请求完成的。调用的 URL 包含之前定义的 GetNotebook 方法的地址,后跟笔记本 ID。
NotebookViewAssistant.prototype.LoadNotebook = function(ID) {
    // Launch REST request
    var request = new Ajax.Request(URL.Notebook + ID, {
        method: 'get',
        evalJSON: 'false',
        onSuccess: this.LoadNotebookSuccess.bind(this),
        onFailure: this.LoadNotebookFailure.bind(this)
    });
};
我提醒您,WCF 服务返回 JSON 对象。因此,在请求结束时,我得到了一个可以直接绑定的 JavaScript 对象。然后,我只需要将其附加到列表,绑定就会自动完成。
NotebookViewAssistant.prototype.LoadNotebookSuccess = function(response) {
    // Stop spinner
    $("waitingWgt").hide();

    // Get content
    this.notebook = response.responseJSON;

    // Bind to the view
    this.sectionModel.items = this.notebook.Sections;
    this.controller.modelChanged(this.sectionModel);
};
其他功能
日志记录
Rino 托盘应用程序中的所有事件或操作都会记录在主窗口中。因此,如果您双击托盘图标,您就可以看到同步过程中发生的情况。
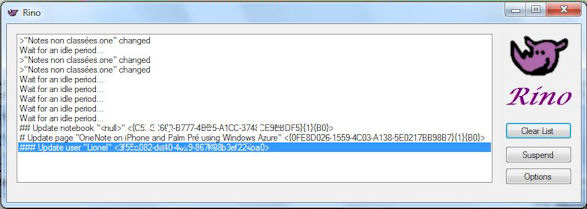
正如您所看到的,为了避免使 PC 过载,Rino 会在内容更新之前等待一段长时间的空闲时间(没有鼠标和键盘事件)。
选择要同步的笔记本
最后,“选项”按钮允许您选择哪些笔记本应该同步到云端,哪些不应该。

结论
本文介绍的 Rino 应用程序只是一个概念验证。但是,它让您了解 Azure 如何用于同步本地计算机的内容并允许从其他地方访问它。下一步应该是不仅允许读取信息,还允许更新信息。