
QR 代码刺绣 DST 文件创建器
从QR码矩阵创建DST刺绣设计文件。
引言
如今,大家都知道QR码。QR码结构由原正秀(Masahiro Hara)在日本发明。本文描述了将QR码矩阵转换为刺绣设计格式(Taijama DST)的过程。
问题
到目前为止,刺绣软件中没有默认的QR码创建函数。只能通过提供QR码图像的任何在线服务生成位图。然后,在刺绣程序中基于该图像生成针迹。对于3或5个QR码,这并不需要太多时间,但对于大量的QR码,则需要很长时间。
解决方案
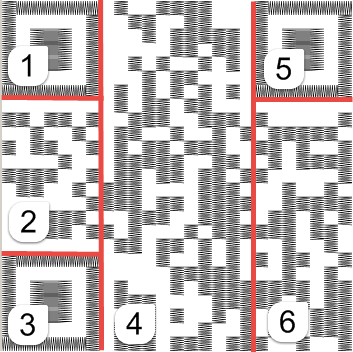
使用外部库来自动化QR码生成。然后,按列为QR码的六个区域生成针迹,最后保存到文件中。六个区域的划分如图所示。
可以通过以下链接下载演示QR码生成的控制台应用程序
在应用程序的根文件夹中,有一个可执行文件、一个dll和一个名为test.asc的文本文件。要从命令提示符启动程序,只需键入以下内容
qrcodegen.exe test.asc
该应用程序将生成一个扩展名为.DST的新文件。该文件可以被任何刺绣设计程序打开。输入字符串可以包含名片格式(VCARD)、地理定位数据(GEO)、URL链接或仅简单的文本。
VCARD格式示例
BEGIN:VCARD
VERSION:3.0
FN:John Doo
N:Jonh
ORG:Company name
URL:http://en.wikipedia.org/wiki/QR_code
EMAIL;TYPE=INTERNET:vasya.kvakin@example.com
END:VCARD
对于地理坐标,输入数据应包含由逗号分隔的经度和纬度,并跟在GEO单词和冒号之后。
GEO:30.31616, 59.95015
如果您有刺绣机,您就可以将此QR码缝制在T恤或您选择的任何衣服上。

背景
代码是用C#编写的。它使用MessagingToolkit.QRCode库从字符串创建QR码矩阵。该库可以通过NuGet进行安装:
PM> Install-Package MessagingToolkit.QRCode
如前所述,输入字符串可以是VCARD、GEO坐标或URL的表示。
QR码矩阵被创建为一个二维锯齿布尔数组。
此时,我们有了QR码的布尔矩阵,下一步是生成一个线条列表。线条是单元格的垂直序列,没有间隙。
这些线条用于创建针迹块,因此针迹被组合成块。块是垂直或水平的条形,它们是一组针迹。
QR码的四个角上有三个独特的正方形。因此,QR码被分成六个区域。第一个区域是左上角正方形,所以它首先生成。然后生成第二个区域 - 位于前一个区域和底部正方形之间的垂直条。第三个区域是左下角正方形。然后,逐列生成第四个区域,直到到达右上角正方形。右上角独特的正方形与第一和第二个正方形一起生成。最后,逐列生成第六个区域。
代码描述
首先要做的是生成QR码矩阵。
类 QRCodeCreator
此类使用MessagingToolkit.QRCode.Codec命名空间生成QR码矩阵。
using System.Text;
using MessagingToolkit.QRCode.Codec;
namespace EmbroideryFile.QRCode
{
    internal class QRCodeCreator
    {
        public bool[][] GetQRCodeMatrix(string DataToEncode)
        {
            if (string.IsNullOrEmpty(DataToEncode))
                return null;
            QRCodeEncoder qrCodeEncoder = new QRCodeEncoder();
            qrCodeEncoder.CharacterSet = "UTF8";
            qrCodeEncoder.QRCodeEncodeMode = QRCodeEncoder.ENCODE_MODE.BYTE;
            qrCodeEncoder.QRCodeScale = 1;
            qrCodeEncoder.QRCodeVersion = -1;
            qrCodeEncoder.QRCodeErrorCorrect = QRCodeEncoder.ERROR_CORRECTION.L;
            return qrCodeEncoder.CalQrcode(Encoding.UTF8.GetBytes(DataToEncode));
        }
    }
}
字符集设置为UTF8,以便能够编码非拉丁字符。编码冗余度设置为低级别(QRCodeEncoder.ERROR_CORRECTION.L),并在QRCodeErrorCorrect属性中设置。这假设QR码不会损坏,因此高冗余度是过度的。此类聚合在QRCodeStitcher类中。
类 QRCodeStitcher
所有针迹块的创建都实现在此类中。它分两步进行:
-
为QR码矩阵的六个区域准备一个不间断的垂直线条列表;
-
为每条连续线条创建针迹块。
要实现第一步,它会遍历矩阵单元格的列,当检测到下一个空单元格时,当前线条完成并添加到结果列表中。因此,从布尔矩阵创建了一个连续线条列表。每条线包含有关起点、终点、线条长度以及是否接触QR码底部的信息。
对于第二步,它逐个单元格地遍历每条线,并将之字形针迹添加到每个针迹块结果中。
在直线条步长中,X和Y轴以及单元格大小是硬编码的:dX = 25; dY = 2; cellSize = 25; 单位是0.1毫米。
QRCodeStitcher类有一个QRCodeCreater成员_qrCode。当设置QRCodeStitchInfo类型的Info属性时,在SetInfo方法中,通过GetQrCodeMatrix方法计算_info成员的Matrix属性。
线条结构如下:
 public struct Line
{
    public Coords Dot1 { get; set; }
    public Coords Dot2 { get; set; }
    public int Length { get; set; }
    public bool Lowest { get; set; }
}
此方法为所有六个区域生成所有针迹块。
private List<List<Coords>> GenerateQRCodeStitchesBoxed()
{
  var blocks = new List<List<Coords>>();
  int rectSize = GetRectSize();
  // the left top rectangle
  blocks.AddRange(GetRectangleSatin(0, 0, rectSize - 1, rectSize - 1));
  // the left top inner box
  blocks.Add(GenerateBoxStitchBlock(2, 2, rectSize - 4));
  // area between top and bottom left rectangle
  blocks.AddRange(GetSatinStitches(GetLaneList(0, rectSize + 1, rectSize, _dimension - rectSize - 1)));
  // the left bottom rectangle
  blocks.AddRange(GetRectangleSatin(0, _dimension - rectSize, rectSize - 1, _dimension - 1));
  // the left bottom inner box
  blocks.Add(GenerateBoxStitchBlock(2, _dimension - rectSize + 2, rectSize - 4));
  // middle area
  blocks.AddRange(GetSatinStitches(GetLaneList(rectSize + 1, 0, _dimension - rectSize - 1, _dimension - 1)));
  // right left top rectangle
  blocks.AddRange(GetRectangleSatin(_dimension - rectSize, 0, _dimension - 1, rectSize - 1));
  // the right top inner box
  blocks.Add(GenerateBoxStitchBlock(_dimension - rectSize + 2, 2, rectSize - 4));
  // area under the right top rectangle
  blocks.AddRange(GetSatinStitches(GetLaneList(_dimension - rectSize, rectSize + 1, _dimension - 1, _dimension - 1)));
  return blocks;
}
使用GenerateBoxStitchBlock方法生成独特正方形的内部框。
/// <summary>
/// Creates stitches for full filled box
/// </summary>
/// <param name="cellHorizonPos">Horisontal position of top left cell of box</param>
/// <param name="cellVerticalPos">Vertical postion of top left cell of box</param>
/// <param name="boxSize">Size of the box</param>
/// <returns>List of Coords</returns>
private List<Coords> GenerateBoxStitchBlock(int cellHorizonPos, int cellVerticalPos, int boxSize)
{
   var block = new List<Coords>();
   int y = 0; int x = 0;
   int startX = cellHorizonPos * _cellSize;
   int startY = cellVerticalPos * _cellSize;
   block.Add(new Coords { X = startX, Y = startY });
   while (y < _cellSize * boxSize)
   {
        while (x < _cellSize * boxSize - _dX)
        {
           x = x + _dX;
           block.Add(new Coords{ X = startX + x, Y = startY + y });
        }
        x = boxSize * _cellSize;
        block.Add(new Coords { X = startX + x, Y = startY + y });
        y = y + _dY;
        while (x > _dX)
        {
            x = x - _dX;
            block.Add(new Coords { X = startX + x, Y = startY + y });
        }
        x = 0;
        block.Add(new Coords { X = startX + x, Y = startY + y });
        y = y + _dY;
   }
   return block;
}
GetRectangleSatin方法创建独特矩形的针迹块。
IEnumerable<List<Coords>> GetRectangleSatin(int x1, int y1, int x2, int y2)
{
     int LeftX = (x1 > x2) ? x2 : x1;
     int TopY = (y1 > y2) ? y2 : y1;
     int RightX = (x1 < x2) ? x2 : x1;
     var BottomY = (y1 < y2) ? y2 : y1;
     int length = RightX - LeftX;
     var rect = new List<List<Coords>>();
     rect.Add(GenerateVerticalColumnStitchBlock(LeftX, TopY, length));
     rect.Add(GenerateHorizonColumnStitchBlock(LeftX, BottomY, length));
     rect.Add(ReverseCoords(GenerateVerticalColumnStitchBlock(RightX, TopY + 1, length)));
     rect.Add(ReverseCoords(GenerateHorizonColumnStitchBlock(LeftX + 1, TopY, length)));
     return rect;
}
之字形列由以下方法形成:
/// <summary>
/// Generates sequence of stitch blocks (columns) by list of lanes
/// </summary>
private List<List<Coords>> GetSatinStitches(List<Line> lanes)
{
  List<List<Coords>> blockList = new List<List<Coords>>();
  foreach (var lane in lanes)
  {
      List<Coords> satin = null;
      if (((lane.Length == 1) && ((lane.Dot1.X % 2) == 0)) ||
           ((lane.Length > 1) && (lane.Dot2.Y > lane.Dot1.Y)))
            satin = GenerateVerticalColumnStitchBlock(lane.Dot1.X, lane.Dot1.Y, lane.Length);
      else
        satin = ReverseCoords(GenerateVerticalColumnStitchBlock(lane.Dot2.X, lane.Dot2.Y, lane.Length));

       blockList.Add(satin);
  }
  return blockList;
}
偶数列从上到下缝制,奇数列从下到上缝制。
GenerateVerticalColoumnStitchBlock方法创建向下针迹的列表。
/// <summary>
/// Generates stitches for vertical line according to position of Dots
/// </summary>
/// <param name="cellHorizonPos"></param>
/// <param name="cellVerticalPos"></param>
/// <param name="length"></param>
List<Coords> GenerateVerticalColumnStitchBlock(int cellHorizonPos, int cellVerticalPos, int length)
{
     var block = new List<Coords>();
     int curX, curY;
     int columnLength = _cellSize * length;
     int startX = cellHorizonPos * _cellSize;
     int startY = cellVerticalPos * _cellSize;
     block.Add(new Coords { X = startX + _cellSize, Y = startY });
     for (curY = 0; curY < columnLength; curY = curY + _dY)
     {
      for (curX = (curY == 0) ? 0 : _dX; (curX < _cellSize) && (curY < columnLength); curX = curX + _dX)
        {
         block.Add(new Coords { X = startX + curX, Y = startY + curY });
         curY = curY + _dY;
        }
      int edgedX = _cellSize - (curX - _dX);
      int edgedY = edgedX * _dY / _dX;
      curX = _cellSize;
      curY = curY + edgedY - _dY;
      block.Add(new Coords { X = startX + curX, Y = startY + curY });
      curY = curY + _dY;
      for (curX = _cellSize - _dX; (curX > 0) && (curY < columnLength); curX = curX - _dX)
      {
        block.Add(new Coords { X = startX + curX, Y = startY + curY });
        curY = curY + _dY;
      }
      edgedX = curX + _dX;
      edgedY = edgedX * _dY / _dX;
      curY = curY + edgedY - _dY;
      block.Add(new Coords { X = startX, Y = startY + curY });
    }
    curX = _cellSize;
    curY = columnLength;
    block.Add(new Coords { X = startX + curX, Y = startY + curY });
    return block;
}
GetLaneList方法返回指定区域角落坐标的连续线条列表。
/// <summary>
/// Gets list of vertical string for specified rectangular area
/// </summary>
/// <param name="x1">start X position of a lane</param>
/// <param name="y1">start Y position of a lane</param>
/// <param name="x2">end X position of a lane</param>
/// <param name="y2">end Y position of a lane</param>
/// <returns></returns>
private List<Line> GetLaneList(int x1, int y1, int x2, int y2)
{
            try
            {
                if (_lines != null) _lines.Clear();
                if (y1 > y2)
                {
                    _topY = y2;
                    _bottomY = y1;
                }
                else
                {
                    _topY = y1;
                    _bottomY = y2;
                }
                if (x1 > x2)
                {
                    _leftX = x2;
                    _rightX = x1;
                }
                else
                {
                    _leftX = x1;
                    _rightX = x2;
                }
                for (int j = _leftX; j <= _rightX; j = j + 2) //X
                {
                    _state = false;
                    for (int i = _topY; i <= _bottomY; i++) // Y
                    {
                        ConsumeRelativeCellDown(j, i);
                    }
                    if (j >= _rightX) break;
                    _state = false;
                    for (int i = _bottomY; i >= _topY; i--) // Y
                    {
                        ConsumeRelativeCellUp(j + 1, i);
                    }
                }
                return _lines;
            }
            catch (Exception ex)
            {
                Trace.WriteLine(string.Format("GetLineList(): {0}",ex));
                throw;
           }
}
ConsumeRelativeCellDown方法用于从顶部单元格到底部单元格的偶数行。
 /// <summary>
 /// Check cell to stop current line or start  new in the down direction
 /// </summary>
 /// <param name="j"></param>
 /// <param name="i"></param>
 void ConsumeRelativeCellDown(int j, int i)
{
            if (_cells[j][i] == true)
            {
                // begin lane at the top of part
                if ((i == _topY))
                {
                    _dot1 = new Coords() { X = j, Y = i };

                    _curLane.Dot1 = _dot1;
                    _laneLen = 1;
                    _state = true;
                }
                else if ((_state == false))
                {
                    // single dot at the bottom of
                    if (i == _bottomY)
                    {
                        _dot1 = new Coords() { X = j, Y = i };
                        _curLane.Dot1 = _dot1;
                        _dot2 = new Coords() { X = j, Y = i };
                        _curLane.Dot2 = _dot2;
                        _curLane.Length = 1;
                        _curLane.Lowest = true;
                        _endLaneFlag = true;
                    }
                    // begin lane
                    else
                    {
                        _dot1 = new Coords() { X = j, Y = i };
                        _curLane.Dot1 = _dot1;
                        _laneLen = 1;
                        _state = true;
                    }
                }
                else if ((i == _bottomY))
                {
                    //   end of lane at the bottom
                    _dot2 = new Coords() { X = j, Y = i };
                    _curLane.Dot2 = _dot2;
                    _curLane.Length = ++_laneLen;
                    _curLane.Lowest = true;
                    _endLaneFlag = true;
                }  // in lane
                else
                {
                    _laneLen++;
                }
            }
            // end lane not an edge
            else if (_state == true)
            {
                _dot2 = new Coords() { X = j, Y = i - 1 };
                _curLane.Dot2 = _dot2;
                _curLane.Length = _laneLen;
                _state = false;
                _endLaneFlag = true;
            }
            if (_endLaneFlag == true)
            {
                _lines.Add(_curLane);
                _endLaneFlag = false;
            }

}
ConsumeRelativeCellUp方法用于从底部单元格到顶部单元格的奇数行。
void ConsumeRelativeCellUp(int j, int i)
{
            if (_cells[j][i] == true)
            {
                // begin lane at the bottom of part
                if ((i == _bottomY))
                {

                    _dot1 = new Coords { X = j, Y = i };
                    _curLane.Dot1 = _dot1;
                    _laneLen = 1;
                    _state = true;
                }
                else if ((_state == false))
                {
                    // single dot at the top of part
                    if (i == _topY)
                    {
                        _dot1 = new Coords { X = j, Y = i };
                        _curLane.Dot1 = _dot1;
                        _dot2 = new Coords { X = j, Y = i };
                        _curLane.Dot2 = _dot2;
                        _curLane.Length = 1;
                        _curLane.Lowest = true;
                        _endLaneFlag = true;
                    }
                    // begin lane
                    else
                    {
                        _dot1 = new Coords { X = j, Y = i };
                        _curLane.Dot1 = _dot1;
                        _laneLen = 1;
                        _state = true;
                    }
                }
                else if ((i == _topY))
                {
                    //   end of lane at the top
                    _dot2 = new Coords { X = j, Y = i };
                    _curLane.Dot2 = _dot2;
                    _curLane.Length = ++_laneLen;
                    _curLane.Lowest = true;
                    _endLaneFlag = true;
                }  // in lane
                else
                {
                    _laneLen++;
                }
            }
            // end lane not an edge
            else if (_state)
            {
                _dot2 = new Coords { X = j, Y = i + 1 };
                _curLane.Dot2 = _dot2;
                _curLane.Length = _laneLen;
                _state = false;
                _endLaneFlag = true;
            }
            if (_endLaneFlag)
            {
                _lines.Add(_curLane);
                _endLaneFlag = false;
            }

}
在以下视频中展示了整个缝制过程:QR码缝制视频。
类 QrcodeDst
此类聚合了DstFile和QrCodeStitcher实例。DstFile实例用于将针迹保存到DST文件中。针迹块在QrCodeStitcher实例中生成。
 public QrcodeDst()
 {
      _dst = new DstFile();
      _stitchGen = new QrCodeStitcher();
 }
该类具有以下属性设置器:
public QRCodeStitchInfo QrStitchInfo
{
   set { _stitchGen.Info = value; }
}
在QrcodeDst类中实现了FillStreamWithDst(Stream stream)方法,以将生成的QR码设计保存为Tajima DST格式。
以下代码演示了如何使用QrcodeDst实例从文件中读取文本并将其保存为DST格式。
var  qrcodeGen = new QrcodeDst();
using (var inputStreamReader = new StreamReader(fileName))
{
    var text = inputStreamReader.ReadToEnd();
    using (Stream outStream = new FileStream(outputPath, FileMode.Create, FileAccess.Write))
    {
      if (qrcodeGen != null)
      {
          qrcodeGen.QrStitchInfo = new QRCodeStitchInfo {QrCodeText = text};
          qrcodeGen.FillStream(outStream);
      }
    }
}
要将针迹保存为刺绣Tajima DST格式,请参考Tajima DST文件的说明。下一段将简要描述它。
Tajima DST文件格式
从针迹列表到DST文件字节的转换基于此处的文件格式描述。在文件中,我们有一系列针迹作为针运动命令。针迹存储为相对于前一个针迹位置的偏移量。每个针迹还存储了命令的类型。针迹类型是:
- 正常
- 跳转
- 停止
DST文件有一个头部。针迹数据从第512个字节位置开始,编号从零开始。
针迹用三个字节编码:
| 位号 | 7 | 6 | 5 | 4 | 3 | 2 | 1 | 0 | |
|---|---|---|---|---|---|---|---|---|---|
| 字节 1 | y+1 | y-1 | y+9 | y-9 | x-9 | x+9 | x-1 | x+1 | |
| 字节 2 | y+3 | y-3 | y+27 | y-27 | x-27 | x+27 | x-3 | x+3 |
| 字节3 | 跳转 | stop | y+81 | y-81 | x-81 | x+81 | 始终开启 | 始终开启 |
|---|
DST文件以三个字节结束:x00 00 F3
以下方法将带类型信息的针迹编码为字节:
  byte[] encode_record(int x, int y, DstStitchType stitchType)
        {
            byte b0, b1, b2;
            b0 = b1 = b2 = 0;
            byte[] b = new byte[3];
            // following values imposible to convert >+121 or < -121.

            if (x >= +41) { b2 += setbit(2); x -= 81; };
            if (x <= -41) { b2 += setbit(3); x += 81; };
            if (x >= +14) { b1 += setbit(2); x -= 27; };
            if (x <= -14) { b1 += setbit(3); x += 27; };
            if (x >= +5) { b0 += setbit(2); x -= 9; };
            if (x <= -5) { b0 += setbit(3); x += 9; };
            if (x >= +2) { b1 += setbit(0); x -= 3; };
            if (x <= -2) { b1 += setbit(1); x += 3; };
            if (x >= +1) { b0 += setbit(0); x -= 1; };
            if (x <= -1) { b0 += setbit(1); x += 1; };
            if (x != 0)
            {
               throw;

            };
            if (y >= +41) { b2 += setbit(5); y -= 81; };
            if (y <= -41) { b2 += setbit(4); y += 81; };
            if (y >= +14) { b1 += setbit(5); y -= 27; };
            if (y <= -14) { b1 += setbit(4); y += 27; };
            if (y >= +5) { b0 += setbit(5); y -= 9; };
            if (y <= -5) { b0 += setbit(4); y += 9; };
            if (y >= +2) { b1 += setbit(7); y -= 3; };
            if (y <= -2) { b1 += setbit(6); y += 3; };
            if (y >= +1) { b0 += setbit(7); y -= 1; };
            if (y <= -1) { b0 += setbit(6); y += 1; };
            if (y != 0)
            {
               throw;

        };

            switch (stitchType)
            {
                case DstStitchType.NORMAL:
                    b2 += (byte)3;
                    break;
                case DstStitchType.END:
                    b2 = (byte)243;
                    b0 = b1 = (byte)0;
                    break;
                case DstStitchType.JUMP:
                    b2 += (byte)131;
                    break;
                case DstStitchType.STOP:
                    b2 += (byte)195;
                    break;
                default:
                    b2 += 3;
                    break;
            };
            b[0] = b0; b[1] = b1; b[2] = b2;
            return b;
        }
通过此链接,可以在线生成QR码刺绣。

要查看生成QR码刺绣(DST格式)的源代码,请点击此处的链接。
相关链接
- Nathan Crawford的网站 - 本网站的代码用于创建刺绣缩略图。
- Rudolf´s Homepage - 在此找到了Tajima DST文件格式的描述。
- Embroidermodder网站 - Embroidermodder是一款免费的刺绣设计制作软件。