
通过 XBEE 模块实现家庭自动化
4.97/5 (15投票s)
通过 XBEE 模块实现无线家庭自动化
介绍
本项目由Shayan Ali Bhatti和Shahbaz Hasan完成,他们是巴基斯坦工业电子工程学院(I.I.E.E.)三年级B.E.专业的学生。这是一个采用XBEE无线收发模块的家居自动化应用程序。我们能够通过XBEE模块将信号无线地从个人电脑发送到AVR ATmega16微控制器。只需通过USB端口将XBEE模块连接到PC,它就可以与另一个XBEE模块进行数据收发。在此项目中,将使用默认的XBEE设置,前提是两个XBEE具有相同的地址,以便它们可以相互通信。该项目共有5个窗体,包括2个主要GUI窗体。第一个GUI控制直流电机和步进电机的参数,如速度、旋转和步进角。第二个GUI允许用户控制灯光、在16x2 LCD上书写,并监测温度以及根据需要设置报警温度。所有编程均使用C#和Visual Studio Windows窗体,并使用devcomponents dotnetbar & NI Measurement Studio 工具进行。

背景
在使用XBEE模块之前,有必要对其有深入的了解。因此,下面提供了本项目所用所有硬件的基本信息。
1. XBEE模块
XBee是Digi International公司一系列外形兼容的无线模块的品牌名称。这些无线电模块使用Freescale制造的微芯片,提供简单的、基于标准的点对点通信,以及网状网络的专有实现。由于其极低的功耗和独特的特性,它们广泛应用于无线网络应用中。
这些模块能够根据IEEE 802.15.4协议传输和接收数据,该协议用于无线通信。XBEE无线电模块提供30米的成功数据传输和接收范围,在视线范围内可达100米。XBEE模块提供UART连接,用于数据输入输出。

我们使用了一对XBEE Series 1收发模块,每个收发模块都能通过UART模块无线传输和接收数据。XBEE模块负责传输和接收PC生成的所有信号,并通过串行RX和TX引脚将它们连接到微控制器。
2. 直流电机
在此项目中,使用了一个5V直流电机进行顺时针和逆时针转动,其方向和速度(PWM)由操作员进行调整。
3. 步进电机
在此项目中,使用了一个5V步进电机,其方向、旋转次数和步进角根据用户的要求进行控制。
4. AVR ATmega16微控制器
在此项目中,使用AVR ATmega16微控制器来控制直流电机、步进电机以及通过XBEE模块进行数据收发。微控制器还控制一个16x2文本LCD和一个条形LED。
5. 文本LCD
在此项目中,使用一个16x2文本LCD,用于在LCD上输入数据和显示。它由微控制器控制,并通过开源Peter Fleury LCD库进行接口连接。
6. LM35温度传感器
使用lm35温度传感器将当前室温发送到微控制器,并在GUI的温度计显示屏上显示。AVR在ADC0引脚上接收其信号,并通过ADC进行转换,使其对GUI用户来说是可读的。
7. 条形LED
在此项目中,使用一个10位LED条形图来切换操作员所需的灯光。
8. 电源适配器
在此项目中,使用了2个可变电源适配器。一个适配器负责为XBEE模块、文本LCD和ATmega16提供5V电压。另一个适配器用于运行直流电机和步进电机。
9. 洞洞板
使用一块大的洞洞板来安装上述所有组件。
代码
我们为项目“XBEE模块家居自动化”制作了5个窗体。由于我们的项目涉及UART模块,因此我们使用了USB转串口线来连接XBEE模块与PC,并使用COM5作为串口,波特率为9600,停止位为1。
让我们逐一了解所有的Windows窗体。
1. 欢迎闪屏窗体
作为一个欢迎窗体,我们创建了一个闪屏窗体,它会在屏幕中央显示4秒钟,显示项目标题和项目成员姓名,然后消失。下面是它的图片。

为了在我的项目命名空间serialporthypterm中创建此窗体,我选择了一个Windows窗体,禁用了其最大化、最小化按钮,并将其起始位置属性设置为居中显示,同时控件框属性也设置为false。通过PictureBox工具添加图片。还使用了一个定时器来确保窗体运行4秒然后消失。定时器最初通过属性框启用。在timer1_Tick事件中,我将时间设置为4000个滴答,其余代码如下:
namespace serialporthypterm
{
    public partial class Form2 : Form
    {
        public Form2()
        {
            InitializeComponent();
        }

        // When the timer1 ticks 4000 times i.e. 4s, then welcome form vanishes,
        // and wizard form i.e. Form4 appears.
        private void timer1_Tick(object sender, EventArgs e)
        {
            this.Visible = false;           // form invisible
            FORM4 fo = new FORM4();         // constructor of Form4
            fo.Show();                      // show Form4
            timer1.Enabled = false;         // timer disabled
        }
    }

}
2. 向导窗体
欢迎窗体在4秒后初始化一个构造函数,该函数绑定显示Form4,即我们项目中的向导窗体。此窗体显示有关项目的详细信息,并询问用户想要选择哪个GUI。它的外观如下:

上面的窗体来自应用程序Devcomponents Dotnetbar,该应用程序在工具栏菜单中内置了用于选择向导窗体的窗体。我在图片框中放置了XBEE硬件图片,并在此处写下了项目详情。当用户按下取消按钮时,整个项目关闭;当按下下一步按钮时,下一页显示如下:

用户选择所需的GUI,该GUI的详细信息将显示在顶部边框上,以告知用户GUI的操作。最后,按下完成按钮后,GUI将进入下一个窗体。因此,此窗体消失,而另一个窗体,即电机控制或温度传感器窗体,会根据用户的意愿出现。代码如下:
namespace serialporthypterm
{
    public partial class FORM4 : Form
    {
        public FORM4()
        {
            InitializeComponent();
        }

        // disable textbox on loading FORM4
        private void FORM4_Load(object sender, EventArgs e)
        {
            textBox1.Visible = false;
        }

        //if cancel button is pressed, then whole app closes down
        private void wizard1_CancelButtonClick(object sender, CancelEventArgs e)
        {
            Close();
            Environment.Exit(1);
        }

        // On press of next button, 2nd page of wizard form appers,
        // asking the GUI to be selected
        private void wizard1_NextButtonClick(object sender, CancelEventArgs e)
        {
            textBox1.Visible = true;
            radioButton1.Checked = false;
            radioButton2.Checked = false;
            wizardPage2.Select();
	    // title of wizard form
wizardPage2.PageTitle = "Select the GUI you want to use";

            wizardPage2.PageDescription = null;
	    // disable finish button
wizardPage2.FinishButtonEnabled = DevComponents.DotNetBar.eWizardButtonState.False;

	    // disable next button
wizardPage2.NextButtonEnabled = DevComponents.DotNetBar.eWizardButtonState.False;


}

        // On selecting radio button1, Motor control GUI is displayed
        // and Finish button is enabled
        private void radioButton1_CheckedChanged(object sender, EventArgs e)
        {
textBox1.Text = "Enables you to control DC motor";
	// enable finish button
wizardPage2.FinishButtonEnabled=DevComponents.DotNetBar.eWizardButtonState.True;


        // On selecting radio button2, Temperature and Light control
        // GUI is selected and Finish button is enabled
        private void radioButton2_CheckedChanged(object sender, EventArgs e)
       {
	textBox1.Text = "Enables you to monitor temperature, control lights and write on LCD";
	// enable finish button
wizardPage2.FinishButtonEnabled = DevComponents.DotNetBar.eWizardButtonState.True;
        }

        // The backbutton takes wizard page back to 1st page from 2nd page
        private void wizard1_BackButtonClick(object sender, CancelEventArgs e)
        {
            textBox1.Visible = false;
// disable finish button
wizardPage2.FinishButtonEnabled = DevComponents.DotNetBar.eWizardButtonState.False;
        }

        // When the finish button is clicked, form vanishes and selects
        // either the form1 or form3 selected via the radio button by user
        private void wizard1_FinishButtonClick(object sender, CancelEventArgs e)
        {
            // show motor control form if 1st option selected
            this.Visible = false;
            if (radioButton1.Checked == true)
            {
                Form3 hee = new Form3();
                hee.Show();
            }

            // show temperature sensor form if 2nd gui selected
            else if (radioButton2.Checked == true)
            {
                Form1 cs = new Form1();
                cs.Show();
            }
            else { }
        }
    }
}
3. 电机控制GUI
在此窗体中,用户可以选择步进电机或直流电机并调整其参数。首先,用户需要按下连接按钮以确保硬件已连接。然后选择直流电机或步进电机。选择每个选项后,电机的图片会变得可见,而另一个电机的面板会变得透明。
现在假设您已连接步进电机,然后选择您是要进行步进旋转还是连续旋转。在步进旋转中,电机只会移动到指定的角度然后停止。在连续旋转中,电机将一直移动直到执行完用户输入的旋转次数,并且按照用户选择的方向。
如果您已连接直流电机,则选择它,并选择您是要进行顺时针还是逆时针旋转。此外,您可以自由选择您希望电机以什么速度运行。 这是它的图片:

此窗体所需的代码如下:
using System;
using System.Collections.Generic;
using System.ComponentModel;
using System.Data;
using System.Drawing;
using System.Linq;
using System.Text;
using System.Windows.Forms;
namespace serialporthypterm
{
public partial class Form3 : Form
{
Int32 c, g, b, z, f, q, mn;
char[] buff = new char[1];
char[] w = new char[1];
string recvd;
public Form3()
{
InitializeComponent();
}
/* main dcmotor control part */
private void DCMotor(int dir, int spd)
{
switch (dir)
{
case 0:
//for speed 25% clock wise
if (spd == 25)
{
buff[0] = 'd';
serialPort1.Write(buff, 0, 1);
buff[0] = 'e';
serialPort1.Write(buff, 0, 1);
}
//for speed 50% clock wise
else if (spd == 50)
{
buff[0] = 'd';
serialPort1.Write(buff, 0, 1);
buff[0] = 'f';
serialPort1.Write(buff, 0, 1);
}
//for speed 75% clock wise
else if (spd == 75)
{
buff[0] = 'd';
serialPort1.Write(buff, 0, 1);
buff[0] = 'g';
serialPort1.Write(buff, 0, 1);
}
//for speed 100% clock wise
else if (spd == 100)
{
buff[0] = 'd';
serialPort1.Write(buff, 0, 1);
buff[0] = 'h';
serialPort1.Write(buff, 0, 1);
}
break;
case 1:
/* for speed 25% anti-clock wise */
if (spd == 25)
{
buff[0] = 'd';
serialPort1.Write(buff, 0, 1);
buff[0] = 'a';
serialPort1.Write(buff, 0, 1);
}
/* for speed 50% anti-clock wise */
else if (spd == 50)
{
buff[0] = 'd';
serialPort1.Write(buff, 0, 1);
buff[0] = 'b';
serialPort1.Write(buff, 0, 1);
}
/* for speed 75% anti-clock wise */
else if (spd == 75)
{
buff[0] = 'd';
serialPort1.Write(buff, 0, 1);
buff[0] = 'c';
serialPort1.Write(buff, 0, 1);
}
/* for speed 100% anti-clock wise */
else if (spd == 100)
{
buff[0] = 'd';
serialPort1.Write(buff, 0, 1);
buff[0] = 'd';
serialPort1.Write(buff, 0, 1);
}
break;
}
}
/* Stepper Motor control : continuous rotation panel */
public void continuousrotation(char[] e, int f)
{
switch (f)
{
/* sending no. of rotations with clock wise rotation */
case 0:
buff[0] = 'a';
serialPort1.Write(buff, 0, 1);
serialPort1.Write(e, 0, 1);
break;
/* sending no. of rotations with anti-clock wise rotation */
case 1:
buff[0] = 'c';
serialPort1.Write(buff, 0, 1);
serialPort1.Write(e, 0, 1);
break;
}
}
/* Stepper Motor Control: Step rotation part */
public void stepcontrol(int s, int cc)
{
switch (cc)
{
/* step rotation:45 degree,clockwise */
case 0:
if (s == 45)
{
buff[0] = 's';
serialPort1.Write(buff, 0, 1);
buff[0] = 'e';
serialPort1.Write(buff, 0, 1);
}
/* step rotation:90 degree,clockwise */
else if (s == 90)
{
buff[0] = 's';
serialPort1.Write(buff, 0, 1);
buff[0] = 'f';
serialPort1.Write(buff, 0, 1);
}
/* step rotation:180 degree,clockwise */
else if (s == 180)
{
buff[0] = 's';
serialPort1.Write(buff, 0, 1);
buff[0] = 'g';
serialPort1.Write(buff, 0, 1);
}
//step rotation:360 degree,clockwise
else if (s == 360)
{
buff[0] = 's';
serialPort1.Write(buff, 0, 1);
buff[0] = 'h';
serialPort1.Write(buff, 0, 1);
}
break;
case 1:
/* step rotation:45 degrees,anti-clockwise */
if (s == 45)
{
buff[0] = 's';
serialPort1.Write(buff, 0, 1);
buff[0] = 'a';
serialPort1.Write(buff, 0, 1);
}
/* step rotation:90 degrees,anti-clockwise */
else if (s == 90)
{
buff[0] = 's';
serialPort1.Write(buff, 0, 1);
buff[0] = 'b';
serialPort1.Write(buff, 0, 1);
}
/* step rotation:180 degrees,anti-clockwise */
else if (s == 180)
{
buff[0] = 's';
serialPort1.Write(buff, 0, 1);
buff[0] = 'c';
serialPort1.Write(buff, 0, 1);
}
/* step rotation:360 degrees,anti-clockwise */
else if (s == 360)
{
buff[0] = 's';
serialPort1.Write(buff, 0, 1);
buff[0] = 'd';
serialPort1.Write(buff, 0, 1);
}
break;
}
}
/* selecting continuous rotation part of stepper motor control */
private void radioButton2_CheckedChanged(object sender, EventArgs e)
{
groupBox1.Enabled = false;
groupBox2.Enabled = true;
}
/* entered in the stepper control portion & choosing the step rotation panel */
private void radioButton1_CheckedChanged(object sender, EventArgs e)
{
groupBox2.Enabled = false;
groupBox1.Enabled = true;
}
/* entering no. of rotations */
private void textBox1_Click(object sender, EventArgs e)
{
textBox1.Clear();
}
/* choosing the step rotation angle */
private void comboBox1_SelectedIndexChanged(object sender, EventArgs e)
{
g = Int32.Parse(comboBox1.Text);
}
/* choosing clockwise rotation in step rotation part of stepper motor control */
private void radioButton3_CheckedChanged(object sender, EventArgs e)
{
c = 0;
}
/* choosing anti-clockwise rotation in step rotation part of stepper motor control */
private void radioButton4_CheckedChanged(object sender, EventArgs e)
{
c = 1;
}
/* choosing step rotation panel in Stepper Motor control */
private void radioButton1_Click(object sender, EventArgs e)
{
serialPort1.Write("0");
z = 0;
}
/* choosing continuous rotation panel in Stepper Motor control */
private void radioButton2_Click(object sender, EventArgs e)
{
serialPort1.Write("1");
z = 1;
}
/* choosing clockwise rotation in continuous rotation part of stepper motor control */
private void radioButton5_CheckedChanged(object sender, EventArgs e)
{
b = 0;
}
/* choosing anti-clockwise rotation in continuous rotation part of stepper motor control */
private void radioButton6_CheckedChanged(object sender, EventArgs e)
{
b = 1;
}
/* calling main function to run DC motor */
private void button4_Click(object sender, EventArgs e)
{
DCMotor(f, q);
}
/* choosing clockwise rotation in DC motor control */
private void radioButton7_CheckedChanged(object sender, EventArgs e)
{
f = 0;
}
/* choosing anti-clockwise rotation in DC motor control */
private void radioButton8_CheckedChanged(object sender, EventArgs e)
{
f = 1;
}
/* selecting speed(duty cycle) for running dc motor */
private void comboBox3_SelectedIndexChanged(object sender, EventArgs e)
{
q = Int32.Parse(comboBox3.Text);
}
/* selecting stepper Motor control and its image appears */
private void radioButton9_CheckedChanged(object sender, EventArgs e)
{
mn = 0;
groupBox6.Enabled = true;
groupBox3.Enabled = false;
this.reflectionImage1.Image = Image.FromFile(@"C:\Documents and Settings\evo\My Documents\My Pictures\stepper motor.jpg");
}
/* selecting DC Motor control and its image appears */
private void radioButton10_CheckedChanged(object sender, EventArgs e)
{
mn = 1;
groupBox3.Enabled = true;
groupBox6.Enabled = false;
this.reflectionImage1.Image = Image.FromFile(@"C:\Documents and Settings\evo\My Documents\My Pictures\dc motor.jpg");
}
/* FORM CHANGE if selected from File menu by user */
private void changeFormToolStripMenuItem_Click(object sender, EventArgs e)
{
serialPort1.Write("="); // tell AVR microcontroller to change FORM
serialPort1.Close();
this.Hide();
FORM4 hoo = new FORM4();
hoo.Show(); // display wizard form
}
/* Exit the whole program */
private void exitToolStripMenuItem_Click(object sender, EventArgs e)
{
serialPort1.Close();
Close();
Environment.Exit(1);
}
/* Open the About box */
private void projectInfoToolStripMenuItem_Click(object sender, EventArgs e)
{
AboutBox1 loo = new AboutBox1();
loo.Show();
}
/* Initializing serial port communication at COM5, 9600 baud rate */
private void buttonX1_Click(object sender, EventArgs e)
{
serialPort1.PortName = "COM5";
serialPort1.BaudRate = 9600;
serialPort1.Open();
if (serialPort1.IsOpen)
{
radioButton1.Enabled = true;
radioButton2.Enabled = true;
buttonX1.Enabled = false;
groupBox1.Enabled = false;
groupBox2.Enabled = false;
}
}
/* rotating either step rotation part or continuous part */
private void buttonX2_Click(object sender, EventArgs e)
{
switch (z)
{
case 0:
stepcontrol(g, c);
break;
case 1:
w[0] = char.Parse(textBox1.Text);
continuousrotation(w, b);
break;
}
}
/* calling main function to run DC motor */
private void buttonX3_Click(object sender, EventArgs e)
{
DCMotor(f, q);
}
/* Close serial port on exiting program */
private void Form3_FormClosing(object sender, FormClosingEventArgs e)
{
serialPort1.Close();
Environment.Exit(1);
}
/* Tell microcontroller that DC Motor form is active */
private void Form3_Activated(object sender, EventArgs e)
{
if (serialPort1.IsOpen)
{
serialPort1.Write("1");
}
else
{
serialPort1.Open();
serialPort1.Write("1");
}
}
}
}
4. 温度和灯光控制GUI
在此窗体中,我们可以观察实时温度、室温,并控制灯光以及在16x2文本LCD上书写文本。
假设您想在LCD上书写。那么您只需在GUI中显示的文本框中书写,所有字符将由PC通过串行方式发送到LCD。
如果用户想控制灯光,那么您只需单击相应的绿色灯光按钮,该灯就会亮起,并连接到AVR微控制器的条形LED上。
现在,同时,LM35温度传感器的输出将不断被微控制器接收,并通过XBEE模块每秒发送到PC。因此,温度计中的温度将根据室温不断变化。第一次读取将保存在室温文本框中,指示室温,但之后,GUI将持续显示当前温度并每秒更新一次。还提供了设置报警温度的功能,用户可以通过该功能设置报警温度。当温度超过设定的报警温度时,将触发报警。 GUI看起来像这样:

温度计是通过NI Measurement Studio工具栏绘制的,它指示当前温度,并显示室温以及文本框中的当前温度。
这是进行必要操作并在GUI上显示的可视化工作室代码。
using System;
using System.Collections.Generic;
using System.ComponentModel;
using System.Data;
using System.Drawing;
using System.Linq;
using System.Text;
using System.Media;
using System.Windows.Forms;
using System.Windows.Forms.VisualStyles;
using System.Threading;

namespace serialporthypterm
{
    public partial class Form1 : Form
    {
        double t = 0, global = 0;
        string handle,current;
        int a = 0, b = 0, c = 0, d = 0, i = 0, f = 0, g = 0, h = 0,alarmtemp=100;
        public Form1()
        {
            InitializeComponent();
        }

        /* Open serial port and select form 1 on form load */
        private void Form1_Load(object sender, EventArgs e)
        {
            /* Check if serial port is open, and select GUI2 on AVR */
            if (serialPort1.IsOpen)
            {
            }
            else
            {
                serialPort1.Open();
            }
        }


        /* On serial port receive event take temperature readings per second and */
        /* display it on thermometer and textbox */
private void serialPort1_DataReceived(object sender, System.IO.Ports.SerialDataReceivedEventArgs e)
        {
            /* update temperature reading per second */
                   timer1.Start();
            if (timer1.Interval == 1000)
            {
                /* read room temperature once only */
                if (global == 0)
                {
                    handle = serialPort1.ReadExisting();
                    textBox4.Text = handle;       // display on room temperature box
                    global++;
                }
                /* now keep reading current temperature */
                else
                {
                    current = serialPort1.ReadExisting();
                    textBox2.Text = current;     //display on current temperature box
                    t = Convert.ToDouble(current);
                    thermometer1.value = t;

                /* give various colors to thermometer on temperature ranges */
                    if (t >= 10 && t < 20)
                    {
                        thermometer1.FillColor = Color.Red;
                        thermometer1.BackColor = Color.Blue;
                    }

                    if (t >= 20 && t < 30)
                    {
                        thermometer1.FillColor = Color.Red;
                        thermometer1.BackColor = Color.Aqua;
                    }

                    if (t >= 30 && t < 40)
                    {
                        thermometer1.FillColor = Color.Red;
                        thermometer1.BackColor = Color.Yellow;
                    }

                    if (t >= 40 && t < 100)
                    {
                        thermometer1.FillColor = Color.Red;
                        thermometer1.BackColor = Color.Red;
                    }

        /* if temperature exceeds 100 degree Celsius then show message */
                    if (t >= 100)
                    {
                        MessageBox.Show("Temperature out of range");
                    }

        /* if temperature exceeds alarm temperature then raise alarm */
                    if (t >= alarmtemp)
                    {
  System.Media.SoundPlayer sound = new System.Media.SoundPlayer(@"C:\WINDOWS\Media\smokealarm.wav");
                        sound.Play();
                    }

                    else { }
                    current = null;
                }
            }
        }
        /* Transfer characters written on textbox to LCD */
        private void textBox1_TextChanged(object sender, EventArgs e)
        {
            serialPort1.Write("[");
            serialPort1.Write(textBox1.Text);
        }

        /* LCD Clear on button press */
        private void buttonX1_Click(object sender, EventArgs e)
        {
               serialPort1.Write("[");
        }

        /* Textbox clear on button press */
        private void buttonX2_Click(object sender, EventArgs e)
        {
               textBox1.Clear();
        }

        /* Led 1 status toggle if button 1 is pressed with a beep sound */
        private void led9_Click(object sender, EventArgs e)
        {
                        if (a==0)
            {
                a = 1;
                serialPort1.Write("1");
                led9.Value=true;
 System.Media.SoundPlayer sound = new System.Media.SoundPlayer(@"C:\WINDOWS\Media\windows xp hardware insert.wav");
                sound.Play();
            }
            else
            {
                a = 0;
                serialPort1.Write("1");
                led9.Value = false;
 System.Media.SoundPlayer sound = new System.Media.SoundPlayer(@"C:\WINDOWS\Media\windows xp hardware remove.wav");
                sound.Play();
            }
        }

        /* Led 2 status toggle if button 2 is pressed with a beep sound */
        private void led10_Click(object sender, EventArgs e)
        {
            if (b == 0)
            {
                led10.Value = true;
                b = 1;
                serialPort1.Write("2");
  System.Media.SoundPlayer sound = new System.Media.SoundPlayer(@"C:\WINDOWS\Media\windows xp hardware insert.wav");
                sound.Play();
            }
            else
            {
                b = 0;
                led10.Value = false;
                serialPort1.Write("2");
  System.Media.SoundPlayer sound = new System.Media.SoundPlayer(@"C:\WINDOWS\Media\windows xp hardware remove.wav");
                sound.Play();
            }
        }

        /* Led 3 status toggle if button 3 is pressed with a beep sound */
        private void led11_Click(object sender, EventArgs e)
        {
            if (c == 0)
            {
                led11.Value = true;
                c = 1;
                serialPort1.Write("3");
  System.Media.SoundPlayer sound = new System.Media.SoundPlayer(@"C:\WINDOWS\Media\windows xp hardware insert.wav");
                sound.Play();
            }
            else
            {
                c = 0;
                led11.Value = false;
                serialPort1.Write("3");
 System.Media.SoundPlayer sound = new System.Media.SoundPlayer(@"C:\WINDOWS\Media\windows xp hardware remove.wav");
                sound.Play();
            }
        }

        /* Led 4 status toggle if button 4 is pressed with a beep sound */
        private void led12_Click(object sender, EventArgs e)
        {
            if (d == 0)
            {
                led12.Value = true;
                d = 1;
                serialPort1.Write("4");
  System.Media.SoundPlayer sound = new System.Media.SoundPlayer(@"C:\WINDOWS\Media\windows xp hardware insert.wav");
                sound.Play();
            }
            else
            {
                d = 0;
                led12.Value = false;
                serialPort1.Write("4");
 System.Media.SoundPlayer sound = new System.Media.SoundPlayer(@"C:\WINDOWS\Media\windows xp hardware remove.wav");
                sound.Play();
            }
        }

        /* Led 5 status toggle if button 5 is pressed with a beep sound */
        private void led13_Click(object sender, EventArgs e)
        {
            if (f == 0)
            {
                led13.Value = true;
                f = 1;
                serialPort1.Write("5");
 System.Media.SoundPlayer sound = new System.Media.SoundPlayer(@"C:\WINDOWS\Media\windows xp hardware insert.wav");
                sound.Play();
            }
            else
            {
                f = 0;
                led13.Value = false;
                serialPort1.Write("5");
  System.Media.SoundPlayer sound = new System.Media.SoundPlayer(@"C:\WINDOWS\Media\windows xp hardware remove.wav");
                sound.Play();
            }
        }

        /* Led 6 status toggle if button 6 is pressed with a beep sound */
        private void led14_Click(object sender, EventArgs e)
        {
            if (g == 0)
            {
                led14.Value = true;
                g = 1;
                serialPort1.Write("6");
  System.Media.SoundPlayer sound = new System.Media.SoundPlayer(@"C:\WINDOWS\Media\windows xp hardware insert.wav");
                sound.Play();
            }
            else
            {
                g = 0;
                led14.Value = false;
                serialPort1.Write("6");
 System.Media.SoundPlayer sound = new System.Media.SoundPlayer(@"C:\WINDOWS\Media\windows xp hardware remove.wav")
                sound.Play();
            }
        }

        /* Led 7 status toggle if button 7 is pressed with a beep sound */
        private void led15_Click(object sender, EventArgs e)
        {
            if (h == 0)
            {
                led15.Value = true;
                h = 1;
                serialPort1.Write("7");
  System.Media.SoundPlayer sound = new System.Media.SoundPlayer(@"C:\WINDOWS\Media\windows xp hardware insert.wav");
                sound.Play();
            }
            else
            {
                h = 0;
                led15.Value = false;
                serialPort1.Write("7");
  System.Media.SoundPlayer sound = new System.Media.SoundPlayer(@"C:\WINDOWS\Media\windows xp hardware remove.wav");
                sound.Play();
            }
        }

        /* Led 8 status toggle if button 8 is pressed with a beep sound */
        private void led16_Click(object sender, EventArgs e)
        {
            if (i == 0)
            {
                led16.Value = true;
                i = 1;
                serialPort1.Write("8");
 System.Media.SoundPlayer sound = new System.Media.SoundPlayer(@"C:\WINDOWS\Media\windows xp hardware insert.wav");
                sound.Play();
            }
            else
            {
                i = 0;
                led16.Value = false;
                serialPort1.Write("8");
System.Media.SoundPlayer sound = new System.Media.SoundPlayer(@"C:\WINDOWS\Media\windows xp hardware insert.wav");
  sound.Play();
            }
        }

                    /* sets the alarm temperature in textbox4 */
        private void buttonX4_Click(object sender, EventArgs e)
        {
            try
            {
                alarmtemp = Convert.ToInt16(textBox3.Text);
            }
            catch (FormatException)
            {
            }

        }

                       /* Show GUI selection menu and change FORM */
        private void changeGUIToolStripMenuItem_Click(object sender, EventArgs e)
        {
            serialPort1.Write("=");             // tell AVR to change form
            timer1.Start();

            while (timer1.Interval == 200) ; // wait for 200ms

            serialPort1.Close();
            this.Hide();
            FORM4 he = new FORM4();
            he.Show();
        }
                        /* Exit the program */
        private void exitToolStripMenuItem_Click(object sender, EventArgs e)
        {
            serialPort1.Close();
            Close();
            Environment.Exit(1);
        }

                        /* Show the Project details in About box */
        private void projectInfoToolStripMenuItem_Click(object sender, EventArgs e)
        {
            AboutBox1 lo = new AboutBox1();
            lo.Show();
        }

                        /* Close the whole program and serial port */
        private void buttonX3_Click(object sender, EventArgs e)
        {
            /* close the serial PORT and previously ON leds */
            if (a != 0)
                serialPort1.Write("1");     // close LED1
                if (b != 0)
                    serialPort1.Write("2");     // close LED2
                    if (c != 0)
                        serialPort1.Write("3");     // close LED3
                        if (d != 0)
                            serialPort1.Write("4");     // close LED4
                           if (f != 0)
                              serialPort1.Write("5");     // close LED5
                                if (g != 0)
                                    serialPort1.Write("6");     // close LED6
                                    if (h != 0)                                                                                       serialPort1.Write("7");     // close LED7
                                        if (i != 0)
                                           serialPort1.Write("8");     // close LED8
                                        else { }
                    /* Clear the LCD screen */
                     serialPort1.Write("[");
                    /* Close serial Port */
                     serialPort1.Close();
            Environment.Exit(1);            // terminates the whole program
            Close();
        }

        /* open serial port and select form 1 every time this form is selected */
        private void Form1_Activated(object sender, EventArgs e)
        {
            if (serialPort1.IsOpen)
            {

            }
            else
            {
                serialPort1.Open();
            }
        }
    }
}
5. 关于框
在此窗体中,我们显示了关于项目的描述。如下所示:
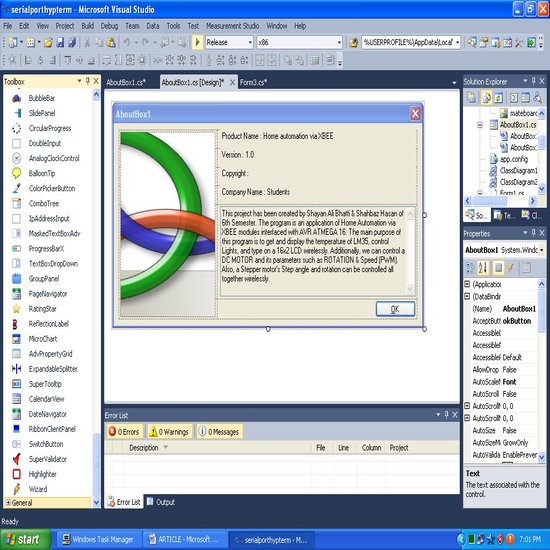
由于您从devcomponents dotnetbar工具栏获得了现成的AboutBox,因此大部分代码是自动生成的,其余部分带有注释。我在这里展示的是可以在GUI的菜单栏访问的项目信息。 这是代码:
namespace serialporthypterm
{
    partial class AboutBox1 : Form
    {
        public AboutBox1()
        {
            InitializeComponent();
            this.Text = String.Format("About {0}", AssemblyTitle);
            this.labelProductName.Text = AssemblyProduct;
            this.labelVersion.Text = String.Format("Version {0}", AssemblyVersion);
            this.labelCopyright.Text = AssemblyCopyright;
            this.labelCompanyName.Text = AssemblyCompany;
            this.textBoxDescription.Text = AssemblyDescription;
        }

        #region Assembly Attribute Accessors

        public string AssemblyTitle
        {
            get
            {
                object[] attributes = Assembly.GetExecutingAssembly().GetCustomAttributes(typeof(AssemblyTitleAttribute), false);
                if (attributes.Length > 0)
                {
                    AssemblyTitleAttribute titleAttribute = (AssemblyTitleAttribute)attributes[0];
                    if (titleAttribute.Title != "")
                    {
                        return titleAttribute.Title;
                    }
                }
                return System.IO.Path.GetFileNameWithoutExtension(Assembly.GetExecutingAssembly().CodeBase);
            }
        }

        public string AssemblyVersion
        {
            get
            {
                return Assembly.GetExecutingAssembly().GetName().Version.ToString();
            }
        }

        public string AssemblyDescription
        {
            get
            {
                object[] attributes = Assembly.GetExecutingAssembly().GetCustomAttributes(typeof(AssemblyDescriptionAttribute), false);
                if (attributes.Length == 0)
                {
                    return "";
                }
                return ((AssemblyDescriptionAttribute)attributes[0]).Description;
            }
        }

        public string AssemblyProduct
        {
            get
            {
                object[] attributes = Assembly.GetExecutingAssembly().GetCustomAttributes(typeof(AssemblyProductAttribute),false);
                if (attributes.Length == 0)
                {
                    return "";
                }
                return ((AssemblyProductAttribute)attributes[0]).Product;
            }
        }

        public string AssemblyCopyright
        {
            get
            {
                object[] attributes = Assembly.GetExecutingAssembly().GetCustomAttributes(typeof(AssemblyCopyrightAttribute), false);
                if (attributes.Length == 0)
                {
                    return "";
                }
                return ((AssemblyCopyrightAttribute)attributes[0]).Copyright;
            }
        }

        public string AssemblyCompany
        {
            get
            {
                object[] attributes = Assembly.GetExecutingAssembly().GetCustomAttributes(typeof(AssemblyCompanyAttribute),false);
                if (attributes.Length == 0)
                {
                    return "";
                }
                return ((AssemblyCompanyAttribute)attributes[0]).Company;
            }
        }
        #endregion

        /* Hide this form on clicking OK button */
        private void okButton_Click(object sender, EventArgs e)
        {
            this.Hide();
        }

        /* Set description text, product name, company name and version labels */
        private void AboutBox1_Load(object sender, EventArgs e)
        {
            textBoxDescription.Text = "This project has been created by Shayan Ali Bhatti & Shahbaz Hasan of 6th Semester. The program is an application of Home Automation via XBEE modules interfaced with AVR ATMEGA 16. It has 2 GUI forms. The 1st GUI's purpose is to observe and change the various parameters such as the PWM(Speed) and ROTATION of a DC Motor. Also, a Stepper Motor's rotations and step angle can be varied as per requirement.The 2nd GUI's purpose is to get and display the temperature sensed by LM35, control Lights, and type on a 16x2 LCD wirelessly via XBEE modules.";

            labelProductName.Text = "Home Automation via XBEE";
            labelCompanyName.Text = "Students";
            labelVersion.Text = "Version : 1.00";
        }
    }
}
电路图设计
这是Proteus仿真电路图。16x2文本LCD用于显示。灯光显示在条形图上。步进电机驱动器使用ULN 2003,而L293D用作直流电机驱动器。ATmega16 AVR控制器用于处理所有硬件,而LM35是正在使用的温度传感器。在仿真期间,最初将虚拟终端连接在XBEE图片的替代位置。

原始硬件
这是电路板的原始硬件图片。

在此项目中我学到的东西
通过这个项目,我们能够使用串口,并理解了C#在硬件交互方面的广阔前景。我们还得出结论,通过使用Devcomponents Dotnetbar应用程序和NI Measurement Studio工具,可以轻松创建一个非常好的GUI,而且易于制作和使用。此外,在使用LM35温度传感器时,应采取适当措施过滤噪声,否则温度将不断变化,产生不良的输出。
结语
我们,Shayan Ali Bhatti & Shahbaz Hasan,非常感谢全能的真主和我们的老师Sir Sajid Hussain,他用他最好的C#编程知识指导我们,并帮助我们发展了编程技能。我们希望这个项目对Code Project网站的会员有所帮助。不要忘记下载包含Visual Studio和AVR代码的主项目文件附件。
关于作者
作者Shayan Ali Bhatti和Shahbaz Hasan是巴基斯坦工业电子工程学院三年级的B.E.学生。两人都对从事基于微控制器的项目表现出浓厚的兴趣。