
带Actian Zen、Windows IoT Core和C#的嵌入式物联网数据库
0/5 (0投票)
在本文中,我们将重点介绍如何在运行Windows IoT Core操作系统的基于ARM的Raspberry Pi上安装Actian Zen Edge Server for IoT,捕获一些简单的时间序列数据,将其写入Zen数据库并从数据库中检索数据。
Actian Zen是一套嵌入式数据库产品,通过其多种实现方式,提供无缝集成和数据可移植性,无需ETL开销。
这些实现方式包括Windows和Linux等完整服务器、桌面、移动设备以及基于Intel或ARM芯片组的物联网硬件,包括Windows IoT Core、Windows Nano Server和Raspbian Linux。
在本文中,我们将重点介绍如何在运行Windows IoT Core操作系统的基于ARM的Raspberry Pi上安装Actian Zen Edge Server for IoT,捕获一些简单的时间序列数据,将其写入Zen数据库并从数据库中检索数据。
解决方案
我们的示例解决方案使用运行Windows IoT Core的Raspberry Pi (ARM) 设备作为经济高效且功能强大的物联网设备。
我们的示例解决方案将捕获时间序列温度数据。此用例中描述的温度系统将只是真实世界设备上可能运行的众多数据收集过程之一,因此数据存储解决方案必须能够同时存储相关数据。
直接在设备上运行Zen可最大程度地减少集成编程。ETL(提取、转换、加载)处理在平台之间转换数据时往往脆弱、容易出错且问题重重。
设置设备
如前所述,我们的演示设备是运行Windows IoT Core的Raspberry Pi。我们将在设备上设置Actian Zen,然后编写一个C#通用Windows平台(UWP)应用程序来读取传感器数据并将其存储在设备上的Zen数据库中。
本文的其余部分假设以下先决条件
- 您有一台已安装并运行Windows IoT Core且带有屏幕的Raspberry Pi。如果您需要更多设置信息,请参阅Windows开发中心的设置您的设备或Adafruit出色的Raspberry Pi上的Windows IoT Core入门教程。
- 您应该熟悉C#编程。您不需要是专家,因为我们将提供运行的代码。
- 您了解基本的SQL命令,如SELECT和INSERT。
下载适用于Windows IoT Core (ARM) 的Actian Zen
要下载适用于Windows IoT Core的Actian Zen,请访问下载页面,并在下拉菜单中选择以下内容
- 产品:Actian Zen (PSQL)
- 版本:v13 R2 评估版
- 平台:Windows IoT Core 32位
单击“应用筛选器”按钮以检索相关下载。
检索后,展开Zen Edge v13 R2 Trial节点,并下载适用于Windows IoT Core ARM 32位的Actian Zen Edge database v13 R2 Trial下载。
在Windows IoT Core (ARM) 上安装Actian Zen Edge数据库
启动您的设备,使其在IoT Dashboard应用程序的“我的设备”选项卡中可见。右键单击您的设备,然后选择“复制IPv4地址”。
接下来,打开Windows文件资源管理器的一个实例,并在位置选项卡中输入您复制的IPv4地址,替换掉< ipv4_address>
\\< ipv4_address>\c$
当提示时,输入您在首次设置Windows IoT Core时分配给Pi设备的管理员用户名和密码。
一旦网络共享在文件资源管理器中打开,创建一个名为temp的新文件夹,并将您之前下载的Actian Zen Edge zip文件复制到Pi设备上的新temp目录中。为了简单起见,我将我的zip文件重命名为install-zen.zip(但这完全是可选的)。
返回IoT Dashboard应用程序,右键单击您的设备并选择“启动PowerShell”。当提示时,再次输入您的Pi管理员用户名和密码进行身份验证(连接需要几分钟)。
在PowerShell提示符下,输入以下命令将目录更改到根C文件夹
cd\
接下来,我们将通过执行以下命令解压zip文件(如有必要,请替换zip文件名)
Expand-Archive -Path "C:\temp\install-zen.zip" -DestinationPath "C:\temp"
现在您可以通过执行以下命令安装Actian Zen Edge数据库
C:\temp\PSQL\Install-PSQL.ps1 server
您将看到大量输出,因为数据库引擎正在安装。安装完成后将显示一条消息。
最后一步是启用Windows防火墙规则。为此,请执行以下命令
& "C:\Program Files\Actian\PSQL\bin\Enable-PsqlFirewallRules.ps1" domain
您将再次看到大量信息输出,然后返回PowerShell提示符。
您可以通过执行以下命令验证数据库引擎是否正在运行
Get-Service -DisplayName "Actian PSQL*"
确认数据库已启动并运行后,您可以随意关闭PowerShell窗口。
组装硬件解决方案
为了演示目的,我们需要一个温度传感器来生成我们将要记录的数据。虽然Raspberry Pi设备包含一些片上温度传感器,但它们目前无法直接通过Windows IoT Core使用。
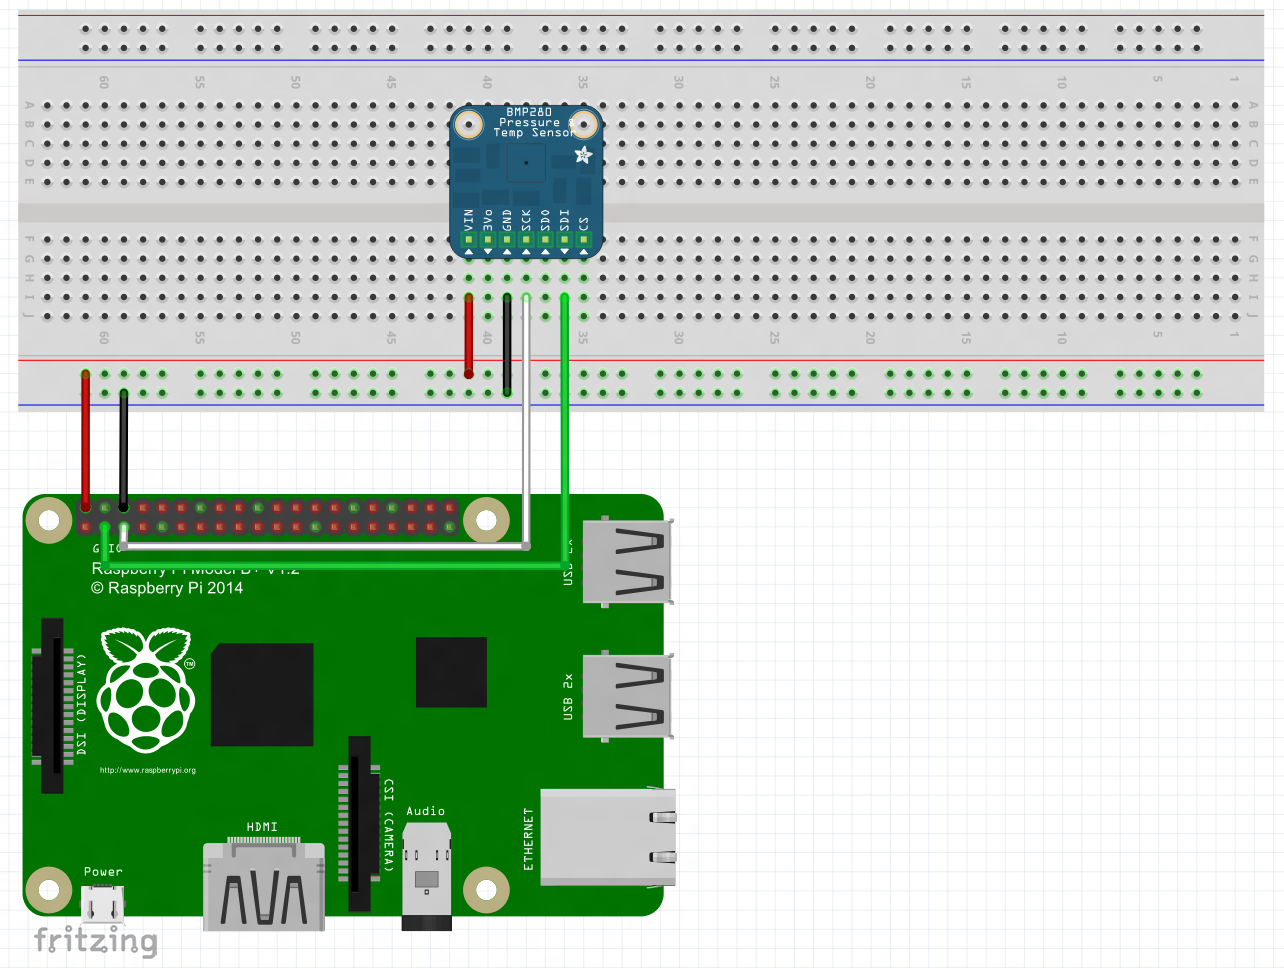
相反,我们将使用一个简单的现成的BMP280温度/压力传感器,您可以通过许多销售Raspberry Pi设备的供应商购买。对于本文,我根据以下原理图组装了硬件。为了安全起见,在准备硬件解决方案之前,请务必关闭Raspberry Pi设备并将其从电源中断开。(您可能需要使用备用接地引脚,具体取决于您用于屏幕的引脚,如有必要,请参阅引脚图)[图片来源]
下载适用于.NET Standard的ADO.NET SDK
要与Actian Zen数据库接口,我们需要下载相应的ADO.NET SDK并为其创建NuGet包源。
返回下载页面并在下拉菜单中选择
- 产品:Actian Zen (PSQL)
- 版本:SDK
- 平台:ADO.NET
然后单击“应用筛选器”按钮。展开ADO.NET节点以查看相关下载,并下载用于Zen v13 R2 (13.30) 的ADO.NET Data Provider for .NET Standard 2.0。
下载包含SDK的zip文件后,将其解压到您选择的文件夹。在解压的文件中有一个NuGet包,我们将在项目中用到它。我们将创建一个本地Nuget包源来使用这个包。
打开Windows文件资源管理器,并在您的C:\驱动器中创建一个名为localnuget的文件夹。将<extracted_file_location>\PSQL-SDK-AdoNetDataProvider4.3-NetStandard-13.30.034.000\PSQL-SDK-AdoNetDataProvider4.3-NetStandard-13.30.034.000\packages\netstandard2.0\Pervasive.Data.SqlClientStd.4.3.0.nupkg文件复制到您刚刚创建的localnuget文件夹中。
打开Visual Studio 2019(免费社区版即可),然后选择不带代码继续链接。
接下来,访问工具 -> NuGet 包管理器 -> 包管理器设置项。
显示“选项”窗口后,选择包源,然后按+(添加)按钮。对于“名称”,输入Local,对于“源”,输入C:\localnuget。
开发 UWP 应用程序
如果您更喜欢下载已经完成的解决方案,可以在这里找到它。
在 Visual Studio 2019 中,访问文件菜单并选择新建项目。在搜索框中,键入uwp,然后选择空白应用(通用 Windows)模板并单击下一步按钮。
在“配置新项目”屏幕中,将项目命名为TempPressure,然后单击创建按钮。
选择“最低版本”项的Windows 10 Fall Creators Update (10.0 Build 16299)或更高版本,然后按OK。
项目生成后,是时候添加一些NuGet包了。右键单击项目文件并选择管理Nuget包。在选择nuget.org包源的情况下,搜索并安装System.Runtime.CompilerServices.Unsafe包。
在仍选择nuget.org包源的情况下,搜索并安装LiveCharts.Uwp包。
接下来将包源更改为Local并清除搜索框,选择Pervasive.Data.SqlClientStd项并安装。
让我们向项目中添加一个名为BMP280.cs的新类。用此链接中的代码替换此文件的内容。此代码是Adafruit为Windows IoT Core创建的一个类的一个稍作修改的版本,用于通过I2C与BMP280传感器进行交互。我不会详细介绍此代码,因为它与数据库中的数据存储无关。如果您想查看它,代码中已包含内联文档。
创建另一个名为Reading.cs的新类。这个类封装了从BMP280捕获的单个传感器读数的数据,并且也代表了我们将存储在Zen数据库中的数据。(代码列表也可在此处找到)
using System;

namespace TempPressure
{
    public class Reading
    {
        public string DeviceName { get; set; }
        public double Temperature { get; set; }
        public double Pressure { get; set; }
        public double Altitude { get; set; }
        public DateTime ReadingTs { get; set; }
    }
}
我们现在将创建一个名为ActianZenDataSource.cs的新类。这个类负责与Raspberry Pi上的数据库引擎交互。出于示例目的,我们只使用数据库引擎安装的现有数据库之一:DEMODATA。
在此类中,您将找到用于创建和删除`UWP_SensorReadings`表的函数,以及记录插入和数据检索代码。请注意,代码如何利用熟悉的ANSI SQL语法。方法的命名是自解释的,代码也内联文档化以提高清晰度。(代码列表也可在此处找到)
using Pervasive.Data.SqlClient;
using System;
using System.Collections.Generic;
using System.Diagnostics;

namespace TempPressure
{
    public class ActianZenDataSource
    {

        private string _tableName = "UWP_SensorReadings";
        private PsqlConnection _conn = new PsqlConnection("Host=localhost;Port=1583;ServerDSN=DEMODATA;");
        private PsqlCommand _cmd = new PsqlCommand();

        private void _createTable()
        {
            if (!_tableExists())
            {
                var query = $@"CREATE TABLE {_tableName}(DeviceName varchar(50), Temperature double, Pressure double, Altitude double, ReadingTs datetime)";

                int recordsAffected = _executeNonQuery(query);
                Debug.WriteLine((recordsAffected == -1) ? "Table: '" + _tableName + "' Successfully Created !!\n" : string.Empty);

            }

        }

        public void DropTable()
        {
            if (_tableExists())
            {
                var query = $@"DROP TABLE {_tableName}";
                _executeNonQuery(query);
                if (_tableExists())
                {
                    Debug.WriteLine("Table not dropped\n");
                }
                else
                {
                    Debug.WriteLine("Table " + _tableName + " Successfully Dropped !!\n");
                }
            }
        }

        public void AddReading(Reading reading)
        {
            //Create Reading Record in database
            // **NOTE: SQL String is being generated for debug output reasons only,
            //          IN PRODUCTION UTILIZE named parameters using the PsqlParameter object
            int recordsAffected = 0;
            var query = $@"INSERT INTO {_tableName} VALUES ( '{ reading.DeviceName }',{ reading.Temperature }, { reading.Pressure }, {reading.Altitude}, '{ reading.ReadingTs.ToString("yyyy-MM-dd HH:mm:ss") }'  )";
            if (!_tableExists())
            {
                this._createTable();
            }

            recordsAffected = _executeNonQuery(query);
            Debug.WriteLine("\nRecords Affected: " + recordsAffected + "\n\n");
        }

        public List<Reading> GetReadings()
        {
            var query = $"SELECT * FROM {_tableName}";
            PsqlDataReader rdr = null;
            string logText = string.Empty;
            List<Reading> retValue = new List<Reading>();

            if (_tableExists())
            {
                try
                {
                    if ((_conn.State != System.Data.ConnectionState.Open))
                    {
                        _conn.Open();
                    }
                    _cmd.Connection = _conn;
                    _cmd.CommandText = query;

                    logText = "Query Executed : " + query + "\n\n";
                    rdr = _cmd.ExecuteReader();
                    int rowCount = 0;

                    while (rdr.Read())
                    {
                        Reading rdg = new Reading();

                        rdg.DeviceName = rdr.GetString(0);
                        rdg.Temperature = rdr.GetDouble(1);
                        rdg.Pressure = rdr.GetDouble(2);
                        rdg.Altitude = rdr.GetDouble(3);
                        rdg.ReadingTs = rdr.GetDateTime(4);

                        retValue.Add(rdg);
                        rowCount++;
                    }
                    logText += "Total Rows :" + rowCount;
                }
                catch (Exception ex)
                {
                    logText = logText + "\nQuery execution failed with exception: " + ex.Message;
                }
                finally
                {
                    _conn.Close();
                }
                Debug.WriteLine(logText);
            }
            else
            {
                Debug.WriteLine("Table does not exist.");
            }

            return retValue;
        }


        private int _executeNonQuery(string query)
        {
            int rowsAffected = 0;
            var logText = string.Empty;
            try
            {
                if ((_conn.State != System.Data.ConnectionState.Open))
                {
                    _conn.Open();
                    Debug.WriteLine("Connection Opened: ");
                }
                _cmd.Connection = _conn;
                _cmd.CommandText = query;

                logText = "Query Executed : " + query + "\n\n";
                rowsAffected = _cmd.ExecuteNonQuery();

            }
            catch (Exception ex)
            {
                logText = logText + "Query execution failed with exception: " + ex.Message;
            }
            finally
            {
                _conn.Close();
            }
            Debug.WriteLine(logText);
            return rowsAffected;
        }

        private bool _tableExists()
        {
            bool result = false;
            int count = 0;
            try
            {
                if ((_conn.State != System.Data.ConnectionState.Open))
                {
                    _conn.Open();
                    Debug.WriteLine("Connection Opened: ");
                }
                _cmd.Connection = _conn;
                _cmd.CommandText = $"select count(*) from X$File where Xf$Name = '{_tableName}'";

                count = (int)_cmd.ExecuteScalar();
                result = (count >= 1);

            }
            catch (Exception ex)
            {
                Debug.WriteLine("**** Exception : " + ex.Message + " ****");
            }
            finally
            {
                _conn.Close();
            }
            return result;
        }
    }
}
现在让我们定义应用程序的用户界面。打开MainPage.xaml,并用以下标记替换其内容(也可在此处找到)
<Page
    x:Class="TempPressure.MainPage"
    xmlns="http://schemas.microsoft.com/winfx/2006/xaml/presentation"
    xmlns:x="http://schemas.microsoft.com/winfx/2006/xaml"
    xmlns:d="http://schemas.microsoft.com/expression/blend/2008"
    xmlns:mc="http://schemas.openxmlformats.org/markup-compatibility/2006"
    xmlns:lvc="using:LiveCharts.Uwp"
    mc:Ignorable="d"
    Background="{ThemeResource ApplicationPageBackgroundThemeBrush}">

    <Grid>
        <Grid.RowDefinitions>
            <RowDefinition />
            <RowDefinition />
            <RowDefinition />
        </Grid.RowDefinitions>
        <Grid.ColumnDefinitions>
            <ColumnDefinition />
            <ColumnDefinition />
            <ColumnDefinition />
        </Grid.ColumnDefinitions>

        <Button x:Name="btnCollectReadings" Width="250" Height="250" Click="BtnCollectReadings_Click" Grid.Column="0" Grid.Row="0">Collect 10 Readings</Button>
        <Button x:Name="btnRefreshReadings" Width="250" Height="250" Grid.Row="0" Grid.Column="1" Click="BtnRefreshReadings_Click">Refresh Readings</Button>
        <Button x:Name="btnDropTable" Width="250" Height="250" Grid.Row="0" Grid.Column="2" Click="BtnDropTable_Click">Drop Table</Button>
        <ListBox x:Name="lstReadings" Grid.ColumnSpan="3" Grid.Row="1" Grid.Column="0" ItemsSource="{Binding Readings}"  >
            <ListBox.ItemTemplate>
                <DataTemplate>
                    <Border>
                        <StackPanel Orientation="Vertical">
                            <TextBlock Text="{Binding DeviceName}"></TextBlock>
                            <StackPanel Orientation="Horizontal">
                                <TextBlock Text="Temperature (C): "></TextBlock>
                                <TextBlock Text="{Binding Temperature}"></TextBlock>
                            </StackPanel>
                            <StackPanel Orientation="Horizontal">
                                <TextBlock Text="Pressure (Pa): "></TextBlock>
                                <TextBlock Text="{Binding Pressure}"></TextBlock>
                            </StackPanel>
                            <StackPanel Orientation="Horizontal">
                                <TextBlock Text="Altitude (m): "></TextBlock>
                                <TextBlock Text="{Binding Altitude}"></TextBlock>
                            </StackPanel>
                            <StackPanel Orientation="Horizontal">
                                <TextBlock Text="Timestamp: "></TextBlock>
                                <TextBlock Text="{Binding ReadingTs}"></TextBlock>
                            </StackPanel>
                        </StackPanel>
                    </Border>
                </DataTemplate>
            </ListBox.ItemTemplate>

        </ListBox>
        <lvc:CartesianChart Series="{Binding Series}" Grid.ColumnSpan="3" Grid.Row="2" Grid.Column="0">
            <lvc:CartesianChart.AxisX>
                <lvc:Axis LabelFormatter="{Binding LabelFormatter}"></lvc:Axis>
            </lvc:CartesianChart.AxisX>
        </lvc:CartesianChart>
    </Grid>
</Page>
打开MainPage.xaml.cs实现类,并用以下代码替换其内容(也可在此处找到)
using LiveCharts;
using LiveCharts.Configurations;
using LiveCharts.Uwp;
using System;
using System.Collections.ObjectModel;
using System.Diagnostics;
using System.Threading.Tasks;
using Windows.UI.Xaml;
using Windows.UI.Xaml.Controls;
using Windows.UI.Xaml.Navigation;

namespace TempPressure
{
    /// <summary>
    /// Control Screen for reading and displaying temperature data
    /// </summary>
    public sealed partial class MainPage : Page
    {
        private BMP280 _bmp280;
        private ActianZenDataSource _ds;
        private string _deviceName;
        public ObservableCollection<Reading> Readings { get; set; }

        //chart items
        public SeriesCollection Series { get; set; }
        public Func<double, string> LabelFormatter { get; set; }

        public MainPage()
        {
            this.InitializeComponent();

        }

        //This method will be called by the application framework when the page is first loaded
        protected override async void OnNavigatedTo(NavigationEventArgs navArgs)
        {
            try
            {

                //initialize public properties
                //Create a new object for our barometric sensor class
                _bmp280 = new BMP280();
                //Initialize the sensor
                await _bmp280.Initialize();

                _ds = new ActianZenDataSource();
                _deviceName = "CPI3";
                Readings = new ObservableCollection<Reading>();

                //initialize series configuration and label formatting for the chart
                var chartConfig = Mappers.Xy<Reading>()
                    .X(model => (double)model.ReadingTs.Ticks)
                    .Y(model => model.Temperature);
                Series = new SeriesCollection(chartConfig);
                LabelFormatter = value => new System.DateTime((long)value).ToString("hh:mm:ss tt");

                this.DataContext = this;
            }
            catch(Exception ex)
            {
                Debug.WriteLine(ex.Message);
            }
        }

        private async void BtnCollectReadings_Click(object sender, RoutedEventArgs e)
        {
                try
                {

                    //Create variables to store the sensor data: temperature, pressure and altitude.
                    //Initialize them to 0.
                    double temp = 0;
                    double pressure = 0;
                    double altitude = 0;

                    //Create a constant for pressure at sea level.
                    //This is based on your local sea level pressure (Unit: Hectopascal)
                    //visit https://www.weather.gov/ and input zip code to obtain the barometer value
                    const double seaLevelPressure = 1013.5;

                    //Read 10 samples of the data at an interval of 1 second
                    for (int i = 0; i < 10; i++)
                    {
                        temp = await _bmp280.ReadTemperature();
                        pressure = await _bmp280.ReadPressure();
                        altitude = await _bmp280.ReadAltitude(seaLevelPressure);

                        //Write the values to your debug console
                        Debug.WriteLine("Temperature: " + temp.ToString() + " deg C");
                        Debug.WriteLine("Pressure: " + pressure.ToString() + " Pa");
                        Debug.WriteLine("Altitude: " + altitude.ToString() + " m");

                        //add the reading to the Actian table
                        _ds.AddReading(new Reading()
                        {
                            DeviceName = _deviceName,
                            Temperature = temp,
                            Pressure = pressure,
                            Altitude = altitude,
                            ReadingTs = DateTime.Now
                        });

                        await Task.Delay(1000);
                    }
            }
            catch (Exception ex)
            {
                Debug.WriteLine(ex.Message);
            }
        }

        private void BtnRefreshReadings_Click(object sender, RoutedEventArgs e)
        {

            //update list and chart with values retrieved from the Actian database

            Readings.Clear();
            Series.Clear();

            var chartValues = new ChartValues<Reading>();
            var readings =  _ds.GetReadings();
            readings.ForEach((read) => {
                Readings.Add(read);
                chartValues.Add(read);
            });

            Series.Add(new LineSeries() { Values = chartValues });
        }

        private void BtnDropTable_Click(object sender, RoutedEventArgs e)
        {
            //clean up - remove readings table from the database
            _ds.DropTable();
        }
    }

}
此页面(及其实现)提供三个按钮
- 收集10个读数(带代码隐藏处理程序
BtnCollectReadings_Click)将以1秒的间隔从传感器获取10个读数。 - 刷新读数(带代码隐藏处理程序
BtnRefreshReadings_Click)将查询当前存储在Zen数据库中`UWP_SensorReadings`表中的所有传感器数据——这将依次填充数据文本列表(`lstReadings`),以及描绘传感器随时间读取值的折线图(`lvc:CartesianChart`元素)。 - 删除表(带代码隐藏处理程序
BtnDropTable_Click)将完全移除UWP_SensorReadings表及其所有相关数据。
运行应用程序
现在是时候在 Raspberry Pi 设备上运行应用程序了。选择 ARM 作为目标 CPU,选择 远程机器(从自动生成的列表中选择 Raspberry Pi 设备或手动输入设备的 IP 地址以连接到它)。
按F5将应用程序部署到Raspberry Pi(应用程序的首次部署总是需要更长的时间)。
加载后,按下收集10个读数按钮,观察Visual Studio中的调试输出窗口,查看从传感器获取的读数(以及随后存储在Zen数据库中的读数)。您应该会看到一系列10个读数,类似于以下内容
温度:23.8488803863525 摄氏度
压力:98287.984375 帕
海拔:258.046339692289 米
连接已打开
连接已打开
查询已执行:INSERT INTO UWP_SensorReadings VALUES ( 'CPI3',23.8488803863525, 98287.984375, 258.046339692289, '2019-04-25 03:18:07' )
受影响的记录:1
现在按下刷新读数按钮,滚动浏览列表数据,并观察渲染的图表。
查看完数据后,您可以随意按下删除表按钮,从DEMODATA数据库中移除UWP_SensorReadings表。