
使用 Web API 和 React 创建用户注册和登录
2.60/5 (3投票s)
在本文中,我们将学习使用 Reactjs 和 Web API 创建登录和注册页面的分步过程
引言
在本文中,我们将学习使用 Reactjs 和 Web API 创建用户注册和登录页面的分步过程。 React 是一个开源 JavaScript 库,用于创建用户界面,特别是单页应用程序。 它用于控制 Web 和移动应用程序的视图层。 React 由 Facebook 工程师 Jordan Walke 开发,并由 Facebook 维护。
必备组件
- 对 React.js 和 Web API 的基本了解
- Visual Studio
- Visual Studio Code
- SQL Server Management Studio
- Node.js
目录
- 创建数据库和表
- 创建 Web API 项目
- 创建 React 项目
- 安装 Bootstrap 和 React Strap
- 添加路由
创建数据库和表
打开 SQL Server Management Studio,创建一个名为 Employees 的数据库,并在该数据库中创建一个表。 将该表命名为 EmployeeLogin。
CREATE TABLE [dbo].[EmployeeLogin](
    [Id] [int] IDENTITY(1,1) NOT NULL,
    [Email] [varchar](50) NULL,
    [Password] [varchar](50) NULL,
    [EmployeeName] [varchar](50) NULL,
    [City] [varchar](50) NULL,
    [Department] [varchar](50) NULL,
 CONSTRAINT [PK_EmployeeLogin] PRIMARY KEY CLUSTERED
(
    [Id] ASC
)WITH (PAD_INDEX = OFF, STATISTICS_NORECOMPUTE = OFF, _
       IGNORE_DUP_KEY = OFF, ALLOW_ROW_LOCKS = ON, ALLOW_PAGE_LOCKS = ON) ON [PRIMARY]
) ON [PRIMARY]

GO
创建 Web API 项目
打开 Visual Studio 并创建一个新项目。

将名称更改为 LoginApplication,然后单击确定 > 选择 Web API 作为其模板。

右键单击 Solution Explorer 中的 Models 文件夹,然后转到 Add >> New Item >> data。

单击“ADO.NET 实体数据模型”选项,然后单击“添加”。 从数据库中选择 EF 设计器,然后单击“下一步”按钮。
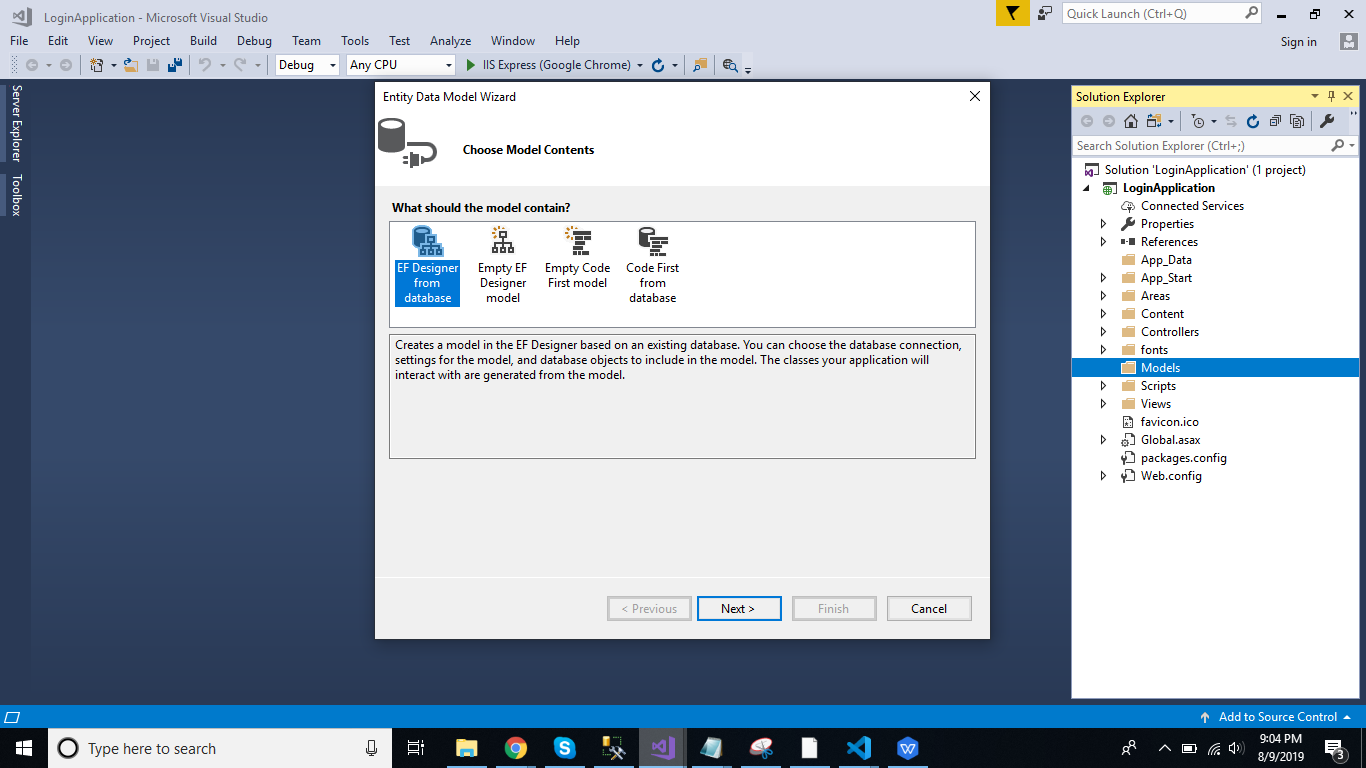
添加连接属性并在下一页选择数据库名称,然后单击确定。

选中 Table checkbox。 默认情况下将选择内部选项。 现在,单击“完成”按钮。

我们的数据模型现在已成功创建。
现在添加一个名为 VM 的新文件夹。 右键单击 VM 文件夹并添加三个类 - Login、Register 和 Response。 现在,将以下代码粘贴到这些类中。
Login 类
public class Login
    {
        public string Email { get; set; }
        public string Password { get; set; }
    }
Register 和 Response 类
public class Register
    {
        public int Id { get; set; }
        public string Email { get; set; }
        public string Password { get; set; }
        public string EmployeeName { get; set; }
        public string City { get; set; }
        public string Department { get; set; }
    }
    public class Response
    {
        public string Status { set; get; }
        public string Message { set; get; }
    }
右键单击 Controllers 文件夹并添加一个新控制器。 将其命名为“Login 控制器”并添加以下命名空间。
using LoginApplication.Models;
using LoginApplication.VM;
在此控制器中创建两种方法以插入和登录,在此控制器中添加以下代码。
using System;
using System.Collections.Generic;
using System.Linq;
using System.Net;
using System.Net.Http;
using System.Web.Http;
using LoginApplication.Models;
using LoginApplication.VM;

namespace LoginApplication.Controllers
{
    [RoutePrefix("Api/login")]
    public class LoginController : ApiController
    {
        EmployeesEntities DB = new EmployeesEntities();
        [Route("InsertEmployee")]
        [HttpPost]
        public object InsertEmployee(Register Reg)
        {
            try
            {
                EmployeeLogin EL = new EmployeeLogin();
                if (EL.Id == 0)
                {
                    EL.EmployeeName = Reg.EmployeeName;
                    EL.City = Reg.City;
                    EL.Email = Reg.Email;
                    EL.Password = Reg.Password;
                    EL.Department = Reg.Department;
                    DB.EmployeeLogins.Add(EL);
                    DB.SaveChanges();
                    return new Response
                    { Status = "Success", Message = "Record SuccessFully Saved." };
                }
            }
            catch (Exception)
            {

                throw;
            }
            return new Response
            { Status = "Error", Message = "Invalid Data." };
        }
        [Route("Login")]
        [HttpPost]
        public Response employeeLogin(Login login)
        {
            var log = DB.EmployeeLogins.Where(x => x.Email.Equals(login.Email) &&
                      x.Password.Equals(login.Password)).FirstOrDefault();

            if (log == null)
            {
                return new Response { Status = "Invalid", Message = "Invalid User." };
            }
            else
                return new Response { Status = "Success", Message = "Login Successfully" };
        }
    }
}
现在,让我们启用 Cors。 转到 Tools,打开 NuGet 包管理器,搜索 Cors,然后安装“Microsoft.Asp.Net.WebApi.Cors”包。 打开 Webapiconfig.cs 并添加以下行
  EnableCorsAttribute cors = new EnableCorsAttribute("*", "*", "*");
  config.EnableCors(cors);
创建 React 项目
现在使用以下命令创建一个新的 reactjs 项目
npx create-reatc-app loginapp
在 Visual Studio Code 中打开新创建的项目,并使用以下命令在此项目中安装 reactstrap 和 bootstrap
npm install --save bootstrap
npm install --save reactstrap react react-dom
使用以下命令在 React 中添加路由
npm install react-router-dom --save
现在转到 src 文件夹并添加三个新组件
- Login.js
- Reg.js
- Dashboard.js
现在打开 Reg.js 文件并添加以下代码
import React, { Component } from 'react';
import { Button, Card, CardFooter, CardBody, CardGroup, Col, Container, Form,
    Input, InputGroup, InputGroupAddon, InputGroupText, Row } from 'reactstrap';
class Reg extends Component {
  constructor() {
    super();
    this.state = {
      EmployeeName: '',
      City: '',
      Email: '',
      Password: '',
      Department: ''
    }

    this.Email = this.Email.bind(this);
    this.Password = this.Password.bind(this);
    this.EmployeeName = this.EmployeeName.bind(this);
    this.Password = this.Password.bind(this);
    this.Department = this.Department.bind(this);
    this.City = this.City.bind(this);
    this.register = this.register.bind(this);
  }

  Email(event) {
    this.setState({ Email: event.target.value })
  }

  Department(event) {
    this.setState({ Department: event.target.value })
  }

  Password(event) {
    this.setState({ Password: event.target.value })
  }
  City(event) {
    this.setState({ City: event.target.value })
  }
  EmployeeName(event) {
    this.setState({ EmployeeName: event.target.value })
  }

  register(event) {
    fetch('https://:51282/Api/login/InsertEmployee', {
      method: 'post',
      headers: {
        'Accept': 'application/json',
        'Content-Type': 'application/json'
      },
      body: JSON.stringify({
        EmployeeName: this.state.EmployeeName,
        Password: this.state.Password,
        Email: this.state.Email,
        City: this.state.City,
        Department: this.state.Department
      })
    }).then((Response) => Response.json())
      .then((Result) => {
        if (Result.Status == 'Success')
                this.props.history.push("/Dashboard");
        else
          alert('Sorrrrrry !!!! Un-authenticated User !!!!!')
      })
  }

  render() {

    return (
      <div className="app flex-row align-items-center">
        <Container>
          <Row className="justify-content-center">
            <Col md="9" lg="7" xl="6">
              <Card className="mx-4">
                <CardBody className="p-4">
                  <Form>
                    <div class="row" className="mb-2 pageheading">
                      <div class="col-sm-12 btn btn-primary">
                        Sign Up
                        </div>
                    </div>
                    <InputGroup className="mb-3">
                      <Input type="text"
                      onChange={this.EmployeeName} placeholder="Enter Employee Name" />
                    </InputGroup>
                    <InputGroup className="mb-3">
                      <Input type="text"
                      onChange={this.Email} placeholder="Enter Email" />
                    </InputGroup>
                    <InputGroup className="mb-3">
                      <Input type="password"
                      onChange={this.Password} placeholder="Enter Password" />
                    </InputGroup>
                    <InputGroup className="mb-4">
                      <Input type="text"
                      onChange={this.City} placeholder="Enter City" />
                    </InputGroup>
                    <InputGroup className="mb-4">
                      <Input type="text"
                      onChange={this.Department} placeholder="Enter Department" />
                    </InputGroup>
                    <Button  onClick={this.register}
                    color="success" block>Create Account</Button>
                  </Form>
                </CardBody>
              </Card>
            </Col>
          </Row>
        </Container>
      </div>
    );
  }
}

export default Reg;

<container> <row classname="justify-content-center">
<card classname="mx-4"> <cardbody classname="p-4">
现在,打开 Login.js 文件,并添加以下代码
import React, { Component } from 'react';
import './App.css';
import { Button, Card, CardBody, CardGroup, Col, Container, Form, Input,
         InputGroup, InputGroupAddon, InputGroupText, Row } from 'reactstrap';
class Login extends Component {
    constructor() {
        super();

        this.state = {
            Email: '',
            Password: ''
        }

        this.Password = this.Password.bind(this);
        this.Email = this.Email.bind(this);
        this.login = this.login.bind(this);
    }

    Email(event) {
        this.setState({ Email: event.target.value })
    }
    Password(event) {
        this.setState({ Password: event.target.value })
    }
    login(event) {
        debugger;
        fetch('https://:51282/Api/login/Login', {
            method: 'post',
            headers: {
                'Accept': 'application/json',
                'Content-Type': 'application/json'
            },
            body: JSON.stringify({
                Email: this.state.Email,
                Password: this.state.Password
            })
        }).then((Response) => Response.json())
            .then((result) => {
                console.log(result);
                if (result.Status == 'Invalid')
                    alert('Invalid User');
                else
                    this.props.history.push("/Dashboard");
            })
    }

    render() {
        return (
            <div className="app flex-row align-items-center">
                <Container>
                    <Row className="justify-content-center">
                        <Col md="9" lg="7" xl="6">
                            <CardGroup>
                                <Card className="p-2">
                                    <CardBody>
                                        <Form>
                                            <div class="row"
                                            className="mb-2 pageheading">
                                                <div class="col-sm-12 btn btn-primary">
                                                    Login
                             </div>
                                            </div>
                                            <InputGroup className="mb-3">
                                                <Input type="text"
                                                 onChange={this.Email}
                                                 placeholder="Enter Email" />
                                            </InputGroup>
                                            <InputGroup className="mb-4">
                                                <Input type="password"
                                                onChange={this.Password}
                                                placeholder="Enter Password" />
                                            </InputGroup>
                                            <Button onClick={this.login}
                                            color="success" block>Login</Button>
                                        </Form>
                                    </CardBody>
                                </Card>
                            </CardGroup>
                        </Col>
                    </Row>
                </Container>
            </div>
        );
    }
}

export default Login;
打开 Dashboard.js 文件,并添加以下代码
import React, { Component } from 'react';
import './App.css';
import { Button, Card, CardBody, CardGroup, Col, Container, Form,
         Input, InputGroup, InputGroupAddon, InputGroupText, Row } from 'reactstrap';
  class Dashboard extends Component {
    render() {

        return (
            <div class="row" className="mb-2 pageheading">
                <div class="col-sm-12 btn btn-primary">
                    Dashboard
             </div>
            </div>
        );
    }
}

export default Dashboard;
打开 App.css 文件,并添加以下 CSS 类
text-align: center;
}
.navheader{
  margin-top: 10px;
  color :black !important;
  background-color: #b3beca!important
}

.PageHeading
{
  margin-top: 10px;
  margin-bottom: 10px;
  color :black !important;
}
打开 App.js 文件,并添加以下代码
import React from 'react';
import logo from './logo.svg';
import './App.css';
import Login from './Login';
import Reg from './Reg';
import Dashboard from './Dashboard';
import { BrowserRouter as Router, Switch, Route, Link } from 'react-router-dom';
function App() {
  return (
    <Router>
      <div className="container">
        <nav className="navbar navbar-expand-lg navheader">
          <div className="collapse navbar-collapse" >
            <ul className="navbar-nav mr-auto">
              <li className="nav-item">
                <Link to={'/Login'} className="nav-link">Login</Link>
              </li>
              <li className="nav-item">
                <Link to={'/Signup'} className="nav-link">Sign Up</Link>
              </li>
            </ul>
          </div>
        </nav> <br />
        <Switch>
          <Route exact path='/Login' component={Login} />
          <Route path='/Signup' component={Reg} />

        </Switch>
        <Switch>
        <Route path='/Dashboard' component={Dashboard} />
        </Switch>
      </div>
    </Router>
  );
}

export default App;
现在,使用 npm start 命令运行项目,并检查结果。

输入详细信息并单击按钮。

输入电子邮件和密码,然后单击登录按钮。