
使用基于 MCM-Framework.Net 的异步消息通信构建专业的 .NET 应用程序
4.81/5 (6投票s)
如何使用 MCM-Framework.Net 的消息、命令和组件有效地构建任意规模的模块化 .NET 应用程序?
介绍
构建一个简单的 .NET 应用程序很容易。你创建一个 UI 和一个模型。UI 更新模型,模型通过事件通知其更改。交互是同步的,在单个线程中进行。
一个专业的应用程序应该提供更多:
- 耗时的操作不能冻结 UI
- 应用程序必须维护多年
- 必须提供测试环境
某些应用程序有额外的要求,例如
- 插件架构
- 重试、中止和超时
- 撤销和事务
- 教程模式
- 宏录制
MCM (Message-Command-Message) 是一个提供专业应用程序基础的开源框架。
该框架与其说是一个软件,不如说是一种理念。它只提供基本的基础设施。高级场景应该根据用户需求作为附加层来创建。这使得学习成本低,并提供了极大的定制可能性。该框架没有特殊要求,您可以与现有系统并行使用它。
此外,框架中没有 XML 配置。几乎所有类都使用泛型。创建源代码由 Visual Studio 的上下文帮助系统Intellisense 支持。
在本文中,我将首先介绍 MCM-Framework.Net 和一个 WinForms 应用程序的入门步骤,但这种模式可以用于任何 .NET API。
基本元素
MCM-Framework.Net 的最重要元素是消息、命令和组件。
消息
消息可以是任何 .NET 对象。消息仅包含信息,不包含逻辑。消息通过消息通道异步发送。创建消息后,其数据不应再更改。因此,应避免在消息中存储服务引用或全局应用程序变量。
命令
命令负责一个单独的任务或一个单独的工作(例如,加载用户、连接、获取天气)。命令可以组合并按顺序执行。它们可以在稍后重复执行(重试、中止模式)。它们的顺序可以被撤销(撤销)或存储(宏)。
每个命令都有其参数和结果。命令不应访问外部服务和组件。执行命令所需的整个环境应在命令参数中定义。由于此要求,可以使用单元测试来测试命令。
组件
组件可以是任何 .NET 对象。组件是消息和命令之间的控制器或中介。它处理传入的消息、执行命令、更新其状态并生成响应消息。UI 控件也可以是组件。
基本操作
松耦合
由于消息通信,系统组件不必相互了解。它们只需要理解消息。减少系统组件之间的依赖关系可以简化维护。可以添加新组件,也可以删除旧组件。所有这些操作都无需重新设计系统架构。这种编程模型提供了插件系统的巨大可扩展性。
Env.ComponentContainer = new MyComponentContainer();
Env.ComponentContainer.Add(new Component1());
Env.ComponentContainer.Add(new Component2());
Env.ComponentContainer.Add(this);
每个组件都可以向消息通道发送消息。消息通道将消息广播给其订阅者。
var message = new HelloRequestMessage("John");
Env.ComponentContainer.Messages.Post(message);
在将组件添加到组件容器后,会检查每个组件是否包含用MessageSubscriberAttribute 标记的方法。只有这些方法会被添加到消息通道的订阅者列表中。
[MessageSubscriber("Messages")]
private void handleHelloRequestMessage(HelloRequestMessage m) { }
如果必须在 UI 线程中调用该方法,则使用重载的属性构造函数。
[MessageSubscriber("Messages", UIThreadSynchronizationMode.PostAsynchronousInUIThread)]
private void handleHelloRequestMessage(HelloRequestMessage m) { }
异步工作
组件不是执行者。工作由命令完成。组件创建并执行命令。命令可以使用CommandAsyncExecutor 同步或异步执行。
var commandExecutor = new CommandAsyncExecutor<HelloCommand>();
commandExecutor.ExecuteCompleted += on_commandExecutor_ExecuteCompleted;

var cmd = new HelloCommand("John");
commandExecutor.ExecuteAsync(cmd);
CommandAsyncExecutor.ExecuteCompleted 事件会在命令执行完成后或在执行过程中发生任何异常后通知。组件可以在执行完成后发送响应消息并更新其状态。
测试
每个命令都有一个参数。参数包含命令的完整环境。环境包含计算和服务所需的参数。将服务表示为抽象类或接口,并用模拟替换它们,可以轻松进行测试。
var arg = new HelloCommandArgument();
arg.Name = "John";
arg.TimeProvider = new ConstTimeProvider(2012, 12, 1);
var cmd = new HelloCommand(arg);
commandExecutor.ExecuteAsync(cmd);
调试
通过消息通道传输消息对于调试来说是一个巨大的优势。消息流是集中的。您可以将侦听器附加到消息通道并拦截每个传入的消息。可以另外将调试组件添加到组件容器。使用扩展调试信息准备的消息可以注入到消息通道,迫使系统以特定方式运行。
重试、中止和超时
如果没有预期的响应消息,可以在一段时间后重新发送请求消息。复杂的 for/foreach 循环和计数器不再需要。
撤销和事务
命令可以存储它们所做的更改。命令的后代可以提供额外的Commit() 和Rollback() 方法。命令的执行顺序可以被反转。
宏录制
传入的消息可以存储并在以后重新发送。
教程
发送模拟用户交互的消息使教程变得容易。UI 会根据传入的消息进行更新。
MCM-Framework.Net 的“Hello World”
您可以阅读以下段落,或者观看视频教程。创建文件夹结构
为了提高可读性,建议采用以下文件夹结构和命名约定。
- Commands - 所有命令都应带有后缀Command
- Components - 所有组件都应带有后缀Component
- Messaging - 在大多数情况下,消息应带有后缀RequestMessage 或ResponseMessage。但在某些情况下,其他后缀更好,例如MyPropertyChangedMessage、EnvironmentInitializedMessage。
- Services - 包含全局提供程序、管理器、处理程序、持久化程序等。

如果存在嵌套命名空间和附加用例(例如,Editing、Configuration、UserManagement),则应在嵌套命名空间中维护上述文件夹结构。这样,您可以为每个用例分组功能。
在测试项目中重新创建主项目的文件夹结构可以简化测试。
定义环境
在根文件夹中创建一个静态类Env。该类将作为单例供我们应用程序的每个组件和用户控件访问。
public static class Env
{
    public const string MessagesChannelName = "MyMessages";
}
创建 ComponentContainer
引用Polenter.Mcm.dll,并在Components命名空间中创建自己的MyComponentContainer,该类继承自Polenter.Mcm.ComponentContainer。
创建一个名为Messages的属性,它是Polenter.Mcm.MessageChannel的一个实例。在某些情况下,创建多个消息通道(例如,重要的系统消息、错误处理)可能是推荐的。在这个简单的例子中,一个消息通道就足够了。
public class MyComponentContainer : ComponentContainer
{
    private MessageChannel _messages1;

    public MessageChannel Messages
    {
        get
        {
            if (_messages1 == null)
            {
                _messages1 = new MessageChannel(Env.MessagesChannelName);
            }
            return _messages1;
        }
    }
} 定义属性Env.Components
    public static class Env
{
    (...)
    public static MyComponentContainer Components { get; set; }
}实例化Components属性并进行处置。对于 WinForms 应用程序,必须在 UI 线程的SynchronizationContext创建后调用creatingComponents()方法。正确的位置是主窗体的构造函数或其OnLoad()方法。
disposeComponents()方法终止消息通道的工作线程。如果不处置ComponentContainer,应用程序将无法关闭。
public partial class Form1 : Form
{
    (...)
    protected override void OnLoad(EventArgs e)
    {
        base.OnLoad(e);
        if (DesignMode)
        {
            return;
        }
        createComponents();
    }

    protected override void OnClosed(EventArgs e)
    {
        disposeComponents();
        base.OnClosed(e);
    }

    private void disposeComponents()
    {
        Env.Components.Dispose();
    }

    private void createComponents()
    {
        Env.Components = new MyComponentContainer();
        (...)
    }
    (...)
}
创建消息
在Messaging命名空间中创建HelloRequestMessage。它只包含一个属性,即 name。
public class HelloRequestMessage
{
    public HelloRequestMessage(string name)
    {
        Name = name;
    }

    public string Name { get; private set; }
}
在同一个命名空间中创建HelloResponseMessage。响应消息是异步操作的结果。因此,它应该继承自Polenter.Mcm.AsyncOperationResponseMessage,它提供了Error和Cancelled属性。
public class HelloResponseMessage : AsyncOperationResponseMessage
{
    public HelloResponseMessage(Exception error) : base(error)
    {
    }

    public string Response { get; set; }
}
创建命令
在Commands命名空间中创建HelloCommand。命令继承自Polenter.Mcm.Command<TArgument, TResult>。重写抽象方法ExecuteCore()。
public class HelloCommand : Command<string, string>
{
    public HelloCommand(string argument) : base(argument)
    {
    }

    protected override void ExecuteCore()
    {
        Thread.Sleep(2000);

        if (string.IsNullOrEmpty(Argument))
        {
            throw new InvalidOperationException("Please enter your name.");
        }

        Result = string.Format("Hello {0}", Argument);
    }
}
为了测试目的,使用Thread.Sleep()模拟耗时操作。此外,还要检查命令参数是否不为空。
创建组件
在Components命名空间中创建HelloComponent。在组件构造函数中创建_helloCommandExecutor,它是Polenter.Mcm.CommandAsyncExecutor<TCommand>的一个实例。
public class HelloComponent
{
    private readonly CommandAsyncExecutor<HelloCommand> _helloCommandExecutor;

    public HelloComponent()
    {
        _helloCommandExecutor = new CommandAsyncExecutor<HelloCommand>();
        _helloCommandExecutor.ExecuteCompleted +=
            on_helloCommandExecutor_ExecuteCompleted;
    }

    private void on_helloCommandExecutor_ExecuteCompleted(object sender, CommandEventArgs<HelloCommand> e)
    {
    }
}
将组件添加到Env.Components。在我们的示例中,这将在Form1.createComponents()方法中完成。在实际应用中,这可以使用 MEF(Managed Extensibility Framework)来完成。有关更多详细信息,请参阅视频教程。
public partial class Form1 : Form
{
    (...)
    private void createComponents()
    {
        Env.Components = new MyComponentContainer();
        Env.Components.Add(new HelloComponent());
        Env.Components.Add(this);
    }
}
创建方法handleHelloRequestMessage()并用Polenter.Mcm.MessageSubscriber属性进行标记。将组件添加到组件容器后,将使用反射检查该组件的所有方法。每个用此属性标记的方法都会被添加到Env.Components.Messages的订阅者列表中,并在HelloRequestMessage发布到此特定消息通道时被调用。
public class HelloComponent
{
    (...)
    [MessageSubscriber(Env.MessagesChannelName)]
    private void handleHelloRequestMessage(HelloRequestMessage m)
    {
        var cmd = new HelloCommand(m.Name);
        _helloCommandExecutor.ExecuteAsync(cmd);
    }
}方法handleHelloRequestMessage()创建一个新的HelloCommand实例,并使用CommandAsyncExecutor.ExecuteAsync()方法异步执行它。CommandAsyncExecutor使用ThreadPool进行执行。执行完成后,它会调用CommandAsyncExecutor.ExecuteCompleted事件。
在事件委托中,创建一个HelloResponseMessage实例,并将此消息发布到Env.Components.Messages。
public class HelloComponent
{
    (...)
    private void on_helloCommandExecutor_ExecuteCompleted(object sender, CommandEventArgs<HelloCommand> e)
    {
        var message = new HelloResponseMessage(e.Command.Error);
        if (!message.HasError)
        {
            message.Response = e.Command.Result;
        }

        Env.Components.Messages.Post(message);
    }
}
创建 UI
使用nameTextBox、responseTextBox和workButton创建一个简单的 UI。
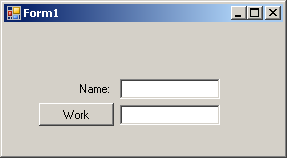
订阅workButton的OnClick事件。在那里创建一个HelloRequestMessage实例,并将其发布到Env.Components.Messages。
public partial class Form1 : Form
{
    (...)
    void on_workButton_Click(object sender, EventArgs e)
    {
        var message = new HelloRequestMessage(nameTextBox.Text);
        Env.Components.Messages.Post(message);
    }
}
更新 UI 需要订阅消息通道的消息。这应该通过 UI 线程来完成,因此我们使用MessageSubscriberAttribute的重载构造函数,并将UIThreadSynchronizationMode.PostAsynchronousInUIThread作为参数。
    public partial class Form1 : Form
{
    (...)
    [MessageSubscriber(Env.MessagesChannelName,UIThreadSynchronizationMode.PostAsynchronousInUIThread)]
    private void handleHelloResponseMessage(HelloResponseMessage m)
    {
        workButton.Enabled = true;
        responseTextBox.Text = string.Empty;

        if (m.HasError)
        {
            MessageBox.Show(m.Error.Message, Application.ProductName, MessageBoxButtons.OK, MessageBoxIcon.Error);
            return;
        }

        responseTextBox.Text = m.Response;
    }

    [MessageSubscriber(Env.MessagesChannelName, UIThreadSynchronizationMode.PostAsynchronousInUIThread)]
    private void handleHelloRequestMessage(HelloRequestMessage m)
    {
        workButton.Enabled = false;
        responseTextBox.Text = "Working...";
    }
}
方法handleHelloRequestMessage()禁用 UI,防止系统再次启动工作。handleHelloResponseMessage()启用 UI,如果发生错误则显示错误消息,否则更新responseTextBox。
这两个方法都作为Env.Components.Add(this)在createComponents()方法中执行的结果添加到消息通道的订阅者列表中。
理解“Hello World”
在 Visual Studio 中按 F5 后,应用程序启动。执行Form1.OnLoad()方法,该方法调用createComponents()方法。首先创建组件容器。使用Env.Components.Add()方法添加组件会检查每个添加的组件,并将所有用MessageSubscriberAttribute标记的方法添加到Env.Components.Messages的订阅者列表中。
按下workButton后,生成一个HelloRequestMessage并发布到Env.Components.Messages。消息通道将此消息广播给所有订阅者。
其中一个订阅者——Form1.handleHelloRequestMessage()——禁用 UI,防止程序再次启动工作。
另一个订阅者——HelloComponent.handleHelloRequestMessage()——创建HelloCommand并使用CommandAsyncExecutor异步执行它。命令执行后,调用ComandAsyncExecutor.ExecuteCompleted事件。事件委托创建HelloResponseMessage并将其再次发布到消息通道。
Form1.handleHelloResponseMessage()等待响应消息,并根据消息内容更新 UI。
方法Form1.handleHelloRequestMessage()和Form1.handleHelloResponseMessage()必须在 UI 线程中调用。因此,它们被标记为使用ThreadSynchronizationMode.PostAsynchronousInUIThread作为参数的MessageSubscriberAttribute重载构造函数。
参考文献
历史
- 2013年1月4日 - 扩展介绍
- 2013年1月2日 - 首次发布