Android中的快速操作模式及其简单实现。
探索Adroid中的快速操作模式并实现一些简单的演示。
介绍
我对整合Android UI模式“快速操作”很感兴趣。基本上,它是一个上下文菜单,不会遮挡正在操作的数据。实现这种模式可能会使您的应用程序更具交互性和趣味性。 快速操作对话框不包含在标准的Android SDK中,因此我们必须手动创建它。
Android中的快速操作模式
快速操作,他是谁?
首先,为了让您轻松地想象这种模式, 看看它是如何工作的 ?看下面的图片

1 - 用户点击一个清晰的视觉目标,然后…… 2 - ……一个快速操作弹出窗口会覆盖在当前屏幕上,其中包含可以执行的最重要和最明显的动作。
3 - 用户选择一个将直接执行的操作,或者在对话框中确认后执行。
以上3个步骤展示了Android中的快速操作的外观。 在Android的默认消息应用程序中,您可以看到实现了快速操作。 点击消息中的图标,您将看到3个选项出现:呼叫、查看联系人 SMS。
何时使用
当您想为具有相互竞争的内部目标的项提供操作时,可以使用快速操作弹出窗口。它必须从一个清晰的视觉目标触发,因此用户知道可以对其执行某些操作。确保弹出窗口不会像传统对话框那样阻塞屏幕,而是出现在项目上方或下方。只在快速操作弹出窗口中使用最重要的和最明显的操作。对于其他上下文操作,您可以选择添加上下文菜单。
当支持多项选择时,例如在Gmail中,请不要使用快速操作。在这种情况下,请改用按钮栏。
一些使用快速操作模式的应用程序。
Twitter
Twitter官方Android应用程序 引入了新的Android UI功能和行为模式,如Dashboard、Search Bar、QuickAction和ActionBar。其中一个有趣的模式是QuickActions,它在列表中显示上下文操作。这种模式实际上已经存在于默认联系人应用程序的QuickContact对话框/栏中(自Android 2.0起)。


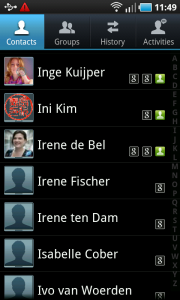
三星Galaxy S联系人


简单演示。
现在我们将构建一个快速操作的简单演示。主活动包含一个ImageView和一个Button。当用户点击这些组件时,将出现一个弹出窗口。它包含3个选项供用户选择。

主活动

用户点击ImageView时出现弹出窗口。

用户点击Button时出现弹出窗口。
现在,让我们探讨一些代码中的要点。
快速操作项
我们首先必须创建一个实体来表示我们快速操作的特定项。它主要包含一个图标和一个标题(用户可见的内容)。除此之外,该项还将有一个id(以便在我们想监听其点击事件时识别它),以及两个状态——是否粘滞(即,点击该项后,快速操作是否会消失)。
它基本上是一个保存快速操作中特定项信息的对象。
创建一个新类并将其命名为QuickAction。该类包含一些例程,应该看起来像这样:
public QuickAction(Context context) {
	super(context);
	inflater = (LayoutInflater) context
			.getSystemService(Context.LAYOUT_INFLATER_SERVICE);
        // load animation
	mTrackAnim = AnimationUtils.loadAnimation(context, R.anim.rail);
	mTrackAnim.setInterpolator(new Interpolator() {
		public float getInterpolation(float t) {
			final float inner = (t * 1.55f) - 1.1f;
			return 1.2f - inner * inner;
		}
	});
	setRootViewId(R.layout.quickaction);
	animStyle = ANIM_AUTO;
	animateTrack = true;
	mChildPos = 0;
}
// show the popup with animation.
public void show(View anchor) {
preShow();
int[] location = new int[2];
anchor.getLocationOnScreen(location);
Rect anchorRect = new Rect(location[0], location[1], location[0]
+ anchor.getWidth(), location[1] + anchor.getHeight());
mRootView.setLayoutParams(new LayoutParams(LayoutParams.WRAP_CONTENT,
LayoutParams.WRAP_CONTENT));
mRootView.measure(LayoutParams.WRAP_CONTENT, LayoutParams.WRAP_CONTENT);
int rootWidth = mRootView.getMeasuredWidth();
int rootHeight = mRootView.getMeasuredHeight();
int screenWidth = mWindowManager.getDefaultDisplay().getWidth();
int xPos = (screenWidth - rootWidth) / 2;
int yPos = anchorRect.top - rootHeight;
boolean onTop = true;
if (rootHeight > anchor.getTop()) {
yPos = anchorRect.bottom;
onTop = false;
}
showArrow(((onTop) ? R.id.arrow_down : R.id.arrow_up),
anchorRect.centerX());
setAnimationStyle(screenWidth, anchorRect.centerX(), onTop);
mWindow.showAtLocation(anchor, Gravity.NO_GRAVITY, xPos, yPos);
if (animateTrack)
mTrack.startAnimation(mTrackAnim);
} 弹出窗口
接下来,我们必须为我们的快速操作实现创建一个基类,以及您想要实现的其他类型的快速操作。这个类基本上是在屏幕上的特定坐标创建一个浮动窗口。它的主要组件是Android框架中的PopupWindow类。
创建一个新类并将其命名为PopupWindows。您的类包含一些例程,应该看起来像这样:
public PopupWindows(Context context) {
	mContext = context;
	mWindow = new PopupWindow(context);
        // A popup window that can be used to display an arbitrary view.
	mWindow.setTouchInterceptor(new OnTouchListener() {
		public boolean onTouch(View v, MotionEvent event) {
			if (event.getAction() == MotionEvent.ACTION_OUTSIDE) {
				mWindow.dismiss();
				return true;
			}
			return false;
		}
	});
	mWindowManager = (WindowManager) context.getSystemService(Context.WINDOW_SERVICE);
}
protected void preShow() {if (mRootView == null)
	throw new IllegalStateException("setContentView was not called with a view to display.");
        onShow();
	if (mBackground == null)
		mWindow.setBackgroundDrawable(new BitmapDrawable());
	else
		mWindow.setBackgroundDrawable(mBackground);
        // set some needed attributes.
	mWindow.setWidth(WindowManager.LayoutParams.WRAP_CONTENT);
	mWindow.setHeight(WindowManager.LayoutParams.WRAP_CONTENT);
	mWindow.setTouchable(true);
	mWindow.setFocusable(true);
	mWindow.setOutsideTouchable(true);
	mWindow.setContentView(mRootView);
}
快速操作
我们必须为我们的快速操作及其特定元素——快速操作项——定义一个布局。
在res/layout/文件夹中创建一个新xml文件,并将其命名为quickaction.xml。这个布局将用于排列其元素水平的快速操作。您的布局应该看起来像这样:
在这个布局中,我们将定义弹出窗口如何出现。
<?xml version="1.0" encoding="utf-8"?>
<RelativeLayout xmlns:android="http://schemas.android.com/apk/res/android"
    android:layout_width="wrap_content"
    android:layout_height="wrap_content">

     <FrameLayout
        android:layout_marginTop="10dip"
        android:id="@+id/header2"
        android:layout_width="fill_parent"
        android:layout_height="wrap_content"
        android:background="@drawable/quickaction_top_frame"/>
       <ImageView
           android:id="@+id/arrow_up"
           android:layout_width="wrap_content"
           android:layout_height="wrap_content"
           android:contentDescription="@string/contentdesc4pic1"
           android:src="@drawable/quickaction_arrow_up" />

    <HorizontalScrollView
        android:id="@+id/scroll"
        android:layout_width="fill_parent"
        android:layout_height="wrap_content"
        android:fadingEdgeLength="0dip"
        android:layout_below="@id/header2"
        android:paddingLeft="1dip"
        android:background="@drawable/quickaction_slider_background"
        android:scrollbars="none">
        <LinearLayout
            android:id="@+id/tracks"
            android:layout_width="wrap_content"
            android:layout_height="wrap_content"
            android:paddingTop="4dip"
            android:paddingBottom="4dip"
            android:orientation="horizontal">

            <ImageView
                android:layout_width="wrap_content"
                android:layout_height="wrap_content"
                android:contentDescription="@string/contentdesc4pic1"
                android:src="@drawable/quickaction_slider_grip_left" />
            <ImageView
                android:layout_width="wrap_content"
                android:layout_height="wrap_content"
                android:contentDescription="@string/contentdesc4pic1"
                android:src="@drawable/quickaction_slider_grip_right" />

        </LinearLayout>

    </HorizontalScrollView>
    <FrameLayout
        android:id="@+id/footer"
        android:layout_width="fill_parent"
        android:layout_height="wrap_content"
        android:layout_below="@id/scroll"
        android:background="@drawable/quickaction_bottom_frame" />
    <ImageView
        android:id="@+id/arrow_down"
        android:layout_width="wrap_content"
        android:layout_height="wrap_content"
        android:layout_marginTop="-1dip"
        android:layout_below="@id/footer"
        android:contentDescription="@string/contentdesc4pic1"
        android:src="@drawable/quickaction_arrow_down" />
</RelativeLayout>
现在,在您希望弹出窗口出现的MainActivity中,添加类似这样的代码
请注意,如果您想在您的应用程序中实现这种模式,只需复制本文第一行提供的源代码中所有相关的资源。在Java应用程序中,您只需要导入项目所需的某些包。因此,您可能不必过多关注这些包(或库)的内容。
假设MainActivity是您将在其中实现快速操作的活动,只需添加一些类似这样的代码:
package vn.com.enclaveit.phatbeo.quickaction;
import android.app.Activity;
import android.os.Bundle;
import android.view.Menu;
import android.view.View;
import android.view.View.OnClickListener;
import android.widget.ImageView;
import android.widget.Button;
import android.widget.Toast;
/**
 *
 * @author Phat (Phillip) H. VU
 *
 */
public class MainActivity extends Activity {
	@Override
	public void onCreate(Bundle savedInstanceState) {
		super.onCreate(savedInstanceState);
		setContentView(R.layout.main);
                // Implement Quick Action here.
                // A pop up will have 3  actions for user select:
                // Phone, Gmail and GTalk.
		// Action item  - Phone
		ActionItem addAction = new ActionItem();
		addAction.setTitle("Phone");
		addAction.setIcon(getResources().getDrawable(R.drawable.phone));

		// Action item - Gmail
		ActionItem accAction = new ActionItem();
		accAction.setTitle("Gmail");
		accAction.setIcon(getResources().getDrawable(R.drawable.gmail));

		// Action item - Talk
		ActionItem upAction = new ActionItem();
		upAction.setTitle("Talk");
		upAction.setIcon(getResources().getDrawable(R.drawable.talk));
		final QuickAction mQuickAction = new QuickAction(this);
		mQuickAction.addActionItem(addAction);
		mQuickAction.addActionItem(accAction);
		mQuickAction.addActionItem(upAction);

		// setup the action item click listener
		mQuickAction.setOnActionItemClickListener(new QuickAction.OnActionItemClickListener() {
			public void onItemClick(int pos) {
				if (pos == 0) { // Phone item selected
					Toast.makeText(MainActivity.this,
					"PHONE item selected",Toast.LENGTH_SHORT).show();
                                        // Place code handling for Phone action here
				} else if (pos == 1) { // Gmail item selected
					Toast.makeText(MainActivity.this,
					"GMAIL item selected",Toast.LENGTH_SHORT).show();
                                        // Place code handling for Gmail action here
				} else if (pos == 2) { // Talk item selected
					Toast.makeText(MainActivity.this, "TALK selected",Toast.LENGTH_SHORT).show();
                                        // Place code handling for Talk action here
				}
			}
		});
                // now, add onClick trigger on ivPic1.
                // when users tap on this, a popup that contains 3 actions will appear.
		ImageView ivPic1 = (ImageView) this.findViewById(R.id.ivPic1);
		ivPic1.setOnClickListener(new OnClickListener() {
			public void onClick(View v) {
				mQuickAction.show(v);
				mQuickAction.setAnimStyle(QuickAction.ANIM_GROW_FROM_CENTER);
			}
		});
		Button btClickMe = (Button) this.findViewById(R.id.button1);
		btClickMe.setOnClickListener(new OnClickListener() {
			public void onClick(View v) {
				mQuickAction.show(v);
				mQuickAction.setAnimStyle(QuickAction.ANIM_GROW_FROM_CENTER);
			}
		});
	}
	@Override
	public boolean onCreateOptionsMenu(Menu menu) {
		getMenuInflater().inflate(R.menu.main, menu);
		return true;
	}
}
兴趣点
+ 学习Android中的一个很棒的模式:快速操作。
+ 学习如何编写交互式文章/教程。
参考文献
+ http://www.androidpatterns.com/uap_pattern/quick-actions
历史
首次发布于2012年1月4日。
