
使用 Angular 和 SVG 创建精美图表
5.00/5 (15投票s)
一个使用 Angular 和 SVG 将数据转化为精美图表的示例
引言
我们都学习过 Angular 教程,最终的结果通常是一个格式整齐的“列表组件”屏幕,显示数据列表,可能还有一个“详细信息组件”来查看选定对象的详细信息。但是,如果我们可以让 Angular 创建漂亮的、响应式的图表而不是这些呢?这正是在这里我们要实现的目标。
我们的最终结果将是这样的

这确实看起来很酷!
显然,这看起来很棒,但并不适用于所有场景或所有类型的数据。但希望本文能教你一些有用的技巧,并向你展示 Angular 和 SVG 的可能性,而无需编写太多代码。
我们将读取一些 JSON 数据,并使用 Angular 绑定到 SVG 元素来创建使用 SVG 的图表。`<svg>` 元素比 `<canvas>` 元素有一个很大的优势,因为它们的内存占用更少,而且由于它们是矢量图形,因此可以放大它们而不会损失图像质量。
你可以在这里点击查看此网站的“实时”版本。你会发现,在这个版本中,我进一步扩展了功能,允许你拖动 SVG 控件,并使用缩放图标或鼠标滚轮进行放大和缩小。你还可以点击员工以显示他们的详细信息。
范围
要编写此应用程序,您需要
- Visual Studio Code 的副本
- 安装了 TypeScript、GIT、npm 和 Angular CLI
- 本文顶部可下载的 `assets.zip` 文件中的资源
- Angular 开发基础知识
我的项目原始模型还包括一个 Web API 项目,用于直接从 SQL Server 读取数据。为了使本文更简洁,我已将其替换为硬编码的 JSON 数据集。但是,如果你有兴趣了解如何使用 ASP.NET Core 2 创建 Web API,可以阅读我的另一篇 Code Project 文章此处。
你还会注意到我有点“作弊”:每个 `Employee` 记录已经有了 x 和 y 坐标。我们不会编写代码来处理一组分层数据,并确定它们在新图表中的位置。每个人的数据都会有所不同,这也不会为本文增加太多价值。
本文更多的是为你提供可以在自己的项目中使用的创意想法,而不是 Angular 的分步介绍。而且,似乎很少有示例展示如何结合使用 Angular 和 SVG。希望你觉得这篇有趣的文章很有用,如果你觉得有用,请记住留下评论!
让我们创建我们的应用程序!
1. 创建 Angular 骨架应用程序
好的,在我的 Windows 机器上,我已经打开了命令提示符,并进入了我的 `c:\repos` 目录。要创建 Angular 应用程序,我现在将运行
ng new Southwind --routing=true --style=scss
几分钟后,我有一个 `c:\repos\Southwind` 文件夹,其中包含 31,000 个文件。好了,我们进入那个文件夹,然后启动 Visual Studio Code
cd Southwind
code .
默认情况下,所有 Angular 应用程序都将在端口 4200 上运行。我喜欢为每个新项目更改此设置,以确保没有冲突。要做到这一点,让我们在 Visual Studio Code 中打开 `package.json`,打开“`package.json`”文件,然后更改“`start`”脚本以指定不同的端口号
  "scripts": {
    "ng": "ng",
    "start": "ng serve --port 4401",
如果我们现在回到命令提示符,我们将能够运行我们新的 Angular 项目
npm start
……然后我们可以在浏览器中打开 `https://:4401` 来查看默认的 Angular 网页。
2. 将 Bootstrap 添加到 Angular 应用程序
接下来,让我们添加 Bootstrap。回到命令提示符,运行以下命令
npm install ngx-bootstrap bootstrap --save
在 Visual Studio Code 中,打开 `src\styles.scss` 文件并添加以下行
@import '../node_modules/bootstrap/dist/css/bootstrap.min.css';
好的,让我们快速检查一下它是否正常工作。在 `src\index.html` 文件中,我将把 `<body>` 标签包装在一个适合 Bootstrap 的容器类中
<body>
  <div class="container-fluid">
      <h3>Southwind</h3>
      <app-root></app-root>
  </div>
</body>
接下来,在 `src\app\app.component.html` 中,让我们删除所有代码,并用以下代码替换它
<p>Welcome to the Southwind app</p>

<div class="row">
  <div class="col-md-3">1st column</div>
  <div class="col-md-3">2nd column</div>
  <div class="col-md-3">3rd column</div>
  <div class="col-md-3">4th column</div>
</div>
如果你现在运行该应用程序,你会看到一个相当单调的屏幕,显示四列。当你将浏览器窗口调整为较小的宽度时,列将堆叠在一起。
![]()
是的,这很无聊……我们应该在这里学习 SVG (!),但说实话,Angular 在过去几年里变化如此迅速和剧烈,我总是喜欢分步创建应用程序并一路进行测试,以确保没有任何东西被悄悄更改。
3. 将资源添加到我们的应用程序
好的,假设这一切都正常工作,让我们向应用程序添加一些资源。我们的小应用程序将包含一些员工数据,以及每个员工的照片。我还包含了一些我在应用程序的“完整版本”中使用的图标,你可以在网上找到。
在本教程的顶部,你会找到一个 `assets.zip` 文件。请将其解压缩到你的 `src\assets` 文件夹中。然后你应该会在 Visual Studio Code 中看到这 3 个文件夹及其文件

好的,让我们加载一些数据!
4. 加载 JSON 数据
在 `assets\SampleData` 文件夹中,你会看到一个新的 `employees.json` 文件。它包含 `employee` 记录列表,以及 `relationship` 记录列表——哪些员工是其他员工的经理或下属?结构如下所示

在 `relationship` 表中,我们有 `employeeId` 和 `managerId` 值,它们都是外键,指向 `employee` 记录。它还包含一个 `type` 字符串,可以是“`Manager`”或“`Sub-manager`”,我们稍后会用到它,只是为了展示我们如何轻松地改变图表中线条的外观以反映不同类型的关系。
要加载此数据,请将 `src\app.component.ts` 文件内容替换为以下行
import { Component } from '@angular/core';
import employeeData from '../assets/SampleData/employees.json';

@Component({
  selector: 'app-root',
  templateUrl: './app.component.html',
  styleUrls: ['./app.component.scss']
})

export class AppComponent {
  public employees: Employee[];
  public relationships: Relationship[];

  constructor() {
    //  Populate our two arrays from our sample-data .json file
    this.employees = employeeData.employees;
    this.relationships = employeeData.relationships;
  }
}

interface Employee {
  id: number;
  job: string;
  firstName: string;
  lastName: string;
  imageUrl: string;
  DOB: string;
  phoneNumber: string;
  xpos: number;
  ypos: number;
}

interface Relationship {
  employeeId: number;
  managerId: number;
  type: string;           // "Manager" or "Sub-manager"
}
(是的,我知道,这两个 `interfaces` 应该放在单独的文件中……但我正试图保持简洁!)
我们在这里定义了两个新的 `interfaces`,它们描述了我们的 json 数据外观,并将 json 数据导入到两个变量 `employees` 和 `relationships` 中。
但是,此文件顶部有一个警告。

默认情况下,Angular 无法直接从 json 文件导入数据。要解决此问题,只需打开 `tsconfig.json` 文件(位于项目根目录)并在“`compilerOptions`”下添加两行
{
  "compileOnSave": false,
  "compilerOptions": {
    "resolveJsonModule": true,
    "esModuleInterop": true,
    . . .
如果你现在回到 `src\app.component.ts` 文件,你会看到这个错误已经消失了。
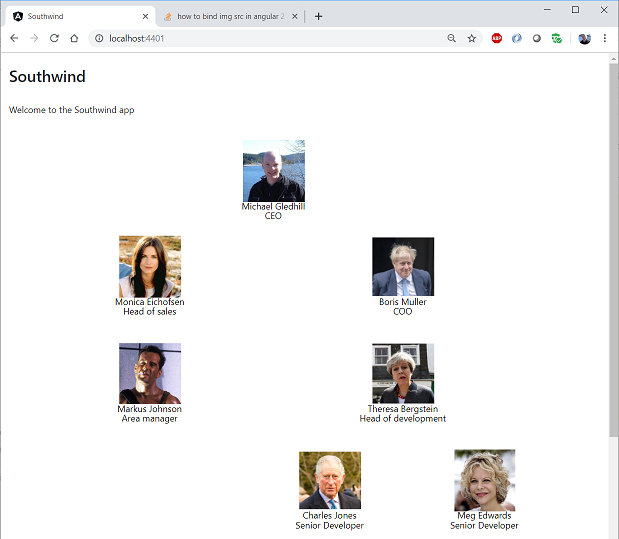
让我们用以下 HTML 替换 `src\app.component.html` 的内容,以确认此代码已正确导入数据
<p>Welcome to the Southwind app</p>

<div class="row">
  <div class="col-md-3 card" *ngFor="let employee of employees;">
    <div class="card-img-top">
        <img [src]="employee.imageUrl" class="card-img-top" style="object-fit: cover;" >
    </div>
    <div class="card-body">
        <h5 class="card-title">{{ employee.firstName }} {{ employee.lastName }}</h5>
        <p class="card-text">
            DOB: {{ employee.DOB | date }}<br />
            Phone: {{ employee.phoneNumber }}
        </p>
    </div>
  </div>
</div>
如果你现在再次打开 `localhost:4401`,你会看到它显示了我们的员工列表,以及他们的照片和出生日期。

请注意,我使用了 Bootstrap 的 **Cards** 样式来显示这些记录。这是一组非常有用的类,尤其是在制作响应式网站时,这些网站在平板电脑/智能手机屏幕上仍然看起来不错。你可以在这里阅读更多关于 Bootstrap Cards 的内容。
让我们使用一个 <svg> 控件!
好的,你准备好在 `<svg>` 控件中看到它了吗?让我们再次替换 `.html` 文件中的内容
<p>Welcome to the Southwind app</p>

<svg width="1000" height="1000">
  <g *ngFor="let employee of employees">
      <!-- Image of the employee -->
      <image [attr.x]="employee.xpos-4"
             [attr.y]="employee.ypos-4"
             width="110" height="110"
            [attr.xlink:href]="employee.imageUrl"/>

      <!-- Employee first & last name -->
      <text [attr.x]="employee.xpos+50"
           [attr.y]="employee.ypos+115"
            width="400" height="30"
            class="cssEmployeeName"
            dominant-baseline="middle"
           text-anchor="middle">
        {{ employee.firstName }} {{ employee.lastName }}
      </text>

      <!-- Employee job -->
      <text [attr.x]="employee.xpos+50" [attr.y]="employee.ypos+132"
            width="400" height="30"
            class="cssEmployeeJob"
            dominant-baseline="middle" text-anchor="middle">
        {{ employee.job  }}
      </text>
    </g>
</svg>
和之前一样,我们使用 `*ngFor` 来遍历员工列表,并为每个员工创建一个图像和两个文本元素,位于网格上的正确位置。
这有多酷!
对我来说,创建上述代码的痛点在于细节。我如何设置要显示的图像的 URL?(**答案**:我们使用 `attr.xlink.href` 属性。)我如何将文本居中放在图像的正下方?(**答案**:我们使用 `dominant-baseline` 和 `text-anchor` 属性来处理居中。)等等。
如果我有一个可用的示例来学习,生活会容易得多…… ;-)
Internet Explorer 11
哦,糟糕。即使在 2019 年,亲爱的 IE 仍然给我们带来麻烦。到目前为止的代码在所有现代浏览器上都能正常工作,但要在 Internet Explorer 11 上使用它,我们需要做一些额外的步骤。(在我的 Windows 10 机器上,这个应用程序完全冻结了 IE11。我不得不使用任务管理器来终止它。)
Angular 会给你一个 `src\polyfills.ts` 文件,这暗示了第一个需要的更改。它告诉你
/** IE10 and IE11 requires the following for NgClass support on SVG elements */
// import 'classlist.js';  // Run `npm install --save classlist.js`.
你需要取消注释这个 `import` 行,并运行它提到的命令
npm install --save classlist.js
接下来,切换到根目录的 `tsconfig.json` 文件,并更改此行
"target": "es2015",
改为这样。
"target": "es5",
最后,在根目录的 `browserslist` 文件中,将行从
not IE 9-11 # For IE 9-11 support, remove 'not'.
...改为...
IE 9-11 # For IE 9-11 support, remove 'not'.
有了这些更改,SVG 视图将在所有浏览器中显示。你需要停止运行应用程序,然后再次运行 `npm start`,这些更改才能生效。
请注意,这些提示适用于任何使用 SVG 控件的 Angular 应用程序……所以请在此页面上添加书签……你将在其他应用程序中使用它!
请记住,许多大公司仍然坚持在员工笔记本电脑上只安装 Internet Explorer,而用户没有管理员权限来安装任何其他浏览器。所以,除非你确定你所有的用户都确实安装了现代浏览器,否则你可能希望为所有项目遵循这些提示。
添加 SVG 线条
接下来,让我们在图像之间添加线条,以显示谁是谁的经理。为此,我们需要在我们的 `src\app.component.ts` 文件中添加两个简单的函数。我们的每个关系记录都引用了两个 `Employee` 记录的 ID,我们需要找到这些 `Employee` 记录以获取它们的 (x,y) 坐标。
记住,当我们遍历 `relationship` 记录时,我们只会得到 `employee` ID 值——我们需要从这里查找相关的 `employee` 记录。
"relationships": [
    {
      "employeeId": 4000,
      "managerId": 4001,
      "type": "Manager"
    },
    {
      "employeeId": 4000,
      "managerId": 4002,
      "type": "Manager"
    },
第二个函数只是一个布尔函数,用于说明关系是“`Manager`”还是“`Sub-manager`”。我们将让 Angular 为后者显示虚线,方法是将 `SVGlineDashed` 类应用于这些特定的线条。
所以,在 `src\app.component.ts` 文件中,让我们添加这两个函数
public GetEmployee(id) {
  //  Search for, and return, an Employee record, with a particular id value
  const employee = this.employees.filter(emp => {
      return emp.id === id;
  });
  if (employee == null) {
    return null;
  }
  return employee[0];
}

public IsSubManager(relationshipType) {
  return (relationshipType === 'Sub-manager');
}
我还要在我们的 `src\app.component.scss` 文件中添加一些 CSS
.SVGline {
  /*  What color line do we want, to connect each of our circular employee image photos ? */
  stroke: #141;
  stroke-width: 3;
}
.SVGlineDashed {
  /*  What type of line shall we use, to connect an employee to a Sub-Manager ? */
  stroke-dasharray: 3,3;
}
有了这两个函数和 CSS,让我们将以下行添加到 `src\app.component.html` 中,紧跟在 `<svg>` 属性之后
  <g *ngFor="let rel of relationships">
    <line *ngIf="employees && rel" class="SVGline"
          [ngClass]="{'SVGlineDashed':IsSubManager(rel.type)}"
          [attr.x1]="GetEmployee(rel.employeeId).xpos+50"
          [attr.y1]="GetEmployee(rel.employeeId).ypos+50"
          [attr.x2]="GetEmployee(rel.managerId).xpos+50"
          [attr.y2]="GetEmployee(rel.managerId).ypos+50">
    </line>
  </g>
因此,我们的每个员工图像大小为 100x100 像素。我们将让 SVG 在某些员工之间显示线条,从这个矩形的中心开始。而且,正如你所看到的,每条线都需要一个“`start`”(x, y)坐标和一个“`end`”(x,y)坐标。
有了这些,我们的网页现在很好地显示了线条,我们的两条下属线条显示为虚线,这要归功于 `SVGlineDashed` CSS 类。

你应该现在明白为什么在 `<svg>` 控件中,我们首先绘制线条。如果我们先绘制图像,线条就会出现在员工的脸上面。
额外的样式
好吧,我们达到了目标,我们有了使用 SVG 的图像图表……但它看起来有点逊。我们可以改进它的第一个方法是将每个图像裁剪成圆形。要做到这一点,我们将
- 绘制一个图像将出现的位置的圆
- 定义一个圆形的 `clipPath`,并给它一个唯一的名称(基于 `*ngFor 迭代器` 索引)
- 绘制图像,使用我们刚刚创建的 `clipPath`
同样,如果你以前从未见过这段代码,它可能对你来说有点奇怪,但尝试将其添加到你自己的代码中,看看它的外观。就个人而言,我尝试了几次(并进行了大量的谷歌搜索)才弄清楚如何创建这些 `clipPaths`,以及如何正确使用它们。
要添加这种圆形裁剪,我们只需要删除当前显示员工图像的行
<!-- Image of the employee -->
<image [attr.x]="employee.xpos-4" [attr.y]="employee.ypos-4"
    width="110" height="110" [attr.xlink:href]="employee.imageUrl"/>
……然后用这段代码替换迭代 `employee` 记录的 `*ngFor`
<g *ngFor="let employee of employees; let i = index" [attr.data-index]="i">
  <circle [attr.cx]="employee.xpos+50"
      [attr.cy]="employee.ypos+50" r="52"
      class="cssEmployeeImage">
  </circle>
  <defs>
    <clipPath id="{{'myCircle'+i}}">
      <circle [attr.cx]="employee.xpos+50" [attr.cy]="employee.ypos+50" r="50" fill="#FFFFFF" />
    </clipPath>
  </defs>

  <!-- Image of the employee -->
  <image [attr.x]="employee.xpos-4" [attr.y]="employee.ypos-4"
      width="110" height="110" [attr.xlink:href]="employee.imageUrl"
      [attr.clip-path]="'url(#myCircle'+i+')'"  />
有了这些更改,我们的图表看起来更专业了

接下来我要做的是将我们的图表变成“暗黑模式”。这是一种个人偏好,但我认为它在具有深色(渐变)背景的情况下看起来更智能。
实际上,我将我们的两个 `text` 元素(用于员工姓名和职位)设置为使用特定的 CSS 类,但我们还没有实际定义它们。我们将在下一步中进行。
首先,在 `app.component.html` 文件中,我们将 `<svg>` 元素包装在以下 HTML 中。请注意,我还为 `<svg>` 元素添加了一个额外的 `style.format` 属性。你很快就会明白为什么。
<div class="MainBody" >
    <div class="ZoomToolbar">
        <img src="../../assets/Photos/ZoomOut.png"
            class="button" height="30" (click)="ZoomOut()" />
        <img src="../../assets/Photos/Zoom1.png"
            class="button" height="30" (click)="ZoomReset()" />
        <img src="../../assets/Photos/ZoomIn.png"
            class="button" height="30" (click)="ZoomIn()" />
    </div>
    <div class="SVGwrapper">

      <svg width="1000" height="1000"
      [style.transform]="'scale(' + SVGscale/10 + ')'" >

          ... the rest of the <svg> component goes here ....

     </svg>

  </div>
</div>
接下来,我们需要在 `src\app.component.scss` 文件中添加一些 CSS 样式
.MainBody {
  background: rgb(150,150,150);
  background: linear-gradient(185deg, rgba(10,60,60,1) 0%, rgba(0,0,0,1) 100%);
  border:1px solid #444;
  height:770px;
  position:relative;
  text-align: left;
  -ms-user-select: none;
}
.ZoomToolbar {
  position: absolute;
  right: 24px;
  top: 5px;
  z-index: 999;
  padding: 10px 25px 10px 100px;
  user-select: none;
  background: linear-gradient(90deg, rgba(0,0,0,0) 0%, rgba(0,0,0,1) 100%);
}
.ZoomToolbar img {
  cursor: pointer;
  margin-right: 10px;
}
.button:active {
  /* When we click on the ZoomIn / ZoomOut button, briefly make the icon shrink. */
  transform: scale(0.9);
}
.SVGwrapper {
  position:absolute;
  left:0px;
  top:0px;
  width:100%;
  height:100%;
  overflow:scroll;
}
.cssEmployeeName {
 font-size:16px;
 font-weight:600;
 fill:white;
 text-shadow:1px 1px 2px #444;
}
.cssEmployeeJob {
 font-size:12px;
 font-weight:400;
 fill:#AAA;
 text-shadow:2px 1px 3px #444;
}
最后,在 `src\app.component.ts` 文件中,让我们添加一个额外的变量
public SVGscale = 10;
我们还需要三个函数,分别对应三个“缩放”按钮。
public ZoomOut() {
  if (this.SVGscale > 1) {
    this.SVGscale -= 1;
  }
}
public ZoomIn() {
  this.SVGscale += 1;
}
public ZoomReset() {
  this.SVGscale = 10;
}
有了这一切,你的网页看起来应该像这样

我的天……我们实际上可以放大和缩小图表!而且请注意,当我们放大时,圆形、线条和文本保持锐利?
顺便说一句,我多年来做了大量的 CSS 工作,在上面的更改中,我偷偷加入了我的一个最喜欢的技巧。那三个“缩放”图标每个都有“`button`”的 CSS 类,用以下 CSS,当你点击按钮时,它们会短暂收缩。这确实为页面增添了专业感——用户会感觉按钮响应了他们的点击。
.button:active {
  /* When we click on the ZoomIn / ZoomOut button, briefly make the icon shrink. */
  transform: scale(0.9);
}
继续,如果我们能用鼠标滚轮放大和缩小,那不是很酷吗?我们可以。而且它非常简单。
只需将以下属性添加到 `<svg>` 控件
<svg width="1000" height="1000" [style.transform]="'scale(' + SVGscale/10 + ')'"
   (mousewheel)="OnSVGmousewheel($event)" >
……然后添加一个函数来测试我们是向上还是向下滚动 `mousewheel`,以调用相应的函数
public OnSVGmousewheel(event: MouseWheelEvent) {
 if (event.deltaY < 0) {
  this.ZoomIn();
 } else {
  this.ZoomOut();
 }
 return false;
}
好的,它总是放大和缩小到 `<svg>` 控件的中心,但看起来还不错,不是吗?
又到了一个非常酷的 CSS 技巧时间了!现在,当我们放大或缩小,它会跳到那个缩放级别,而不是平滑地动画到缩放级别。为了解决这个问题,我们只需要将这些行添加到 `src\app.component.scss` 文件中
svg {
  transition: transform 0.3s;
}
这同样是那些真正能让 Web 应用程序脱颖而出的小技巧之一。
搜索
接下来,让我们向我们的应用程序添加一个搜索功能。现在,我们将在屏幕上有一个搜索文本框,我们希望将其绑定到组件中的一个属性,所以我们需要做的第一件事是在 `app.module.ts` 文件中添加几行来说明我们将使用 `ngModel`。首先,我们需要将 `FormsModule` 导入到我们的应用程序中
import { FormsModule } from '@angular/forms';
然后,我们需要将其添加到我们的导入列表中
imports: [
    FormsModule,
    BrowserModule,
   ... etc ...
好的,现在让我们添加这个搜索控件的 HTML。回到 `src\app.component.html`,在 `MainBody` 行之后添加以下几行
<div class="MainBody" >
  <div class="searchToolbar">
    <label for="tbSearch">Search:</label>
    <input type="text" class="form-control"
    style="width:205px;display:inline-block;margin-left:20px;"
           [(ngModel)]="searchText" autofocus (input)="FilterBySearch()"
           placeholder="e.g. Smith" />
  </div>
  <div class="ZoomToolbar">
然后在我们的 `src\app.component.scss` 文件中添加一些 CSS
.searchToolbar {
  position: absolute;
  top: 5px;
  left: 5px;
  width: 380px;
  height: 52px;
  padding: 6px 10px 5px 10px;
  color: white;
  z-index: 999;
  background: linear-gradient(270deg, rgba(0,0,0,0) 0%,
                             rgba(0,0,0,0.8) 80%, rgba(0,0,0,1) 100%);
  text-align: left;
}
有了这些,我们在图表左上角有一个漂亮的文本框,但它实际上还没有做任何事情。

在我们的 `src\app.component.ts` 文件中,我们需要添加一个新的变量,我们将将其绑定到这个 `textbox`
public searchText = '';
我们还将向 `employee` 接口添加一个新的变量
interface Employee {
  highlighted: boolean;
  id: number;
为了实际进行搜索,我们需要一个 `FilterBySearch()` 函数,每当我们输入一些内容时就会调用它
public FilterBySearch() {
  if (this.employees == null || this.searchText == null) {
    return;
  }
  const str = this.searchText.toLowerCase();
  this.employees.filter(function (employee) {
    if (employee.firstName.toLowerCase().indexOf(str) > -1
       || employee.lastName.toLowerCase().indexOf(str) > -1
       || str === '') {
      employee.highlighted = true;
      return employee;
    } else {
      employee.highlighted = false;
    }
  });
}
这段代码将遍历我们的 `employee` 记录列表,并将 `highlighted` 值设置为 true 或 false,以表示它们是否匹配我们的搜索字符串。回到 `src\app.component.html` 文件,我们需要为那些确实匹配这个搜索字符串的员工在我们的图像/姓名/职位元素上添加一个 CSS 类,方法是在我们现有的 `<g>` 分组元素上添加一个 `ngClass`
 <g *ngFor="let employee of employees; let i = index" [attr.data-index]="i"
   [ngClass]="{'NotSearchResult': !employee.highlighted}" >
然后我们需要添加一个类来稍微“变暗”任何不匹配我们搜索字符串的员工。
.NotSearchResult {
  opacity: 0.4;
}
有了这些更改,我们就拥有了一个响应式的搜索功能。当你开始在文本框中键入时,立即,那些不匹配你的字符串的员工会变暗,从而突出显示匹配的员工。同样,你可以在此网站的实时版本中看到这一点。
只有一个小问题:当我们第一次进入这个屏幕时,没有任何员工被高亮显示,所以它们都是暗的!要解决这个问题,我们只需要记住在构造函数中调用我们的 `FilterBySearch` 函数。
  constructor() {
    //  Populate our two arrays from our sample-data .json file
    this.employees = employeeData.employees;
    this.relationships = employeeData.relationships;

    this.FilterBySearch();
  }
就是这样。我们现在拥有了一个酷炫、响应式的搜索功能。
添加一个弹出(模态)组件
图表现在看起来很棒,与常规的 Angular 网页大相径庭,但是如果我们能点击一个员工并看到他们的额外详细信息,那就更好了。显然,最简单的方法是向我们的 `<g>` 元素添加一个链接以重定向到另一个页面
<a routerLink="./customerDetails">
但是,让我们来谈谈如何向应用程序添加一个弹出 `Component`。这是 Angular 中的一个主题,如果你遵循正确的步骤,它会很简单,但如果你没有看过可用的示例,它会让你头疼。
这是在我点击Monica Eichofsen后,最终结果的外观

首先,我们将需要创建一个新的 `Component`,它将在我们点击一个员工时显示。在 Visual Studio 的终端窗口中,如果你当前正在运行应用程序,请按 CTRL+C,然后使用以下命令添加一个新组件
ng generate component customer-details --module app --skipTests=true
我们还需要将 Angular Materials 添加到我们的应用程序中,因为我们将使用它来使组件显示为弹出窗口
npm install --save @angular/material @angular/cdk @angular/animations hammerjs
接下来,我们需要对 `app.module.ts` 文件进行一些更改。首先,我们需要在文件顶部导入两个新包
import { MatDialogModule } from '@angular/material/dialog';
import { BrowserAnimationsModule } from '@angular/platform-browser/animations';
你需要将 Angular Materials 包添加到我们的导入部分
  imports: [
    BrowserAnimationsModule,
    MatDialogModule,
    . . .
  ],
我们还需要在 `styles.scss` 文件中添加两行,以确保我们的应用程序能够正确地为 Materials 控件设置样式
@import "../node_modules/@angular/material/prebuilt-themes/deeppurple-amber.css";
@import 'https://fonts.googleapis.com/icon?family=Material+Icons';
你可以在 Angular 网页上阅读更多关于如何使用 `MatDialog` 的信息
现在,我们需要确保我们的 Customer Details 组件包含在 `declarations` 部分
  declarations: [
    AppComponent,
    CustomerDetailsComponent
  ],
……但我们还需要将其添加到新部分 `entryComponents`
  entryComponents: [
    //  Any modal components need to go in here, aswell as in the "declarations" section
    CustomerDetailsComponent
  ],
  providers: [],
(我为你节省了半小时的谷歌搜索时间,因为你的模态组件在运行时拒绝显示!)
好的。我们的应用程序现在知道 Google Materials 了。让我们切换到我们新的 `customer-details\customer-details.component.html` 文件,并将其更改为将我们的员工详细信息显示为 Bootstrap 卡
<div class="card">
    <div class="card-img-top">
        <img [src]="employee.imageUrl" class="card-img-top" style="object-fit: cover;" >
    </div>
    <div class="card-body">
        <h5 class="card-title">{{ employee.firstName }} {{ employee.lastName }}</h5>
        <p class="card-text">
            DOB: {{ employee.DOB | date }}<br />
            Phone: {{ employee.phoneNumber }}
        </p>
    </div>
</div>
接下来,让我们更改 `customer-details.component.ts` 文件
import { Component, Inject } from '@angular/core';
import { MAT_DIALOG_DATA, MatDialogRef } from '@angular/material';

@Component({
  selector: 'app-customer-details',
  templateUrl: './customer-details.component.html',
  styleUrls: ['./customer-details.component.scss']
})

export class CustomerDetailsComponent {

  private employee: Employee;

  constructor(
    public dialogRef: MatDialogRef<CustomerDetailsComponent>,

    @Inject(MAT_DIALOG_DATA) private data: any) {
      this.employee = data.employee;
    }
}
请注意,我们如何必须注入 `MAT_DIALOG_DATA`,以便能够将数据传递到此组件,因为我们将需要告诉它要显示哪个 `Employee` 记录。
现在,我们只需要让我们的 `AppComponent` 在我们点击员工时显示我们的新组件。
转到 `app.component.html`,并将 `(click)` 元素添加到我们为每个员工使用的 `<g>` 元素上
<g *ngFor="let employee of employees; let i = index" [attr.data-index]="i"
    [ngClass]="{'NotSearchResult': !employee.highlighted}"
    (click)="SelectEmployee(employee)" >
最后,我们需要对 `app.component.ts` 进行一些更改。首先,让我们在文件顶部添加依赖项。
import { MatDialog } from '@angular/material';
import { CustomerDetailsComponent } from './customer-details/customer-details.component';
我们需要修改我们的构造函数,以便使用 Materials 类
constructor(private dialog: MatDialog) {
有了所有这些,我们就可以添加 `SelectEmployee` 函数了。我们只是让 Angular Materials 打开我们 `CustomerDetailsComponent` 的一个实例,并将所选 `Employee` 记录的副本传递给它
public SelectEmployee(employee) {
  const dialogRef = this.dialog.open(CustomerDetailsComponent, {
    width: '250px',
    data: { employee }
  });
}
因为我们的 `CustomerDetailsComponent` 引用了 `Employee` 接口,我们需要转到 `app.component.ts` 文件,并将这个类设为可导出
export interface Employee {
是的,记住所有这些步骤都很繁琐,但它能保持我们的页面干净且响应迅速,这应该能为你实现自己的图表/工作流程页面提供一些灵感和想法。
未来发展
你可能已经注意到,此网页的在线版本还允许你拖动图表,当你放大时,这非常重要。关键在于简单地将 `<svg>` 控件设置为 `position:absolute`,并在拖动时更改 `top` 和 `left` 值。
这很容易做到,我将在本文顶部的下载版本中包含完整的源代码,但超出了本文的范围。
重要的是,你要看到使用 Angular 和 SVG 将真实数据转化为精美图表是多么的简单。
最终想法
我没有告诉你的是,多年前,我为我工作的金融公司创建了一个类似的 HTML/SVG 网页,用于显示工作流程图。它非常酷,你可以拖放元素——但是——那是在 AngularJS 或 React 之前的时代——代码是冗长的 JavaScript 代码。别想对*那个*进行持续测试!
正如你所见,使用 Angular,你可以很好地将 TypeScript 代码与 HTML 代码分开,使其易于维护和管理。最终结果看起来确实不错。
祝你在自己的 SVG 项目中好运,如果你有任何问题,请给我留言。
历史
- 2019年11月22日:初始版本