使用 Angular 8 进行 Facebook 和 Google 登录
4.83/5 (6投票s)
如何使用 Angular 8 进行 Facebook 和 Google 登录
引言
在本文中,我们将学习使用 Angular 8 允许用户通过 Facebook 和 Gmail 登录应用程序的分步过程。使用 Facebook 和 Google 登录可以使应用程序对用户来说安全便捷。当用户点击 Facebook 或 Gmail 登录按钮时,用户将被导航到 Facebook 或 Google 以授予应用程序权限。作为响应,用户将收到一个 Token 密钥和其他个人详细信息。在演示中,我们将使用 angular6-social-login Angular 库。
必备组件
- Visual Studio
- Angular 和 Web API 的基本知识
- Visual Studio Code
- SQL Server Management Studio
本文涵盖的主题
- 创建 Angular 8 项目
- 创建 Google 应用并获取 Client ID
- 创建 Facebook 应用并获取 App ID
- 创建数据库和表
- 创建 Web API 项目
- 安装 Bootstrap 并添加路由
使用以下命令创建 Angular 8 项目
ng new socaillogindemo
在 Visual Studio Code 中打开新创建的项目,并使用以下命令在此项目中安装 Bootstrap
npm install bootstrap --save
安装 SocialLoginModule
现在,使用以下命令安装 angular6-social-login 包
npm install angular-6-social-login
创建 Google 应用并获取 Client ID。我们需要做的第一件事是创建一个 Google 项目以获取用户凭据。转到 Google API 控制台,然后点击凭据。点击创建凭据,然后选择OAuth Client ID。

选择Web 应用程序,输入您的项目 URL,然后点击创建按钮。

这将创建一个 Client ID 和 Secret Key。

创建 Facebook 应用并获取 App ID
转到 Facebook 的开发者页面并创建一个新应用程序。

点击创建 App ID。

点击Facebook 登录的设置按钮。

点击Web。

输入您的应用程序的 URL,然后点击保存。现在,转到设置。

现在,在 Visual Studio Code 中打开项目并创建两个组件。要创建组件,请打开终端并使用以下命令
ng g c Login --spec=false
ng g c Dashboard --spec=false
创建一个名为 "socialusers" 的类,并在该类中添加以下属性
export class Socialusers {
    provider: string;
    id: string;
    email: string;
    name: string;
    image: string;
    token?: string;
    idToken?: string;
}
创建一个名为 "sociallogin" 的服务来调用 Web API。
打开 social login 服务并导入所需的包和类。然后,在 sociallogin.service.ts 文件中添加以下代码行。
    import { Injectable } from '@angular/core';
    import { HttpClient } from '@angular/common/http';
    @Injectable({
      providedIn: 'root'
    })
    export class SocialloginService {
    url;
      constructor(private http: HttpClient) { }
      Savesresponse(responce)
      {
        this.url =  'https://:64726/Api/Login/Savesresponse';
        return this.http.post(this.url,responce);
      }
    }
项目结构
让我们检查一下 Angular 应用程序的项目结构。

现在,打开 app.module.ts 并导入 Social Login Module、Google 和 Facebook Login Providers 以及 AuthService。在此文件中,添加我们在创建 Facebook 和 Google 应用时生成的 Facebook 和 Google client ID。然后,将以下代码添加到文件中
import { BrowserModule } from '@angular/platform-browser';
import { HttpClientModule } from '@angular/common/http';
import { NgModule } from '@angular/core';
import { AppComponent } from './app.component';
import { GoogleLoginProvider, FacebookLoginProvider, AuthService }
         from 'angular-6-social-login';
import { SocialLoginModule, AuthServiceConfig } from 'angular-6-social-login';
import { LoginComponent } from './login/login.component';
import { DashboardComponent } from './dashboard/dashboard.component';
import { AppRoutingModule } from '../app/app-routing.module';
export function socialConfigs() {
  const config = new AuthServiceConfig(
    [
      {
        id: FacebookLoginProvider.PROVIDER_ID,
        provider: new FacebookLoginProvider('app -id')
      },
      {
        id: GoogleLoginProvider.PROVIDER_ID,
        provider: new GoogleLoginProvider('app-id')
      }
    ]
  );
  return config;
}
@NgModule({
  declarations: [
    AppComponent,
    LoginComponent,
    DashboardComponent
  ],
  imports: [
    BrowserModule,
    HttpClientModule,
    AppRoutingModule
  ],
  providers: [
    AuthService,
    {
      provide: AuthServiceConfig,
      useFactory: socialConfigs
    }
  ],
  bootstrap: [AppComponent]
})
export class AppModule { }
打开 login.component.ts 文件并添加以下代码
import { Component, OnInit } from '@angular/core';
import { GoogleLoginProvider, FacebookLoginProvider, AuthService }
         from 'angular-6-social-login';
import { SocialLoginModule, AuthServiceConfig } from 'angular-6-social-login';
import { Socialusers } from '../Models/socialusers'
import { SocialloginService } from '../Service/sociallogin.service';
import { Router, ActivatedRoute, Params } from '@angular/router';
@Component({
  selector: 'app-login',
  templateUrl: './login.component.html',
  styleUrls: ['./login.component.css']
})
export class LoginComponent implements OnInit {
  response;
    socialusers=new Socialusers();
  constructor(
    public OAuth: AuthService,
    private SocialloginService: SocialloginService,
    private router: Router
  ) { }
  ngOnInit() {
  }
  public socialSignIn(socialProvider: string) {
    let socialPlatformProvider;
    if (socialProvider === 'facebook') {
      socialPlatformProvider = FacebookLoginProvider.PROVIDER_ID;
    } else if (socialProvider === 'google') {
      socialPlatformProvider = GoogleLoginProvider.PROVIDER_ID;
    }
    this.OAuth.signIn(socialPlatformProvider).then(socialusers => {
      console.log(socialProvider, socialusers);
      console.log(socialusers);
      this.Savesresponse(socialusers);
    });
  }
  Savesresponse(socialusers: Socialusers) {
    this.SocialloginService.Savesresponse(socialusers).subscribe((res: any) => {
      debugger;
      console.log(res);
      this.socialusers=res;
      this.response = res.userDetail;
      localStorage.setItem('socialusers', JSON.stringify( this.socialusers));
      console.log(localStorage.setItem('socialusers', JSON.stringify(this.socialusers)));
      this.router.navigate([`/Dashboard`]);
    })
  }
}
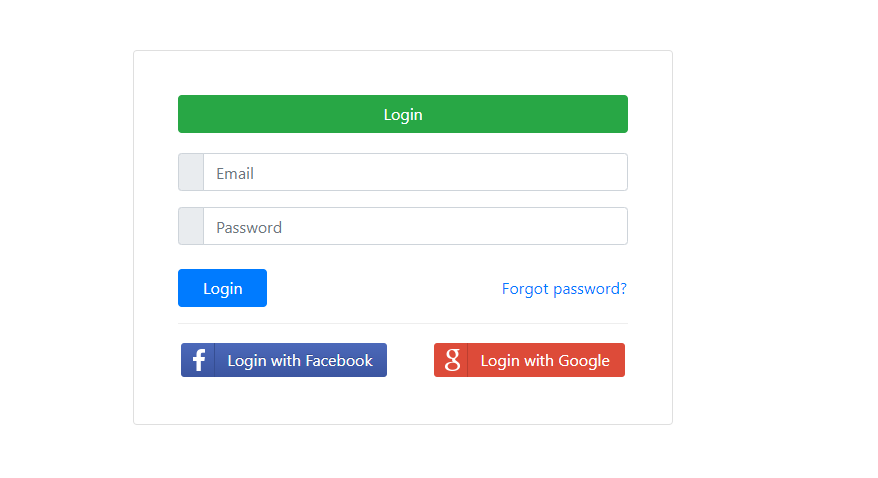
打开 login.component.html 文件并添加以下行
<div class="container" style="padding-top:60px;">
    <div class="row">
        <div class="col-md-6 mx-auto">
            <div class="card-group">
                <div class="card p-4">
                    <div class="card-body">
                        <form name="form">
                            <!-- <button class="btn btn-primary"
                            style="text-align:center">Login</button>   -->
                            <button type="submit" class="btn btn-block btn-success">
                             Login</button>
                            <div style="padding-top: 20px;" class="input-group mb-3">
                                <div class="input-group-prepend">
                                    <span class="input-group-text">
                                    <i class="icon-user"></i></span>
                                </div>
                                <input type="text" name="UserName"
                                 class="form-control sty1" placeholder="Email"
                                    required>
                            </div>
                            <div class="input-group mb-4">
                                <div class="input-group-prepend">
                                    <span class="input-group-text">
                                    <i class="icon-lock"></i></span>
                                </div>
                                <input type="password" name="Passward"
                                 class="form-control" placeholder="Password">
                            </div>
                            <div>
                                <p style="color:#E92626;font-size:20px;
                                 font-weight:normal" Class="success" align="left">
                                    {{errorMessage}}
                                </p>
                            </div>
                            <div class="row">
                                <div class="col-6">
                                    <button type="submit" class="btn btn-primary px-4">
                                     Login</button>
                                </div>
                                <div class="col-6 text-right">
                                    <button type="button" class="btn btn-link px-0">
                                     Forgot password?</button>
                                </div>
                            </div>
                        </form>
                            <hr style="border-top: 1px solid #eee;">
                            <div class="row">
                                <div class="col-6">
                                    <button (click)="socialSignIn('facebook')"
                                     class="loginBtn loginBtn--facebook">
                                        Login with Facebook
                                    </button>

                                </div>
                                <div class="col-6 text-right">
                                    <button (click)="socialSignIn('google')"
                                     class="loginBtn loginBtn--google">
                                        Login with Google
                                    </button>
                                </div>
                            </div>
                    </div>
                </div>
            </div>
        </div>
    </div>
</div>
打开 dashboard.component.ts 文件并添加以下行
import { Component, OnInit } from '@angular/core';
import { SocialLoginModule, AuthServiceConfig, AuthService } from 'angular-6-social-login';
import { Socialusers } from '../Models/socialusers'
import { SocialloginService } from '../Service/sociallogin.service';
import { Router } from '@angular/router';
@Component({
  selector: 'app-dashboard',
  templateUrl: './dashboard.component.html',
  styleUrls: ['./dashboard.component.css']
})
export class DashboardComponent implements OnInit {
  socialusers = new Socialusers();
  constructor(public OAuth: AuthService,    private router: Router) { }
  ngOnInit() {
    this.socialusers = JSON.parse(localStorage.getItem('socialusers'));
    console.log(this.socialusers.image);
  }
  logout() {
   alert(1);
    this.OAuth.signOut().then(data => {
      debugger;
      this.router.navigate([`/Login`]);
    });
  }
}
打开 dashboard.component.html 文件并添加以下行
<nav style="background-color: #1e7e34 !important"
 class="navbar navbar-expand-lg navbar-light bg-light">
    <div class="collapse navbar-collapse" id="navbarSupportedContent">
      <ul class="navbar-nav mr-auto">
        <li class="nav-item active">
          <a class="nav-link" href="#">Home <span class="sr-only"></span></a>
        </li>
        <li class="nav-item">
          <a class="nav-link" href="#">About</a>
        </li>
      </ul>
      <form class="form-inline my-2 my-lg-0">
          <a class="nav-link">{{this.socialusers.name}} <span class="sr-only"></span></a>
        <button (click)="logout()" class="btn btn-outline-success my-2 my-sm-0" >
         Logout</button>
      </form>
    </div>
  </nav>
打开 app-routing.module.ts 文件并添加以下代码以创建 路由
import { NgModule } from '@angular/core';
import { Routes, RouterModule } from '@angular/router';
import { DashboardComponent } from './dashboard/dashboard.component';
import { LoginComponent } from './login/login.component';
export const routes: Routes = [
  {
    path: '',
    redirectTo: 'login',
    pathMatch: 'full',
  },
  {
    path: 'login',
    component: LoginComponent,
    data: {
      title: 'Login Page'
    }
  },
  {
    path: 'Dashboard',
    component: DashboardComponent,
    data: {
      title: 'Dashboard Page'
    }
  },
];
@NgModule({
  imports: [RouterModule.forRoot(routes)],
  exports: [RouterModule]
})
export class AppRoutingModule { }
创建 Web API 项目
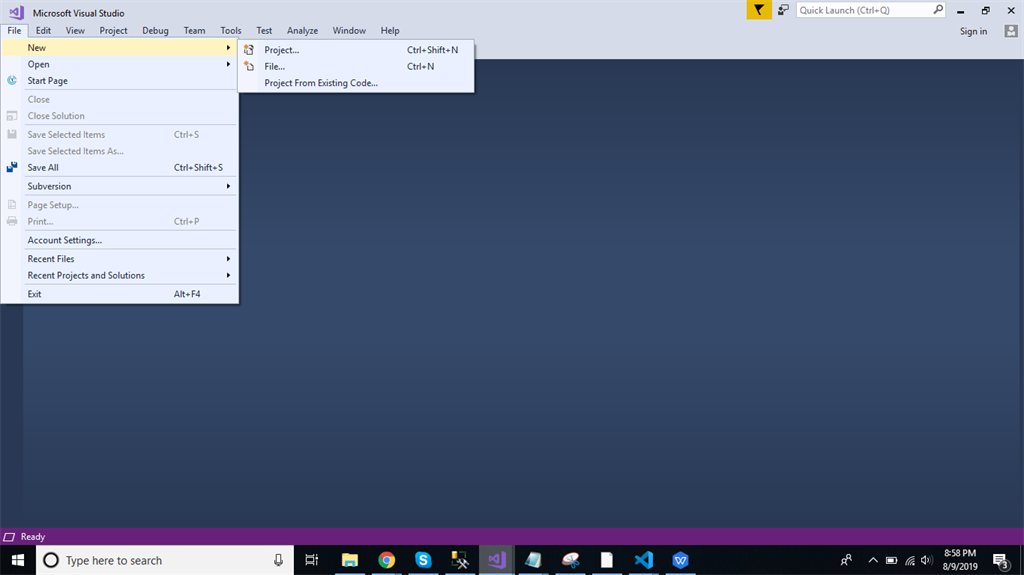
打开 Visual Studio 并创建一个新项目。

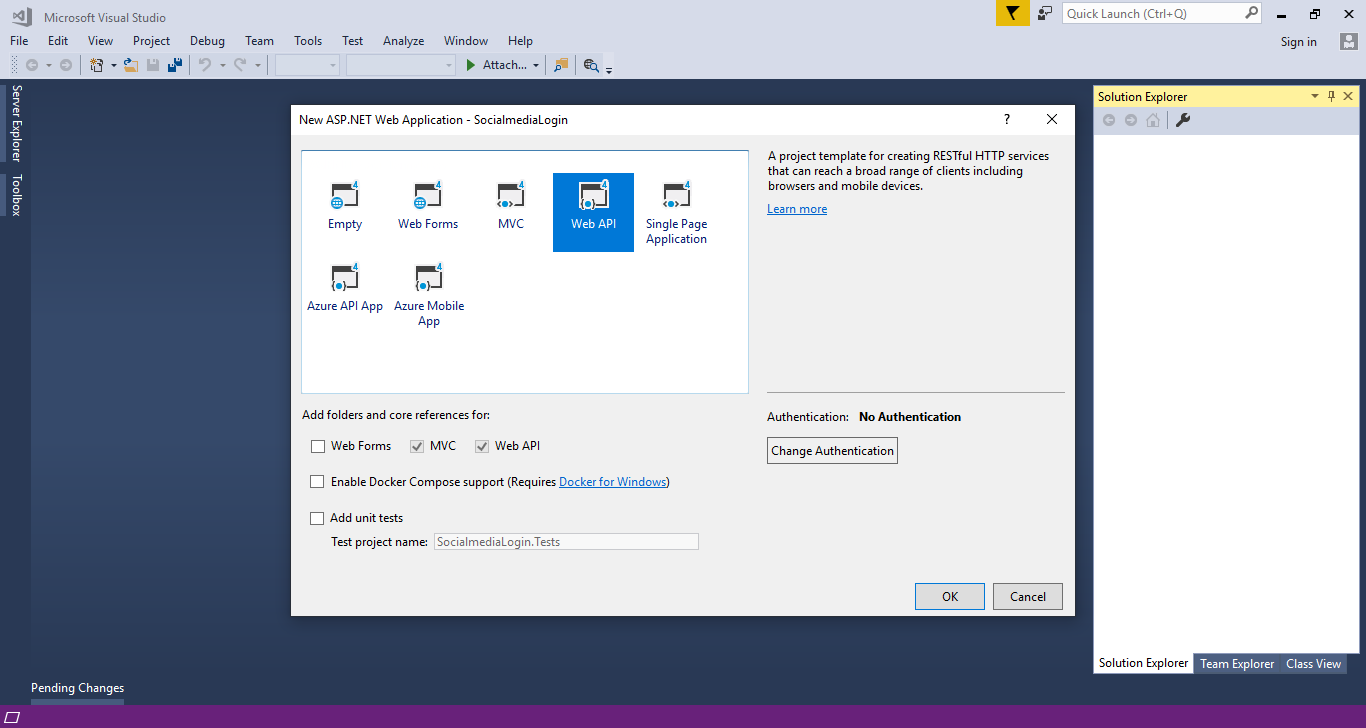
将名称更改为 SocialmediaLogin,然后点击确定 > 选择 Web API 作为其模板。

在解决方案资源管理器中右键单击 Models 文件夹,然后转到添加 >> 新项 >> 数据。

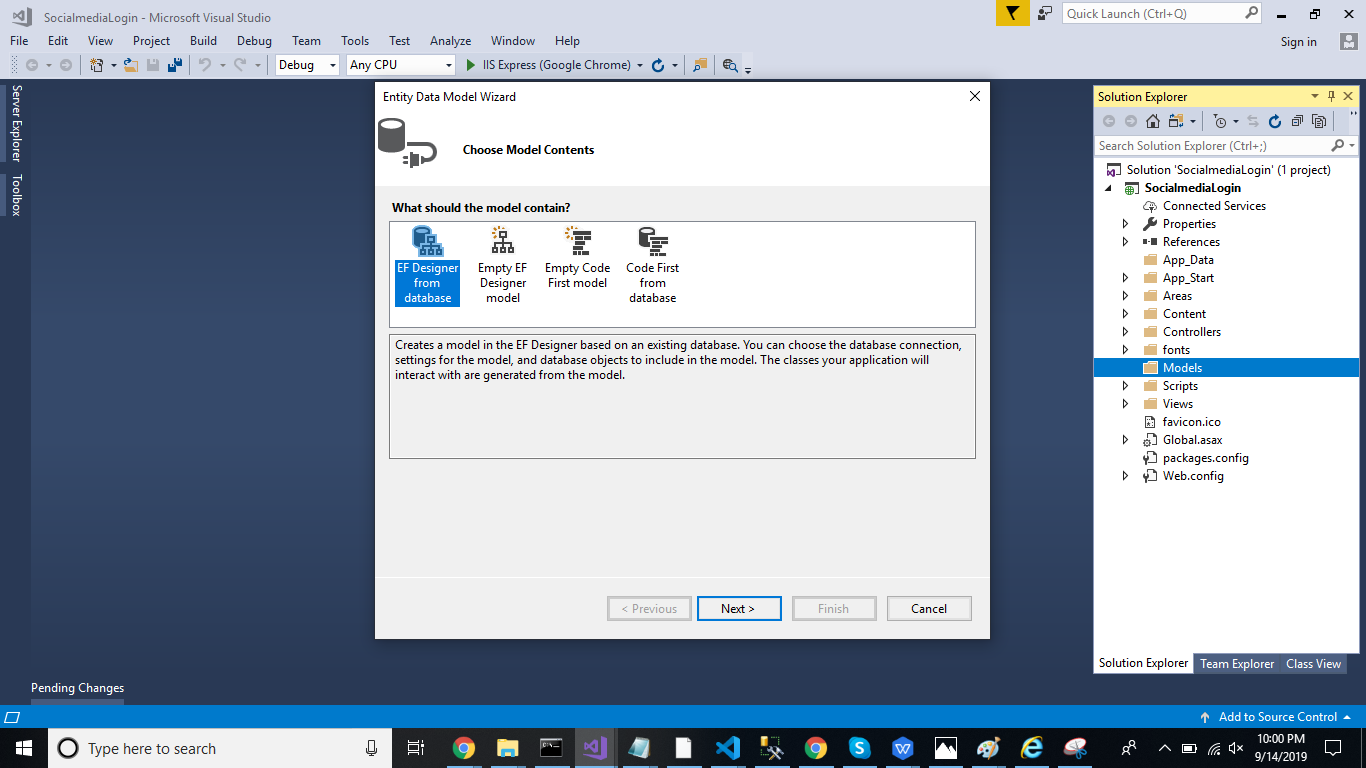
点击 "ADO.NET Entity Data Model" 选项,然后点击 "添加"。从数据库中选择 "EF designer",然后点击 "下一步" 按钮。

添加连接属性并在下一页选择数据库名称,然后单击确定。

选中表复选框。内部选项将默认选中。现在,点击 "完成" 按钮。

现在,我们的数据模型已成功创建。
接下来,右键单击 model 文件夹并添加两个类 — Users 和 Response。现在,将以下代码粘贴到这些类中。
Response 类
public class Response
    {
        public string Status { set; get; }
        public string Message { set; get; }
    }
Users 类
    public class Users
    {
        public string name { get; set; }
        public string email { get; set; }
        public string provider { get; set; }
        public string provideid { get; set; }
        public string image { get; set; }
        public string token { get; set; }
        public string idToken { get; set; }
    }
}
右键单击 Controllers 文件夹并添加一个新的控制器。将其命名为 "Login controller",并添加以下命名空间。
using LoginApplication.Models;
在此控制器中创建一个方法来保存数据。在此控制器中添加以下代码。
using System;
using System.Collections.Generic;
using System.Linq;
using System.Net;
using System.Net.Http;
using System.Web.Http;
using SocailMediaLogin.Models;
namespace SocailMediaLogin.Controllers
{
    public class LoginController : ApiController
    {
        [Route("Api/Login/Savesresponse")]
        [HttpPost]
        public object Savesresponse(Users user)
        {
            try
            {
                SocialLoginEntities DB = new SocialLoginEntities();
                Socaillogin Social= new Socaillogin();
                if (Social.TId == 0)
                {
                    Social.name = user.name;
                    Social.email = user.email;
                    Social.provideid = user.provideid;
                    Social.provider = user.provider;
                    Social.image = user.image;
                    Social.token = user.token;
                    Social.idToken = user.idToken;
                    var a=  DB.Socaillogins.Add(Social);
                    DB.SaveChanges();
                    return a;
                }
            }
            catch (Exception)
            {
                throw;
            }
            return new Response
            { Status = "Error", Message = "Invalid Data." };
        }
    }
}
现在,让我们启用 Cors。转到工具,打开 NuGet 包管理器,搜索 Cors,然后安装 Microsoft.Asp.Net.WebApi.Cors 包。打开 Webapiconfig.cs,并添加以下行
EnableCorsAttribute cors = new EnableCorsAttribute("*", "*", "*");
config.EnableCors(cors);
现在,转到 Visual Studio Code 并运行项目,然后检查结果

点击Google 登录按钮。

它将重定向到 Google 帐户。然后,点击邮箱 ID。

输入密码,然后点击下一步。它将重定向到仪表板页面。
检查数据库表中的数据,以确保用户详细信息已保存在表中。
同样,通过点击Facebook 登录按钮,我们可以使用 Facebook 登录。
摘要
在本文中,我们讨论了使用 Angular 8 和 Web API 在应用程序中进行 Facebook 和 Google 登录的过程。
历史
- 2019 年 11 月 8 日:初始版本
