
ApiBoilerPlate:用于构建 ASP.NET Core 3 API 的新功能和改进
5.00/5 (12投票s)
ApiBoilerPlate 的新版本已于近期发布。在这篇文章中,我们将介绍添加到该模板的新功能。
引言
两个月前,ApiBoilerPlate 首次发布,令人难以置信的是,该模板在短时间内获得了数百次安装。我很高兴它在某种程度上使一些开发人员受益,感谢大家的支持。我非常激动地宣布 ApiBoilerPlate 的新版本已于近期发布。在这篇文章中,我们将介绍添加到该模板的新功能。
ApiBoilerPlate 是什么?
ApiBoilerPlate 是一个简单而有组织的rible 项目模板,用于使用 .NET Core 3.x(截至目前最快/最新的 .NET Core 版本)构建 ASP.NET Core API,并包含预配置的工具和框架。它具有 API 的大多数功能,例如数据库 CRUD 操作、基于令牌的授权、HTTP 响应格式一致性、全局异常处理、日志记录、HTTP 请求速率限制、运行状况检查等等。其目标是在启动新的 ASP.NET Core API 项目时,帮助您快速设置应用程序的核心结构及其依赖项。这样您就可以专注于实现特定业务的代码要求,而无需反复复制粘贴项目核心结构、常见功能并重新安装其依赖项。这将加快您的开发时间,同时为您的所有应用程序强制执行标准的项目结构及其依赖项和配置。
使用的工具和框架
- .NET Core 3.0
- ASP.NET Core - 用于构建 RESTful API
- Dapper - 用于数据访问
- AutoMapper - 用于将实体模型映射到 DTO
- AutoWrapper - 用于处理请求异常和一致的
Http响应格式 - AutoWrapper.Server - 用于从
AutoWrapper的ApiResponse输出中解包Result属性 - Swashbuckle.AspNetCore - 用于安全的 API 文档
- FluentValidation.AspNetCore - 用于
DTO验证 - Serilog.AspNetCore - 用于日志记录功能
- IdentityServer4.AccessTokenValidation - 用于
JWT身份验证和授权处理 - Microsoft.Extensions.Http.Polly - 用于实现
HttpClient的韧性和瞬态故障处理 - AspNetCoreRateLimit - 用于根据 IP 地址或客户端 ID 控制客户端对外部
API的请求速率 - AspNetCore.Diagnostics.HealthChecks - 用于执行运行状况检查
- Microsoft.AspNetCore.Diagnostics.HealthChecks - 用于获取应用程序中运行状况检查的结果
- AspNetCore.HealthChecks.UI - 用于运行状况状态可视化
- xUnit 和 Moq - 用于单元测试
主要收获
使用该模板可以获得以下好处:
- 为数据库 CRUD 操作配置的示例代码
- 使用 Dapper 配置的基本数据访问
- 使用
Serilog配置的日志记录 - 为将实体模型映射到 DTO 配置的
AutoMapper - 为
DTO验证配置的FluentValidation - 为处理请求异常和一致的
Http响应格式配置的AutoWrapper - 为从 AutoWrapper 的
ApiResponse输出中解包 Result 属性配置的AutoWrapper.Server - 配置的
SwaggerAPI 文档 - 配置的
CORS - 配置的
JWT授权和验证 - 用于请求客户端凭据令牌的配置示例代码
- 使用
Bearer授权配置Swagger以保护 API 文档 - 用于连接受保护的外部 API 的配置示例代码
- 用于实现自定义 API 分页的配置示例代码
- 配置的
HttpClient韧性和瞬态故障处理 - 配置的
Http请求速率限制器 - 配置的
HealthChecks和HealthChecksUI - 配置的单元测试项目
- 为 Worker 服务配置的示例代码。要处理后台的扩展性处理,您可以查看 Worker Template,由 Jude Daryl Clarino 创建。该模板也基于
ApiBoilerPlate。
如何获取?

安装模板有两种方式:
- 通过 Nuget 使用 .NET CLI:ApiBoilerPlate.AspNetCore
- 通过 Visual Studio 的 VSIX 市场:ApiBoilerPlate.AspNetCore
有关安装步骤,请访问以下链接:
已更改的内容?
我个人喜欢保持事物简单、干净和有条理。新版本(v2)的模板已重新组织,以简化文件夹结构的 agrupamentos 并重构以提供更干净的代码。主要的变化是将 Configurations、Extensions、Filters、Handlers、Helpers 和 Installers 文件夹移到一个名为 Infrastructure 的新文件夹中。v2 版本中有一些新文件夹,目的是组织应用程序所需的文件,而不会将它们混杂在一起,以体现关注点分离和易于维护。
在 Startup.cs 文件中配置的一些服务已移至 Infrastructure/Installers 文件夹下的专用类文件。这将使 Startup.cs 文件更简洁,并允许您为每个 middleware 的配置拥有一个专用文件。
另一个变化是将 Domain 文件夹合并到 Data 文件夹中,以简化一些内容。在 Entity 文件夹中,您将看到一个名为 "EntityBase" 的新类,它提供了一个基类,其中包含实体类的常用属性。
DTO(又名数据传输对象)文件夹也已重新组织,以分离 Request 和 Response 对象。这意味着每个请求 dto 都应该有自己的类,每个响应 dto 都应该有自己的类以及特定的验证规则。这是为了将它们与实体类(又名 Models)解耦,这样当需求发生变化或您的实体属性发生变化时,它们不会受到影响,也不会破坏您的 API。您的实体类应该只用于数据库相关过程,而您的 DTO 用于将请求和响应对象与您的实体类映射,并且只暴露您希望客户端看到的属性。
我还向 PersonManager.cs 类添加了几个方法来演示分页和使用事务执行查询。
最后,所有 Nuget 依赖项都已更新到最新版本。
添加了什么?
我收集了版本 1 中社区反馈的所有请求,并为版本 2 添加了一些新功能。以下是新添加功能列表:
- 启用
CORS JWT授权和验证- 用于请求客户端凭据令牌的示例代码
- 使用
Bearer授权保护 API 文档的Swagger - 用于连接受保护外部 API 的示例代码
- 用于实现自定义 API 分页的示例代码
HttpClient韧性和瞬态故障处理Http请求速率限制器HealthChecks和HealthChecksUI- 单元测试项目
启用 CORS
跨域资源共享(也称为 CORS)允许托管在不同域/端口上的客户端访问您的 API 端点。模板已配置为允许任何源、标头和方法,如以下代码所示:
services.AddCors(options =>
{
    options.AddPolicy("AllowAll",
    builder =>
    {
        builder.AllowAnyOrigin()
                .AllowAnyHeader()
                .AllowAnyMethod();
    });
});
您可能需要更改默认策略配置,以便根据您的业务需求仅允许特定的源、标头和方法。有关更多信息,请参阅 在 ASP.NET Core 中启用跨域请求 (CORS)。
IdentityServer4 JWT 身份验证
该模板使用 IdentityServer4 对访问令牌进行身份验证和验证。您可以在 Installers/RegisterIdentityServerAuthentication.cs 文件中找到配置 IdentityServer 身份验证的代码。以下是代码片段:
services.AddAuthentication(IdentityServerAuthenticationDefaults.AuthenticationScheme)
    .AddIdentityServerAuthentication(options =>
    {
        options.Authority = config["ApiResourceBaseUrls:AuthServer"];
        options.RequireHttpsMetadata = false;
        options.ApiName = "api.boilerplate.core";
});
上面的代码添加了身份验证支持,使用 "Bearer" 作为默认方案。然后配置 IdentityServer 身份验证处理程序。Authority 是托管 IdentityServer 的基本 URL。ApiName 应该在您的 IdentityServer 中注册为 Audience。RequireHttpsMetadata 属性默认关闭,您应该在生产环境中部署应用程序时将其打开。
当您的 API 使用 [Authorize] 属性进行修饰时,请求客户端应提供从 IdentityServer 生成的访问令牌,并将其作为 Bearer Authorization Header 传递,然后才能获得对您的 API 端点的访问权限。有关更多信息,请参阅:IdentityServer:保护 API。
用于请求客户端凭据令牌的示例代码
我意识到访问受保护的内部/外部服务是一个非常常见的场景,因此我决定包含一个示例代码来演示如何在 ASP.NET Core 中实现它。在版本 2 中,您可以看到一个名为 "Services" 的新文件夹,其中包含一个名为 AuthServerConnect 的类,代码如下:
public class AuthServerConnect : IAuthServerConnect
{
    private readonly HttpClient _httpClient;
    private readonly IDiscoveryCache _discoveryCache;
    private readonly ILogger<AuthServerConnect> _logger;
    private readonly IConfiguration _config;

    public AuthServerConnect(HttpClient httpClient, IConfiguration config,
           IDiscoveryCache discoveryCache, ILogger<AuthServerConnect> logger)
    {
        _httpClient = httpClient;
        _config = config;
        _discoveryCache = discoveryCache;
        _logger = logger;
    }
    public async Task<string> RequestClientCredentialsTokenAsync()
    {

        var endPointDiscovery = await _discoveryCache.GetAsync();
        if (endPointDiscovery.IsError)
        {
            _logger.Log(LogLevel.Error, $"ErrorType: {endPointDiscovery.ErrorType}
                        Error: {endPointDiscovery.Error}");
            throw new HttpRequestException
            ("Something went wrong while connecting to the AuthServer Token Endpoint.");
        }

        var tokenResponse = await _httpClient.RequestClientCredentialsTokenAsync
                            (new ClientCredentialsTokenRequest
        {
            Address = endPointDiscovery.TokenEndpoint,
            ClientId = _config["Self:Id"],
            ClientSecret = _config["Self:Secret"],
            Scope = "SampleApiResource"
        });

        if (tokenResponse.IsError)
        {
            _logger.Log(LogLevel.Error, $"ErrorType: {tokenResponse.ErrorType}
                                         Error: {tokenResponse.Error}");
            throw new HttpRequestException
            ("Something went wrong while requesting Token to the AuthServer.");
        }

        return tokenResponse.AccessToken;
    }
}
上面的代码片段通过传递注册的 client_id、client_secret 和 scope 来请求 IdentityServer Token 端点的访问令牌。
每次通过 HttpClient 发出 Http 请求时,都会调用 RequestClientCredentialsTokenAsync() 方法。此过程封装在一个名为 ProtectedApiBearerTokenHandler 的自定义 bearer 令牌 DelegatingHandler 类中。以下是代码片段:
public class ProtectedApiBearerTokenHandler : DelegatingHandler
{
    private readonly IAuthServerConnect _authServerConnect;

    public ProtectedApiBearerTokenHandler(IAuthServerConnect authServerConnect)
    {
        _authServerConnect = authServerConnect;
    }

    protected override async Task<HttpResponseMessage> SendAsync
         (HttpRequestMessage request, CancellationToken cancellationToken)
    {
        // request the access token
        var accessToken = await _authServerConnect.RequestClientCredentialsTokenAsync();

        // set the bearer token to the outgoing request as Authentication Header
        request.SetBearerToken(accessToken);

        // Proceed calling the inner handler,
        // that will actually send the request to our protected API
        return await base.SendAsync(request, cancellationToken);
    }
}
我们可以在 Startup.cs 文件的 configureServices() 方法中将 ProtectedApiBearerTokenHandler 注册为 Transient 服务。
services.AddTransient<ProtectedApiBearerTokenHandler>();
用于访问受保护的内部/外部 API 的示例代码
在 Services 文件夹下,您可以找到 SampleApiConnect.cs 类,其中包含几个用于请求外部服务或 API 的方法,如下面的代码所示:
namespace ApiBoilerPlate.Services
{
    public class SampleApiConnect: IApiConnect
    {
      private readonly HttpClient _httpClient;
      private readonly ILogger<SampleApiConnect> _logger;
      public SampleApiConnect(HttpClient httpClient,ILogger<SampleApiConnect> logger)
        {
            _httpClient = httpClient;
            _logger = logger;
        }

        public async Task<SampleResponse>
        PostDataAsync<SampleResponse, SampleRequest>(string endPoint, SampleRequest dto)
        {
            var content = new StringContent(JsonSerializer.Serialize(dto),
                          Encoding.UTF8, HttpContentMediaTypes.JSON);
            var httpResponse = await _httpClient.PostAsync(endPoint, content);

            if (!httpResponse.IsSuccessStatusCode)
            {
                _logger.Log(LogLevel.Warning, $"[{httpResponse.StatusCode}]
                            An error occured while requesting external api.");
                return default(SampleResponse);
            }

            var jsonString = await httpResponse.Content.ReadAsStringAsync();
            var data = Unwrapper.Unwrap<SampleResponse>(jsonString);

            return data;
        }

        public async Task<SampleResponse> GetDataAsync<SampleResponse>(string endPoint)
        {
            var httpResponse = await _httpClient.GetAsync(endPoint);

            if (!httpResponse.IsSuccessStatusCode)
            {
                _logger.Log(LogLevel.Warning, $"[{httpResponse.StatusCode}]
                            An error occured while requesting external api.");
                return default(SampleResponse);
            }

            var jsonString = await httpResponse.Content.ReadAsStringAsync();
            var data = Unwrapper.Unwrap<SampleResponse>(jsonString);

            return data;
        }
    }
}
为了利用依赖注入,我们可以为 SampleApiConnect 类注册一个 HttpClientFactory 的类型化实例,然后将 ProtectedApiBearerTokenHandler 作为消息处理程序传递。您可以在 Infrastructure/Installer/ RegisterApiResources.cs 文件中找到以下代码片段:
services.AddHttpClient<IApiConnect, SampleApiConnect>(client =>
{
    client.BaseAddress = new Uri(config["ApiResourceBaseUrls:SampleApi"]);
    client.DefaultRequestHeaders.Accept.Clear();
    client.DefaultRequestHeaders.Accept.Add
           (new MediaTypeWithQualityHeaderValue(HttpContentMediaTypes.JSON));
})
.AddHttpMessageHandler<ProtectedApiBearerTokenHandler>();
这样,当我们向 SampleApiConnect 端点发出 Http 请求时,它会自动为我们生成访问令牌,并在每次调用 Http 调用时将其设置为 Bearer Authentication 标头。
以下是调用 SampleApiConnect 方法的代码,您可以在 API/v1/SampleApiControlle.cs 文件中找到:
public class SampleApiController : ControllerBase
{
    private readonly ILogger<SampleApiController> _logger;
    private readonly IApiConnect _sampleApiConnect;

    public SampleApiController
           (IApiConnect sampleApiConnect, ILogger<SampleApiController> logger)
    {
        _sampleApiConnect = sampleApiConnect;
        _logger = logger;
    }

    [Route("{id:long}")]
    [HttpGet]
    public async Task<ApiResponse> Get(long id)
    {
        if (ModelState.IsValid)
            return new ApiResponse
            (await _sampleApiConnect.GetDataAsync<SampleResponse>($"/api/v1/sample/{id}"));
        else
            throw new ApiException(ModelState.AllErrors());
    }

    [HttpPost]
    public async Task<ApiResponse> Post([FromBody] SampleRequest dto)
    {
        if (ModelState.IsValid)
            return new ApiResponse(await _sampleApiConnect.PostDataAsync
                   <SampleResponse, SampleRequest>("/api/v1/sample", dto));
        else
            throw new ApiException(ModelState.AllErrors());
    }
}
HttpClient 韧性和瞬态故障处理
当您在 API 应用程序中调用内部或外部服务时,使用 Http 等传输与服务通信时,始终存在瞬态故障发生的风险。瞬态故障可能会阻止请求完成,但也很可能是临时性问题。
该模板使用 Polly 使我们能够以流畅且线程安全的方式表达重试、断路器、超时、舱壁隔离和回退等策略。该模板使用以下功能:
Retry- 可能是网络短暂中断Circuit-breaker- 重试几次,但停止,以免使系统过载Timeout- 重试,但在 n 秒/分钟后放弃
您可以在 Infrastructure/Installer/RegisterApiResources.cs 文件中找到 Polly 的配置方式。以下是代码片段:
var policyConfigs = new HttpClientPolicyConfiguration();
config.Bind("HttpClientPolicies", policyConfigs);

var timeoutPolicy = Policy.TimeoutAsync<HttpResponseMessage>
                    (TimeSpan.FromSeconds(policyConfigs.RetryTimeoutInSeconds));

var retryPolicy = HttpPolicyExtensions
    .HandleTransientHttpError()
    .OrResult(r => r.StatusCode == HttpStatusCode.NotFound)
    .WaitAndRetryAsync(policyConfigs.RetryCount, _ => TimeSpan.FromMilliseconds
                      (policyConfigs.RetryDelayInMs));

var circuitBreakerPolicy = HttpPolicyExtensions
   .HandleTransientHttpError()
   .CircuitBreakerAsync(policyConfigs.MaxAttemptBeforeBreak,
                  TimeSpan.FromSeconds(policyConfigs.BreakDurationInSeconds));

var noOpPolicy = Policy.NoOpAsync().AsAsyncPolicy<HttpResponseMessage>();


services.AddTransient<ProtectedApiBearerTokenHandler>();


services.AddHttpClient<IApiConnect, SampleApiConnect>(client =>
{
    client.BaseAddress = new Uri(config["ApiResourceBaseUrls:SampleApi"]);
    client.DefaultRequestHeaders.Accept.Clear();
    client.DefaultRequestHeaders.Accept.Add
           (new MediaTypeWithQualityHeaderValue(HttpContentMediaTypes.JSON));
})
.SetHandlerLifetime(TimeSpan.FromMinutes(policyConfigs.HandlerTimeoutInMinutes))
.AddHttpMessageHandler<ProtectedApiBearerTokenHandler>()
.AddPolicyHandler(request => request.Method == HttpMethod.Get? retryPolicy : noOpPolicy)
.AddPolicyHandler(timeoutPolicy)
.AddPolicyHandler(circuitBreakerPolicy);
上面的代码片段定义了一组用于 Retries、CircuitBreaker 和 Timeout 的 Polly 策略。在此示例中,出于幂等性原因,我们仅对 GET 请求应用了重试策略。它将每 500 毫秒重试 3 次。我们还应用了断路器,允许重试 3 次,并在第 4 次尝试时阻止执行 30 秒。最后,当执行超出特定阈值时,我们设置了 Timeout,在此情况下为 5 秒超时。这确保了调用者不必等待超过超时时间。
这是 appsettings.TEST.json 文件中的 HttpClientPolicies 配置:
"HttpClientPolicies": {
    "RetryCount": 3,
    "RetryDelayInMs": 500,
    "RetryTimeoutInSeconds": 5,
    "BreakDurationInSeconds": 30,
    "MaxAttemptBeforeBreak": 3,
    "HandlerTimeoutInMinutes": 5
}
HTTP 请求速率限制器
为了防止您的 API 端点被滥用,我们通常会对客户端在一段时间内可以使用的请求数量强制执行速率限制。在服务器端限制 API 端点的吞吐量可以保护我们的系统免于资源过载,从而降低 API 端点的性能。
该模板使用 AspNetCoreRateLimit,它提供了一个解决方案,旨在根据 IP 地址或客户端 ID 控制客户端对 API 的请求速率。您可以在 Infrastructure/Installer/RegisterRequestRateLimiter.cs 文件中找到其实现方式。以下是代码片段:
internal class RegisterRequestRateLimiter : IServiceRegistration
{
    public void RegisterAppServices(IServiceCollection services, IConfiguration config)
    {
        // needed to load configuration from appsettings.json
        services.AddOptions();
        // needed to store rate limit counters and ip rules
        services.AddMemoryCache();

        //load general configuration from appsettings.json
        services.Configure<IpRateLimitOptions>(config.GetSection("IpRateLimiting"));

        // inject counter and rules stores
        services.AddSingleton<IIpPolicyStore, MemoryCacheIpPolicyStore>();
        services.AddSingleton<IRateLimitCounterStore, MemoryCacheRateLimitCounterStore>();

        // https://github.com/aspnet/Hosting/issues/793
        // the IHttpContextAccessor service is not registered by default.
        // the clientId/clientIp resolvers use it.
        services.AddSingleton<IHttpContextAccessor, HttpContextAccessor>();

        // configuration (resolvers, counter key builders)
        services.AddSingleton<IRateLimitConfiguration, RateLimitConfiguration>();
    }
}
以下是 appsettings.TEST.json 文件中的 IpRateLimiting 配置:
"IpRateLimiting": {
    "EnableEndpointRateLimiting": true,
    "StackBlockedRequests": false,
    "RealIpHeader": "X-Real-IP",
    "ClientIdHeader": "X-ClientId",
    "HttpStatusCode": 429,
    "GeneralRules": [
      {
        "Endpoint": "*:/api/*",
        "Period": "1s",
        "Limit": 2
      }
    ]
}
上面的配置定义了包含 "/api/" 段的每个端点请求的规则。客户端每秒只能请求一个端点 2 次。当然,您可以自由更改最适合您需求的配置。
需要将 EnableEndpointRateLimiting 设置为 true,以便将 IP 速率限制应用于特定端点,例如 "*:/api/*",而不是所有端点("*")。在 GeneralRules 部分,我们设置了一个速率限制规则。该规则规定,对于像 "*:/api/*" 这样的端点,每 1 秒只允许 2 次请求。Endpoint 的格式意味着对于任何 Http 动词("*:"),所有以 "/api/" 开头并以任何内容结尾("*")的 URL 都将遵守该规则。
以下是捕获的 200 和 429 Http 状态码请求的示例屏幕截图:

对于失败的 API 请求,响应包含异常消息“API calls quota exceeded! maximum admitted 2 per 1s.”和 Http 状态码 429 Too Many Requests。响应标头包括“Retry-After: 1”的键值对,指示消费者在 1 秒后重试以克服速率限制。
有关更多信息,请参阅:https://github.com/stefanprodan/AspNetCoreRateLimit 和 Changhui Xu 关于请求速率限制的出色 文章。
HealthChecks 和 HealthChecksUI
优秀的系统是为了预期和处理意外问题而构建的,而不是默默地失败。
该模板使用 HealthChecks 来监控应用程序的运行状况。这使我们能够监控应用程序依赖项的状态,例如数据库连接、外部服务等等。HealthChecks 可以在出现问题或某些服务不可用时立即提醒我们,而不是从客户那里得知。
您可以在 Infrastructure/Installers/RegisterHealthChecks.cs 文件中找到示例 HealthChecks 配置。以下是代码片段:
//Register HealthChecks and UI
services.AddHealthChecks()
        .AddCheck("Google Ping", new PingHealthCheck("www.google.com", 100))
        .AddCheck("Bing Ping", new PingHealthCheck("www.bing.com", 100))
        .AddUrlGroup(new Uri(config["ApiResourceBaseUrls:AuthServer"]),
                    name: "Auth Server",
                    failureStatus: HealthStatus.Degraded)
        .AddUrlGroup(new Uri(config["ApiResourceBaseUrls:SampleApi"]),
                    name: "External Api",
                    failureStatus: HealthStatus.Degraded)
        .AddNpgSql(config["ConnectionStrings:PostgreSQLConnectionString"],
                    name: "PostgreSQL",
                    failureStatus: HealthStatus.Unhealthy)
        .AddSqlServer(
                    connectionString: config["ConnectionStrings:SQLDBConnectionString"],
                    healthQuery: "SELECT 1;",
                    name: "SQL",
                    failureStatus: HealthStatus.Degraded,
                    tags: new string[] { "db", "sql", "sqlserver" });

services.AddHealthChecksUI();
它使用 AspNetCore.Diagnostics.HealthChecks 的以下 Nuget 包来执行基本的 HealthCheck 监控:
AspNetCore.HealthChecks.SqlServerAspNetCore.HealthChecks.NpgsqlAspNetCore.HealthChecks.Uris
我还包含了一个简单的 PingHealthCheck 作为示例。以下是代码片段:
internal class PingHealthCheck : IHealthCheck
{
    private string _host;
    private int _timeout;

    public PingHealthCheck(string host, int timeout)
    {
        _host = host;
        _timeout = timeout;
    }

    public async Task<HealthCheckResult> CheckHealthAsync
           (HealthCheckContext context, CancellationToken cancellationToken = default)
    {
        try
        {
            using (var ping = new Ping())
            {
                var reply = await ping.SendPingAsync(_host, _timeout);
                if (reply.Status != IPStatus.Success)
                {
                    return HealthCheckResult.Unhealthy
                    ($"Ping check status [{ reply.Status }]. Host
                    {_host} did not respond within {_timeout} ms.");
                }

                if (reply.RoundtripTime >= _timeout)
                {
                    return HealthCheckResult.Degraded
                    ($"Ping check for {_host} takes too long to respond.
                    Expected {_timeout} ms but responded in {reply.RoundtripTime} ms.");
                }

                return HealthCheckResult.Healthy($"Ping check for {_host} is ok.");
            }
        }
        catch
        {
            return HealthCheckResult.Unhealthy
                   ($"Error when trying to check ping for {_host}.");
        }
    }
}
在 Startup.cs 文件的 Configure() 方法中,我们可以通过添加以下代码来启用 HealthChecks 和 HealthChecksUI:
//Enable HealthChecks and UI
app.UseHealthChecks("/selfcheck", new HealthCheckOptions
{
      Predicate = _ => true,
      ResponseWriter = UIResponseWriter.WriteHealthCheckUIResponse
}).UseHealthChecksUI();
"/selfcheck" 是您可以调用或您的正常运行时间监控将调用的端点,以获取应用程序的状态。例如,如果您运行应用程序并导航到 "/selfcheck",它应该以 JSON 格式向您返回以下响应:
{
    "status": "Unhealthy",
    "totalDuration": "00:00:02.0427058",
    "entries": {
        "Google Ping": {
            "data": {},
            "description": "Ping check for www.google.com is ok.",
            "duration": "00:00:00.0308662",
            "status": "Healthy"
        },
        "Bing Ping": {
            "data": {},
            "description": "Ping check status [TimedOut].
                            Host www.bing.com did not respond within 100 ms.",
            "duration": "00:00:00.4633644",
            "status": "Unhealthy"
        },
        "Auth Server": {
            "data": {},
            "description": "No connection could be made because
                            the target machine actively refused it.",
            "duration": "00:00:02.0204641",
            "exception": "No connection could be made because
                          the target machine actively refused it.",
            "status": "Degraded"
        },
        "External Api": {
            "data": {},
            "description": "No connection could be made because
                            the target machine actively refused it.",
            "duration": "00:00:02.0219353",
            "exception": "No connection could be made because
                          the target machine actively refused it.",
            "status": "Degraded"
        },
        "PostgreSQL": {
            "data": {},
            "description": "Host can't be null",
            "duration": "00:00:00.0083434",
            "exception": "Host can't be null",
            "status": "Unhealthy"
        },
        "SQL": {
            "data": {},
            "duration": "00:00:00.0246875",
            "status": "Healthy"
        }
    }
}
如果您想获得漂亮的 UI 来监控每个检查的运行状况状态,那么您只需导航到 "/healthchecks-ui",您应该会看到类似这样的界面:

这真是太棒了!
有关配置 ASP.NET Core HealthChecks 的更多信息,请参阅 https://github.com/Xabaril/AspNetCore.Diagnostics.HealthChecks。
使用 Bearer 授权保护 Swagger 文档
在 Swagger 中,我们可以通过定义一个或多个安全方案来描述我们如何保护我们的 APIs。由于该模板使用 JWT 来保护 API,我们可以定义一个 "Bearer" 方案来保护我们的 SwaggerUI API 文档。在 Infrastructure/Installers/RegisterSwagger.cs 文件中,您可以找到以下代码:
services.AddSwaggerGen(options =>
{
    options.SwaggerDoc("v1", new OpenApiInfo
                      { Title = "ASP.NET Core Template API", Version = "v1" });

    options.AddSecurityDefinition("Bearer", new OpenApiSecurityScheme
    {
        Scheme = "Bearer",
        Description = "Enter 'Bearer' following by space and JWT.",
        Name = "Authorization",
        Type = SecuritySchemeType.Http,

    });

    options.OperationFilter<SwaggerAuthorizeCheckOperationFilter>();
});
上面的代码片段使用 Http 类型的 "Bearer" 安全方案定义了一个安全定义。SecuritySchemeType.Http 类型是用于 Basic、Bearer 和其他 Http 身份验证方案的 OpenApi 3 规范的一部分。
上面的代码中要注意的一点是 OperationFilter 的注入。该行允许为需要 Bearer 方案的 API 应用安全定义。以下是位于 Infrastructure/Filters 文件夹下的 SwaggerAuthorizeCheckOperationFilter.cs 类的代码:
internal class SwaggerAuthorizeCheckOperationFilter : IOperationFilter
{
    public void Apply(OpenApiOperation operation, OperationFilterContext context)
    {
        // Check for authorize attribute
        var hasAuthorize = context.MethodInfo.DeclaringType.GetCustomAttributes
                           (true).OfType<AuthorizeAttribute>().Any() ||
                           context.MethodInfo.GetCustomAttributes(true).OfType
                           <AuthorizeAttribute>().Any();

        if (!hasAuthorize) return;

        operation.Responses.TryAdd
                  ("401", new OpenApiResponse { Description = "Unauthorized" });
        operation.Responses.TryAdd
                  ("403", new OpenApiResponse { Description = "Forbidden" });

        operation.Security = new List<OpenApiSecurityRequirement>
            {
               new OpenApiSecurityRequirement{
                    {
                        new OpenApiSecurityScheme{
                            Reference = new OpenApiReference{
                                Id = "Bearer",
                                Type = ReferenceType.SecurityScheme
                            }
                        },new List<string>()
                    }
            } };

    }
}
不需要授权的 API 端点将被忽略,过滤器仅根据 AuthorizeAttribute 的存在而应用。
以下是已保护的 SwaggerUI 的示例屏幕截图:

请注意,授权仅应用于特定的 API 端点。在这种情况下,只有 SampleApi 控制器受到 Bearer 方案授权的保护。单击 Authorize 按钮或任何 SampleApi 端点应会弹出以下对话框:

一旦您提供有效的访问令牌,您就应该能够从 SwaggerUI 测试受保护的端点。
API 分页示例代码
如果您重视性能,那么您可能希望在 API 中实现分页,以限制发送给请求客户端的数据量。您可能有一个返回所有数据的 GET 端点,当您的 API 提供的数据量增长时,您的 API 最终可能会变得不可用。
分页是指从 API 获取部分结果。想象一下数据库中有数百万条结果,而您的应用程序试图一次性返回所有这些结果。
这不仅是一种极其无效的结果返回方式,而且还可能对应用程序本身或运行它的硬件产生毁灭性的影响。此外,每个客户端的内存资源有限,需要限制显示结果的数量。
分页在许多方面都有助于提高性能和可伸缩性:
- SQL Server 获取数据时,页面读取 I/O 的数量减少。
- 从数据库服务器传输到 Web 服务器的数据量减少。
- 在 Web 服务器上使用内存来存储我们对象模型中的数据量减少。
- 从 Web 服务器传输到客户端的数据量减少。
- 所有这些加起来,可能会产生显著的积极影响——特别是对于大量数据集合。
您可以在 Data/DataManager/PersonsManager.cs 文件中找到分页示例。以下是代码片段:
public async Task<(IEnumerable<Person> Persons, Pagination Pagination)>
       GetPersonsAsync(UrlQueryParameters urlQueryParameters)
{
    IEnumerable<Person> persons;
    int recordCount = 0;

    var query = @"SELECT ID, FirstName, LastName FROM Person
                            ORDER BY ID DESC
                            OFFSET @Limit * (@Offset -1) ROWS
                            FETCH NEXT @Limit ROWS ONLY";

    var param = new DynamicParameters();
    param.Add("Limit", urlQueryParameters.PageSize);
    param.Add("Offset", urlQueryParameters.PageNumber);

    if (urlQueryParameters.IncludeCount)
    {
        query += " SELECT COUNT(ID) FROM Person";
        var pagedRows = await DbQueryMultipleAsync<Person>(query, param);

        persons = pagedRows.Data;
        recordCount = pagedRows.RecordCount;
    }
    else
    {
        persons = await DbQueryAsync<Person>(query, param);
    }

    var metadata = new Pagination
    {
        PageNumber = urlQueryParameters.PageNumber,
        PageSize = urlQueryParameters.PageSize,
        TotalRecords = recordCount

    };

    return (persons, metadata);

}
GetPersonsAsync() 接受一个 UrlQueryParameters 对象,并返回一个名为 Persons 和 Pagination 的命名 Tuple。
上面的代码片段根据请求客户端提供的页码和页面大小执行分页。但是,在某些情况下,客户端应用程序还要求您的 API 在响应中包含总记录数,以便它们也可以在 UI 中呈现分页数据。包含总记录数可能会对性能造成影响,因为我们需要在数据库中执行 2 个 SQL 查询:第一个是获取数据块,第二个是获取总记录数。
这就是为什么我们将 IncludeCount 作为 UrlQueryParameters 的一部分添加的原因,以便我们可以默认关闭此功能。当客户端设置 IncludeCount = true 时,我们使用 Dapper 的 QueryMultipleAsync() 方法在单个数据库往返中执行多个查询并读取多个结果集。
您可以在 Data 文件夹下找到 UrlQueryParameters 和 Pagination 类的定义。以下是在 PersonsController 类中调用 GetPersonsAsync() 方法的方式:
[Route("paged")]
[HttpGet]
public async Task<IEnumerable<PersonResponse>>
       Get([FromQuery] UrlQueryParameters urlQueryParameters)
{
    var data = await _personManager.GetPersonsAsync(urlQueryParameters);
    var persons = _mapper.Map<IEnumerable<PersonResponse>>(data.Persons);

    Response.Headers.Add("X-Pagination", JsonSerializer.Serialize(data.Pagination));

    return persons;
}
现在,当您发出以下 GET 请求时:
https://:44321/api/v1/persons/paged?pagenumber=1&pagesize=3&includecount=true
响应输出应返回类似这样的内容:
{
    "message": "Request successful.",
    "isError": false,
    "result": [
        {
            "id": 14002,
            "firstName": "Vianne Maverich",
            "lastName": "Durano",
            "dateOfBirth": "2019-11-26T00:00:00",
            "fullName": "Vianne Maverich Durano"
        },
        {
            "id": 13002,
            "firstName": "Vynn Markus",
            "lastName": "Durano",
            "dateOfBirth": "2019-11-26T00:00:00",
            "fullName": "Vynn Markus Durano"
        },
        {
            "id": 12002,
            "firstName": "Michelle",
            "lastName": "Durano",
            "dateOfBirth": "1990-11-03T00:00:00",
            "fullName": "Michelle Durano"
        }
    ]
}
自定义标头 X-Pagination 应添加到响应标头中,其中包含分页的 metadata,如下图所示:
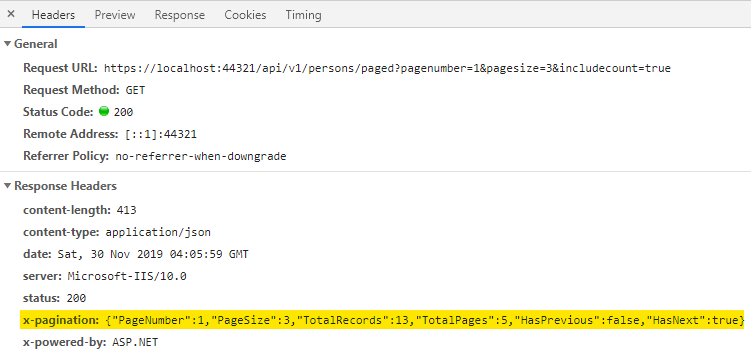
API 响应使用 AutoWrapper 自动格式化 Http 响应。
单元测试项目
该模板还包含一个使用 xUnit 和 Moq 的单元测试项目。以下是测试类的示例代码片段:
public class PersonsControllerTests
{
    private readonly Mock<IPersonManager> _mockDataManager;
    private readonly PersonsController _controller;

    public PersonsControllerTests()
    {
        var logger = Mock.Of<ILogger<PersonsController>>();

        var mapperProfile = new MappingProfileConfiguration();
        var configuration = new MapperConfiguration(cfg => cfg.AddProfile(mapperProfile));
        var mapper = new Mapper(configuration);

        _mockDataManager = new Mock<IPersonManager>();

        _controller = new PersonsController(_mockDataManager.Object, mapper, logger);
    }

    private IEnumerable<Person> GetFakePersonLists()
    {
        return new List<Person>
            {
                new Person()
                {
                    ID = 1,
                    FirstName = "Vynn Markus",
                    LastName = "Durano",
                    DateOfBirth = Convert.ToDateTime("01/15/2016")
                },
                new Person()
                {
                    ID = 2,
                    FirstName = "Vianne Maverich",
                    LastName = "Durano",
                    DateOfBirth = Convert.ToDateTime("02/15/2016")
                }
            };
    }

    private CreatePersonRequest FakeCreateRequestObject()
    {
        return new CreatePersonRequest()
        {
            FirstName = "Vinz",
            LastName = "Durano",
            DateOfBirth = Convert.ToDateTime("02/15/2016")
        };
    }

    private UpdatePersonRequest FakeUpdateRequestObject()
    {
        return new UpdatePersonRequest()
        {
            FirstName = "Vinz",
            LastName = "Durano",
            DateOfBirth = Convert.ToDateTime("02/15/2016")
        };
    }

    private CreatePersonRequest FakeCreateRequestObjectWithMissingAttribute()
    {
        return new CreatePersonRequest()
        {
            FirstName = "Vinz",
            LastName = "Durano"
        };
    }

    private CreatePersonRequest FakeUpdateRequestObjectWithMissingAttribute()
    {
        return new CreatePersonRequest()
        {
            FirstName = "Vinz",
            LastName = "Durano"
        };
    }

    [Fact]
    public async Task GET_All_RETURNS_OK()
    {
        // Arrange
        _mockDataManager.Setup(manager => manager.GetAllAsync())
           .ReturnsAsync(GetFakePersonLists());

        // Act
        var result = await _controller.Get();

        // Assert
        var persons = Assert.IsType<List<PersonResponse>>(result);
        Assert.Equal(2, persons.Count);
    }

    [Fact]
    public async Task GET_ById_RETURNS_OK()
    {
        long id = 1;

        _mockDataManager.Setup(manager => manager.GetByIdAsync(id))
           .ReturnsAsync(GetFakePersonLists().Single(p => p.ID.Equals(id)));

        var person = await _controller.Get(id);
        Assert.IsType<PersonResponse>(person);
    }

    [Fact]
    public async Task GET_ById_RETURNS_NOTFOUND()
    {
        var apiException = await Assert.ThrowsAsync<ApiException>(() => _controller.Get(10));
        Assert.Equal(404, apiException.StatusCode);
    }
}
测试项目应包含 POST、PUT 和 DELETE 方法的测试。为简洁起见,我已简化测试代码。这是测试的截图:

StringExtensions 的示例方法
我还发现将 string 转换为 datetime、int 和 long 类型在解析数据时非常常见,因此我想包含一些用于处理这些转换的示例方法。以下是 StringExtension 方法:
namespace ApiBoilerPlate.Infrastructure.Extensions
{
    public static class StringExtensions
    {
        public static DateTime ToDateTime(this string dateString)
        {
            DateTime resultDate;
            if (DateTime.TryParse(dateString, out resultDate))
                return resultDate;

            return default;
        }
        public static DateTime? ToNullableDateTime(this string dateString)
        {
            if (string.IsNullOrEmpty((dateString ?? "").Trim()))
                return null;

            DateTime resultDate;
            if (DateTime.TryParse(dateString, out resultDate))
                return resultDate;

            return null;
        }

        public static int ToInt32(this string value, int defaultIntValue = 0)
        {
            int parsedInt;
            if (int.TryParse(value, out parsedInt))
            {
                return parsedInt;
            }

            return defaultIntValue;
        }

        public static int? ToNullableInt32(this string value)
        {
            if (string.IsNullOrEmpty(value))
                return null;

            return value.ToInt32();
        }

        public static long ToInt64(this string value, long defaultInt64Value = 0)
        {
            long parsedInt64;
            if (Int64.TryParse(value, out parsedInt64))
            {
                return parsedInt64;
            }

            return defaultInt64Value;
        }

        public static long? ToNullableInt64(this string value)
        {
            if (string.IsNullOrEmpty(value))
                return null;

            return value.ToInt64();
        }
    }
}
就是这样!如果您发现错误或希望添加新功能,请随时在 Github 上提交 issue。您的宝贵反馈对于更好地改进此项目非常有帮助。如果您觉得它有用,请给它一个 star 以表达对该项目的支持。谢谢!
参考文献
- http://vmsdurano.com/apiboilerplate-a-project-template-for-building-asp-net-core-apis/
- https://www.carlrippon.com/scalable-and-performant-asp-net-core-web-apis-paging/
- https://docs.microsoft.com/en-us/aspnet/core/security/cors?view=aspnetcore-3.0
- https://github.com/App-vNext/Polly
- https://github.com/stefanprodan/AspNetCoreRateLimit
- https://codeburst.io/rate-limiting-api-endpoints-in-asp-net-core-926e31428017
- https://github.com/Xabaril/AspNetCore.Diagnostics.HealthChecks
- https://gunnarpeipman.com/aspnet-core-health-checks/
- https://docs.microsoft.com/en-us/aspnet/core/host-and-deploy/health-checks?view=aspnetcore-3.0
历史
- 2019 年 12 月 1 日:初始版本