
使用 Aspose.OMR 捕获纸质输入
5.00/5 (2投票s)
Aspose.OMR for .NET 提供了一个光学标记识别 API,您可以使用它来创建本地扫描的纸质文档。我们将引导您完成演示。
纸质表格上收集的数据最终需要存储在系统中才能发挥作用。企业通常的做法是雇佣数据录入员,逐一将纸质表格中的数据手动输入到他们的系统中。这是一个非常耗时、易出错且成本高昂的过程。从纸质源捕获数据的更好解决方案是数字化自动化。
在本文中,我们将引导您完成一个简化的流程,该流程涵盖使用 Aspose.OMR API 的纸质表格的创建、打印、扫描和数据导入自动化。
什么是 OMR?
OMR 是光学标记识别的缩写,通常用于代表选择题答案的纸质表格。人们使用钢笔或铅笔填涂圆圈来表示对问题的答案。OMR 是通过使用扫描或照片等成像技术来自动化检索这些表格上记录的信息的技术。

使用 OMR 技术时要注意的一点:OMR 不是 OCR(光学字符识别)——它的用途严格限于检测表格上以填涂圆圈形式标记的答案。但是,可以在单个软件程序中结合这两种技术。
Aspose.OMR 是一个基于 .NET Framework 的 OMR API,用于本地软件。此 API 兼容所有 .NET Framework 项目,如 Windows Forms、WPF、ASP.NET 和 WCF,可使用 C# 或 VB.Net 语言。
Aspose.OMR 功能包括表单图像创建、表单模板生成、通过扫描或照片处理表单,以及将提取结果导出为 CSV、XML 或 JSON 格式。Aspose.OMR 还提供了多种基于云的 API,供那些希望将处理卸载给第三方的人使用。
使用 Aspose.OMR API 实现 OMR 工作流
仅需七个步骤即可完成整个 OMR 工作流。我们将逐步完成这些步骤,并使用简单的 C# .NET Framework 控制台应用程序和 Aspose.OMR API 实现完整的 OMR 工作流的自动化。
首先,打开 Visual Studio 2019(社区版即可)并创建一个新的 C# .NET Framework 控制台应用程序。

将应用程序命名为“AsposeOMRWorkflow”,并将其放置在您选择的文件位置。按“创建”按钮生成项目文件。

现在项目已加载,我们可以通过 NuGet 包管理器引入 Aspose.OMR API。右键单击项目文件,然后选择“管理 NuGet 程序包”项。

在 NuGet 程序包管理器中,按“浏览”选项卡搜索“Aspose.OMR”,从列表中选择它,然后按安装按钮将其添加到项目中。

由于我们将在本项目中自动化填写纸质表格的扫描,因此我们需要在项目中添加额外的引用。再次右键单击项目文件并选择“添加引用”。

在添加引用对话框中,从左侧菜单选择“COM”,然后搜索“Windows Image”。这将调出 Microsoft Windows Image Acquisition Library v2.0 的库。选择此库,然后按“确定”按钮将其添加到项目中。此库的简写形式在我们源代码中称为 WIA。

步骤 1 - 定义表单
Aspose.OMR API 在定义表单内容时使用专有的文本标记。表单项还可以具有可选属性。这些属性始终定义在父项下方的新行上,并用制表符缩进。您将在下方看到此示例。表单可以由多种类型的项组成,如下所示
普通文本
标记
?text=<textual content goes here>
当您希望在表单上输出不被 OMR 引擎解释的文本项时,请使用普通文本。这可能是姓名和日期行、签名行或表单的一般说明。文本中的空格在生成的表单中会保留。


问题
标记
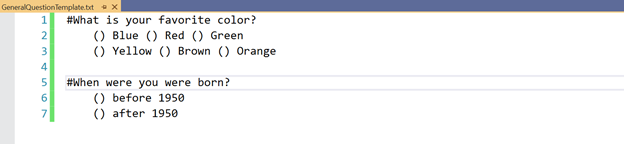
#What is your question?
() Answer A  () Answer B
() Answer C    () Answer D
问题使用默认编号和默认圆圈值输出,圆圈值按字母顺序排列。要使用圆圈中的默认值,只需用左圆括号和右圆括号表示一个圆圈。您可以将圆圈和答案放在多行上,表单将相应地渲染。

具有自定义答案值的题目
标记
#How do you rate this question? 5 for good, 1 for bad.
(5) (4) (3) (2) (1)
当 OMR 引擎模板处理器运行时,它将返回圆括号之间的值。您不限于默认的字母答案。您可以使用上面标记定义的任何内容填充圆圈。如果您尝试使用多个字符,表单将渲染为圆括号中的第一个字符。


Grid
标记
?grid=<Name of the field>
sections_count=<number of bubbles per line>
网格是垂直表单项。输入大数字值(如学生 ID 和会员 ID)时使用网格。sections_count 属性允许您定义代表最终值的数字数量。每个数字(0 到 9)的圆圈将渲染在代表值中数字字符的下方。


答题卡
标记
?answer_sheet=<name of section>
elements_count=<number of questions>
columns_count=<number of columns when outputting questions>
许多考试都有包含问题文本的二级文本或小册子。在这种情况下,不必在表单上重复问题。相反,只需渲染问题编号和圆圈。答题卡项允许您使用指定的列数(columns_count 属性)显示指定数量的问题(elements_count 属性)。


让我们来定义将在控制台应用程序中使用我们的自定义问卷。向项目中添加一个新文本文件,并将其命名为“QuestionnaireMarkup.txt”,并用下面指定的标记填充它
?text=Name__________________________________         Date____________
?grid=ID
sections_count=5
#What are some of the functions of Aspose.OMR? Mark all that apply.
() OCR () Capture human-marked data
() Generate data collection forms () Enhance images
#What is your favorite color?
(r) Red  (g) Green
(b) Blue (o) Other
#Rate this question (5 - good, 1 - bad)
(5) (4) (3) (2) (1)
#Are you currently in a good mood?
(Yes) Yes (No) No
?text=    Booklet #1 Answer Sheet
?answer_sheet=Booklet1
elements_count=15
columns_count=3
?text=Sign__________________________________

在 QuestionnaireMarkup.txt 的属性中(右键单击文件,选择“属性”),确保“复制到输出目录”设置为“如果较新则复制”。
步骤 2 - 生成模板和表单图像文件
现在是时候使用 OMR 引擎根据我们为问卷定义的标记生成模板和表单图像文件了。模板生成为基于 JSON 的文件(扩展名为 .omr)。此文件由模板处理器在内部使用,以描述表单上每个元素的*.omr*文件包含 JSON 格式的表单元素位置信息,而 .png 文件将包含将打印在纸上供人们填写的表单图像。该文件在角落有盒子,当模板处理器应用从生成的模板中提取的位置数据来解释表单中已填写的信息时,这些盒子充当注册点。
表单图像是一个 PNG 图像,将打印在纸上供人们填写。此文件在角落有框,当模板处理器应用模板中的位置数据来解释表中已填写的信息时,这些框充当注册点。
要生成模板和表单图像,请向 Program 类添加一个方法(代码内联注释)
//you will need to add the following using statement at the top of the file:
//using Aspose.OMR.Api;
static void GenerateFormTemplateAndImage()
{
    //fully qualified path to the form markup file
    var formMarkupFilePath = AppDomain.CurrentDomain.BaseDirectory +
        "QuestionnaireMarkup.txt";
    //initialize an instance of the Aspose OMR engine
    var omrEngine = new OmrEngine();
    //use the Aspose OMR engine to generate the template and
    //image from the markup file
    var result = omrEngine.GenerateTemplate(formMarkupFilePath);
    if (result.ErrorCode != 0)
    {
        Console.WriteLine($"ERROR: {result.ErrorCode} -
            {result.ErrorMessage}");
    }
    else
    {
        //save the files as OmrOutput.omr for the template,
        //and OmrOutput.png for the form image
        result.Save("", "OmrOutput");
    }
}
如代码所示,此方法将根据我们在步骤 1 中创建的标记文件生成两个文件。 .omr 文件包含 JSON 格式的表单元素的位置信息,而 .png 文件将包含将用于打印在纸上并分发给用钢笔或铅笔填写的人的表单图像。
步骤 3 - 打印表单图像
下一步是将表单图像打印到纸上。为此,我们将向 Program 类添加另一个方法(代码内联注释)
//this method requires the following using statements at the top of the file
// using System.Drawing;
// using System.Drawing.Printing;
static void PrintFormImage()
{
    //fully qualified path to the form image
    var questionnaireImagePath = AppDomain.CurrentDomain.BaseDirectory +
        "OmrOutput.png";

    //we will be using the default printer to print the form
    PrintDocument pd = new PrintDocument();
    //event handler fired when a print job is requested
    pd.PrintPage += (sender, args2) =>
    {
        //obtain image to print
        Image i = Image.FromFile(questionnaireImagePath);
        //obtain paper margins
        Rectangle m = args2.MarginBounds;
        //ensure we scale the image proportionally on the page
        if ((double)i.Width / (double)i.Height >
            (double)m.Width / (double)m.Height) // image is wider
        {
            m.Height = (int)((double)i.Height / (double)i.Width *
                (double)m.Width);
        }
        else
        {
            m.Width = (int)((double)i.Width / (double)i.Height *
                (double)m.Height);
        }
        //render the image
        args2.Graphics.DrawImage(i, m);
    };

    //prints one copy of the form image
    pd.Print();
}
步骤 4 和 5 - 填写表单并获取填写表单的数字图像
步骤 4 是唯一需要手动干预的步骤。分发表单,让人用钢笔或铅笔填写,然后收集填好的表单。
收集完填好的表单后,我们继续进行步骤 5 — 对表单进行数字化成像。这可以通过多种方式完成,例如使用数码相机拍照、使用平板扫描仪或使用 ADF(自动文档进纸器)扫描仪。
在此示例中,代码实现了使用 ADF 扫描仪,但也可以修改为使用平板扫描仪。如果使用数码相机,可以跳过此步骤 — 然而,重要的是让纸质表格占据图片的大部分,因此可能需要裁剪。
添加以下方法从 ADF 扫描仪扫描多个文档(代码内联注释)
//this method requires the following using statements at the top of the file
// using System.Linq;
// using System.Collections.Generic;
// using System.IO;
//  using System.Drawing.Imaging;
static void ScanForms(int numberOfForms)
{
    //fully qualified output path where the scanned images of the
    //forms will be located.
    var scannedImagePath = AppDomain.CurrentDomain.BaseDirectory + @"Scans\";
    //obtain the first defined scanner found on the computer
    var scanner = WIAScanner.GetDevices().FirstOrDefault();
    List<Image> images = new List<Image>();
    int idx = 0;

    //scans multiple forms and stores the images in the images list
    images = WIAScanner.Scan(scanner.DeviceID, numberOfForms,
        WIAScanQuality.Final, WIAPageSize.Letter, DocumentSource.Feeder);
    if (images.Count > 0)
    {
        //create the Scans directory if it doesn't already exist
        Directory.CreateDirectory(scannedImagePath);
    }
    //save each image obtained from the scanner into the Scans folder.
    foreach (var img in images)
    {
        var fileName = "img" + ++idx;
        img.Save(scannedImagePath + fileName + ".jpg", ImageFormat.Jpeg);
    }
}
注意:在 Github 存储库中提供的源代码中,添加了一个辅助类(WIAScanner.cs)来处理控制扫描设备所需的大部分底层代码。我们不会详细介绍此代码,因为它不是本文的重点。从存储库获取此文件并将其添加到您的项目中。
步骤 6 和 7 - 处理数字图像并导出收集到的数据
现在我们已经将一系列扫描并存储在文件系统上的图像收集起来,我们可以使用 OMR 引擎模板处理器来提取问卷的结果。模板处理器使用注册标记(表单上的方框)根据我们在步骤 2 中生成的模板(.omr 文件)来识别表单元素的*.omr*文件包含 JSON 格式的表单元素位置信息,而 .png 文件将包含将打印在纸上供人们填写的表单图像。该文件在角落有盒子,当模板处理器应用从生成的模板中提取的位置数据来解释表单中已填写的信息时,这些盒子充当注册点。
在 Program 类中实现以下方法,以循环遍历 Scans 目录中的图像,处理信息,并将其导出到 JSON 文件。目前我们将 JSON 信息存储在文件系统中,但也可以将其发送到您选择的位置,例如数据库或发送到 Web 服务。
static void ProcessScansAndExportData()
{
    //fully qualified output path where the scanned images
    //of the forms will be located.
    var scannedImagePath = AppDomain.CurrentDomain.BaseDirectory +
        @"Scans\";
    ///fully qualified path to the form template
    var templatePath = AppDomain.CurrentDomain.BaseDirectory +
        "OmrOutput.omr";
    //initialize an instance of the Aspose OMR engine
    var omrEngine = new OmrEngine();
    //retrieve all images from the Scans folder
    var dirInfo = new DirectoryInfo(scannedImagePath);
    var files = dirInfo.GetFiles("*.jpg");
    //use the omrEngine to create an instance of the template
    //processor based on the generated template
    var templateProcessor2 = omrEngine.GetTemplateProcessor(templatePath);
    foreach (var file in files)
    {
        //use the template processor to extract form data from the form image
        string jsonResults =
            templateProcessor2.RecognizeImage(file.FullName, 28).GetJson();
        //save the extracted data in a json file
        File.WriteAllText(AppDomain.CurrentDomain.BaseDirectory +
            Path.GetFileNameWithoutExtension(file.FullName) +
            "_scan_results.json", jsonResults);
    }
}
查看模板处理器使用 RecognizeImage 方法评估表单图像的代码行。此方法最多接受两个参数:表单的数字图像和模板引擎的阈值。
可以修改阈值以指示评估过程的灵敏度。此值范围为 0 到 100,较高的值表示方法解释表单上圆圈填写方式的严格程度。
根据您的具体情况,您可能希望修改此值以获得满足您需求的最佳性能。一种可视化确定阈值的方法是使用 Aspose 提供的开源 GUI 工具加载您的模板和示例表单图像,并使用图形控件确定合适的值。
设置 OMR 工作流自动化
我们将通过输出一个菜单系统来完成控制台应用程序的实现,该系统将运行我们已经创建的方法。将 Program.cs 中的 Main 方法替换为以下代码
static void Main(string[] args)
{
    License omrLicense = new License();
    omrLicense.SetLicense("Aspose.Total.lic");
    var menuSelection = "";

    while (menuSelection != "X" && menuSelection != "x")
    {
        Console.ForegroundColor = ConsoleColor.Cyan;
        Console.WriteLine("Generate Template - T");
        Console.WriteLine("Print Questionnaire - P");
        Console.WriteLine("Scan Flatbed Docs - S");
        Console.WriteLine("Evaluate Scanned Docs - E");
        Console.WriteLine("Exit - X");
        Console.ForegroundColor = ConsoleColor.White;
        menuSelection = Console.ReadLine();

        switch (menuSelection)
        {
            case "T":
            case "t":
                GenerateFormTemplateAndImage();
                break;
            case "P":
            case "p":
                PrintFormImage();
                break;
            case "S":
            case "s":
                ScanForms(4);
                break;
            case "E":
            case "e":
                ProcessScansAndExportData();
                break;
            case "X":
            case "x":
            default:
                break;
        }
        Console.BackgroundColor = ConsoleColor.DarkGreen;
        Console.WriteLine("Finished");
        Console.BackgroundColor = ConsoleColor.Black;
    }
}
运行应用程序时,将显示一个菜单,允许用户自动化 OMR 工作流的每一步。他们可以通过输入字母“X”随时退出应用程序。
解释结果
以下是一个扫描表单及其相关的 JSON 格式结果的示例

结果
{
   "RecognitionResults": [{
    	"ElementName": "Question1",
    	"Value": "B,C"
	}, {
    	"ElementName": "Question2",
    	"Value": "b"
	}, {
    	"ElementName": "Question3",
    	"Value": "3"
	}, {
    	"ElementName": "Question4",
    	"Value": "Y"
	}, {
    	"ElementName": "Booklet15",
    	"Value": "A"
	}, {
    	"ElementName": "Booklet110",
    	"Value": "A"
	}, {
    	"ElementName": "Booklet115",
    	"Value": "B"
	}, {
    	"ElementName": "Booklet16",
    	"Value": "C"
	}, {
    	"ElementName": "Booklet111",
    	"Value": "A"
	}, {
    	"ElementName": "Booklet116",
    	"Value": "A"
	}, {
    	"ElementName": "Booklet17",
    	"Value": "B"
	}, {
    	"ElementName": "Booklet112",
    	"Value": "B"
	}, {
    	"ElementName": "Booklet117",
    	"Value": "D"
	}, {
    	"ElementName": "Booklet18",
    	"Value": "D"
	}, {
    	"ElementName": "Booklet113",
    	"Value": "C"
	}, {
    	"ElementName": "Booklet118",
    	"Value": "B"
	}, {
    	"ElementName": "Booklet19",
    	"Value": "D"
	}, {
    	"ElementName": "Booklet114",
    	"Value": "D"
	}, {
    	"ElementName": "Booklet119",
    	"Value": "C"
	}, {
    	"ElementName": "ID",
    	"Value": "12345"
	}]
}
模板处理器在此表单上实现了 100% 的准确率。您可以看到 Question1 到 Question4 对应于表单上的前 4 个问题。您可以识别我们的 Booklet 1 答题卡答案,因为元素名称带有“Booklet1”前缀,表示“Booklet15”是 Booklet 1 的第 5 个问题。最后,我们已在模板中标识为“ID”的网格是数组中的最后一项,它将表单上填写的*.omr*文件包含 JSON 格式的表单元素位置信息,而 .png 文件将包含将打印在纸上供人们填写的表单图像。该文件在角落有盒子,当模板处理器应用从生成的模板中提取的位置数据来解释表单中已填写的信息时,这些盒子充当注册点。的值合并为一个值。
结论
在 .NET 项目中使用 Aspose.OMR API 库可以大大简化 OMR 过程。在本文中,我们实现了端到端的 OMR 工作流示例。
该库的一个亮点是定义阈值的灵活性,可以根据您的场景和表单(例如,小学生填写的表单与成人填写的表单)进行微调,以获得最终的精确结果。
从开发者的角度来看,通过 NuGet 包含该库以及以编程方式加载许可证文件都是轻松无忧的。API 本身也清晰简洁,使开发体验更加积极。