
使用 ASP.NET Core 和 Angular 8 进行服务器端分页
4.67/5 (3投票s)
在本文中,我们将学习如何创建服务器端分页,这在我们需要显示大量记录时非常有用。
引言
这是一个由三部分组成的系列文章,在本文中,我们将显示记录数,并计算总页数,但每页只能看到选定的记录。因此,我们不会一次性获取所有记录,而是会根据页面获取记录,这将提高我们的性能。
它将如何工作?
假设我们要前端显示 500 条记录,并且每页只显示 100 条记录。当您单击第 2 页时,它将显示接下来的 100 条记录,依此类推。在 Angular 中,我们可以使用管道并安装一些软件包来显示分页,但是如果我们一次只显示 100 条记录,那么我们为什么要获取全部 500 条记录呢?这会降低我们的性能。
因此,一次只获取 100 条记录,然后在单击下一页时,获取该特定页面的下一 100 条记录会更好。这里,每次单击页面时,都会从数据库表中获取记录。
必备组件
- 具备 Angular 的基础知识
- 必须安装 Visual Studio Code
- 必须安装 Angular CLI
- 必须安装 Node JS
- 必须安装 Microsoft Visual Studio 2017
- SQL Server 2014。
Using the Code
后端
在这里,我们将使用 SQL Server 进行后端相关的代码编写。
第一步是创建一个数据库。
步骤 1
create database company
让我们在本地 SQL Server 上创建一个数据库。我希望您已在机器上安装了 SQL Server 2017(您也可以使用 SQL Server 2008、2012 或 2016)。
第二步
使用以下代码创建 CompanyDetails 表
CREATE TABLE [dbo].[CompanyDetails](
    [CompanyId] [int] IDENTITY(1,1) NOT NULL,
    [CompanyName] [nvarchar](100) NULL,
    [City] [nvarchar](50) NULL,
    [State] [nvarchar](50) NULL,
    [Owner] [nvarchar](50) NULL,
    [PublishYear] [int] NULL,
 CONSTRAINT [PK_CompanyDetails] PRIMARY KEY CLUSTERED
(
    [CompanyId] ASC
)WITH (PAD_INDEX = OFF, STATISTICS_NORECOMPUTE = OFF, _
 IGNORE_DUP_KEY = OFF, ALLOW_ROW_LOCKS = ON, ALLOW_PAGE_LOCKS = ON) ON [PRIMARY]
) ON [PRIMARY]
GO
现在让我们添加存储过程。
步骤 3
创建以下存储过程
GetAllCompanies
Create Proc [dbo].[Usp_GetAllCompanies]
 @PageNo INT ,
 @PageSize INT ,
 @SortOrder VARCHAR(200)
As
Begin

    Select * From   (Select ROW_NUMBER() Over (
    Order by CompanyName ) AS 'RowNum', *
         from   [CompanyDetails]
        )t  where t.RowNum Between ((@PageNo-1)*@PageSize +1) AND (@PageNo*@pageSize)

End
GetAllCompaniesCount
Create Proc [dbo].[Usp_getAllCompaniesCount]
As

Begin
        select count(CompanyId) from   [CompanyDetails]
End
Web API
创建一个 ASP.NET Core 应用程序。
请按照以下步骤创建 ASP.NET Core 应用程序。
步骤 1
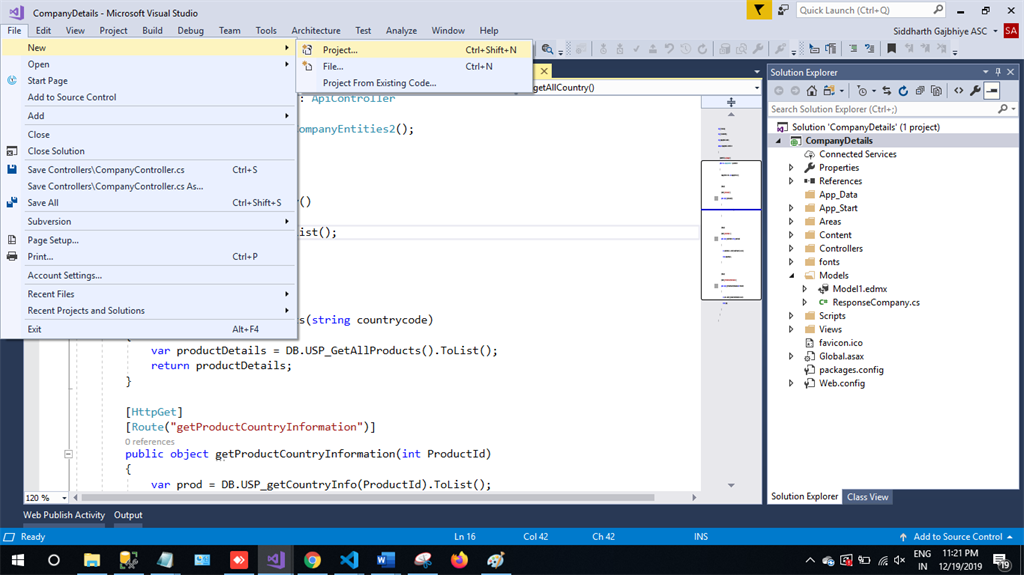
在 Visual Studio 2019 中,单击 文件 -> 新建 -> 项目。
第二步
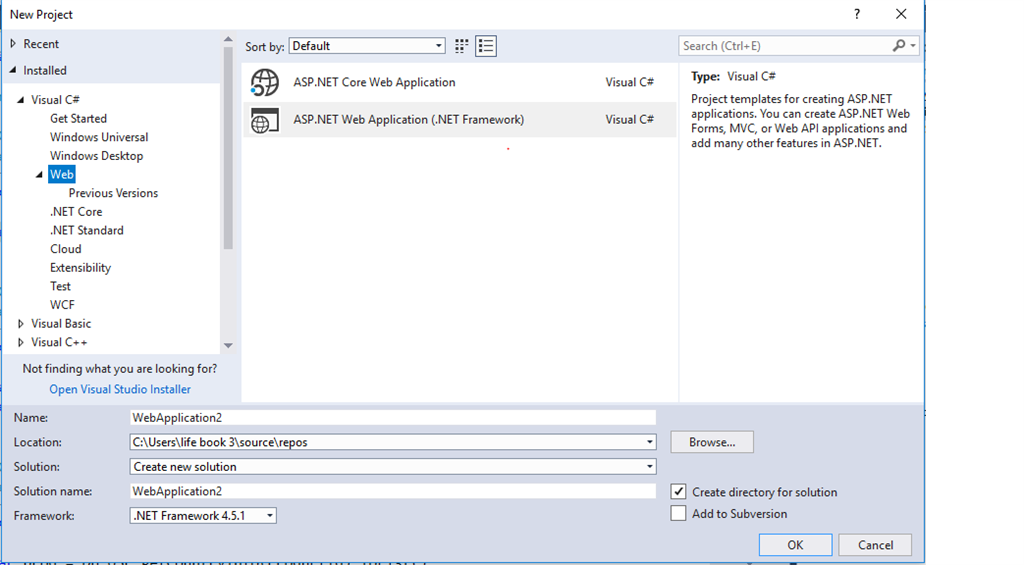
选择 创建 选项并选择 ASP.NET Web 应用程序。
步骤 3
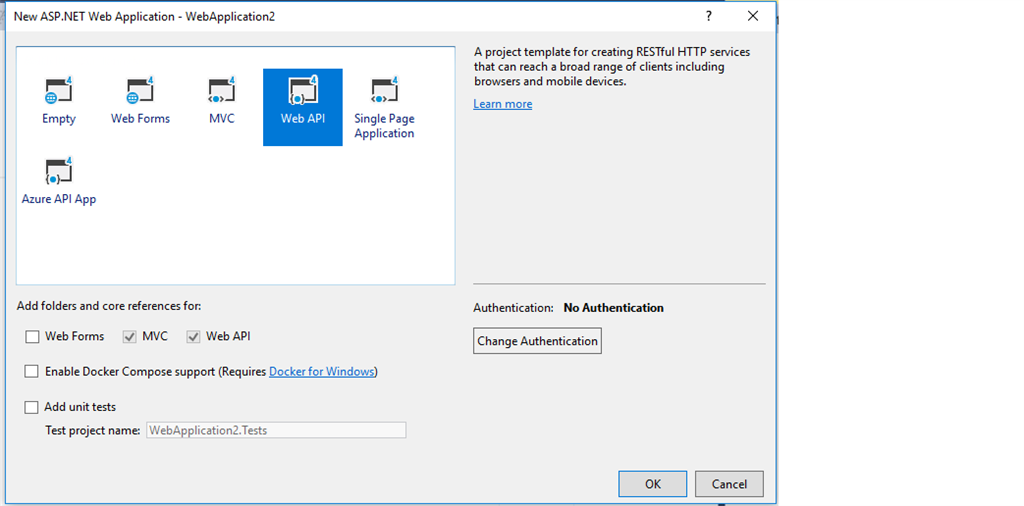
选择 Web API,然后单击 确定。
步骤 4
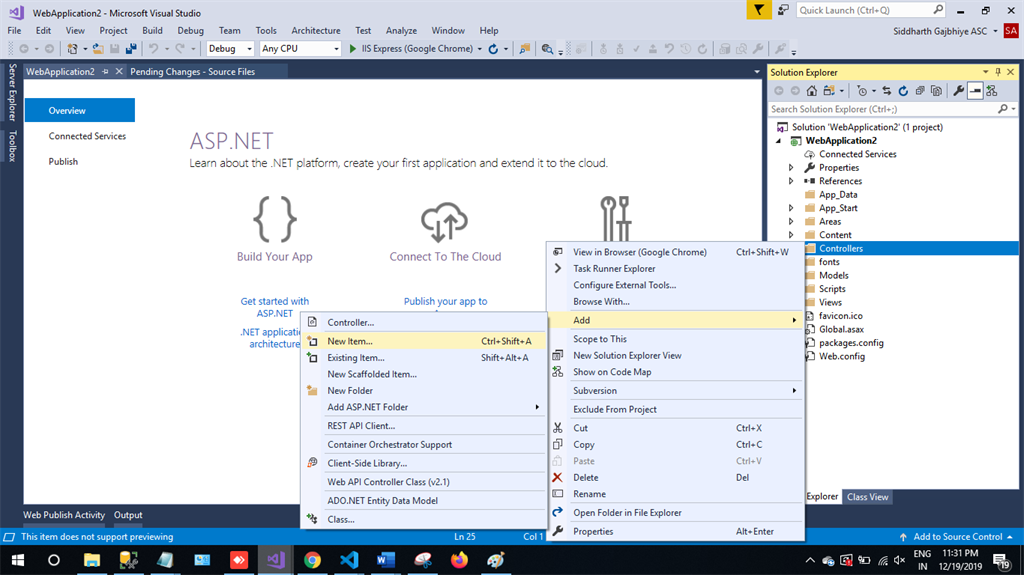
现在右键单击控制器,然后添加一个新项。
步骤 5
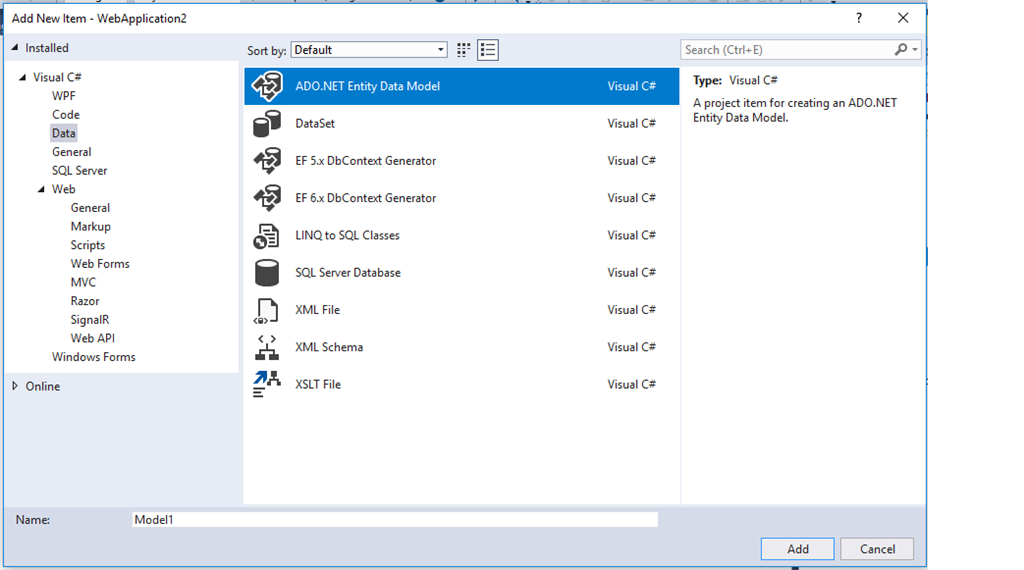
选择 ADO.NET Entity Data Model,然后单击 添加。
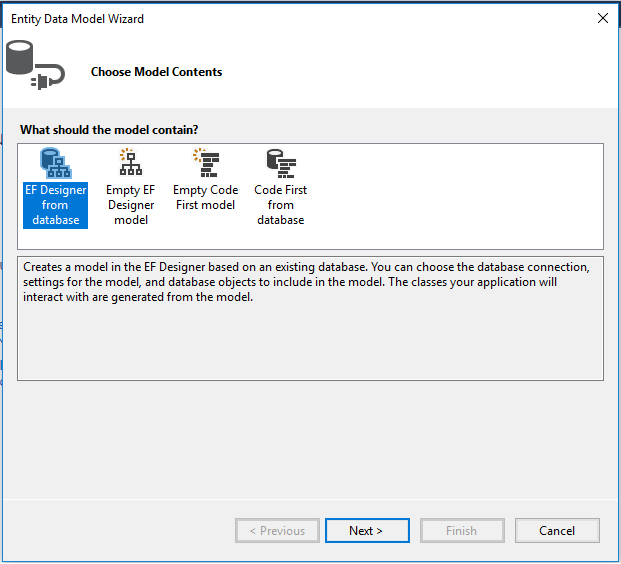
步骤 6
下一步是 EF Designer,只需单击 下一步。
步骤 7
将显示一个新弹出窗口。单击 下一步。如果您的连接未建立,请单击新建连接。
步骤 8
复制数据库连接服务器名称并将其粘贴到服务器名称 文本框 中。您将看到所有数据库,选择您的数据库,然后单击 确定。
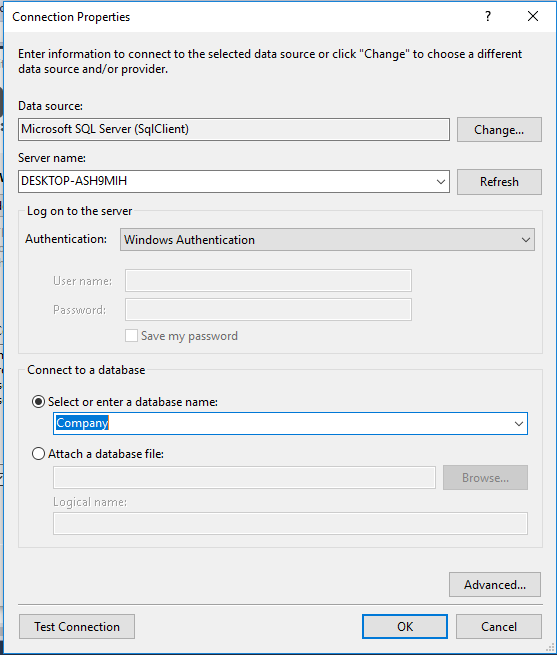
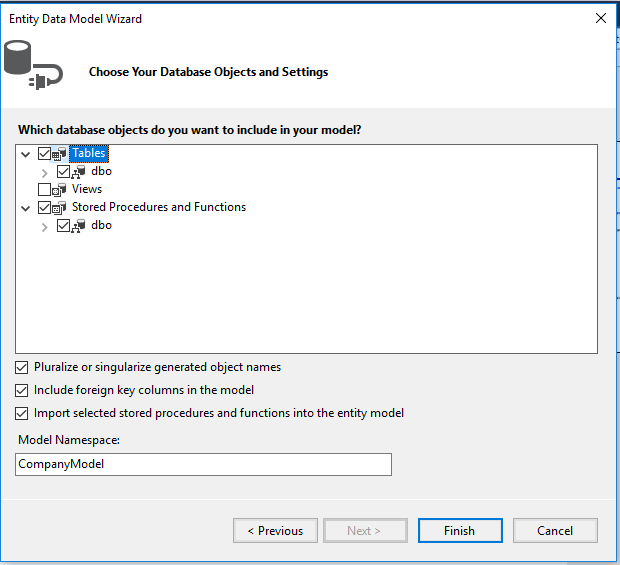
步骤 9
将显示下一个弹出窗口,粘贴数据库服务器名称,选择数据库并测试连接,然后单击 下一步。在这里,在新屏幕中,选择您的表和存储过程。然后单击 完成。
下一步是右键单击 controllers 文件夹并添加一个新控制器。将其命名为“Paginationcontroller”,并在 Paginationcontroller 中添加以下命名空间。
这是获取所有分页记录的完整代码。
完整的 Paging Controller 代码
using System.Collections.Generic;
using System.Data.Entity.Core.Objects;
using System.Linq;
using System.Web.Http;
using Pagination.Models;
namespace Pagination.Controllers
{
    public class PaginationController : ApiController
    {
        CompanyEntities2 db = new CompanyEntities2();

        [HttpGet]
        public object getAllCompanies(int pageNo, int pageSize, string sortOrder)
        {

            var oMyString = new ObjectParameter("totalCount", typeof(int));

            var companyDetails = db.Usp_GetAllCompanies(pageNo, pageSize, sortOrder).ToList();
            return companyDetails;
        }

        [HttpGet]
        public object getAllCompaniesCount()
        {

            var companyDetailsCount = db.Usp_getAllCompaniesCount().SingleOrDefault();
            return companyDetailsCount;
        }
    }
}
前端
步骤 1
让我们使用以下 npm 命令创建一个 Angular 项目
ng new pagination
第二步
在 Visual Studio Code 中打开新创建的项目,并在该项目中 安装 bootstrap
npm install bootstrap --save
现在打开 styles.css 文件并添加 Bootstrap 文件引用。要在 styles.css 文件中添加引用,请添加此行
@import '~bootstrap/dist/css/bootstrap.min.css';
步骤 3
现在让我们使用以下命令创建一个新组件
ng g c pagination
步骤 4
现在使用以下命令创建一个新服务
ng generate service pagination
步骤 5
现在打开 pagination.component.html 并粘贴以下代码以查看 HTML 模板。
<div class="row">
  <div class="col-12 col-md-12">
    <div class="card">
      <div class="card-header">
        Companies 1-{{pageSize}} (Total:{{totalCompaniesCount}})
      </div>
      <div class="card-body position-relative">

        <div class="table-responsive cnstr-record companie-tbl">
          <table class="table table-bordered heading-hvr">
            <thead>
              <tr>
                <th style="cursor: pointer;" [ngClass]="order =='CompanyNumber'? 'active':''"
                  (click)="setOrder('CompanyNumber')" width="80">Company Name.</th>
                <th style="cursor: pointer;" [ngClass]="order =='CompanyType'? 'active':''"
                  (click)="setOrder('CompanyType')" width="75">City</th>
                <th [ngClass]="order =='CompanyName'? 'active':''" style="cursor: pointer;"
                  (click)="setOrder('CompanyName')">State
                </th>
                <th [ngClass]="order =='OrgNo'? 'active':''"
                 style="cursor: pointer;" (click)="setOrder('OrgNo')"
                  width="75">Owner
                </th>
                <th [ngClass]="order =='Street'? 'active':''"
                 style="cursor: pointer; width:250px"
                  (click)="setOrder('Street')">Publish Year</th>
              </tr>
            </thead>
            <tbody>
              <tr *ngFor="let item of companies">
                <td>{{item.CompanyName}}</td>
                <td>{{item.City}}</td>
                <td>{{item.State}}</td>
                <td>{{item.Owner}}</td>
                <td>{{item.PublishYear}}</td>

              </tr>
            </tbody>
          </table>

        </div>
        <!-- Code by pagination -->
        <div class="container mw-100">
          <div class="row">
            <div class="col-md-3"> </div>
            <div *ngIf="companies !=0" class="col-md-6">
              <ul class="pagination justify-content-center">
                <li *ngFor="let page of pageField;let i=index" class="page-item">
                  <a (click)="showCompaniesByPageNumber(page,i)"
                  [ngClass]="pageNumber[i] ? 'pageColor':'page-link'"
                    style=" margin-right: 5px;;margin-top: 5px">{{page}}

                </li>
              </ul>
              <div style="text-align: center;">
                Page {{currentPage}} of Total page {{paginationService.exactPageList}}
              </div>
            </div>
          </div>
        </div>
      </div>
    </div>
  </div>
</div>
步骤 6
之后,打开 pagination.component.ts 文件,并在其中编写逻辑的文件中添加以下代码。
import { Component, OnInit } from '@angular/core';
import { ApiService } from './api.service';
import { PaginationService } from './pagination.service';

@Component({
  selector: 'app-pagination',
  templateUrl: './pagination.component.html',
  styleUrls: ['./pagination.component.css']
})
export class PaginationComponent implements OnInit {
  companies = [];
  pageNo: any = 1;
  pageNumber: boolean[] = [];
  sortOrder: any = 'CompanyName';
  //Pagination Variables

  pageField = [];
  exactPageList: any;
  paginationData: number;
  companiesPerPage: any = 5;
  totalCompanies: any;
  totalCompaniesCount: any;

  constructor(public service: ApiService, public paginationService: PaginationService) { }

  ngOnInit() {
    this.pageNumber[0] = true;
    this.paginationService.temppage = 0;
    this.getAllCompanies();
  }
  getAllCompanies() {
    this.service.getAllCompanies
    (this.pageNo, this.companiesPerPage, this.sortOrder).subscribe((data: any) => {
      this.companies = data;
      this.getAllCompaniesCount();
    })
  }

  //Method For Pagination
  totalNoOfPages() {

    this.paginationData = Number(this.totalCompaniesCount / this.companiesPerPage);
    let tempPageData = this.paginationData.toFixed();
    if (Number(tempPageData) < this.paginationData) {
      this.exactPageList = Number(tempPageData) + 1;
      this.paginationService.exactPageList = this.exactPageList;
    } else {
      this.exactPageList = Number(tempPageData);
      this.paginationService.exactPageList = this.exactPageList
    }
    this.paginationService.pageOnLoad();
    this.pageField = this.paginationService.pageField;

  }
  showCompaniesByPageNumber(page, i) {
    this.companies = [];
    this.pageNumber = [];
    this.pageNumber[i] = true;
    this.pageNo = page;
    this.getAllCompanies();
  }

  getAllCompaniesCount() {
    this.service.getAllCompaniesCount().subscribe((res: any) => {
      this.totalCompaniesCount = res;
      this.totalNoOfPages();
    })
  }
}
步骤 7
接下来打开 pagination.component.css 文件并粘贴代码以进行一些样式设置。
@charset "utf-8";
/* CSS Document */
@media all{
    *{padding:0px;margin:0px;}
div{vertical-align:top;}
img{max-width:100%;}
html {-webkit-font-smoothing:antialiased; -moz-osx-font-smoothing:grayscale;}
body{overflow:auto!important; width:100%!important;}
html, body{background-color:#e4e5e6;}
html {position:relative; min-height:100%;}

.card{border-radius:4px;}
.card-header:first-child {border-radius:4px 4px 0px 0px;}

/*Typekit*/
html, body{font-family:'Roboto', sans-serif; font-weight:400; font-size:13px;}
body{padding-top:52px;}

p{font-family:'Roboto', sans-serif; color:#303030; font-weight:400; margin-bottom:1rem;}
input, textarea, select{font-family:'Roboto', sans-serif;}

h1,h2,h3,h4,h5,h6{font-family:'Roboto', sans-serif; font-weight:700;}
h1{font-size:20px; color:#000000; margin-bottom:10px;}
h2{font-size:30px;}
h3{font-size:24px;}
h4{font-size:18px;}
h5{font-size:14px;}
h6{font-size:12px;}

.row {margin-right:-8px; margin-left:-8px;}
.col, .col-1, .col-10, .col-11, .col-12, .col-2, .col-3, .col-4, .col-5,
.col-6, .col-7, .col-8, .col-9, .col-auto, .col-lg, .col-lg-1, .col-lg-10,
.col-lg-11, .col-lg-12, .col-lg-2, .col-lg-3, .col-lg-4, .col-lg-5, .col-lg-6,
.col-lg-7, .col-lg-8, .col-lg-9, .col-lg-auto, .col-md, .col-md-1, .col-md-10,
.col-md-11, .col-md-12, .col-md-2, .col-md-3, .col-md-4, .col-md-5, .col-md-6,
.col-md-7, .col-md-8, .col-md-9, .col-md-auto, .col-sm, .col-sm-1, .col-sm-10,
.col-sm-11, .col-sm-12, .col-sm-2, .col-sm-3, .col-sm-4, .col-sm-5, .col-sm-6,
.col-sm-7, .col-sm-8, .col-sm-9, .col-sm-auto, .col-xl, .col-xl-1, .col-xl-10,
.col-xl-11, .col-xl-12, .col-xl-2, .col-xl-3, .col-xl-4, .col-xl-5, .col-xl-6,
.col-xl-7, .col-xl-8, .col-xl-9, .col-xl-auto {padding-right:8px; padding-left:8px;}

.card-header{background-color:#f0f3f5; border-bottom:1px solid #c8ced3;
font-size:13px; font-weight:600; color:#464646;
text-transform:uppercase; padding:.75rem 8px;}

.cnstr-record th{white-space:nowrap;padding:.45rem .2rem; font-size:13px;
border-bottom-width:0px!important;}
.cnstr-record thead{background:#f0f3f5;}

.cnstr-record .form-control{font-size:13px; padding:0px 0rem 0px 0.2rem;
height:calc(2rem + 2px);}
.cnstr-record select.form-control{padding-left:.05rem;}
.cnstr-record .table td, .cnstr-record .table th {vertical-align:middle;}
.cnstr-record .table td{padding:.3rem;}
.cnstr-record .table td h4{margin:0px;}

.wp-50{width:50px;}
.wp-60{width:60px;}
.wp-70{width:70px;}
.wp-80{width:80px;}
.wp-90{width:90px;}
.wp-100{width:100px;}
.mw-auto{min-width:inherit;}
.expand-row{width:100%; border:solid 1px #596269; display:inline-block;
border-radius:3px; width:16px; height:16px; vertical-align:top;
background:#596269; color:#ffffff!important;}
.expand-row img{vertical-align:top; position:relative; top:2px;}
.sub-table th{font-weight:400; font-size:12px;}
.sub-table td{background:#efefef;}
.no-bg td{background:inherit;}
.mw-100{max-width:100%;}

.activeTabColor{
    color: #fff;
    background-color: #000000;
}
.page-item:first-child .page-link {
    margin-left: 0;
    border-top-left-radius: .25rem;
    border-bottom-left-radius: .25rem;
}

.pageColor{
    position: relative;
    display: block;
    padding: .5rem .75rem;
    margin-left: -1px;
    line-height: 1.25;
    color: white!important;
    background-color: black!important;
    border: 1px solid #dee2e6;
}
.notAllowed{
    position: relative;
    display: block;
    padding: .5rem .75rem;
    margin-left: -1px;
    line-height: 1.25;
    color: #007bff;
    background-color: #fff;
    border: 1px solid #dee2e6;
    cursor: not-allowed;
}
.page-link {
    position: relative;
    display: block;
    padding: .5rem .75rem;
    margin-left: -1px;
    line-height: 1.25;
    color: #007bff;
    background-color: #fff;
    border: 1px solid #dee2e6;
}
}
步骤 8
最后,打开 pagination.service.ts 文件并添加服务以调用我们的 API。
import { Injectable } from '@angular/core';

@Injectable()

export class PaginationService {
    //Pagination Variables

    temppage: number = 0;
    pageField = [];
    exactPageList: any;

    constructor() {
    }

    // On page load
    pageOnLoad() {
        if (this.temppage == 0) {

            this.pageField = [];
            for (var a = 0; a < this.exactPageList; a++) {
                this.pageField[a] = this.temppage + 1;
                this.temppage = this.temppage + 1;
            }
        }
    }
}
步骤 9
让我们在 api.service.ts 文件中添加以下代码
import { Injectable } from '@angular/core';
import { HttpClient } from '@angular/common/http';
import { Observable } from 'rxjs';

@Injectable({
  providedIn: 'root'
})
export class ApiService {
    private url = "";

    constructor(public http: HttpClient) {
    }

getAllCompanies(pageNo,pageSize,sortOrder): Observable<any> {
    this.url = 'https://:59390/api/Pagination/getAllCompanies?pageNo=' +
                pageNo+'&pageSize='+pageSize+'&sortOrder='+sortOrder;
    return this.http.get(this.url);
  }

  getAllCompaniesCount(): Observable<any> {
    this.url = 'https://:59390/api/Pagination/getAllCompaniesCount';
    return this.http.get(this.url);
  }
}
第 10 步
下一步也是最后一步是向项目中添加 app 模块文件。
import { BrowserModule } from '@angular/platform-browser';
import { NgModule } from '@angular/core';

import { AppComponent } from './app.component';
import { ApiService } from './pagination/api.service';
import { HttpClientModule } from '@angular/common/http';
import { PaginationService } from './pagination/pagination.service';
import { PaginationComponent } from './pagination/pagination.component';

@NgModule({
  declarations: [
    AppComponent,
    PaginationComponent
  ],
  imports: [
    BrowserModule,
    HttpClientModule
  ],
  providers: [ApiService,PaginationService],
  bootstrap: [AppComponent]
})
export class AppModule { }
第 11 步
现在是时候查看输出了,只需打开终端并键入“ng serve -o”以自动编译并在浏览器中打开。
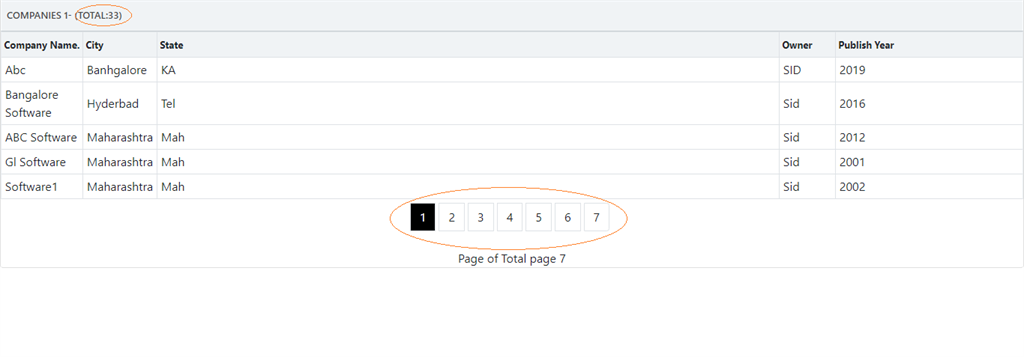
加载我们的页面后,您可以看到如下所示的输出图像
在这里,总记录数为 33,基于此,我们的前端逻辑将计算页数,即每页显示 5 条记录(可更改),因此直到第 6 页,每页有 5 条记录,这意味着现在只剩下 3 条记录,它们将出现在最后一页,即第 7 页。
第 2 页:要显示的记录总数为 5。
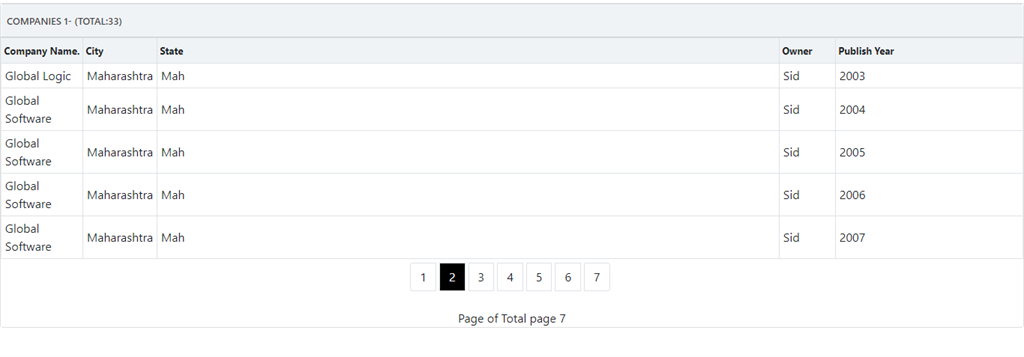
在最后一页,只显示 3 条记录。

通过这一步,我们已成功完成了前端、Web API 和后端编码。
结论
在本文中,我试图解释如何使用 Angular 8 和 ASP.NET 进行服务器端分页,获取记录并以分页方式显示它们。
这是服务器端分页的第一部分。
在我下一篇文章或第二部分中,我们将学习如何添加上一步和下一步按钮,此外,我们将手动设置每页的记录总数。
我只是一个学习者,渴望学习新事物,不仅仅是技术方面,而是所有方面。
“永不停止学习,因为生活永不停止教导” .....作者:释迦牟尼。
最后,请不要忘记就本文提供您宝贵的反馈/评论/问题。如果您喜欢并理解本文,请告诉我,我该如何改进它。
历史
- 2020 年 1 月 9 日:初始版本