Cookie 身份验证 in .NET Core 3.0
4.65/5 (8投票s)
.NET Core 中有多种身份验证选项。本文将演示如何在 .NET Core 3.0 中添加基于 Cookie 的身份验证。
引言
身份验证是根据用户的身份来确定或授予用户访问系统或用户权限的过程。在 .NET Core 中有多种身份验证选项。本文将演示如何在 .NET Core 3.0 中添加基于 Cookie 的身份验证。
使用 .NET Core 3.0,您可以开箱即用地使用基于 Cookie 的身份验证,而无需添加新的 NuGet 包。
必备组件
创建 Web 应用程序的步骤
- 打开 Visual Studio 2019,然后从选项列表中选择 创建新项目 选项

- 选择该选项后,将打开一个新窗口以选择项目模板。
- 选择“ASP.NET Core Web 应用程序”,然后单击 下一步 按钮。

- 将打开一个新屏幕来配置您的新项目。根据需要提供 项目名称、位置、解决方案名称。按 创建 按钮。

- 单击 创建 按钮后,将打开一个新屏幕来配置与项目相关的信息,例如您想创建哪个环境的 Web 应用程序?.NET Framework 或 .NET Core。从下拉列表中选择 .NET Core 和 ASP.NET Core 版本。然后,从列表中选择 Web 应用程序(模型-视图-控制器)选项,然后按 创建 按钮来创建项目。

现在我们的项目将以 .NET Core 环境的基本结构打开。您可以在解决方案资源管理器中观察到,它将包含 Controllers、Models 和 Views 文件夹,以及“Startup.cs”和其他文件,如下图所示

- 运行您的应用程序以检查创建的 Web 应用程序是否正常运行。默认情况下,它将打开项目的主页(Home 控制器的 Index 页)。
集成 Cookie 身份验证
[Authorize]:此属性有助于验证用户以访问控制器(用户信息)Claim:包含将存储在 Cookie 中的用户相关信息ClaimsIdentity:传递声明列表和AuthenticationTypeClaimsPrincipal:接受ClaimsIdentity数组SignInAsync:将ClaimsPrinciple作为参数传递给它,最后,此方法将在浏览器中创建 Cookie
Startup.cs 文件代码更改
- 打开“Startup.cs”文件,并在
ConfigureServices方法中添加AddAuthentication服务,如下所示。提供登录路径以登录用户,以检查/验证用户是否有效。public void ConfigureServices(IServiceCollection services) { services.AddAuthentication("CookieAuthentication") .AddCookie("CookieAuthentication", config => { config.Cookie.Name = "UserLoginCookie"; config.LoginPath = "/Login/UserLogin"; }); services.AddControllersWithViews(); } - 在“Startup.cs”文件的
Configure方法中添加UseAuthentication和UseAuthorization扩展方法。UseAuthentication:帮助我们检查“您是谁?”UseAuthorization:帮助检查“您是否可以访问信息?” - Startup.cs 文件中的完整代码
	using System;
	using System.Collections.Generic;
	using System.Linq;
	using System.Threading.Tasks;
	using Microsoft.AspNetCore.Builder;
	using Microsoft.AspNetCore.Hosting;
	using Microsoft.AspNetCore.HttpsPolicy;
	using Microsoft.Extensions.Configuration;
	using Microsoft.Extensions.DependencyInjection;
	using Microsoft.Extensions.Hosting;

	namespace CookieAuthenticationDemo
	{
	    public class Startup
	    {
	        public Startup(IConfiguration configuration)
	        {
	            Configuration = configuration;
	        }

	        public IConfiguration Configuration { get; }

	        // This method gets called by the runtime.
            // Use this method to add services to the container.
	        public void ConfigureServices(IServiceCollection services)
	        {
	            services.AddAuthentication("CookieAuthentication")
	                 .AddCookie("CookieAuthentication", config =>
	                 {
	                     config.Cookie.Name = "UserLoginCookie";
	                     config.LoginPath = "/Login/UserLogin";
	                 });

	            services.AddControllersWithViews();
	        }

	        // This method gets called by the runtime.
            // Use this method to configure the HTTP request pipeline.
	        public void Configure(IApplicationBuilder app, IWebHostEnvironment env)
	        {
	            if (env.IsDevelopment())
	            {
	                app.UseDeveloperExceptionPage();
	            }
	            else
	            {
	                app.UseExceptionHandler("/Home/Error");
	                // The default HSTS value is 30 days.
	                // You may want to change this for production scenarios,
                    // see https://aka.ms/aspnetcore-hsts.
	                app.UseHsts();
	            }
	            app.UseHttpsRedirection();
	            app.UseStaticFiles();

	            app.UseRouting();

	            // who are you?
	            app.UseAuthentication();

	            // are you allowed?
	            app.UseAuthorization();

	            app.UseEndpoints(endpoints =>
	            {
	                endpoints.MapControllerRoute(
	                    name: "default",
	                    pattern: "{controller=Home}/{action=Index}/{id?}");
	            });
	        }
	    }
	}
在 Models 文件夹中添加 User.cs 文件
在 Models 文件夹中添加一个名为 Users 的新类,并将以下代码行放入其中
	using System.Collections.Generic;

	namespace CookieAuthenticationDemo.Models
	{
	    public class Users
	    {
	        public int Id { get; set; }
	        public string UserName { get; set; }
	        public string Name { get; set; }
	        public string EmailId { get; set; }
	        public string Password { get; set; }

	        public IEnumerable<Users> GetUsers()
	        {
	            return new List<Users>() { new Users
	            { Id = 101, UserName = "anet", Name = "Anet",
	            EmailId = "anet@test.com", Password = "anet123" } };
	        }
	    }
	}
使用新的 Action 方法更新 HomeController
HomeController 是 Visual Studio 在创建新项目时创建的默认控制器。
- 在
HomeController中添加一个新的 Action 方法,以使用Authorize属性获取用户列表。using CookieAuthenticationDemo.Models; using Microsoft.AspNetCore.Authorization; using Microsoft.AspNetCore.Mvc; namespace CookieAuthenticationDemo.Controllers { public class HomeController : Controller { public IActionResult Index() { return View(); } [Authorize] public ActionResult Users() { var uses = new Users(); return View(uses.GetUsers()); } } } - 为 Users 添加视图
- 转到 Views 文件夹并选择 Home 文件夹
- 右键单击 Home 文件夹以选择添加选项,然后选择 视图。
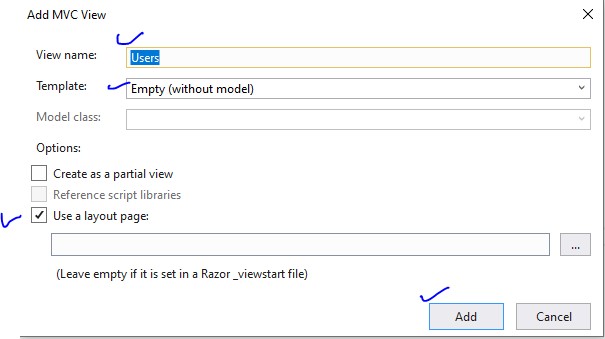
- 将弹出一个窗口来添加视图。
- 将 视图名称 设为 User,选择 模板 为 Empty,选择 Use a layout page,然后按 Add 按钮。将在 Home 文件夹中创建一个新的 Users.cshtml 文件。请参阅下图添加视图

将以下代码行放入其中以显示用户列表
	@model IEnumerable<CookieAuthenticationDemo.Models.Users>

	@{
	    ViewData["Title"] = "Users";
	}

	<h1>Users</h1>
	<table class="table">
	    <thead>
	        <tr>
	            <th>
	                @Html.DisplayNameFor(model => model.Id)
	            </th>
	            <th>
	                @Html.DisplayNameFor(model => model.UserName)
	            </th>
	            <th>
	                @Html.DisplayNameFor(model => model.Name)
	            </th>
	            <th>
	                @Html.DisplayNameFor(model => model.EmailId)
	            </th>
	            <th></th>
	        </tr>
	    </thead>
	    <tbody>
	@foreach (var item in Model) {
	        <tr>
	            <td>
	                @Html.DisplayFor(modelItem => item.Id)
	            </td>
	            <td>
	                @Html.DisplayFor(modelItem => item.UserName)
	            </td>
	            <td>
	                @Html.DisplayFor(modelItem => item.Name)
	            </td>
	            <td>
	                @Html.DisplayFor(modelItem => item.EmailId)
	            </td>
	        </tr>
	}
	    </tbody>
	</table>
添加名为 Login 的新控制器
- 右键单击 controllers 文件夹
- 选择 Add,然后选择 Controller,再选择 MVC empty controller,然后单击 Add 按钮。
- 将控制器命名为 Login,即“LoginController”
- 将以下代码添加到该控制器中
using CookieAuthenticationDemo.Models; using Microsoft.AspNetCore.Authentication; using Microsoft.AspNetCore.Mvc; using System.Collections.Generic; using System.Linq; using System.Security.Claims; namespace CookieAuthenticationDemo.Controllers { public class LoginController : Controller { [HttpGet] public ActionResult UserLogin() { return View(); } [HttpPost] public ActionResult UserLogin([Bind] Users user) { // username = anet var users = new Users(); var allUsers = users.GetUsers().FirstOrDefault(); if (users.GetUsers().Any(u => u.UserName == user.UserName )) { var userClaims = new List<Claim>() { new Claim(ClaimTypes.Name, user.UserName), new Claim(ClaimTypes.Email, "anet@test.com"), }; var grandmaIdentity = new ClaimsIdentity(userClaims, "User Identity"); var userPrincipal = new ClaimsPrincipal(new[] { grandmaIdentity }); HttpContext.SignInAsync(userPrincipal); return RedirectToAction("Index", "Home"); } return View(user); } } } - 添加
UserLogin.cshtml(UserLogin 视图) 页面- 在 Views 文件夹中添加一个名为
User的新文件夹。 - 在 User 文件夹中添加
UserLogin,并将以下代码行放入其中以实现用户登录UserLogin.cshtml 的代码
@model CookieAuthenticationDemo.Models.Users

	@{
	    ViewData["Title"] = "User Login";
	}

	<hr />
	<div class="row">
	    <div class="col-md-4">
	        <form asp-action="UserLogin">
	            <h2>User Login</h2>
	            <div asp-validation-summary="ModelOnly" class="text-danger"></div>
	            <div class="form-group">
	                <label asp-for="UserName" class="control-label"></label>
	                <input asp-for="UserName" class="form-control" />
	                <span asp-validation-for="UserName" class="text-danger"></span>
	            </div>
	            <div class="form-group">
	                <label asp-for="Password" class="control-label"></label>
	                <input type="password" asp-for="Password"
                     class="form-control" />
	                <span asp-validation-for="Password" class="text-danger"></span>
	            </div>
	            <div class="form-group">
	                <input type="submit" value="Login"
                     class="btn btn-default btn-primary" />
	            </div>
	        </form>
	    </div>
	</div>
- 在 Views 文件夹中添加一个名为
更新 _Layout.cshtml 页面
更新 _Layout.cshtml 页面以添加新的选项卡/超链接以获取用户列表。
_Layout.cshtml 的代码如下
	<!DOCTYPE html>
	<html lang="en">
	<head>
	    <meta charset="utf-8" />
	    <meta name="viewport"
	    content="width=device-width, initial-scale=1.0" />
	    <title>@ViewData["Title"] - CookieAuthenticationDemo</title>
	    <link rel="stylesheet"
	    href="~/lib/bootstrap/dist/css/bootstrap.min.css" />
	    <link rel="stylesheet" href="~/css/site.css" />
	</head>
	<body>
	    <header>
	        <nav class="navbar navbar-expand-sm
	        navbar-toggleable-sm navbar-light bg-white border-bottom box-shadow mb-3">
	            <div class="container">
	                <a class="navbar-brand" asp-area=""
	                asp-controller="Home"
	                asp-action="Index">CookieAuthenticationDemo</a>
	                <button class="navbar-toggler" type="button"
	                data-toggle="collapse"
	                data-target=".navbar-collapse"
	                aria-controls="navbarSupportedContent"
	                        aria-expanded="false" aria-label="Toggle navigation">
	                    <span class="navbar-toggler-icon"></span>
	                </button>
	                <div class="navbar-collapse
	                collapse d-sm-inline-flex flex-sm-row-reverse">
	                    <ul class="navbar-nav flex-grow-1">
	                        <li class="nav-item">
	                            <a class="nav-link text-dark"
	                            asp-area="" asp-controller="Home"
	                            asp-action="Index">Home</a>
	                        </li>
	                        <li class="nav-item">
	                            <a class="nav-link text-dark"
	                            asp-area="" asp-controller="Home"
	                            asp-action="Users">Users</a>
	                        </li>
	                    </ul>
	                </div>
	            </div>
	        </nav>
	    </header>
	    <div class="container">
	        <main role="main" class="pb-3">
	            @RenderBody()
	        </main>
	    </div>

	    <footer class="border-top footer text-muted">
	        <div class="container">
	            © 2020 - CookieAuthenticationDemo - <a asp-area=""
	            asp-controller="Home" asp-action="Privacy">Privacy</a>
	        </div>
	    </footer>
	    <script src="~/lib/jquery/dist/jquery.min.js"></script>
	    <script src="~/lib/bootstrap/dist/js/bootstrap.bundle.min.js"></script>
	    <script src="~/js/site.js" asp-append-version="true"></script>
	    @RenderSection("Scripts", required: false)
	</body>
	</html>
运行您的应用程序
成功运行应用程序后,应用程序的输出应如下屏幕所示

单击 Users 选项卡以获取用户列表,它将打开一个登录页面以登录用户。
问题:为什么会要求登录?
答案:[Authorize] 属性限制未经授权的请求访问数据/信息,并将重定向到登录页面以检查用户是否有效。在我们的例子中,我们将此属性添加到了 HomeController 的 Users Action 方法上。

提供用户名和密码进行登录。登录后,将在浏览器中创建一个 Cookie,如下所示

再次单击 Users 选项卡,现在您可以找到用户列表的最终结果,而无需显示登录屏幕。

要测试您的基于 Cookie 的身份验证,您可以从浏览器中删除已创建的 Cookie,然后单击 Users 选项卡。它将再次要求登录。
摘要
在本文中,我讨论了如何在 .NET Core 3.0 中添加基于 Cookie 的身份验证。我们还创建了一个用户登录表单,以便用户登录我们的应用程序以访问有用的信息。请查找附加的代码以更好地理解。
历史
- 2020 年 1 月 14 日:初始版本
