
C++17 新特性和技巧
4.99/5 (39投票s)
C++17 标准的新特性
- 下载 structured_bindings - 1 KB
- 下载 if-init-statement - 1 KB
- 下载 switch-init-statement - 1 KB
- 下载 namespace_cpp17 - 1 KB
- 下载 new_attributes - 1 KB
- 下载 from_chars - 1 KB
- 下载 to_chars - 1 KB
- 下载 constexpr_lambdas - 1 KB
- 下载 lambda_capturing_this - 1 KB
- 下载 __has_include - 1 KB
- 下载 if-constexpr - 1 KB
- 下载 string_view - 1 KB
- 下载 std-byte - 1 KB
- 下载 std-variant - 1 KB
- 下载 std-optional - 1 KB
- 下载 std-any - 1 KB
- 下载 filesystem - 1 KB
- 下载 parallel_sort - 1 KB
目录
- 引言
- 设置集成开发环境(IDE)
- 结构化绑定
- 带初始化的 'if' 和 'switch' 语句
- Constexpr lambdas 和按值捕获 *this
- if constexpr
- __has_include
- 使用属性命名空间时无需重复
- 属性 'nodiscard'、'fallthrough'、'maybe_unused'
- std::string_view
- 嵌套 'namespaces'
- 字符串转换
- 超对齐动态内存分配
- 折叠表达式
- 'inline' 变量
- 库新增内容
- 文件系统
- 并行算法
- C++17 中已移除的特性
- 摘要
引言
在本文中,我们将讨论新的 C++17 标准的新特性。
本文提供了真实的示例,将帮助该语言新标准的初学者更快地理解如何在实践中应用新特性。
各章节中的代码已在 Visual Studio 2017 中测试过。

(您可以点击图片查看放大的原始图片这里。)
设置集成开发环境 (IDE)
无论使用哪种 IDE,您很可能都需要配置它以使用最新的 C++ 标准。
我使用 Visual Studio 2017,所以我会演示如何设置它以使用新标准。
设置 C++ 版本
要为 Visual Studio 项目设置编译器选项,请遵循以下步骤
- 在解决方案资源管理器窗口中,右键单击项目名称,然后选择“属性”以打开项目属性页对话框(或按 ALT + ENTER)。
- 选择“配置属性” > “C/C++” > “语言”属性页。
- 在属性列表中,选择“一致性模式”属性的下拉菜单,然后选择 /permissive-。
这将禁用非标准的 C++ 扩展,并在 VS2017 中启用标准一致性。
- 在属性列表中,选择“C++ 语言标准”属性的下拉菜单,然后选择 /std:c++17 或 /std:c++latest。
- 按“确定”按钮保存您的更改。

要启用新标准的最新功能,您也可以采取另一种方法
- 打开项目的属性页对话框。
- 选择“配置属性”->“C/C++”->“命令行”。
- 在“附加选项”文本框中添加以下参数:/std:c++17 或 /std:c++latest
- 按“确定”按钮保存您的更改。

结构化绑定
函数返回多个值在编程中并非新概念,许多其他编程语言中也存在类似的功能。C++17 引入了一项新功能(结构化绑定),提供了与其他语言中多返回值类似的功能。
在下面的示例中,我想概述一下在旧的 C++ 标准、现代标准 (C++11/14) 以及今天的 C++17 中,我们可以从函数返回多个值的一些选项。
     #include <iostream>
     #include <tuple> // std::tie

     const double PI = 3.14159265;

     void calculateSinCos(const double param, double & resSin, double & resCos)
     {
          resSin = sin(param * PI / 180.0); // converting degrees to radians
          resCos = cos(param * PI / 180.0); // converting degrees to radians
     }

     std::pair<double, double> calculateSinCos(const double param)
     {
          return { sin(param * PI / 180.0), cos(param * PI / 180.0) };
     }

     std::tuple<double, double> calculateSinCos_Tuple(const double param)
     {
          return std::make_tuple(sin(param * PI / 180.0),
                 cos(param * PI / 180.0));  // packing values into tuple
     }

     int main()
     {
          double param { 90.0 };
          double resultSin { 0.0 };
          double resultCos { 0.0 };

          //C++98
          calculateSinCos(param, resultSin, resultCos);
          std::cout << "C++98 : sin(" << param << ") = " <<
          resultSin << ", cos(" << param << ") = "
          << resultCos << "\n";

          //C++11
          const auto resSinCos(calculateSinCos(param));
          std::cout << "C++11 : sin(" << param << ") = " <<
          resSinCos.first << ", cos(" << param << ") = "
          << resSinCos.second << "\n";

          //C++11
          std::tie(resultSin, resultCos) = calculateSinCos(param);
          std::cout << "C++11 : sin(" << param << ") = " <<
          resultSin << ", cos(" << param << ") = "
          << resultCos << "\n";

          // C++17
          auto[a, b] =  calculateSinCos(param);
          std::cout << "C++17 :
          sin(" << param << ") = " << a << ",
          cos(" << param << ") = " << b << "\n";

          // C++17
          auto[x, y] =
             calculateSinCos_Tuple(param); // std::make_tuple(sin(val), cos(val));
          std::cout << "C++17 :
          sin(" << param << ") = " << x << ",
          cos(" << param << ") = " << y << "\n";
     }
让我们看看上面的代码
- 在这种方法中
calculateSinCos(param, resultSin, resultCos);
我们使用了最古老且可能仍是最常见的方法——使用作为引用传递的 OUTPUT 参数来向调用者“返回”值。
- 考虑访问从函数返回的多个值的不同方式
const auto resSinCos(calculateSinCos(param));
通过
resSinCos.first和resSinCos.second访问生成的std::pair的各个值不是很具表达力,因为我们很容易混淆名称,而且难以阅读。 - 另外,在 C++17 之前,可以使用
std::tie来解包一个元组/对以达到类似的效果。std::tie(resultSin, resultCos) = calculateSinCos(param);
这种方法演示了如何将生成的 pair 解包到两个变量中。注意,这个例子展示了
std::tie的全部威力,但尽管如此,std::tie的功能不如结构化绑定强大,因为我们必须首先定义所有我们想要绑定的变量。 - 结构化绑定是 C++17 的一项新功能,它使代码更具可读性、表现力和简洁性。
auto[a, b] = calculateSinCos(param);
注意,变量
a和b不是引用;它们是生成的对象成员变量的别名(或绑定)。编译器会为临时对象分配一个唯一的名称。 - 在 C++11 中,
std::tuple容器被添加进来,用于构建一个包含多个返回值的元组。但是 C++11 和 C++14 都不支持直接从元组中轻松获取std::tuple元素的简单方法(当然,我们可以使用std::tie来解包元组,但我们仍然需要了解每个对象的类型以及这个元组中有多少个对象。哎,这太痛苦了……)C++17 修复了这个缺陷,结构化绑定允许我们编写如下代码::
auto[x, y] = calculateSinCos_Tuple(param);
让我们看看上面结构化绑定代码的输出

正如我们所见,不同的方法显示了相同的结果……
带初始化的 'if' 和 'switch' 语句
良好的编程风格限制了变量的作用域。有时,需要获取某个值,并且只有当它满足特定条件时,才能进行进一步处理。
为此,C++17 提供了一个带有初始化的新版 'if' 语句。
if (init; condition)
让我们看看在 C++17 新标准之前 'if' 条件是如何工作的
#include <iostream>

int getValueOfNumber() {

	return 5;
}

int main() {

	int num = getValueOfNumber();
	if (num > 100) {
		std::cout << "The value of the num is greater than 100" << std::endl;
	}
	else {
		std::cout << "The value of the num is less than or equal to 100" << std::endl;
	}

	std::cout << "num =" << num << std::endl;
}
请注意,num 值在 if 和 else 语句内部以及作用域条件之外都是可见的。
现在,在 C++17 中,我们可以这样写
#include <iostream>

int getValueOfNumber() {

     return 5;
}

int main() {

	if (auto num = getValueOfNumber(); num > 100) {
		std::cout << "The value of the num is greater than 100" << std::endl;
	}
	else {
		std::cout << "The value of the num is less than or equal to 100" << std::endl;
	}

	std::cout << "num =" << num;
}
如果我们尝试编译上面的代码,我们会得到以下错误

现在,num 仅在 if 和 else 语句内部可见,因此在 if/else 作用域之外访问变量会导致错误……
这同样适用于 switch 语句。
C++17 提供了带有初始化的新版 'switch' 语句。
switch (init; condition)
让我们看看在 C++17 新标准之前 'switch' 条件是如何工作的
#include <iostream>
#include <cstdlib>
#include <ctime>

int getRandomValueBetween_1_and_2() {
     srand(time(NULL));
     return rand() % 2 + 1; // // value in the range 1 to 2
}

int main() {

     int num = getRandomValueBetween_1_and_2();
     switch (num) {
     case 1:
          std::cout << "num = 1 \n"; break;
     case 2:
          std::cout << "num = 2 \n"; break;
     default:
          std::cout << "Error value in num ! \n";
     }

     std::cout << "Value output outside the 'switch': num =" << num << std::endl;
}
请注意,num 值在 switch 语句内部以及作用域条件之外都是可见的。
现在,在 C++17 中,我们可以这样写
#include <iostream>
#include <cstdlib>
#include <ctime>

int getRandomValueBetween_1_and_2() {
     srand(time(NULL));
     return rand() % 2 + 1; // value in the range 1 to 2
}

int main() {

     switch (auto num(getRandomValueBetween_1_and_2()); num) {
     case 1:
          std::cout << "num = 1 \n"; break;
     case 2:
          std::cout << "num = 2 \n"; break;
     default:
          std::cout << "Error value in num ! \n";
     }

     std::cout << "Value output outside the 'switch': num =" << num << std::endl;
}
如果我们尝试编译上面的代码,我们会得到以下错误
现在,num 仅在 switch 语句内部可见,因此在 switch 作用域之外访问变量会导致错误……
由于所描述的机制,变量的作用域保持得很短。在 C++17 之前,这只能通过额外的 {花括号} 来实现。
较短的生命周期减少了作用域内的变量数量,保持代码整洁并使重构更容易。
因此,这个 C++17 的新特性对于未来的使用非常有用。
constexpr lambdas 和按值捕获 *this
正如这里所写:“在 C++11 及更高版本中,lambda 表达式——通常称为 lambda——是一种在调用或作为参数传递给函数的位置定义匿名函数对象(闭包)的便捷方式。通常,lambda 用于封装传递给算法或异步方法的几行代码。本文定义了什么是 lambda,将它们与其他编程技术进行比较,描述了它们的优点,并提供了一个基本示例。”
C++17 为 lambda 表达式提供了两项重大改进
- constexpr lambdas
- 捕获 *this
constexpr lambdas
Lambda 表达式是 C++11 中引入的一种用于编写匿名函子的简短形式,它已成为现代 C++ 标准不可或缺的一部分。使用 C++11 中也引入的 constexpr 关键字,我们可以在编译时求值函数或变量的值。在 C++17 中,这两个实体被允许相互作用,因此 lambda 可以在常量表达式的上下文中被调用。
例如
constexpr auto my_val {foo()};
使用 constexpr 修饰符声明变量 my_val 将确保它存储的函数对象将在编译时创建和初始化。
在lambda 表达式的定义中,我们可以使用可选的 constexpr 参数
[capture clause] (parameter list) mutable costexpr exception-specification -> return-type
{

}
如果我们用 constexpr 关键字显式标记 lambda 表达式,那么当该表达式不满足 constexpr 函数的标准时,编译器将生成一个错误。使用 constexpr 函数和 lambda 表达式的优点是,如果它们使用在整个过程中都是常量的参数调用,编译器可以在编译时计算出它们的结果。这将导致二进制文件中的代码更少。如果我们没有显式地指出 lambda 表达式是 constexpr,但这些表达式满足所有必需的标准,那么它们无论如何都会被认为是 constexpr,只是隐式地。
例如
constexpr auto NvalueLambda = [](int n) { return n; }; // implicitly constexpr
如果我们希望 lambda 表达式是 constexpr,最好显式地将其设置为这样,因为在出现错误的情况下,编译器会通过打印错误消息来帮助我们识别它们。
让我们看一个例子,演示 C++17 如何静态地(在编译时)评估 lambda 表达式和函数
#include <iostream>

constexpr int Increment(int value) {
	return [value] { return value + 1; }();
};

constexpr int Decrement(int value) {
	return [value] { return value - 1; }();
};

constexpr int AddTen(int value) {
	return [value] { return value + 10; }();
};

int main() {

	constexpr auto SumLambda    = [](const auto &a, const auto &b)
                                    { return a + b; };            // implicitly constexpr
	constexpr auto NvalueLambda = [](int n) { return n; };        // implicitly constexpr
	constexpr auto Pow2Lambda   = [](int n) { return n * n; };    // implicitly constexpr

	auto Add32Lambda = [](int n)
	{
		return 32 + n;
	};

	auto GetStr = [](std::string s)
	{
		return "Hello" + s;
	};

	constexpr std::string(*funcPtr)(std::string) = GetStr;

	static_assert(13 == SumLambda(8,5),   "SumLambda does not work correctly");
	static_assert(12 == NvalueLambda(12), "NvalueLambda does not work correctly");
	static_assert(42 == Add32Lambda(10),  "Add32Lambda does not work correctly");
	static_assert(25 == Pow2Lambda(5),    "Pow2Lambda does not work correctly");
	static_assert(11 == Increment(10),    "Increment does not work correctly");
	static_assert( 9 == Decrement(10),    "Decrement does not work correctly");
	static_assert(25 == AddTen(15),       "AddTen does not work correctly");

	constexpr int resultAdd32 = Add32Lambda(10);  // implicitly constexpr

	std::cout << "SumLambda(8,5)   = " << SumLambda(8, 5)  << std::endl;
	std::cout << "NvalueLambda(12) = " << NvalueLambda(12) << std::endl;
	std::cout << "Add32Lambda(10)  = " << Add32Lambda(10)  << std::endl;
	std::cout << "Pow2Lambda(5)    = " << Pow2Lambda(5)    << std::endl;
	std::cout << "Increment(10)    = " << Increment(10)    << std::endl;
	std::cout << "Decrement(10)    = " << Decrement(10)    << std::endl;
	std::cout << "DAddTen(15)      = " << AddTen(15)       << std::endl;
	std::cout << "funcPtr("" World"") = " <<
	funcPtr(" World").c_str() << std::endl;

	return 0;
}
正如我们在程序的最后几行所看到的,static_assert 函数执行编译时断言检查。静态断言是一种在代码编译时检查条件是否为 true 的方法。如果不是,编译器必须发出错误消息并停止编译过程。因此,我们在编译时检查 lambda 表达式!如果条件为 TRUE,static_assert 声明没有效果。如果条件为 FALSE,断言失败,编译器显示错误消息并且编译失败。
由于我们所有的 lambda 表达式都遵循规则,因此没有产生错误。程序编译良好,执行程序后,我们将看到以下输出

按值捕获 *this
在 C++17 中,我们可以在类的成员函数使用的 lambda 表达式内部使用 'this' 指针,以捕获整个类对象的副本。
例如,lambda 表达式的语法可能如下所示
auto my_lambda = [*this]() { };
让我们想象一下,我们需要实现一个将进行复杂算术运算的类。它将有一个成员函数,该函数会将数字 10 添加到原始值,并显示加法的结果。
为此,我们实现以下代码
#include <iostream>

class ArithmeticOperations {

     public:
          ArithmeticOperations(const int val = 0) : m_sum(val) {}

          void addTen() {
               auto addTenLambda = [this]() { m_sum += 10;
               std::cout << "\nFrom 'addTenLambda' body : the value of m_sum =
                            " << m_sum << "\n\n"; };
               addTenLambda();
          }

          int getSum() {
               return m_sum;
          }

     private:
          int m_sum;
};

int main() {
     ArithmeticOperations oper;

     std::cout << "Before calling addTen() value of m_sum = " << oper.getSum() << '\n';
     oper.addTen();
     std::cout << "After  calling addTen() value of m_sum = " << oper.getSum() << '\n';

     return 0;
}

正如我们在 ArithmeticOperations::addTen 中看到的,我们使用了一个捕获 'this' 指针的 lambda 表达式。通过捕获 'this' 指针,我们有效地让 lambda 表达式访问了周围成员函数所能访问的所有成员。
也就是说,addTenLambda 的函数调用操作符将可以访问 ArithmeticOperations 的所有 protected 和 private 成员,包括成员变量 m_sum。
因此,我们可以看到在 addTen 函数中调用 addTenLambda 之后,m_sum 的值发生了变化。
然而,也许有人不想改变数据成员的原始值,而只是想得到我们之前的值加上 10 的结果。
然后,我们可以利用 C++17 的新功能——捕获原始对象的副本,并对这个副本进行更改类成员值的操作。
#include <iostream>

class ArithmeticOperations {

public:
     ArithmeticOperations(const int val = 0) : m_sum(val) {}

     void addTen_CaptureCopy() {
          auto addTenLambdaCopy = [*this]() mutable
          { m_sum += 10; std::cout << "\nFrom 'addTenLambdaCopy'
           body : the value of m_sum = " << m_sum << "\n\n"; };
          addTenLambdaCopy();
     }

     int getSum() {
          return m_sum;
     }

private:
     int m_sum;
};

int main() {
     ArithmeticOperations oper;

     std::cout << "Before calling addTen_CaptureCopy() value of m_sum =
                  " << oper.getSum() << '\n';
     oper.addTen_CaptureCopy();
     std::cout << "After  calling addTen_CaptureCopy() value of m_sum =
                  " << oper.getSum() << "\n\n";
     return 0;
}

在上面的示例中,我们引用了一个显式捕获 *this 的 lambda 表达式,以获取 this 的副本,并可以访问原始对象的所有数据成员。
捕获之后,我们使用 lambda 表达式体来修改原始 this 副本的 m_sum 成员。
因此,在 lambda 表达式中直接将 10 添加到 (* this).m_sum 之后,我们在屏幕上显示了 (* this).m_sum 的新值。
然而,当我们从主函数访问 getSum() 时,我们得到的是未被改变的原始对象的 m_sum 值。这就是区别!
这种技术可以用于,例如,lambda 表达式的生命周期可能比原始对象更长的情况。例如,在使用异步调用和并行处理时。
if constexpr
在 C++17 中,出现了 'if constexpr' 表达式。这个新特性就像常规的 if-else 结构一样工作。它们之间的区别在于条件表达式的值是在编译时确定的。
为了更好地说明 'if constexpr' 结构对于 C++17 是多么伟大的创新,让我们看看在以前的语言标准中,类似的功能是如何用 std::enable_if 实现的。
#include <iostream>
#include <string>

template <typename T>
std::enable_if_t<std::is_same<T, int>::value, void>
TypeParam_Cpp11(T x) {
     std::cout << "TypeParam_Cpp11: int : " << x << std::endl;
}

template <typename T>
std::enable_if_t<std::is_same<T, double>::value, void>
TypeParam_Cpp11(T x) {
     std::cout << "TypeParam_Cpp11: double : " << x << std::endl;
}

template <typename T>
std::enable_if_t<std::is_same<T, std::string>::value, void>
TypeParam_Cpp11(T x) {
     std::cout << "TypeParam_Cpp11: std::string : " << x << std::endl;
}

int main() {
     TypeParam_Cpp11(5.9);
     TypeParam_Cpp11(10);
     TypeParam_Cpp11(std::string("577"));

     return 0;
}
以上代码的输出如下

上面三个 TypeParam_Cpp11 函数的实现看起来很简单。只是函数复杂化了以下表达式 std::enable_if_t <condition, type> (C++14 添加了 std::enable_if_t 的一个变体。它只是访问 std::enable_if_t 内部 ::type 的一个别名) 如果条件为 true (即,仅当 std::is_same 为 true,且因此 T 和 U 是相同类型时),std::enable_if 有一个 public 成员 typedef type,否则,std::enable_if_t 不指向任何东西。因此,在任何给定时间,条件只能对三个实现中的一个为 true。
当编译器看到具有相同名称的不同模板函数并且必须选择其中一个时,一个重要的原则就会起作用:它由缩写 SFINAE(替换失败不是错误)表示。在这种情况下,这意味着如果其中一个函数的返回值无法基于无效的模板表达式推断出来(即,当条件为 false 时的 std::enable_if_t),编译器不会生成错误。它只会继续工作并尝试处理其他函数实现。这就是全部的秘密。哎……真麻烦!
现在让我们使用 C++17 的新特性,即 ‘if constexpr’ 表达式,来修改上面的实现,这使我们能够通过在编译时做出决策来简化代码。
#include <iostream>
#include <string>

template <typename T>
void TypeParam_Cpp17(T x)   {
     if constexpr (std::is_same_v<T, int>) {
          std::cout << "TypeParam_Cpp17: int : " << x << std::endl;
     }
     else if constexpr (std::is_same_v<T, double>) {
          std::cout << "TypeParam_Cpp17: double : " << x << std::endl;
     }
     else if constexpr (std::is_same_v<T, std::string>) {
          std::cout << "TypeParam_Cpp17: std::string : " << x << std::endl;
     }
}

int main() {

     TypeParam_Cpp17(5.9);
     TypeParam_Cpp17(10);
     TypeParam_Cpp17(std::string("577"));

     return 0;
}
上述代码的输出

上面的例子使用了条件判断。包含多个条件的 constexpr-if-else 块,在编译时完成分支判断。为了确定参数 'x' 的类型,TypeParam 函数使用了表达式 std::is_same_v<A, B>。如果 A 和 B 是相同类型,表达式 std::is_same_v<A, B> 的值为布尔值 true,否则值为 false。
总的来说,编译器从程序生成的所有运行时代码将不包含与 'if constexpr' 条件相关的额外分支。看起来这些机制的工作方式与用于文本替换的 #if 和 #else 预处理器宏相同,但在这种结构中,整个代码甚至不需要在语法上是正确的。'if constexpr' 结构的分支必须在语法上有效,但未使用的分支不必在语义上正确。
__has_include
C++ 17 有一个新特性用于测试可用的头文件。新标准使得可以使用宏常量预处理器令牌或预处理表达式 __has_include 来检查给定的头文件是否存在。
为了避免重复包含相同的文件和无限递归,通常使用头文件保护
#ifndef MyFile_H
#define MyFile_H
// contents of the file here
#endif
然而,我们现在可以像下面这样使用预处理器的常量表达式
     #if __has_include (<header_name>)
     #if __has_include ("header_name")
例如,在我们需要编写可移植代码并且在编译时根据操作系统检查需要获取哪个头文件的情况下,可以不使用像这样的代码
#ifdef _WIN32
#include <tchar.h>
#define the_windows 1
#endif

#if (defined(linux) || defined(__linux) || defined(__linux__) ||
     defined(__GNU__) || defined(__GLIBC__)) && !defined(_CRAYC)
#include <unistd.h>
#endif

#include <iostream>

int main() {
#ifdef the_windows
	std::cout << "This OS is Windows";
#else
	std::cout << "This OS is Linux";
#endif
	return 0;
}
在 C++17 中,我们可以使用 __has_include() 宏来达到同样的目的。
#if __has_include(<tchar.h>)
#include <tchar.h>
#define the_windows 1
#endif

#if __has_include(<unistd.h>)
#include <unistd.h>
#endif

#include <iostream>

int main() {
#ifdef the_windows
     std::cout << "This OS is Windows";
#else
     std::cout << "This OS is Linux";
#endif
     return 0;
}
使用属性命名空间时无需重复
在 C++17 中,当使用“非标准”属性时,规则被稍微优化了。
在 C++11 和 C++14 中,如果我们需要写几个属性,就必须为每个命名空间指定一个附加的前缀,像这样
     [[ rpr::kernel, rpr::target(cpu,gpu) ]] // repetition
     int foo() {
          /* .....*/
          return 0;
     }
当然,上面的代码看起来有点杂乱和臃肿。因此,国际标准化组织决定简化需要同时使用多个属性的情况。
在 C++17 中,我们不再需要为一起使用的后续属性的每个命名空间添加前缀。
例如,使用这项创新,上面显示的代码看起来会更清晰、更易懂。
     [[using rpr: kernel, target(cpu,gpu)]] // without repetition
     int foo() {
          /* .....*/
          return 0;
     }
属性 'nodiscard', 'fallthrough', 'maybe_unused'
在 C++11 中,通用属性被添加到语言中,允许编译器提供有关代码中字符或表达式的额外信息。
过去,主流编译器提出了自己的机制,例如
- GNU GCC 和 LLVM/Clang 中的
__attribute__(deprecated) - Visual C++ 中的
__declspec(deprecated)
通用属性,也是一系列属性说明符,允许我们以一种独立于编译器的方式表达相同的意思。
C++17 中的新属性
在 C++17 中,有三个新属性进入了标准,它们允许我们控制各种编译器警告的出现。
fallthrough放在switch的case分支之前,表示此处故意省略了 break 运算符,也就是说,编译器不应该对穿透(fallthrough)发出警告。void Test_With_fallthrough_Attribute(int num_version) { switch (num_version) { case 1998: std::cout << "c++ 98"; break; case 2011: std::cout << "c++ 11" << std::endl; break; case 2014: std::cout << "c++ 14" << std::endl; case 2017: std::cout << "c++ 17" << std::endl; [[fallthrough]];// No warning! The hint to the compiler case 2020: std::cout << "c++ 20" << std::endl; break; default: std::cout << "Error!" << std::endl; break; } }然而,微软的 C++ 编译器目前不会对穿透行为发出警告,所以这个属性对编译器行为没有影响。
nodiscard指示函数返回的值不能被忽略,必须存储在某个变量中。让我们看下面的例子
          int Test_Without_nodiscard_Attribute() {
               return 5;
          }

          [[nodiscard]] int Test_With_nodiscard_Attribute() {
               return 5;
          }

          int main() {
               Test_Without_nodiscard_Attribute();
               Test_With_nodiscard_Attribute();
               return 0;
          }
编译后,调用
Test_With_nodiscard_Attribute ()函数时将返回以下警告“
warning C4834: 丢弃带有 'nodiscard' 属性的函数的返回值”,如下图所示
这意味着你可以强制用户处理错误。
让我们修复上面的代码
int Test_Without_nodiscard_Attribute() { return 5; } [[nodiscard]] int Test_With_nodiscard_Attribute() { return 5; } int main() { Test_Without_nodiscard_Attribute(); int res = Test_With_nodiscard_Attribute(); return 0; }maybe_unused使编译器在某些编译模式下抑制关于未使用变量的警告(例如,函数返回码仅在 assert 中检查)。让我们看下面的例子
     [[maybe_unused]] void foo() { std::cout <<
     "Hi from foo() function \n"; } // Warning suppressed for function not called

     int main() {

          [[maybe_unused]] int x = 10; // Warning suppressed for x

          return 0;
     }
在上面的例子中,函数
foo()和局部变量 'x' 没有被使用,但是关于未使用变量的警告将被抑制。在 Visual Studio 2017 版本 15.3 及更高版本中(可通过 /std:c++17 使用)[[maybe_unused]] 指定变量、函数、类、typedef、非静态数据成员、枚举或模板特化可能被有意不使用。
当标记为 [[maybe_unused]] 的实体未被使用时,编译器不会发出警告。

std::string_view
C++17 为我们带来了一个名为 std::string_view 的新类型,这是一个定义在 string_view 头文件中的类型,已添加到标准库中。
由于该类型的性能,建议将其用于输入字符串参数,以替代 const std::string&。该类型的值将类似于 const std::string 类型的值,但有一个主要区别:它们封装的字符串永远不能通过其公共接口被修改。换句话说,std::string_view 让我们能够以非拥有方式引用现有字符串,我们可以查看但不能触摸 std::string_view 的字符(虽然使用 const std::string_view & 没有问题,但我们也可以按值传递 std::string_view,因为复制这些对象很廉价)。
让我们来看下面的例子
#include <iostream>
#include <string_view>
#include <chrono>

void func_str(const std::string & s) {
     std::cout << "s =" << s.data() << std::endl;
}

void func_str_view(std::string_view  s) {
     std::cout << "s =" << s.data() << std::endl;
}

int main() {
     std::string str ("abcdefghijklmnopqrstuvwxyz0123456789ABCDEFGHIJKLMNOPQRSTUVWXYZ");

	auto t1 = std::chrono::high_resolution_clock::now();
	func_str(str);
	auto t2 = std::chrono::high_resolution_clock::now();
	auto duration1 = std::chrono::duration_cast<std::chrono::milliseconds>(t2 - t1).count();
	std::cout << "The processing time of func_str(str) is " << duration1 << " ticks\n\n";

	auto t3 = std::chrono::high_resolution_clock::now();
	func_str_view(str);
	auto t4 = std::chrono::high_resolution_clock::now();
	auto duration2 = std::chrono::duration_cast<std::chrono::milliseconds>(t4 - t3).count();
	std::cout << "The processing time of func_str_view(str) is " << duration2 << " ticks\n\n";

     return 0;
}
我们来看一下上面代码的输出

当然在您的机器上,输出可能会有所不同,但无论如何,上面的例子表明使用 std::string_view 的函数要快得多。注意 func_str_view 函数接受某个 string,但不需要所有权,它清楚地反映了意图:该函数获得了对 string 的概览。func_str_view 函数也适用于 const char * 参数,因为 std::string_view 是一个字符数组的薄视图,仅持有一个指针和一个长度。因此,这允许我们只提供一个方法,该方法可以有效地接受 const char* 或 std::string,而无需不必要地复制底层数组。
例如,我们可以这样调用一个函数
func_str_view("abcdefghijklmnopqrstuvwxyz0123456789ABCDEFGHIJKLMNOPQRSTUVWXYZ");
这个 func_str_view 函数不拥有任何东西,它只是查看 string,不涉及任何堆分配和字符数组的深拷贝。
这就是为什么这个函数比 func_str 快得多的原因。
同时,与它的“亲戚” - std::string 相比,std::string_view 也有一些限制。
std::string_view对空字符结尾一无所知与
std::string不同,std::string_view不支持c_str()函数,该函数会给我们一个以null结尾的字符数组。当然,std::string_view有data()函数,但就像std::string的data()一样,这并不能保证字符数组会以null结尾。因此,要调用一个带有以
string null结尾的参数的函数func_str_view_c_str("aaaaabbbbbccccc");我们需要在函数体中创建一个临时的stringstd::string,例如,像这样void func_str_view_c_str(std::string_view s) { std::cout << "s = " << std::string(s).c_str() << std::endl; // string_view does not provide a c_str() }- 从函数返回
std::string_view可能会导致悬空指针的问题让我们看下面的例子
     #include <iostream>
     #include <string_view>

     class StringMngr {
          std::string m_str;

     public:
          StringMngr(const char* pstr = "Test") :m_str(pstr) {}

          std::string_view GetSubString() const {
               return m_str.substr(1u); // substring starts at index 1 till the end
          }
     };

     int main() {
          StringMngr str_mgr;
          std::cout << "str_mgr.GetSubString() = " << str_mgr.GetSubString();

          return 0;
     }
上面代码的输出如下所示

上面的代码是如何工作的?可能会有什么问题?
我们只是想赋予查看
substring的权利,但问题在于std::string::substr()返回一个std::string类型的临时对象。而该方法返回的是一个时间线(即,临时对象)的概览(即,视图),当这个概览可以使用时,这个临时对象已经消失了。
正确的解决方案是在调用
substr之前显式转换为std::string_view。std::string_view GetSubString() const { return std::string_view(m_str).substr(1u); }修改
GetSubString()函数后,我们得到了预期的输出
std::string_view的substr()方法更正确:它返回子字符串的概览,而不会创建临时副本。真正的问题是,理想情况下,
std::string::substr()方法应该返回std::string_view。而这只是 C++ 中尚未解决的更普遍的悬空引用问题的一个方面。
嵌套 'namespaces'
命名空间用于将代码组织成逻辑组,以便将不同的实体(如类、方法和函数)归为一个名称。此外,命名空间旨在防止名称冲突,这在您的代码库包含多个库时尤其可能发生。命名空间范围内的所有标识符在没有限定符的情况下彼此可见。好的,这可以理解,在 C++17 之前,我们像这样使用命名空间。
#include <iostream>

namespace CompanyABC
{
     class Transport
     {
     public:
          void foo() { std::cout << "foo()"; }
     };

     void goHome1() { std::cout << "goHome1()"; }
     void startGame() { std::cout << "goHome1()"; }
}
当我们使用两个或更多个嵌套命名空间时,事情变得有趣起来。
在 C++ 17 之前,我们使用以下命名空间格式
#include <iostream>

namespace CompanyDEF {
     namespace  GroundTransportation {
          namespace HeavyTransportation {

               class Transport {
               public:
                    void foo() { std::cout << "foo() \n"; }
               };

               void goHome() { std::cout << "goHome() \n"; }
          } // HeavyTransportation

          void startGame() { std::cout << "startGame() \n"; }

     } // roundTransportation

} // CompanyDEF
实体按如下方式创建和调用
	CompanyDEF::GroundTransportation::HeavyTransportation::Transport trnsprt;
	trnsprt.foo();

	CompanyDEF::GroundTransportation::HeavyTransportation::goHome();
	CompanyDEF::GroundTransportation::startGame();
从 C++17 开始,嵌套命名空间可以写得更紧凑
#include <iostream>

namespace CompanyDEF {
     namespace  GroundTransportation {
          namespace HeavyTransportation {

               class Transport {
               public:
                    void foo() { std::cout << "foo() \n"; }
               };

               void goHome() { std::cout << "goHome() \n"; }
          } // HeavyTransportation

          void startGame() { std::cout << "startGame() \n"; }

     } // roundTransportation

} // CompanyDEF
实体按如下方式创建和调用
	using namespace CompanyDEF::GroundTransportation::HeavyTransportation;
	using namespace CompanyDEF::GroundTransportation::HeavyTransportation;
	using namespace CompanyDEF::GroundTransportation;

	Transport trnsprt;
	trnsprt.foo();

	goHome();
	startGame();
字符串转换
当然,在之前的 C++ 标准中,总是有字符串转换函数,例如:std::atoi、std::atol、std::atoll、std::stoi、std::stol、std::stoll、std::sprintf、std::snprintf、std::stringstream、std::sscanf、std::strtol、std::strtoll、std::stringstream、std::to_string 等。不幸的是,这些功能在性能方面效率不够高。通常认为,上述函数对于复杂的字符串处理(例如高效处理 JSON 或 XML 等复杂数据格式)来说速度较慢。特别是当这类数据格式用于网络通信,而高带宽是关键因素时。
在 C++17 中,我们得到了两组函数:from_chars 和 to_chars,它们允许低级字符串转换并显著提高性能。
例如,微软报告称 C++17 浮点数 to_chars() 在科学记数法方面得到了改进,对于 float 类型,它比 sprintf_s() “%.8e” 快大约 10 倍,对于 double 类型,它比 sprintf_s() “%.16e” 快 30 倍。这使用了 Ulf Adams 的新算法 Ryu。
让我们看一个例子,说明如何使用 std::from_chars 将字符串转换为整数和浮点数。
#include <iostream>
#include <string>
#include <array>
#include <charconv> // from_chars

int main()
{
	std::cout << "---------------------------------------------------------------------------------------------------\n";
	std::cout << "Let's demonstrate string conversion to integer using the 'std::from_chars' function " << std::endl;
	std::cout << "---------------------------------------------------------------------------------------------------\n";

	std::array<std::string, 8=""> arrIntNums = { std::string("-123"),
                              std::string("-1234"),
                              std::string("-12345"),
                              std::string("-1234567890987654321"),
                              std::string("123"),
                              std::string("1234"),
                              std::string("1234567890"),
                              std::string("1234567890987654321")};
	int stored_int_value { 0 };
	for (auto& e : arrIntNums)
	{
		std::cout << "Array element = " << e << std::endl;
		const auto res = std::from_chars(e.data(), e.data() + e.size(),
                         stored_int_value /*, int base = 10*/);

		switch (res.ec)
		{
			case std::errc():
				std::cout << "Stored value: " << stored_int_value << ",
                Number of characters = " << res.ptr - e.data() << std::endl;
				break;
			case std::errc::result_out_of_range:
				std::cout << "Result out of range!
                Number of characters = " << res.ptr - e.data() << std::endl;
				break;
			case std::errc::invalid_argument:
				std::cout << "Invalid argument!" << std::endl;
				break;
			default:
				std::cout << "Error: res.ec = " << int(res.ec) << std::endl;
		}
	}

	std::cout << "\n---------------------------------------------------------------------------------------------------";
	std::cout << "\nLet's demonstrate string conversion to double using the 'std::from_chars' function ";
	std::cout << "\n---------------------------------------------------------------------------------------------------\n";

	std::array<std::string, 8=""> arrDoubleNums = { std::string("4.02"),
                                 std::string("7e+5"),
                                 std::string("A.C"),
                                 std::string("-67.90000"),
                                 std::string("10.9000000000000000000000"),
                                 std::string("20.9e+0"),
                                 std::string("-20.9e+1"),
                                 std::string("-10.1") };
	double stored_dw_value { 0.0 };
	for (auto& e : arrDoubleNums)
	{
		std::cout << "Array element = " << e << std::endl;
		const auto res = std::from_chars(e.data(), e.data() + e.size(),
                         stored_dw_value, std::chars_format::general);

		switch (res.ec)
		{
		case std::errc():
			std::cout << "Stored value: " << stored_dw_value << ",
                 Number of characters = " << res.ptr - e.data() << std::endl;
			break;
		case std::errc::result_out_of_range:
			std::cout << "Result out of range! Number of characters = "
                      << res.ptr - e.data() << std::endl;
			break;
		case std::errc::invalid_argument:
			std::cout << "Invalid argument!" << std::endl;
			break;
		default:
			std::cout << "Error: res.ec = " << int(res.ec) << std::endl;
		}
	}

	return 0;
}
请注意,在第二次调用 std::from_chars 时,我们使用了额外的最后一个参数 std::chars_format::general。
std::chars_format::general(定义在头文件 <charconv> 中)用于为 std::to_chars 和 std::from_chars 函数指定浮点数格式。
让我们看看上面代码的输出,它将字符串转换为整数和双精度浮点数。

现在让我们做相反的操作,即考虑一个例子,说明我们如何使用 std::to_chars 将整数和浮点数转换为字符串。
#include <iostream>
#include <string>
#include <array>
#include <charconv> // to_chars

int main()
{
     std::cout << "--------------------------------------------------------------------------------------------------------------------\n";
     std::cout << "Let's demonstrate the conversion of long values to a string (5 characters long) using the 'std::to_chars' function " << std::endl;
     std::cout << "--------------------------------------------------------------------------------------------------------------------\n";

     // construction uses aggregate initialization
     std::array<long, 8=""> arrIntNums = { -123,-1234,-12345, -1234567890, 123, 1234, 1234567890, 987654321};
     std::string stored_str_value{ "00000" };
     for (auto& e : arrIntNums)
     {
          stored_str_value = "00000";
          std::cout << "Array element = " << e << std::endl;
          const auto res = std::to_chars(stored_str_value.data(),
              stored_str_value.data() + stored_str_value.size(), e /*, int base = 10*/);

          switch (res.ec)
          {
               case std::errc():
                    std::cout << "Stored value: " << stored_str_value << ",
                    Number of characters = " << res.ptr - stored_str_value.data() << std::endl;
                    break;
               case std::errc::result_out_of_range:
                    std::cout << "Result out of range! Number of characters = "
                              << res.ptr - stored_str_value.data() << std::endl;
                    break;
               case std::errc::value_too_large:
                    std::cout << "Value too large!" << std::endl;
                    break;
               default:
                    std::cout << "Error: res.ec = " << int(res.ec) << std::endl;
          }

     }

     std::cout << "--------------------------------------------------------------------------------------------------------------------\n";
     std::cout << "Let's demonstrate the conversion of double values to a string (5 characters long) using the 'std::to_chars' function " << std::endl;
     std::cout << "--------------------------------------------------------------------------------------------------------------------\n";

     // construction uses aggregate initialization
     std::array<double, 8=""> arrDoubleNums = {4.02, 7e+5, 5, -67.90000,
                                 10.9000000000000000000101,20.9e+0,-20.9e+1,-10.1};

     for (auto& e : arrDoubleNums)
     {
          stored_str_value = "00000";
          std::cout << "Array element = " << e << std::endl;
          const auto res = std::to_chars(stored_str_value.data(),
          stored_str_value.data() + stored_str_value.size(), e, std::chars_format::general);

          switch (res.ec)
          {
               case std::errc():
                    std::cout << "Stored value: " << stored_str_value << ",
                    Number of characters = " << res.ptr - stored_str_value.data() << std::endl;
                    break;
               case std::errc::result_out_of_range:
                    std::cout << "Result out of range! Number of characters = "
                              << res.ptr - stored_str_value.data() << std::endl;
                    break;
               case std::errc::value_too_large:
                    std::cout << "Value too large!" << std::endl;
                    break;
               default:
                    std::cout << "Error: res.ec = " << int(res.ec) << std::endl;
          }
     }

     return 0;
}
让我们看看上面代码的输出,它将 long 和 double 值转换为字符串。

超对齐动态内存分配
C++17 引入了针对超对齐数据的动态内存分配。
/Zc:alignedNew (C++17 over-aligned allocation) 这篇文章完美地描述了编译器和 MSVC 库如何支持 C++17 标准的动态内存分配,所以我不会在这个问题上添加任何内容。
折叠表达式
C++17 标准引入了一个新的语言语法元素——折叠表达式。这个新语法用于折叠可变参数模板的参数包(可变参数模板接收可变数量的参数,自 C++11 起得到支持)。使用折叠有助于避免繁琐的递归调用,并允许我们以紧凑的形式将操作应用于包的所有单个参数。在处理模板参数包列表时,折叠表达式可以与以下二元运算符一起使用:+, -, *, /, %, ^, &, |, =, <, >, <<, >>, +=, -=, *=, /=, %=, ^=, &=, |=, <<=, >>=,==, !=, <=, >=, &&, ||, ,, .*, ->*。
使用可变参数模板声明折叠表达式的语法
template<class... T>
decltype(auto) summation(T... Values)
{
	// unfolds into the expression Values1 + (Values2 + (Values3 + Values4))...
	return (Values + ...);
}
让我们看下面的例子
#include <iostream>
#include <string>

template <typename ... Ts>
auto Sum_RightHand(Ts ... ts)
{
     return (ts + ...);
}

template <typename ... Ts>
auto Sum_LeftHand(Ts ... ts)
{
     return (... + ts);
}

int main() {

     std::cout << "Sum_RightHand output: \n";
     std::cout << Sum_RightHand(10, 20, 30) << std::endl;
     std::cout << Sum_RightHand(1.5, 2.8, 3.2) << std::endl;
     std::cout << Sum_RightHand(std::string("Hi "), std::string("standard "),
                  std::string("C++ 17")) << std::endl;

     std::cout << "\n";

     std::cout << "Sum_LeftHand output: \n";
     std::cout << Sum_LeftHand(10, 20, 30) << std::endl;
     std::cout << Sum_LeftHand(1.5, 2.8, 3.2) << std::endl;
     std::cout << Sum_LeftHand(std::string("Hi "), std::string("standard "),
                  std::string("C++ 17")) << std::endl;

     return 0;
}
上面代码的输出如下所示

在上面的代码中,我们为两个函数都使用了模板参数包定义了签名。
template <typename ... Ts>
auto function_name (Ts ... ts)
函数展开所有参数并使用折叠表达式将它们求和。(在函数作用域内,我们使用了 + 运算符来应用于参数包的所有值)
正如我们所见,Sum_RightHand (ts + ...) 和 Sum_LeftHand (... + ts) 得到相同的结果。然而,它们之间存在差异,这在其他情况下可能很重要:如果省略号 (...) 在运算符的右侧,则表达式称为右折叠。如果在左侧,则是左折叠。
在我们的例子中,Sum_LeftHand 展开如下
10 + (20 + 30)
1.5 + (2.8 + 3.2)
"Hi" + ("standard " + "C++ 17")
而使用 Sum_RightHand 的右一元折叠展开如下
(10 +20) + 30
(1.5 + 2.8) + 3.2
("Hi" + "standard ") + "C++ 17"
这些函数适用于不同的数据类型:int、double 和 std::string,但它们可以为任何实现了 + 运算符的类型调用。
在上面的例子中,我们向两个函数传递了一些参数以获得求和的结果。但是如果我们不带参数调用函数会发生什么?
例如像这样
int main() {

     std::cout << Sum_RightHand() << std::endl;
     return 0;
}

通过不带参数调用 Sum_RightHand() 函数,一个任意长度的参数包将不包含可以折叠的值,这会导致编译错误。
要解决这个问题,我们需要返回一个特定的值。一个显而易见的解决方案是返回零。
所以我们可以像这样实现它
#include <iostream>
#include <string>

template <typename ... Ts>
auto Sum_RightHand(Ts ... ts) {
     return (ts + ... + 0);
}

template <typename ... Ts>
auto Sum_LeftHand(Ts ... ts) {
     return (0 + ... + ts);
}

int main() {
     std::cout << "Sum_LeftHand()  = " << Sum_LeftHand()  << std::endl;
     std::cout << "Sum_RightHand() = " << Sum_RightHand() << std::endl;
     return 0;
}
上述代码的输出

请注意,两个折叠表达式都使用了初始值零!当没有参数时,中性元素非常重要——在我们的例子中,任何数加上零都不会改变任何东西,这使得 0 成为一个中性元素。因此,我们可以使用 + 或 - 运算符将 0 添加到任何折叠表达式中。如果参数包为空,这将导致函数返回值 0。从数学的角度来看,这是正确的,但从实现的角度来看,我们需要根据我们的需求来确定什么是正确的。
'inline' 变量
C++17 标准让我们能够声明内联变量。
这个特性使得实现纯头文件库(其中构成库的所有宏、函数和类的完整定义对编译器来说在一个头文件中可见)变得容易得多。
注意 C++11 向我们介绍了非静态数据成员,通过它我们可以在一个地方声明和初始化成员变量。
     class MyDate {

          int m_year   { 2019 };
          int m_month  { 11 };
          int m_day    { 10 };
          std::string strSeason{ "Winter" };
     };
然而,在 C++17 之前,我们不能直接在类中初始化静态变量数据成员的值。我们必须在类外进行初始化。
让我们看一个 'Environment' 类的简单例子,它可以是一个典型的纯头文件库的一部分。
#include <iostream>

class Environment {
public:
     static const std::string strVersionOS { "Windows" };
};

Environment environementManager;
在类定义下方,我们定义了一个全局类对象,用于访问 Environment 类的静态数据成员。
如果我们尝试编译上述文件,我们会得到以下错误

这里发生了什么,为什么编译器会抱怨?
Environment 类包含一个 static 成员,同时它本身是全局可访问的,这导致当从多个翻译单元包含时出现双重定义的符号。当我们为了编译和链接而将其包含在多个 C++ 源文件中时,它没有成功。
要修复此错误,我们需要添加 inline 关键字,这在 C++17 之前是不可能的。
#include <iostream>

class Environment {
     public:
          static const inline std::string strVersionOS { "Widows" };
     };

inline Environment environementManager;
就是这样...
以前,只有方法/函数可以声明为内联,但 C++17 允许我们也声明内联变量。
在上面的例子中,我们在一个地方进行了声明和定义,但这也可以在不同的地方完成,例如,像这样
#include <iostream>

class Environment {
public:
     static const std::string strVersionOS;
};

inline const std::string  Environment::strVersionOS = "Windows";

inline Environment environementManager;
库新增内容
许多新的、有用的数据类型已添加到 C++17 的标准库中,其中一些源于 Boost。
std::byte 代表一个字节。开发人员传统上使用 char(有符号或无符号)来表示字节,但现在有一种类型不仅可以是字符或整数。
然而,std::byte 可以转换为整数,反之亦然。std::byte 类型旨在与数据仓库交互,不支持算术运算,但支持位运算。
为了说明以上内容,让我们看看下面的代码
#include <iostream>
#include <cstddef>

void PrintValue(const std::byte& b) {
     std::cout << "current byte value is " << std::to_integer<int>(b) << std::endl;
}

int main() {
     std::byte bt {2};
     std::cout << "initial value of byte is " << std::to_integer<int>(bt) << std::endl;
     bt <<= 2;
     PrintValue(bt);
}
上述代码的输出

std::variant 是一个类型安全的联合体,在给定时间包含其中一个备选类型的值(这里不能有引用、数组或 'void')。
一个简单的例子:假设有一些数据,某个公司可以用一个 ID 或一个带有该公司全名的 string 来表示。这样的信息可以用一个包含无符号整数或 string 的 std::variant 来表示。通过给一个 std::variant 赋值一个整数,我们就设置了值,然后我们可以使用 std::get 来提取它,像这样
#include <iostream>
#include <variant>

int main() {
     std::variant<uint32_t, std::string> company;
     company = 1001;

     std::cout << "The ID of company is " << std::get<uint32_t>(company) << std::endl;
	return 0;
}
上述代码的输出

如果我们尝试使用一个未以这种方式定义的成员(例如,std::get<std::string>(company)),程序将抛出异常。
为什么使用 std::variant 而不是通常的 union?这主要是因为 union 在语言中主要是为了与 C 兼容而存在的,并且不能与非 POD 类型的对象一起工作。
这意味着,特别地,将具有自定义拷贝构造函数和析构函数的成员放入 union 中并不容易。而使用 std::variant,则没有这样的限制。
std::optional 类型是一个可能包含也可能不包含值的对象;这个对象作为函数的返回值非常有用和方便,当函数无法返回值时,它就作为一种替代方案,例如替代 null 指针。使用 optional 时,我们还有一个额外的好处:现在函数失败的可能性直接在声明中明确指出,而且由于我们必须从 optional 中提取值,我们意外使用 null 值的概率大大降低了。
让我们来看下面的例子
#include <iostream>
#include <string>
#include <optional>

std::optional<int> StrToInt(const std::string& s) {
     try {
          int val = std::stoi(s);
          return val;
     }
     catch (std::exception&) {
          return {};
     }
}

int main() {

     int good_value = StrToInt("689").value_or(0);
     std::cout << "StrToInt(""689"") returns " << good_value << std::endl;

     int bad_value = StrToInt("hfjkhjjkgdsd").value_or(0);
     std::cout << "StrToInt(""hfjkhjjkgdsd"") returns " << bad_value << std::endl;

     return 0;
}
上述代码的输出

上面的例子展示了一个 StrToInt 函数,它试图将一个 string 转换为一个整数。通过返回 std::optional,StrToInt 函数留下了传递一个无法转换的无效 string 的可能性。在 main 函数中,我们使用 value_or() 函数从 std::optional 中获取值,如果函数失败,它将返回默认值零(在转换失败的情况下)。
C++17 的另一个新增内容是 std::any 类型。std::any 为任何类型的单个值提供了一个类型安全的容器,并提供了允许您执行类型安全验证的工具。
让我们看下面的例子
#include <any>
#include <utility>
#include <iostream>
#include <vector>

int main() {

     std::vector<std::any> v { 10, 20.2, true, "Hello world!" };

     for (size_t i = 0; i < v.size(); i++) {
          auto& t = v[i].type();

          if (t == typeid(int)) {
               std::cout << "Index of vector : " << i << " Type of value : 'int'\n";
          }
          else if (t == typeid(double)) {
               std::cout << "Index of vector : " << i << " Type of value : 'double'\n";
          }
          else if (t == typeid(bool)) {
               std::cout << "Index of vector : " << i << " Type of value : 'bool'\n";
          }
          else if (t == typeid(char *)) {
               std::cout << "Index of vector : " << i << " Type of value : 'char *'\n";
          }
     }

     std::cout << "\n std::any_cast<double>(v[1]) = " << std::any_cast<double>(v[1])
               << std::endl;

     return 0;
}
以上代码的输出如下

在上面的代码中,我们在循环中遍历 std::vector<std::any> 的元素。在每次迭代中,我们提取向量的一个元素,然后尝试确定 std::any 值的真实类型。
请注意,std::any_cast<T>(val) 返回 'val' 中内部 T 值的副本。如果我们需要获取引用以避免复制复杂对象,我们需要使用 any_cast<T&>(val) 结构。
但 double 类型不是一个复杂的对象,因此我们可以负担得起获取一个副本。这正是我们在上面代码的倒数第二行所做的,我们在其中从 v[1] 访问了一个 double 类型的对象。
文件系统
C++17 添加了一个新的库,旨在极大简化与文件系统及其组件(如路径、文件和目录)的交互。由于每两个程序中就有一个或多或少地与文件系统打交道,我们有了一个新功能,可以省去我们在文件系统中处理文件路径的繁琐工作。毕竟,一些文件路径是绝对的,而另一些是相对的,而且它们甚至可能不是直接的,因为它们包含间接地址:. (当前目录) 和 .. (父目录)。
为了分隔目录,Windows 操作系统使用反斜杠 (\),而 Linux、MacOS 和各种类 Unix 操作系统使用斜杠 (/)
C++17 中引入的新功能支持不同操作系统的相同操作原则,因此我们不需要为支持不同操作系统的可移植程序编写不同的代码片段。
以下示例说明了如何使用 filesystem::path 和 filesystem::exists。std::filesystempath 类在我们使用与 Filesystem 相关的库时至关重要,因为大多数函数和类都与它相关联。filesystem::exists 函数允许您检查指定的文件路径是否实际存在。
让我们选择属性打开 Visual Studio 中的项目属性页,然后选择“配置属性” > “调试” > “命令参数”,并定义命令行参数:“C:\Test1”

然后运行以下代码
#include <iostream>
#include <filesystem>

namespace   fs = std::filesystem;

int main(int argc, char *argv[]) {
	if (argc != 2) {
		std::cout << "Usage: " << argv[0] << " <path>\n";
		return 1;
	}

	fs::path path_CmdParam { argv[1] };

	if (fs::exists(path_CmdParam)) {
		std::cout << "The std::filesystem::path " << path_CmdParam << " is exist.\n";
	}
	else {
		std::cout << "The std::filesystem::path " << path_CmdParam << " does not exist.\n";
		return 1;
     }

     return 0;
}
路径 'C:\Test1' 在我的机器上不存在,因此程序打印以下输出

在主函数中,我们检查用户是否提供了命令行参数。如果答案是否定的,我们会发出错误消息并显示如何正确使用程序。如果提供了文件路径,我们基于它创建一个 filesystem::path 对象的实例。我们基于一个包含文件路径描述的字符串初始化了一个路径类的对象。filesystem::exists 函数允许您检查指定的文件路径是否实际存在。到目前为止,我们还不能确定,因为可以创建不属于真实文件系统对象的路径类对象。exists 函数只接受一个路径类的实例,如果它实际存在,则返回 true。这个函数能够确定我们传递给它的是哪种路径(绝对或相对),这使得它非常有用。
除了 filesystem::exists 函数,filesystem 模块还提供了许多用于创建、删除、重命名和复制的有用函数。
- filesystem::create_directories 用于创建一个目录(即使我们需要创建多个子目录)
- filesystem::remove - 删除一个文件或一个空目录
- filesystem:: remove_all - 删除一个文件或递归删除一个目录
- filesystem::copy、filesystem::copy_file 和 filesystem::rename 用于使用操作系统工具复制和重命名目录和文件
- filesystem::resize_file 用于截断或增加文件大小(如果文件之前小于新文件大小,文件大小会增加,并且新区域看起来像被零填充)
在下一个示例中,我们将演示如何使用绝对和相对文件路径,以了解路径类及其相关辅助函数的强大之处。路径类会自动执行所有必要的字符串转换。它接受宽字符和窄字符数组的参数,以及格式为 UTF8 或 UTF16 的 std::string 和 std::wstring 类型。
#include <iostream>
#include <filesystem>

namespace   fs = std::filesystem;

int main(int argc, char *argv[]) {
     fs::path pathToFile { L"C:/Test/Test.txt" };

     std::cout << "fs::current_path() = "
               << fs::current_path()         << std::endl
               << "fs::absolute (C:\\Test\\Test.txt) = "
               << fs::absolute(pathToFile)   << std::endl

     << std::endl;

     std::cout << "(C:\\Test\\Test.txt).root_name() = "
               << pathToFile.root_name()     << std::endl
               << "(C:\\Test\\Test.txt).root_path() = "
               << pathToFile.root_path()     << std::endl
               << "(C:\\Test\\Test.txt).relative_path() = "
               << pathToFile.relative_path() << std::endl
               << "(C:\\Test\\Test.txt).parent_path() = "
               << pathToFile.parent_path()   << std::endl
               << "(C:\\Test\\Test.txt).filename() = "
               << pathToFile.filename()      << std::endl
               << "(C:\\Test\\Test.txt).stem() = "
               << pathToFile.stem()          << std::endl
               << "(C:\\Test\\Test.txt).extension() = "
               << pathToFile.extension()     << std::endl;

     fs::path concatenateTwoPaths{ L"C:/" };
     concatenateTwoPaths /= fs::path("Test/Test.txt");
     std::cout << "\nfs::absolute (concatenateTwoPaths) = "
               << fs::absolute(concatenateTwoPaths) << std::endl;

     return 0;
}
上述代码的输出

current_path() 函数返回当前工作目录的绝对路径(在上面的示例中,该函数返回我笔记本电脑上的 home 目录,因为我是从那里启动应用程序的)。接下来,我们对 fs::path pathToFile 进行各种操作。
path 类有几个方法可以返回有关路径本身不同部分的信息,而不是它可能引用的文件系统对象。
- pathToFile.root_name() 返回通用格式路径的根名称
- pathToFile.root_path() 返回路径的根路径
- pathToFile.relative_path() 返回相对于根路径的路径
- pathToFile.parent_path() 返回父目录的路径
- pathToFile.filename() 返回路径的通用格式文件名部分
- pathToFile.stem() 返回由通用格式路径标识的文件名,并去掉其扩展名
- pathToFile.extension() 返回文件名的扩展名
在最后三行(在 return 语句之前),我们可以看到 filesystem::path 如何自动规范化路径分隔符。
我们可以在构造函数参数中使用 '/' 作为目录分隔符。这使我们能够使用相同的字符串在 Unix 和 WINDOWS 环境中存储路径。
现在让我们看看如何使用 <filesystem> 通过递归和非递归遍历目录来列出目录中的所有文件。
以下列目录为例

并运行以下代码
#include <iostream>
#include <filesystem>

namespace   fs = std::filesystem;

int main(int argc, char *argv[]) {

	fs::path dir{ "C:\\Test\\" };

	if (!exists(dir)) {
		std::cout << "Path " << dir << " does not exist.\n";
		return 1;
	}

	for (const auto & entry : fs::directory_iterator(dir))
		std::cout << entry.path() << std::endl;

	return 0;
}
上述代码的输出

请注意,for 循环使用了 C++17 中引入的 std::filesystem::directory_iterator,它可以作为一个 LegacyInputIterator,遍历目录的 directory_entry 元素(但不访问子目录)。然而,我们的目录“C:\Test”包含子目录

如果我们在上面的代码中将 fs::directory_iterator 改为 std::filesystem::recursive_directory_iterator
     for (const auto & entry : fs::recursive_directory_iterator(dir))
          std::cout << entry.path() << std::endl;
那么运行程序后我们将得到以下输出

std::filesystem::recursive_directory_iterator 是一个 LegacyInputIterator,它迭代目录的 directory_entry 元素,并递归地迭代所有子目录的条目。
同样,与前一种情况一样,迭代顺序是未指定的,只是每个目录条目只被访问一次。
我们也可以使用 std::copy_if 算法来获取子目录列表,该算法将范围 [begin,end) 中 ' [](const fs::path& path) ' 返回 true 的元素复制到 'subdirs' 向量的范围中,并使用构造一个 std::back_inserter 在容器 'subdirs' 的末尾插入新元素(见下面的代码)。
std::copy 显示生成的 'subdirs' 向量
#include <iostream>
#include <filesystem>
#include <vector>
#include <iterator>

namespace   fs = std::filesystem;

int main(int argc, char *argv[]) {

     fs::path dir{ "C:\\Test\\" };

     if (!exists(dir)) {
          std::cout << "Path " << dir << " does not exist.\n";
          return 1;
     }

     std::cout << "\nLet's show all the subdirectories " << dir << "\n";

     std::vector<fs::path> paths;
     for (const auto & entry : fs::recursive_directory_iterator(dir))
          paths.push_back(entry.path());

     fs::recursive_directory_iterator begin("C:\\Test");
     fs::recursive_directory_iterator end;


     std::vector<fs::path> subdirs;
     std::copy_if(begin, end, std::back_inserter(subdirs), [](const fs::path& path) {
          return fs::is_directory(path);
     });

     std::copy(subdirs.begin(), subdirs.end(),
               std::ostream_iterator<fs::path>(std::cout, "\n"));

     return 0;
}
下面是递归遍历“C:\Test\”目录的输出,该目录在上面的代码中呈现。

在 C++17 中,<filesystem> 拥有一系列用于获取文件/目录元信息和执行文件系统操作的工具。
例如,我们有机会获取文件大小,读取或设置进程上次写入给定文件的时间,读取或设置文件权限等。
让我们再次看一下上一个例子中的目录

#include <iostream>
#include <fstream>
#include <filesystem>

namespace   fs = std::filesystem;

void demo_perms(fs::perms p)
{
     std::cout << ((p & fs::perms::owner_read) != fs::perms::none ? "r" : "-")
          << ((p & fs::perms::owner_write) != fs::perms::none ? "w" : "-")
          << ((p & fs::perms::owner_exec)  != fs::perms::none ? "x" : "-")
          << ((p & fs::perms::group_read)  != fs::perms::none ? "r" : "-")
          << ((p & fs::perms::group_write) != fs::perms::none ? "w" : "-")
          << ((p & fs::perms::group_exec)  != fs::perms::none ? "x" : "-")
          << ((p & fs::perms::others_read) != fs::perms::none ? "r" : "-")
          << ((p & fs::perms::others_write)!= fs::perms::none ? "w" : "-")
          << ((p & fs::perms::others_exec) != fs::perms::none ? "x" : "-")
          << '\n';
}

std::time_t getFileWriteTime(const std::filesystem::path& filename) {
     #if defined ( _WIN32 )
     {
          struct _stat64 fileInfo;
          if (_wstati64(filename.wstring().c_str(), &fileInfo) != 0)
          {
               throw std::runtime_error("Failed to get last write time.");
          }
          return fileInfo.st_mtime;
     }
     #else
     {
          auto fsTime = std::filesystem::last_write_time(filename);
          return decltype (fsTime)::clock::to_time_t(fsTime);
     }
     #endif
}

int main(int argc, char *argv[]) {

	fs::path     file_Test1 { "C:\\Test\\Test1.txt" };
	std::string  line;
	std::fstream myfile(file_Test1.u8string());

	std::cout << "The " << file_Test1 << "contains the following value :  ";
	if (myfile.is_open())
	{
		while (getline(myfile, line)) {
			std::cout << line << '\n';
		}
		myfile.close();
	}
	else {
          std::cout << "Unable to open " << file_Test1 ;
          return 1;
	}

	std::cout << "File size = " << fs::file_size(file_Test1) << std::endl;
	std::cout << "File permissions = ";
	demo_perms(fs::status(file_Test1).permissions());

	std::time_t t = getFileWriteTime(file_Test1);
	std::cout << file_Test1 << " write time is : "
              << std::put_time(std::localtime(&t), "%c %Z") << '\n';

	return 0;
}

在上面的代码中,我们可以看到使用 fs::file_size,我们可以在不读取文件内容的情况下确定文件的大小(正如程序输出所示,文件包含 5 个字符:TEST1,这正是 fs::file_size 函数计算的结果)。要读取或设置文件权限,我们使用 fs::status("C:\Test\Test1.txt").permissions() 和取自这里的 demo_perms 函数。为了演示文件 "C:\Test\Test1.txt" 的最后修改时间,我们使用了 getFileWriteTime 函数。正如这里所写:clock::to_time_t (ftime) 在 MSVC 上不起作用,所以该函数为 _WIN32 (非 POSIX Windows) 和其他操作系统使用了一个可移植的解决方案。
在下一个示例中,我们将显示文件系统上的可用空间信息。全局函数 fs::space 返回一个 fs::space_info 类型的对象,该对象描述了指定路径所在介质上的可用空间量。如果我们传递位于同一介质上的多个路径,结果将是相同的。
#include <iostream>
#include <fstream>

namespace   fs = std::filesystem;

int main(int argc, char *argv[]) {

     fs::space_info diskC = fs::space("C:\\");

     std::cout << "Let's show information about disk C : \n";

     std::cout << std::setw(15) << "Capacity"
               << std::setw(15) << "Free"
               << std::setw(15) << "Available"
               << "\n"
               << std::setw(15) << diskC.capacity
               << std::setw(15) << diskC.free
               << std::setw(15) << diskC.available
               << "\n";

     return 0;
}
上面代码的输出显示了磁盘可用空间的信息

返回的 fs::space_info 对象包含三个指标(都以字节为单位)
- 容量是文件系统的总大小,以字节为单位。
- 空闲是文件系统上的空闲空间,以字节为单位。
- 可用是对非特权进程可用的空闲空间(可能等于或小于空闲空间)
并行算法
C++17 标准库中增加了大多数通用算法的并行版本支持,以帮助程序利用并行执行来提高性能。如今,几乎每台计算机都有多个处理器核心,然而,在默认情况下,大多数情况下,当调用任何标准算法时,只使用其中一个核心,而其他核心不参与标准算法的运行。C++17 修复了这种情况,当处理大型数组或数据容器时,算法可以通过将工作分配给所有可用核心来更快地工作。
因此,来自 <algorithm> 的处理容器的函数都有并行版本。它们都收到了额外的重载,该重载接受执行策略的第一个参数,该参数决定了算法将如何执行。
在 C++17 中,执行策略的第一个参数可以取以下 3 个值之一
- std::execution::seq 用于正常的顺序执行
- std::execution::par 用于正常的并行执行,在此模式下,程序员必须注意避免访问数据时的竞争状态,但可以使用内存分配、互斥锁等。
- std::execution::par_unseq 用于非顺序并行执行,在此模式下,程序员传递的函子不应分配内存、锁定互斥锁或其他资源
因此,例如,要获得 std::sort 算法的并行版本,我们所要做的就是告诉算法使用所谓的并行执行策略,并只使用以下最适合特定情况的选项之一
     std::sort(std::execution::par,
     begin (name_of_container)), end (name_of_container)); //same thing as the
                                                           //version without an execution policy
     std::sort(std::execution::seq,
     begin (name_of_container)), end (name_of_container));
     std::sort(std::execution::par_unseq,
     begin (name_of_container)), end (name_of_container));
让我们看下面的例子,其中一个包含 10,000 个整数的 std::vector 通过 std::sort 进行排序,有并行化和没有并行化两种情况。
#include <iostream>
#include <chrono>
#include <vector>
#include <algorithm>
#include <execution>

using namespace std;
using std::chrono::duration;
using std::chrono::duration_cast;
using std::chrono::high_resolution_clock;

void printVector(const char * pStatus, std::vector<int> &vect)
{
	std::cout << "The vector with " << vect.size() << " elements "
              << pStatus << " sorting : \n";
	for (int val : vect) {
		std::cout << val << " ";
	}
	std::cout << "\n\n";
}

int main() {
	const int numberOfElements = 10000;
	const int numOfIterationCount = 5;

	std::cout << "The number of concurrent threads supported is "
	<< std::thread::hardware_concurrency() << "\n\n";

	std::vector<int> vect(numberOfElements);
	std::generate(vect.begin(), vect.end(), std::rand);

	//printVector("before (original vector)", vect);

	std::cout << "Let's sort the vector using sort() function WITHOUT PARALLELIZATION : \n";
	for (int i = 0; i < numOfIterationCount; ++i) {
		std::vector<int> vec_to_sort(vect);
		//printVector("before", vec_to_sort);
		const auto t1 = high_resolution_clock::now();
		std::sort(vec_to_sort.begin(), vec_to_sort.end());
		const auto t2   = high_resolution_clock::now();
		std::cout << "The time taken to sot vector of integers is : "
		<< duration_cast<duration<double, milli>>(t2 - t1).count() << "\n";
		//printVector("after", vec_to_sort);
	}

	std::cout << "\n\n";
	std::cout << "Let's sort the vector using sort() function
	and a PARALLEL unsequenced policy (std::execution::par_unseq) : \n";
	for (int i = 0; i < numOfIterationCount; ++i) {
		std::vector<int> vec_to_sort(vect);
		// printVector("before", vec_to_sort);
		const auto t1 = high_resolution_clock::now();
		std::sort(std::execution::par_unseq, vec_to_sort.begin(), vec_to_sort.end());
		const auto t2 = high_resolution_clock::now();
		std::cout << "The time taken to sot vector of integers is : "
		<< duration_cast<duration<double, milli>>(t2 - t1).count() << "\n";
		// printVector("after", vec_to_sort);
	}

	std::cout << "\n\n";

	return 0;
}
以上代码的输出如下

在上述实现中,只有当范围大小(numberOfElements)超过某个阈值时,算法的并行版本才会比串行版本带来性能提升,这个阈值可能会根据编译标志、平台或设备而变化。我们的实现中有一个人为设置的 10,000 个元素的阈值。
我们可以尝试不同的阈值和范围大小,看看这对执行时间有何影响。当然,如果只有十个元素,我们不太可能注意到任何差异。
然而,在对大型数据集进行排序时,并行执行更有意义,其好处可能非常显著。
算法库也定义了 for_each() 算法,我们现在可以用它来并行化许多常规的基于范围的 for 循环。然而,我们需要考虑到循环的每次迭代都可以独立于其他迭代执行,否则你可能会遇到数据竞争。
C++17 中已移除的特性
- 三字符组
三字符组已从 C++17 中移除,因为它们不再需要。
总的来说,三字符组是为缺少某些字符的终端发明的。因此,我们可以写
??= define来代替#define。三字符组在最开始就被替换为必要的字符,因此这些写法是等价的。我们可以写 '
??<' 来代替 '{',使用 '??>' 来代替 '}'。它们在 80 年代的 C/C++ 中使用,因为旧的编码表不支持所有必要的字符 ISO/IEC646,例如:
table { border-collapse: collapse; } th, td { border: 1px solid orange; padding: 10px; text-align: left; }三字符组 等效符号 ??= # ??( [ ??/ \ ??) ] ??' ^ ??< { ??! | ??> } ??- ~ Visual C++ 仍然支持三字符组替换,但默认是禁用的。有关如何启用三字符组替换的信息,请参阅这里。
- 移除 bool 的 operator++
bool 的 operator++ 已被弃用,并在 C++17 中被移除。
让我们看看下面的代码
     #include <iostream>

     int main() {
          bool b1 = false;
          b1++;

          return 0;
     }
编译上述代码后,我们得到以下错误

- 错误 (活动) E2788: 不允许对布尔值进行递增
- 编译器错误 C2428: '操作' : 不允许对 '
bool' 类型的操作数执行
- 移除 register 关键字
register 关键字甚至在 C++11 标准中就已被弃用。
只是在 C++17 中,才决定移除它,因为它在新编译器中已不再使用。
如果我们声明一个 register 变量,它只是给编译器一个提示。可以用它,也可以不用。即使我们不将变量声明为 register,编译器也可以把它放在处理器寄存器中。
在 Visual Studio 2017 版本 15.7 及更高版本中编写以下代码时:(可通过 /std:c++17 使用)
register int x = 99;
我们将收到以下警告:“
warning C5033: 'register' 不再是受支持的存储类” - 移除 std::auto_ptr
std::auto_ptr是在 C++98 中引入的,自 C++17 起已正式从 C++ 中排除。让我们看看下面的代码
     #include <iostream>
     #include <memory>

     int main() {
          std::auto_ptr<int> p1(new int);

          return 0;
     }
编译上述代码后,我们得到以下错误
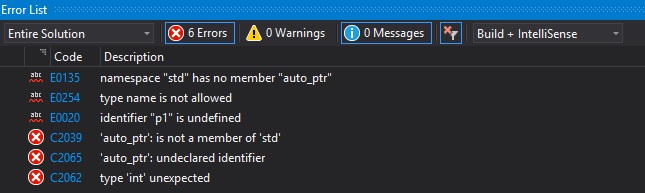
命名空间 "
std" 没有成员"auto_ptr"... - 移除动态异常规范
动态异常规范,或 throw(optional_type_list) 规范,在 C++11 中被弃用,并在 C++17 中被移除,除了
throw(),它是noexcept(true)的别名。让我们看一个例子
#include <iostream> int foo(int x) throw(int) { if (100 == x) { throw 2; } return 0; } int main() { auto x = foo(100); return 0; }编译后,编译器将返回以下警告:“warning C5040: 动态异常规范仅在 C++14 及更早版本中有效,将其视为
noexcept(false)” - 移除一些已弃用的别名
- 从 std::function 中移除分配器
以下原型在 C++17 中被移除
          template< class Alloc >
          function( std::allocator_arg_t, const Alloc& alloc ) noexcept;

          template< class Alloc >
          function( std::allocator_arg_t, const Alloc& alloc,std::nullptr_t ) noexcept;

          template< class Alloc >
          function( std::allocator_arg_t, const Alloc& alloc, const function& other );

          template< class Alloc >
          function( std::allocator_arg_t, const Alloc& alloc, function&& other );

          template< class F, class Alloc >
          function( std::allocator_arg_t, const Alloc& alloc, F f );


总结
Bjarne Stroustrup (C++ 的创造者): “C 让你很容易搬起石头砸自己的脚;C++ 让这变得更难,但当你真的这么做时,它会炸掉你的整条腿。”
我真诚地希望本文的内容能帮助某些人避免“腿部受伤” :-)