
使用 React/Redux/Typescript 和 Hooks 的演示应用程序
5.00/5 (2投票s)
使用 React/Redux 和 hooks 的小型演示应用程序
目录
概述
距离我上次在 CodeProject 上写文章已经有一段时间了。在我停止写作之后,我看到了许多有趣的文章,很多都出自 Honey The Code Witch 之手,我觉得是时候重新开始写文章了。这篇文章是关于 React/Redux/TypeScript 的,我知道这方面的文章已经很多了。但我想做的是探索如何使用 React hooks 和 Redux hooks。因此,本文将围绕一个简单的 WebApi 后端和一个尽可能使用 Redux 和 hooks 的相当直接的 React 前端展开。
Hooks 是一个相当新的特性,它允许你在不创建类的情况下使用 state 和其他 React 特性。
有许多关于如何将现有的 React 类转换为基于 Hook 的组件的文章,例如这些:
- 使用 State Hook 将基于 React 类的组件转换为函数式组件
- 将 React 类组件转换为带 Hooks 的 React 函数式组件的10个步骤
- 使用 React Hooks 将你的类组件转换为函数式组件
- 使用 React Hooks 将 React 类组件转换为函数式组件的5种方法
因此,我不会对此进行深入探讨。
那么这个应用程序是做什么的?
这个应用程序非常简单。它实现了以下功能:
- 有两个页面,Home 和 Search,通过 React Router 实现路由。
- Home 页面展示了一个关于电子音乐流派的 D3 力导向图。这是一个硬编码的列表。当你点击一个节点时,它会调用后端的 WebApi 并收集一些关于你所选节点的数据(Lorem Ipsum 文本),这些数据将显示在一个滑出式面板中。
- Search 页面允许你从一个硬编码的流派列表中进行选择,一旦选中一个,就会调用后端的 WebApi,此时会显示一些与所选流派匹配的硬编码(服务器端)项目的图片。然后你可以点击它们,并在一个 Boostrap 弹出窗口中查看更多信息。
这就是它的全部功能,然而正如我们将看到的,这里有足够的内容让我们深入研究。这个小小的演示应用程序足以展示如下内容:
- 在 TypeScript 中使用 d3
- 在 TypeScript 中使用 Redux
- 如何使用 React hooks 和 Redux hooks 来创建自定义组件
演示视频
完成的演示应用程序的演示视频在这里。
代码在哪里?
本文的代码可在 https://github.com/sachabarber/DotNetReactRedux 获取。下载后,你只需要运行 npm install。然后它应该可以在 Visual Studio 中正常运行。
后端
正如我所说,本文的后端是一个简单的 WebApi,其中使用了以下 Controller 类。
GenreController
基本上有两个路由:
info/{genre}:这个路由由前端网站 Home 页面上的 D3 力导向图使用,我们稍后会看到。基本上,当你点击图中的一个节点时,它会调用这个端点,并为所选节点的流派显示一些 Lorem Ipsum 文本。details/{genre}:这个路由在搜索屏幕上使用,我们获取一些硬编码的流派项目列表,这些项目是为响应搜索而显示的。
这里唯一需要注意的另一件事是,我使用了 Nuget 包 LoremNET 来生成 Lorem Ipsum 文本。
using System;
using System.Collections.Generic;
using System.Linq;
using System.Threading;
using DotNetCoreReactRedux.Models;
using Microsoft.AspNetCore.Mvc;
using Microsoft.AspNetCore.Mvc.Formatters;

namespace DotNetCoreReactRedux.Controllers
{
    [ApiController]
    [Route("[controller]")]
    public class GenreController : ControllerBase
    {
        [Route("info/{genre}")]
        [HttpGet]
        public GenreInfo Get(string genre)
        {
            var paragraphs = LoremNET.Lorem.Paragraphs(8, 9, 4, 5, 8, 11);

            return new GenreInfo()
            {
                GenreName = genre,
                Paragraphs = paragraphs.ToArray()
            };
        }

        [Route("details/{genre}")]
        [HttpGet]
        public GenreDetailedItemContainer GetDetailed(string genre)
        {
            if (GenreDetailsFactory.Items.Value.ContainsKey(genre.ToLower()))
            {
                return new GenreDetailedItemContainer()
                {
                    GenreName = genre,
                    Items = GenreDetailsFactory.Items.Value[genre.ToLower()]
                };
            }
            return new GenreDetailedItemContainer()
            {
                GenreName = genre,
                Items = new List<GenreDetailedItem>()
            };
        }
    }

    public static class GenreDetailsFactory
    {
        public static Lazy<Dictionary<string, List<GenreDetailedItem>>> Items =
               new Lazy<Dictionary<string,
               List<GenreDetailedItem>>>(CreateItems, LazyThreadSafetyMode.None);

        private static Dictionary<string, List<GenreDetailedItem>> CreateItems()
        {
            var items = new Dictionary<string, List<GenreDetailedItem>>();

            items.Add("gabber", new List<GenreDetailedItem>()
            {
                new GenreDetailedItem()
                {
                    Paragraphs = LoremNET.Lorem.Paragraphs(8, 9, 4, 5, 3, 11).ToArray(),
                    Band = "Rotterdam Termination Squad",
                    Title = "Poing",
                    ImageUrl = "https://img.discogs.com/OvgtN_-O-4MapL7Hr9L5NUNalF8=/300x300/
                                filters:strip_icc():format(jpeg):mode_rgb():quality(40)/
                                discogs-images/R-146496-1140115140.jpeg.jpg"
                },
                new GenreDetailedItem()
                {
                    Paragraphs = LoremNET.Lorem.Paragraphs(8, 9, 4, 5, 7, 11).ToArray(),
                    Band = "De Klootzakken",
                    Title = "Dominee Dimitri",
                    ImageUrl = "https://img.discogs.com/nJ2O1mYa4c5nkIZcuKK_6wN-lH0=/
                                fit-in/300x300/filters:strip_icc():format(jpeg):mode_rgb()
                                :quality(40)/discogs-images/R-114282-1085597479.jpg.jpg"
                },
                new GenreDetailedItem()
                {
                    Paragraphs = LoremNET.Lorem.Paragraphs(8, 9, 4, 5, 8, 11).ToArray(),
                    Band = "Neophyte",
                    Title = "Protracker Ep",
                    ImageUrl = "https://img.discogs.com/YC8l_-aoYt-OcLNTntu57FIA5w8=/
                                300x300/filters:strip_icc():format(jpeg):mode_rgb():
                                quality(40)/discogs-images/R-5039-1149857244.jpeg.jpg"
                },
                new GenreDetailedItem()
                {
                    Paragraphs = LoremNET.Lorem.Paragraphs(8, 9, 4, 5, 2, 11).ToArray(),
                    Band = "Disciples Of Belial",
                    Title = "Goat Of Mendes",
                    ImageUrl = "https://img.discogs.com/vHAvCPck9EHzi78PG5HDtAMxv0M=/
                                fit-in/300x300/filters:strip_icc():format(jpeg):mode_rgb()
                                :quality(40)/discogs-images/R-160557-1546568764-3706.jpeg.jpg"
                },
                new GenreDetailedItem()
                {
                    Paragraphs = LoremNET.Lorem.Paragraphs(8, 9, 4, 5, 7, 11).ToArray(),
                    Band = "Bloodstrike",
                    Title = "Pathogen",
                    ImageUrl = "https://img.discogs.com/SAqIcgp3kiqPaSVZsGn-oh8E4RE=/
                                fit-in/300x300/filters:strip_icc():format(jpeg):mode_rgb()
                                :quality(40)/discogs-images/R-18210-1448556049-2613.jpeg.jpg"
                },
                new GenreDetailedItem()
                {
                    Paragraphs = LoremNET.Lorem.Paragraphs(8, 9, 4, 5, 3, 11).ToArray(),
                    Band = "Mind Of Kane",
                    Title = "The Mind EP",
                    ImageUrl = "https://img.discogs.com/Hc_is4Ga5A1704qshrkXp9LkhKM=/
                                300x300/filters:strip_icc():format(jpeg):mode_rgb():
                                quality(40)/discogs-images/R-160262-1557585935-9794.jpeg.jpg"
                },
                new GenreDetailedItem()
                {
                    Paragraphs = LoremNET.Lorem.Paragraphs(8, 9, 4, 5, 5, 11).ToArray(),
                    Band = "Stickhead",
                    Title = "Worlds Hardest Kotzaak",
                    ImageUrl = "https://img.discogs.com/HFKhwj9ZfVEwLW0YJm_rUHx75lU=/
                                fit-in/300x300/filters:strip_icc():format(jpeg):mode_rgb()
                                :quality(40)/discogs-images/R-20557-1352933734-5019.jpeg.jpg"
                },
            });

            items.Add("acid house", new List<GenreDetailedItem>()
            {
                new GenreDetailedItem()
                {
                    Paragraphs = LoremNET.Lorem.Paragraphs(8, 9, 4, 5, 5, 11).ToArray(),
                    Band = "Various",
                    Title = "ACid House",
                    ImageUrl = "https://img.discogs.com/WmSfj73-GK0TQhpLZTnLaEqWvdU=/
                                300x300/filters:strip_icc():format(jpeg):mode_rgb():
                                quality(40)/discogs-images/R-1224150-1264336074.jpeg.jpg"
                },
                new GenreDetailedItem()
                {
                    Paragraphs = LoremNET.Lorem.Paragraphs(8, 9, 4, 5, 3, 11).ToArray(),
                    Band = "Rififi",
                    Title = "Dr Acid And Mr House",
                    ImageUrl = "https://img.discogs.com/3w5QDa6y7PK7tYZ99hzPnMdxIVE=/300x300/
                               filters:strip_icc():format(jpeg):mode_rgb():quality(40)/
                               discogs-images/R-195695-1484590974-8359.jpeg.jpg"
                },
                new GenreDetailedItem()
                {
                    Paragraphs = LoremNET.Lorem.Paragraphs(8, 9, 4, 5, 6, 11).ToArray(),
                    Band = "Tyree",
                    Title = "Acid Over",
                    ImageUrl = "https://img.discogs.com/rQVeuPgGK0ksQ-g2xJEWrx1ktnc=/300x300/
                               filters:strip_icc():format(jpeg):mode_rgb():quality(40)/
                               discogs-images/R-61941-1080462105.jpg.jpg"
                },
                new GenreDetailedItem()
                {
                    Paragraphs = LoremNET.Lorem.Paragraphs(8, 9, 4, 5, 2, 11).ToArray(),
                    Band = "Acid Jack",
                    Title = "Acid : Can You Jack",
                    ImageUrl = "https://img.discogs.com/ojC7tbyzBe9XLpC9-sPtYiSfu4g=/300x300/
                               filters:strip_icc():format(jpeg):mode_rgb():quality(40)/
                               discogs-images/R-466567-1155405490.jpeg.jpg"
                },
                new GenreDetailedItem()
                {
                    Paragraphs = LoremNET.Lorem.Paragraphs(8, 9, 4, 5, 5, 11).ToArray(),
                    Band = "Bam Bam",
                    Title = "Wheres Your Child",
                    ImageUrl = "https://img.discogs.com/RIsPWasW9OV6iJlGW1dF7x5B_Hg=/
                               fit-in/300x300/
                               filters:strip_icc():format(jpeg):mode_rgb():quality(40)/
                               discogs-images/R-43506-1356639075-5067.jpeg.jpg"
                },
            });

            items.Add("drum & bass", new List<GenreDetailedItem>()
            {
                new GenreDetailedItem()
                {
                    Paragraphs = LoremNET.Lorem.Paragraphs(8, 9, 4, 5, 8, 11).ToArray(),
                    Band = "Bad Company",
                    Title = "Bad Company Classics",
                    ImageUrl = "https://img.discogs.com/uArBfSolc15i_Ys5S4auaHYTo8w=/
                               fit-in/300x300/
                               filters:strip_icc():format(jpeg):mode_rgb():quality(40)/
                               discogs-images/R-1138493-1195902484.jpeg.jpg"
                },
                new GenreDetailedItem()
                {
                    Paragraphs = LoremNET.Lorem.Paragraphs(8, 9, 4, 5, 4, 11).ToArray(),
                    Band = "Adam F",
                    Title = "F Jam",
                    ImageUrl = "https://img.discogs.com/99njVrjJq6ES0l6Va2eTFcjP1AU=/300x300/
                               filters:strip_icc():format(jpeg):mode_rgb():quality(40)/
                               discogs-images/R-5849-1237314693.jpeg.jpg"
                },
                new GenreDetailedItem()
                {
                    Paragraphs = LoremNET.Lorem.Paragraphs(8, 9, 4, 5, 2, 11).ToArray(),
                    Band = "Diesel Boy",
                    Title = "A Soldier's Story - A Drum And Bass DJ Mix",
                    ImageUrl = "https://img.discogs.com/cFV--pJXg69KkvlJ6q8EV8pg218=/
                               fit-in/300x300/
                               filters:strip_icc():format(jpeg):mode_rgb():quality(40)/
                               discogs-images/R-3353-1175897684.jpeg.jpg"
                },
                new GenreDetailedItem()
                {
                    Paragraphs = LoremNET.Lorem.Paragraphs(8, 9, 4, 5, 4, 11).ToArray(),
                    Band = "Future Mind",
                    Title = "Drum & Bass",
                    ImageUrl = "https://img.discogs.com/R46K8de0GA89HoYxJDjUBDexmgs=/300x300/
                               filters:strip_icc():format(jpeg):mode_rgb():quality(40)/
                               discogs-images/R-4685019-1372172049-9885.jpeg.jpg"
                },
            });

            return items;
        }
    }
}
前端
前端完全基于 React/ReactRouter/TypeScript 和 Redux,我们会尽可能使用 hooks。
总体思路
如概述中所述,基本思想是这样的,应用程序
- 有两个页面 Home 和 Search,通过 React Router 实现路由
- Home 页面展示了一个关于电子音乐流派的 D3 力导向图。这是一个硬编码的列表。当你点击一个节点时,它会调用后端的 WebApi 并收集一些关于你所选节点的数据(Lorem Ipsum 文本),这些数据将显示在一个滑出式面板中。
- Search 页面允许你从一个硬编码的流派列表中进行选择,一旦选中一个,就会调用后端的 WebApi,此时会显示一些与所选流派匹配的硬编码(服务器端)项目的图片。然后你可以点击它们,并在一个 Boostrap 弹出窗口中查看更多信息。
当你第一次启动应用程序时,它应该看起来像这样

在这里,你可以点击 d3 图中的节点,这会显示一个滑入的信息面板,或者你可以如上所述使用 Search 页面。
Create React App / .NET Core React/Redux 入门模板
该应用程序是使用 .NET Core 命令行 dotnet new reactredux 启动的。这会给你一些入门代码,其中包括一个使用 TypeScript 的示例 WebApi/Router/Redux 代码,该代码内部也使用了 CreateReactApp 模板。所以它是一个非常好的起点。
使用的库
我在应用程序中使用了以下第三方库。
Redux
我正在使用 Redux,关于它的文章数不胜数,所以我不会过多赘述。但对于那些不了解的人来说,Redux 提供了一个状态存储(store),它恰好与 React 配合得非常好。
它允许一个很好的流程,发生以下情况
- React 组件分发(dispatch)动作(actions),这些动作由一个分发器(dispatcher)接收。
- 分发器将动作推送给一个 reducer,reducer 负责确定 store 的新状态。
- reducer 创建新状态。
- React 组件通过使用 Connect 或通过 hooks 来获知新状态。本文使用 hooks。

我们可以像这样配置 store 和 reducers
import { applyMiddleware, combineReducers, compose, createStore } from 'redux';
import thunk from 'redux-thunk';
import { connectRouter, routerMiddleware } from 'connected-react-router';
import { History } from 'history';
import { ApplicationState, reducers } from './';

export default function configureStore(history: History, initialState?: ApplicationState) {
    const middleware = [
        thunk,
        routerMiddleware(history)
    ];

    const rootReducer = combineReducers({
        ...reducers,
        router: connectRouter(history)
    });

    const enhancers = [];
    const windowIfDefined = typeof window === 'undefined' ? null : window as any;
    if (windowIfDefined && windowIfDefined.__REDUX_DEVTOOLS_EXTENSION__) {
        enhancers.push(windowIfDefined.__REDUX_DEVTOOLS_EXTENSION__());
    }

    return createStore(
        rootReducer,
        initialState,
        compose(applyMiddleware(...middleware), ...enhancers)
    );
}
还有这个
import * as Genre from './Genre';
import * as Search from './Search';


// The top-level state object
export interface ApplicationState {
    genres: Genre.GenreInfoState | undefined;
    search: Search.SearchState | undefined;
}

// Whenever an action is dispatched, Redux will update each top-level application
// state property using the reducer with the matching name.
// It's important that the names match exactly, and that the reducer
// acts on the corresponding ApplicationState property type.
export const reducers = {
    genres: Genre.reducer,
    search: Search.reducer
};

// This type can be used as a hint on action creators so that its 'dispatch'
// and 'getState' params are
// correctly typed to match your store.
export interface AppThunkAction<TAction> {
    (dispatch: (action: TAction) => void, getState: () => ApplicationState): void;
}
ReduxThunk
ReduxThunk 是一个中间件,它允许你向 Redux store 分发函数。对于一个普通的 Redux store,你只能通过分发一个 action 来进行简单的同步更新。中间件扩展了 store 的能力,让你能够编写与 store 交互的异步逻辑。
Thunks 是用于处理 Redux 基本副作用逻辑的推荐中间件,包括需要访问 store 的复杂同步逻辑,以及像 AJAX 请求这样的简单异步逻辑。
这是 ReduxThunk 的全部源代码,很巧妙,不是吗?
function createThunkMiddleware(extraArgument) {
  return ({ dispatch, getState }) => (next) => (action) => {
    if (typeof action === 'function') {
      return action(dispatch, getState, extraArgument);
    }

    return next(action);
  };
}

const thunk = createThunkMiddleware();
thunk.withExtraArgument = createThunkMiddleware;

export default thunk;
这里可能是一个使用 ReduxThunk 的例子
// This type can be used as a hint on action creators so that
// its 'dispatch' and 'getState' params are
// correctly typed to match your store.
export interface AppThunkAction<TAction> {
    (dispatch: (action: TAction) => void, getState: () => ApplicationState): void;
}

export const actionCreators = {
    requestSearchInfo: (genre: string):
       AppThunkAction<KnownAction> => (dispatch, getState) => {
        // Only load data if it's something we don't already have (and are not already loading)
        const appState = getState();
        if (appState && appState.search && genre !== appState.search.searchInfo.genreName) {
            fetch(`genre/details/${genre}`)
                .then(response => response.json() as Promise<GenreDetailedItemContainer>)
                .then(data => {
                    dispatch({ type: 'RECEIVE_SEARCH_INFO', genre: genre, searchInfo: data });
                });

            dispatch({ type: 'REQUEST_SEARCH_INFO', genre: genre });
        }
    }
};
ScrollBars
我使用了这个 React 组件,在应用程序中实现漂亮的滚动条,它能给你带来像这样的精美滚动条

这个组件使用起来相当简单。你只需要通过 NPM 安装它,然后在你的 TSX 文件中使用它
import { Scrollbars } from 'react-custom-scrollbars';

<Scrollbars
	autoHeight
	autoHeightMin={200}
	autoHeightMax={600}
	style={{ width: 300 }}>
	<div>Some content in scroll</div>
</Scrollbars>
实用程序
我喜欢内部中介类型总线的想法,因此,我根据这里的演示代码加入了一个基于 RxJs 的实现。这个服务本身看起来是这样的
import { Subject, Observable } from 'rxjs';

export interface IEventMessager
{
    publish(message: IMessage): void;
    observe(): Observable<IMessage>;
}

export interface IMessage {

}

export class ShowInfoInSidePanel implements IMessage {

    private _itemClicked: string;

    public constructor(itemClicked: string) {
        this._itemClicked = itemClicked;
    }

    get itemClicked(): string {
        return this._itemClicked;
    }
}

export class EventMessager implements IEventMessager {

    private subject = new Subject<IMessage>();

    publish(message: IMessage) {
        this.subject.next(message);
    }

    observe(): Observable<IMessage> {
        return this.subject.asObservable();
    }
}
而这可能是它的用法示例
import React, { useState, useEffect } from 'react';
import { useDispatch, useSelector } from 'react-redux';
import { IEventMessager } from "./utils/EventMessager";
import { IMessage, ShowInfoInSidePanel } from "./utils/EventMessager";
import { filter, map } from 'rxjs/operators';

export interface HomeProps {
    eventMessager: IEventMessager;
}

const Home: React.FunctionComponent<HomeProps> = (props) => {

    const dispatch = useDispatch();

    const [currentState, setState] = useState(initialState);

    useEffect(() => {

        const sub = props.eventMessager.observe()
        .pipe(
            filter((event: IMessage) => event instanceof ShowInfoInSidePanel),
            map((event: IMessage) => event as ShowInfoInSidePanel)
        )
        .subscribe(x => {
            ....
        });

        return () => {
            sub.unsubscribe();
        }
    }, [props.eventMessager]);
}

export default Home;
路由
该演示应用使用了 ReactRouter 和 Redux,因此主挂载点看起来像这样。需要注意的是,我们使用了 ConnectedRouter,这是因为我们正在使用 Redux,我们在外部的 Provider 组件中提供了 store。
import 'bootstrap/dist/css/bootstrap.css';

import * as React from 'react';
import * as ReactDOM from 'react-dom';
import { Provider } from 'react-redux';
import { ConnectedRouter } from 'connected-react-router';
import { createBrowserHistory } from 'history';
import configureStore from './store/configureStore';
import App from './App';
import registerServiceWorker from './registerServiceWorker';

import 'bootstrap/dist/css/bootstrap.min.css';
import 'bootstrap/dist/js/bootstrap.min.js';

// Create browser history to use in the Redux store
const baseUrl = document.getElementsByTagName('base')[0].getAttribute('href') as string;
const history = createBrowserHistory({ basename: baseUrl });

// Get the application-wide store instance, prepopulating with state
// from the server where available.
const store = configureStore(history);

ReactDOM.render(
    <Provider store={store}>
        <ConnectedRouter history={history}>
            <App />
        </ConnectedRouter>
    </Provider>,
    document.getElementById('root'));

registerServiceWorker();
它使用了 App,看起来像这样
import * as React from 'react';
import { Route } from 'react-router';
import Layout from './components/Layout';
import Home from './components/Home';
import Search from './components/Search';
import { EventMessager } from "./components/utils/EventMessager";
import './custom.css'

let eventMessager = new EventMessager();

export default () => (
    <Layout>
        <Route exact path='/' render={(props: any) => <Home {...props}
         eventMessager={eventMessager} />} />
        <Route path='/search' component={Search} />
    </Layout>
);
它又使用了这个 Layout 组件
import * as React from 'react';
import { Container } from 'reactstrap';
import NavMenu from './NavMenu';

export default (props: { children?: React.ReactNode }) => (
    <React.Fragment>
        <NavMenu/>
        <Container className="main">
            {props.children}
        </Container>
    </React.Fragment>
);
它最终使用了 NavMenu 组件,如下所示
import * as React from 'react';
import { NavItem, NavLink } from 'reactstrap';
import { Link } from 'react-router-dom';
import './css/NavMenu.css';
import HoverImage from './HoverImage';

import homeLogo from './img/Home.png';
import homeHoverLogo from './img/HomeHover.png';
import searchLogo from './img/Search.png';
import searchHoverLogo from './img/SearchHover.png';

const NavMenu: React.FunctionComponent = () => {

    return (
        <div className="sidenav">
            <NavItem>
                <NavLink tag={Link} style={{ textDecoration: 'none' }} to="/">
                    <HoverImage hoverSrc={homeHoverLogo} src={homeLogo} />
                </NavLink>
            </NavItem>
            <NavItem>
                <NavLink tag={Link} style={{ textDecoration: 'none' }} to="/search">
                    <HoverImage hoverSrc={searchHoverLogo} src={searchLogo} />
                </NavLink>
            </NavItem>
        </div>
    );
}

export default NavMenu
眼尖的读者会发现,这里还使用了一个特殊的 HoverImage 组件,这是我写的一个简单的组件,用于通过图像进行导航。如下所示。
HoverImage 组件
如上所示,路由使用了一个简单的 HoverImage 组件,它只是允许用户在 MouseOver(鼠标悬停)时显示不同的图像。这是该组件的代码
import React, { useState } from 'react';

export interface HoverImageProps {
    src?: string;
    hoverSrc?: string;
}

const HoverImage: React.FunctionComponent<HoverImageProps> = (props) => {

    // Declare a new state variable, which we'll call "count"
    const [imgSrc, setSource] = useState(props.src);

    return (
        <div>
            <img
                src={imgSrc}
                onMouseOver={() => setSource(props.hoverSrc)}
                onMouseOut={() => setSource(props.src)} />
        </div>
    );
}

HoverImage.defaultProps = {

    src: '',
    hoverSrc:'',
}

export default HoverImage
Home 组件
Home 组件是一个顶层路由组件,看起来像这样

该组件使用了 Redux,并使用 Redux 调用后端 WebApi,同时也使用了 ReduxThunk。Redux 的流程是这样的
- 我们分发
requestGenreInfo动作。 - 我们使用 Redux hook 来监听
GenresState 的状态变化。
Home 组件标记中最重要的部分如下所示
import React, { useState, useEffect } from 'react';
import { useDispatch, useSelector } from 'react-redux';
import ForceGraph from './graph/ForceGraph';
import data from "./electronic-genres";
import { Scrollbars } from 'react-custom-scrollbars';
import SlidingPanel, { PanelType } from './slidingpanel/SlidingPanel';
import './css/SlidingPanel.css';
import { IEventMessager } from "./utils/EventMessager";
import { IMessage, ShowInfoInSidePanel } from "./utils/EventMessager";
import { filter, map } from 'rxjs/operators';
import HoverImage from './HoverImage';
import circleLogo from './img/circle.png';
import circleHoverLogo from './img/circleHover.png';

//CSS
import './css/ForceGraph.css';

//redux
import { ApplicationState } from '../store';
import * as GenreStore from '../store/Genre';

export interface HomeProps {
    eventMessager: IEventMessager;
}

const initialState = {
    isopen: false,
    selectedNodeText : ''
}

const Home: React.FunctionComponent<HomeProps> = (props) => {

    const dispatch = useDispatch();

    const [currentState, setState] = useState(initialState);

    useEffect(() => {
        const sub = props.eventMessager.observe()
        .pipe(
            filter((event: IMessage) => event instanceof ShowInfoInSidePanel),
            map((event: IMessage) => event as ShowInfoInSidePanel)
        )
        .subscribe(x => {
            //pass callback to setState to prevent currentState
            //  being a dependency
            setState(
                (currentState) => ({
                    ...currentState,
                    isopen: true,
                    selectedNodeText: x.itemClicked
                })
            );
        });

        return () => {
            sub.unsubscribe();
        }
    }, [props.eventMessager]);

    React.useEffect(() => {
        dispatch(GenreStore.actionCreators.requestGenreInfo(currentState.selectedNodeText));
    }, [currentState.selectedNodeText]);


    const storeState: GenreStore.GenreInfoState = useSelector(
        (state: ApplicationState) => state.genres as GenreStore.GenreInfoState
    );

    return (
        <div>
            ....
                    <ForceGraph
                        width={window.screen.availHeight}
                        height={window.screen.availHeight}
                        eventMessager={props.eventMessager}
                        graph={data} />
            ....
		</div>
    );
}

export default Home;
滚动条
这和上面提到的 ScrollBars 是一样的。
D3 力导向图
Home 组件的核心是一个 d3 力导向图。但由于我试图把事情做得更好,我想用 TypeScript 来实现 d3 图。所以我从这篇很棒的博客文章开始,并在此基础上进行了扩展。那篇博客文章中的例子将图表分成了这 4 个部分
- ForceGraph
- Labels
- 链接
- 节点
ForceGraph
这是包含其他部分的主组件。并且在 Home 组件中使用的就是这个。这是它的代码
import * as React from 'react';
import * as d3 from 'd3';
import { d3Types } from "./GraphTypes";
import Links from "./Links";
import Nodes from "./Nodes";
import Labels from "./Labels";
import '../css/ForceGraph.css';
import { IEventMessager } from "../utils/EventMessager";

interface ForceGraphProps {
    width: number;
    height: number;
    graph: d3Types.d3Graph;
    eventMessager: IEventMessager;
}

export default class App extends React.Component<ForceGraphProps, {}> {
    simulation: any;

    constructor(props: ForceGraphProps) {
        super(props);
        this.simulation = d3.forceSimulation()
            .force("link", d3.forceLink().id(function
            (node: any, i: number, nodesData: d3.SimulationNodeDatum[]) {
                return node.id;
            }))
            .force("charge", d3.forceManyBody().strength(-100))
            .force("center", d3.forceCenter(this.props.width / 2, this.props.height / 2))
            .nodes(this.props.graph.nodes as d3.SimulationNodeDatum[]);

        this.simulation.force("link").links(this.props.graph.links);
    }

    componentDidMount() {
        const node = d3.selectAll(".node");
        const link = d3.selectAll(".link");
        const label = d3.selectAll(".label");

        this.simulation.nodes(this.props.graph.nodes).on("tick", ticked);

        function ticked() {
            link
                .attr("x1", function (d: any) {
                    return d.source.x;
                })
                .attr("y1", function (d: any) {
                    return d.source.y;
                })
                .attr("x2", function (d: any) {
                    return d.target.x;
                })
                .attr("y2", function (d: any) {
                    return d.target.y;
                });

            node
                .attr("cx", function (d: any) {
                    return d.x;
                })
                .attr("cy", function (d: any) {
                    return d.y;
                });

            label
                .attr("x", function (d: any) {
                    return d.x + 5;
                })
                .attr("y", function (d: any) {
                    return d.y + 5;
                });
        }
    }

    render() {
        const { width, height, graph, eventMessager } = this.props;
        return (
            <svg className="graph-container"
                width={width} height={height}>
                <Links links={graph.links} />
                <Nodes nodes={graph.nodes} simulation={this.simulation}
                                           eventMessager={eventMessager}/>
                <Labels nodes={graph.nodes} />
            </svg>
        );
    }
}
Labels
这些标签代表链接的标签,代码如下
import * as React from "react";
import * as d3 from "d3";
import { d3Types } from "./GraphTypes";

class Label extends React.Component<{ node: d3Types.d3Node }, {}> {
    ref!: SVGTextElement;

    componentDidMount() {
        d3.select(this.ref).data([this.props.node]);
    }

    render() {
        return <text className="label" ref={(ref: SVGTextElement) => this.ref = ref}>
                   {this.props.node.id}
               </text>;
    }
}

export default class Labels extends React.Component<{ nodes: d3Types.d3Node[] }, {}> {
    render() {
        const labels = this.props.nodes.map((node: d3Types.d3Node, index: number) => {
            return <Label key={index} node={node} />;
        });

        return (
            <g className="labels">
                {labels}
            </g>
        );
    }
}
链接
这些标签代表图表的链接,代码如下
import * as React from "react";
import * as d3 from "d3";
import { d3Types } from "./GraphTypes";

class Link extends React.Component<{ link: d3Types.d3Link }, {}> {
    ref!: SVGLineElement;

    componentDidMount() {
        d3.select(this.ref).data([this.props.link]);
    }

    render() {
        return <line className="link" ref={(ref: SVGLineElement) => this.ref = ref}
                     strokeWidth={Math.sqrt(this.props.link.value)} />;
    }
}

export default class Links extends React.Component<{ links: d3Types.d3Link[] }, {}> {
    render() {
        const links = this.props.links.map((link: d3Types.d3Link, index: number) => {
            return <Link key={index} link={link} />;
        });

        return (
            <g className="links">
                {links}
            </g>
        );
    }
}
节点
这些标签代表图表的节点,代码如下
import * as React from "react";
import * as d3 from "d3";
import { d3Types } from "./GraphTypes";
import { IEventMessager } from "../utils/EventMessager";
import { ShowInfoInSidePanel } from "../utils/EventMessager";

class Node extends React.Component<{ node: d3Types.d3Node, color: string,
                                     eventMessager: IEventMessager }, {}> {
    ref!: SVGCircleElement;

    componentDidMount() {
        d3.select(this.ref).data([this.props.node]);
    }

    render() {
        return (
            <circle className="node" r={5} fill={this.props.color}
                ref={(ref: SVGCircleElement) => this.ref = ref}
                onClick={() => {
                    this.props.eventMessager.publish
                    (new ShowInfoInSidePanel(this.props.node.id));
                }}>>
                <title>{this.props.node.id}</title>
            </circle>
        );
    }
}

export default class Nodes extends React.Component
    <{ nodes: d3Types.d3Node[], simulation: any, eventMessager: IEventMessager }, {}> {
    componentDidMount() {
        const simulation = this.props.simulation;
        d3.selectAll<any,any>(".node")
            .call(d3.drag()
                .on("start", onDragStart)
                .on("drag", onDrag)
                .on("end", onDragEnd));

        function onDragStart(d: any) {
            if (!d3.event.active) {
                simulation.alphaTarget(0.3).restart();
            }
            d.fx = d.x;
            d.fy = d.y;
        }

        function onDrag(d: any) {
            d.fx = d3.event.x;
            d.fy = d3.event.y;
        }

        function onDragEnd(d: any) {
            if (!d3.event.active) {
                simulation.alphaTarget(0);
            }
            d.fx = null;
            d.fy = null;
        }
    }

    render() {
        const nodes = this.props.nodes.map((node: d3Types.d3Node, index: number) => {
            return <Node key={index} node={node} color="blue"
            eventMessager={this.props.eventMessager} />;
        });

        return (
            <g className="nodes">
                {nodes}
            </g>
        );
    }
}
节点代码的重要部分是,有一个 onClick 处理程序,它使用 EventMessager 类将消息分派回 Home 组件,该组件将侦听此事件并进行 Redux 调用,以获取所选节点文本的数据。
Redux
这是 Redux 代码,它将 Home 组件的动作创建者和 Redux store 状态变化连接在一起。可以看到,它接收 requestGenreInfo,该请求被发送到后端 WebApi(即 fetch(genre/info/${genre})),然后根据结果构造一个新的 GenreInfoState,并通过 Redux store 分派回 Search 组件的 Redux useSelector hook,该 hook 正在监听此状态变化。
import { Action, Reducer } from 'redux';
import { AppThunkAction } from './';

// -----------------
// STATE - This defines the type of data maintained in the Redux store.

export interface GenreInfoState {
    isLoading: boolean;
    genre: string;
    genreInfo: GenreInfo;
}

export interface GenreInfo {
    genreName: string;
    paragraphs: Array<string>;
}

// -----------------
// ACTIONS - These are serializable (hence replayable) descriptions of state transitions.
// They do not themselves have any side-effects;
// they just describe something that is going to happen.

interface RequestGenreInfoAction {
    type: 'REQUEST_GENRE_INFO';
    genre: string;
}

interface ReceiveGenreInfoAction {
    type: 'RECEIVE_GENRE_INFO';
    genre: string;
    genreInfo: GenreInfo;
}

// Declare a 'discriminated union' type.
// This guarantees that all references to 'type' properties contain one of the
// declared type strings (and not any other arbitrary string).
type KnownAction = RequestGenreInfoAction | ReceiveGenreInfoAction;

// ----------------
// ACTION CREATORS - These are functions exposed to UI components
// that will trigger a state transition.
// They don't directly mutate state,
// but they can have external side-effects (such as loading data).

export const actionCreators = {
    requestGenreInfo: (genre: string):
       AppThunkAction<KnownAction> => (dispatch, getState) => {
        // Only load data if it's something we don't already have
        // (and are not already loading)
        const appState = getState();
        if (appState && appState.genres && genre !== appState.genres.genre) {
            fetch(`genre/info/${genre}`)
                .then(response => response.json() as Promise<GenreInfo>)
                .then(data => {
                    dispatch({ type: 'RECEIVE_GENRE_INFO', genre: genre, genreInfo: data });
                });

            dispatch({ type: 'REQUEST_GENRE_INFO', genre: genre });
        }
    }
};

// ----------------
// REDUCER - For a given state and action, returns the new state.
// To support time travel, this must not mutate the old state.
let pars: string[] = [];
const emptyGenreInfo = { genreName: '', paragraphs: pars };
const unloadedState: GenreInfoState =
      { genre: '', genreInfo: emptyGenreInfo, isLoading: false };

export const reducer: Reducer<GenreInfoState> =
    (state: GenreInfoState | undefined, incomingAction: Action): GenreInfoState => {
    if (state === undefined) {
        return unloadedState;
    }

    const action = incomingAction as KnownAction;
    switch (action.type) {
        case 'REQUEST_GENRE_INFO':
            return {
                genre: action.genre,
                genreInfo: state.genreInfo,
                isLoading: true
            };
        case 'RECEIVE_GENRE_INFO':
            // Only accept the incoming data if it matches the most recent request.
            // This ensures we correctly
            // handle out-of-order responses.
            var castedAction = action as ReceiveGenreInfoAction;
            if (action.genre === state.genre) {
                return {
                    genre: castedAction.genre,
                    genreInfo: castedAction.genreInfo,
                    isLoading: false
                };
            }
            break;
    }

    return state;
};
SlidingPanel
正如本文开头的演示视频所示,当一个 D3 节点被点击时,我们使用一个很酷的滑动面板来显示被点击节点的结果。这时,会针对所选节点的文本向后端 WebApi 控制器发出调用。其思路是,节点使用 EventMessager RX 类分发一条消息,Home 组件监听该消息,然后设置一个名为 isOpen 的 prop 值,该值控制 SlidingPanel 是否过渡滑入。
这个订阅代码如下所示
useEffect(() => {
	const sub = props.eventMessager.observe()
	.pipe(
		filter((event: IMessage) => event instanceof ShowInfoInSidePanel),
		map((event: IMessage) => event as ShowInfoInSidePanel)
	)
	.subscribe(x => {
		//pass callback to setState to prevent currentState
		//  being a dependency
		setState(
			(currentState) => ({
				...currentState,
				isopen: true,
				selectedNodeText: x.itemClicked
			})
		);
	});

	return () => {
		sub.unsubscribe();
	}
}, [props.eventMessager]);
这是 SlidingPanel 组件,我将它从这个 JSX 版本改编成了 TypeScript 版本。
import React from 'react';
import { CSSTransition } from 'react-transition-group';
import '../css/SlidingPanel.css';

export enum PanelType {
    Top = 1,
    Right,
    Bottom,
    Left,
}

type Nullable<T> = T | null;
export interface SliderProps {
    type: PanelType;
    size: number;
    panelClassName?: string;
    isOpen: boolean;
    children: Nullable<React.ReactElement>;
    backdropClicked: () => void;
}

const getPanelGlassStyle = (type: PanelType, size: number, hidden: boolean):
      React.CSSProperties => {
    const horizontal = type === PanelType.Bottom || type === PanelType.Top;
    return {
        width: horizontal ? `${hidden ? '0' : '100'}vw` : `${100 - size}vw`,
        height: horizontal ? `${100 - size}vh` : `${hidden ? '0' : '100'}vh`,
        ...(type === PanelType.Right && { left: 0 }),
        ...(type === PanelType.Top && { bottom: 0 }),
        position: 'inherit',
    };
};

const getPanelStyle = (type: PanelType, size: number): React.CSSProperties => {
    const horizontal = type === PanelType.Bottom || type === PanelType.Top;
    return {
        width: horizontal ? '100vw' : `${size}vw`,
        height: horizontal ? `${size}vh` : '100vh',
        ...(type === PanelType.Right && { right: 0 }),
        ...(type === PanelType.Bottom && { bottom: 0 }),
        position: 'inherit',
        overflow: 'auto',
    };
};

function getNameFromPanelTypeEnum(type: PanelType): string {

    let result = "";
    switch (type) {
        case PanelType.Right:
            result = "right";
            break;
        case PanelType.Left:
            result = "left";
            break;
        case PanelType.Top:
            result = "top";
            break;
        case PanelType.Bottom:
            result = "bottom";
            break;
    }
    return result;
}

const SlidingPanel: React.SFC<SliderProps> = (props) => {

    const glassBefore = props.type === PanelType.Right || props.type === PanelType.Bottom;
    const horizontal = props.type === PanelType.Bottom || props.type === PanelType.Top;
    return (
        <div>
            <div className={`sliding-panel-container
                 ${props.isOpen ? 'active' : ''} 'click-through' `}>
                <div className={`sliding-panel-container
                 ${props.isOpen ? 'active' : ''} 'click-through' `}>
                    <CSSTransition
                        in={props.isOpen}
                        timeout={500}
                        classNames={`panel-container-${getNameFromPanelTypeEnum(props.type)}`}
                        unmountOnExit
                        style={{ display: horizontal ? 'block' : 'flex' }}
                    >
                        <div>
                            {glassBefore && (
                                <div
                                    className="glass"
                                    style={getPanelGlassStyle(props.type, props.size, false)}
                                    onClick={(e: React.MouseEvent<HTMLDivElement,
                                    MouseEvent>) => { props.backdropClicked(); }}
                                />
                            )}
                            <div className="panel"
                                 style={getPanelStyle(props.type, props.size)}>
                                 <div className={`panel-content
                                 ${props.panelClassName || ''}`}>{props.children}</div>
                            </div>
                            {!glassBefore && (
                                <div
                                    className="glass"
                                    style={getPanelGlassStyle(props.type, props.size, false)}
                                    onClick={(e: React.MouseEvent<HTMLDivElement, MouseEvent>)
                                    => { props.backdropClicked(); }}
                                />
                            )}
                        </div>
                    </CSSTransition>
                </div>
            </div>
        </div>
    );
}

SlidingPanel.defaultProps = {
    type: PanelType.Left,
    size: 50,
    panelClassName: '',
    isOpen: false,
    children: null,
    backdropClicked: () => null
}

export default SlidingPanel;
这大部分功劳真的要归功于原作者。我只是把它 TypeScript 化了。
Search 组件
Search 组件是一个顶层路由组件,看起来像这样
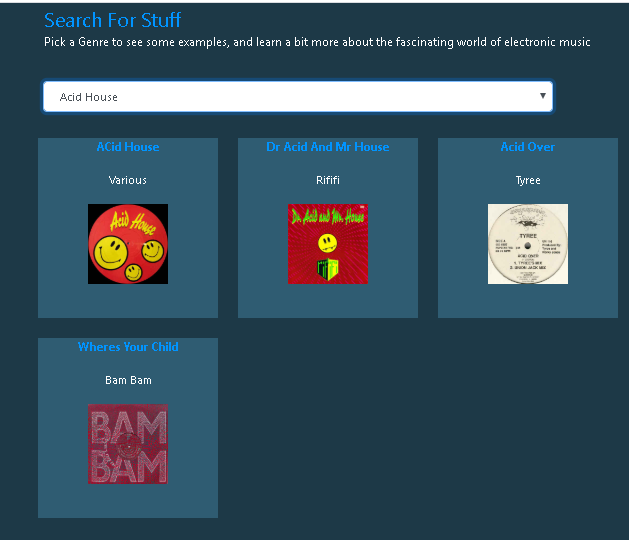
该组件使用了 Redux,并使用 Redux 调用后端 WebApi,同时也使用了 ReduxThunk。Redux 的流程是这样的
- 我们分发
requestSearchInfo动作。 - 我们使用 Redux hook 来监听
SearchState 的状态变化。
Search 组件标记中最重要的部分如下所示
import React, { useState } from 'react';
import { useDispatch, useSelector } from 'react-redux';
import { Scrollbars } from 'react-custom-scrollbars';

//css
import './css/Search.css';

//redux
import { ApplicationState } from '../store';
import * as SearchStore from '../store/Search';

export interface SearchProps {

}

interface ISearchState {
    selectedItem: string;
    selectedSearchItem: SearchStore.GenreDetailedItem;
}

const initialState: ISearchState = {
    selectedItem: '',
    selectedSearchItem: null
}

const Search: React.FunctionComponent<SearchProps> = () => {

    const dispatch = useDispatch();

    const [currentState, setState] = useState<ISearchState>(initialState);

    const onGenreChange = (e: React.ChangeEvent<HTMLSelectElement>) => {
        if (e.target.value === '--') {
            return;
        }

        setState(
            {
                selectedItem: e.target.value,
                selectedSearchItem: null
            }
        );
    }

    const onImgMouseDown = (item: SearchStore.GenreDetailedItem) => {
        setState(
            {
                ...currentState,
                selectedSearchItem: item
            }
        );
    }

    const storeState: SearchStore.SearchState = useSelector(
        (state: ApplicationState) => state.search as SearchStore.SearchState
    );

    React.useEffect(() => {
        dispatch(SearchStore.actionCreators.requestSearchInfo(currentState.selectedItem));
    }, [currentState.selectedItem]);

    return (
        <div>
           .....
        </div>
    );
}

export default Search;
滚动条
这和上面提到的 ScrollBars 是一样的。
Redux
这是 Redux 代码,它将 Search 组件的动作创建者和 Redux store 状态变化连接在一起。可以看到,它接收 requestSearchInfo,该请求被发送到后端 WebApi(即 fetch(genre/details/${genre})),然后根据结果构造一个新的 SearchState,并通过 Redux store 分派回 Search 组件的 Redux useSelector hook,该 hook 正在监听此状态变化。
import { Action, Reducer } from 'redux';
import { AppThunkAction } from './';

// -----------------
// STATE - This defines the type of data maintained in the Redux store.

export interface SearchState {
    isLoading: boolean;
    genre: string;
    searchInfo: GenreDetailedItemContainer;
}

export interface GenreDetailedItemContainer {
    genreName: string;
    items: Array<GenreDetailedItem>;
}

export interface GenreDetailedItem {
    title: string;
    band: string;
    imageUrl: string;
    paragraphs: Array<string>;
}

// -----------------
// ACTIONS - These are serializable (hence replayable) descriptions of state transitions.
// They do not themselves have any side-effects;
// they just describe something that is going to happen.

interface RequestSearchInfoAction {
    type: 'REQUEST_SEARCH_INFO';
    genre: string;
}

interface ReceiveSearchInfoAction {
    type: 'RECEIVE_SEARCH_INFO';
    genre: string;
    searchInfo: GenreDetailedItemContainer;
}

// Declare a 'discriminated union' type.
// This guarantees that all references to 'type' properties contain one of the
// declared type strings (and not any other arbitrary string).
type KnownAction = RequestSearchInfoAction | ReceiveSearchInfoAction;

// ----------------
// ACTION CREATORS - These are functions exposed to UI components
// that will trigger a state transition.
// They don't directly mutate state, but they can have external side-effects
// (such as loading data).

export const actionCreators = {
    requestSearchInfo: (genre: string):
        AppThunkAction<KnownAction> => (dispatch, getState) => {
        // Only load data if it's something we don't already have (and are not already loading)
        const appState = getState();
        if (appState && appState.search && genre !== appState.search.searchInfo.genreName) {
            fetch(`genre/details/${genre}`)
                .then(response => response.json() as Promise<GenreDetailedItemContainer>)
                .then(data => {
                    dispatch({ type: 'RECEIVE_SEARCH_INFO', genre: genre, searchInfo: data });
                });

            dispatch({ type: 'REQUEST_SEARCH_INFO', genre: genre });
        }
    }
};

// ----------------
// REDUCER - For a given state and action, returns the new state.
// To support time travel, this must not mutate the old state.
let items: GenreDetailedItem[] = [];
const emptySearchInfo = { genreName: '', items: items };
const unloadedState: SearchState = { genre: '', searchInfo: emptySearchInfo, isLoading: false };

export const reducer: Reducer<SearchState> =
(state: SearchState | undefined, incomingAction: Action): SearchState => {
    if (state === undefined) {
        return unloadedState;
    }

    const action = incomingAction as KnownAction;
    switch (action.type) {
        case 'REQUEST_SEARCH_INFO':
            return {
                genre: action.genre,
                searchInfo: state.searchInfo,
                isLoading: true
            };
        case 'RECEIVE_SEARCH_INFO':
            // Only accept the incoming data if it matches the most recent request.
            // This ensures we correctly handle out-of-order responses.
            var castedAction = action as ReceiveSearchInfoAction;
            if (action.genre === state.genre) {
                return {
                    genre: castedAction.genre,
                    searchInfo: castedAction.searchInfo,
                    isLoading: false
                };
            }
            break;
    }

    return state;
};
Bootstrap 弹出窗口
我使用 Bootstrap 来显示一个弹出窗口,运行时看起来像这样。

我使用了这段相当标准的 Bootstrap 代码
<div className="modal fade" id="exampleModal"
role="dialog" aria-labelledby="exampleModalLabel"
aria-hidden="true">
    <div className="modal-dialog" role="document">
        <div className="modal-content">
            <div className="modal-header">
                <h5 className="modal-title"
                id="exampleModalLabel"
                style={{ color: "#0094FF" }}>
                {currentState.selectedSearchItem.title}</h5>
                <button type="button" className="close"
                data-dismiss="modal" aria-label="Close">
                    <span aria-hidden="true">×</span>
                </button>
            </div>
            <div className="modal-body">
                <img className="searchImgPopup"
                src={currentState.selectedSearchItem.imageUrl} />
                <Scrollbars
                    autoHeight
                    autoHeightMin={200}
                    autoHeightMax={600}
                    style={{ width: 300 }}>
                    <div className="mainHeader"
                    style={{ color: "#0094FF" }}>{currentState.selectedSearchItem.band}</div>
                    <div className="subHeader">
                        {currentState.selectedSearchItem.paragraphs.map((para, index) => (
                            <p key={index}>{para}</p>
                        ))}
                    </div>
                </Scrollbars>
            </div>
        </div>
    </div>
</div>
结论
写这个小应用我玩得很开心。我确实看到,通过使用 Redux hooks,它确实清理了整个 Connect -> MapDispatchToProps/MapStateToProps 的流程,让代码更整洁了一些。我试图去掉我所有的基于类的组件,转而使用纯组件或函数式组件,但我有时发现 TypeScript 会给我带来一点阻碍。不过总的来说,我发现这相当可行,并且我很享受这个过程。
总之,希望大家喜欢它,一如既往地欢迎投票/评论。
历史
- 2020年4月28日:初始版本