
为 iOS Vision 框架构建 Core ML 流水线
5.00/5 (3投票s)
在本文中,我们将创建一个 Core ML 管道作为我们的端到端模型。
引言
本系列文章假设您熟悉 Python、Conda 和 ONNX,并且对在 Xcode 中开发 iOS 应用程序具有一定的经验。欢迎您下载此项目的源代码。我们将使用 macOS 10.15+、Xcode 11.7+ 和 iOS 13+ 运行代码。
摆脱冗余框
在我们将所有模型打包成一个管道之前,还有最后一件事要解决。上次我们运行预测时,我们的模型产生了以下结果。
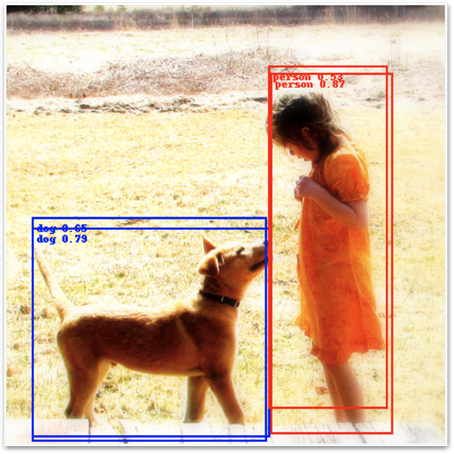
预测是正确的,但为每个单元格和框生成的独立检测导致了冗余和重叠的框。对我们来说幸运的是,有一种经过验证的解决此类问题的方法:非最大抑制算法。由于它已在 Core ML 中实现并可用作模型层或专用模型,因此我们不会在此详细描述它。了解此算法接受检测列表(带有置信度分数的框和类别)并仅返回与最大置信度相对应的框(没有冗余重叠的框)就足够了。目前,只有 nonMaximumSuppresion 模型(不是层)的输出才被 iOS Vision 框架正确识别,因此我们将坚持使用它。
让我们从上次完成的地方开始 - 使用创建的 model_decoder 实例 - 参见您下载的源代码。
现在,我们继续如下(借用这篇文章的代码)
nms_spec = ct.proto.Model_pb2.Model()
nms_spec.specificationVersion = 3
nms = nms_spec.nonMaximumSuppression
nms.confidenceInputFeatureName = "all_scores"
nms.coordinatesInputFeatureName = "all_boxes"
nms.confidenceOutputFeatureName = "scores"
nms.coordinatesOutputFeatureName = "boxes"
nms.iouThresholdInputFeatureName = "iouThreshold"
nms.confidenceThresholdInputFeatureName = “confidenceThreshold"
现在我们可以定义基本参数
nms.iouThreshold = 0.5
nms.confidenceThreshold = 0.4
nms.pickTop.perClass = True

labels = np.loadtxt('./models/coco_names.txt', dtype=str, delimiter='\n')
nms.stringClassLabels.vector.extend(labels)
iouThreshold 参数的值在 [0, 1] 范围内。它确定何时可以将单个类的两个框视为冗余。值 1 意味着只有完全相同的框才被视为重叠和冗余,而值 0 意味着即使没有任何实际重叠的框也可能被视为冗余。显而易见的是,该值应该介于 0 和 1 之间。
confidenceThreshold 参数允许我们过滤掉置信度分数低于配置值的检测。如果 pickTop.perClass 值设置为 False,则即使它们引用不同的类别,框也可能被视为重叠和冗余,因此对于多类检测,您通常希望将其设置为 True。最后,标签被添加到模型中,因此我们不必在 iOS 应用程序中按类别 ID 查找标签。
现在,我们可以将 model_decoder 的输出映射到我们的新模型输入
for i in range(2):
    decoder_output = model_decoder._spec.description.output[i].SerializeToString()

    nms_spec.description.input.add()
    nms_spec.description.input[i].ParseFromString(decoder_output)

    nms_spec.description.output.add()
    nms_spec.description.output[i].ParseFromString(decoder_output)

nms_spec.description.output[0].name = 'scores'
nms_spec.description.output[1].name = 'boxes'

output_sizes=[80, 4]
for i in range(2):
    ma_type = nms_spec.description.output[i].type.multiArrayType
    ma_type.shapeRange.sizeRanges.add()
    ma_type.shapeRange.sizeRanges[0].lowerBound = 0
    ma_type.shapeRange.sizeRanges[0].upperBound = -1
    ma_type.shapeRange.sizeRanges.add()
    ma_type.shapeRange.sizeRanges[1].lowerBound = output_sizes[i]
    ma_type.shapeRange.sizeRanges[1].upperBound = output_sizes[i]
    del ma_type.shape[:]
让我们保存非最大抑制模型
model_nms = ct.models.MLModel(nms_spec)
model_nms.save('./models/yolov2-nms.mlmodel')
构建管道
将所有模型(model_converted、model_decoder 和 model_nms)就位后,我们可以构建一个将它们绑定在一起的管道
input_features = [ ('input.1', datatypes.Array(1,1,1)), # Placeholder
                   ('iouThreshold', datatypes.Double()),
                   ('confidenceThreshold', datatypes.Double())
                 ]
output_features = [ 'scores', 'boxes' ]

pipeline = ct.models.pipeline.Pipeline(input_features, output_features)
pipeline.spec.specificationVersion = 3

pipeline.add_model(model_converted)
pipeline.add_model(model_decoder)
pipeline.add_model(model_nms)
要做的最后一件事是将管道的输入和输出占位符替换为实际模型的输入和输出,然后保存管道
pipeline.spec.description.input[0].ParseFromString(model_converted._spec.description.input[0].SerializeToString())
pipeline.spec.description.output[0].ParseFromString(model_nms._spec.description.output[0].SerializeToString())
pipeline.spec.description.output[1].ParseFromString(model_nms._spec.description.output[1].SerializeToString())

model_pipeline = ct.models.MLModel(pipeline.spec)
model_pipeline.save(“./models/yolov2-pipeline.mlmodel")
对管道的预测
由于我们的管道返回的数据格式与我们之前使用的格式略有不同(框和类别置信度在两个数组中而不是单个数组中),我们需要更新我们的 annotate_image 函数
def annotate_image(image, preds):
    annotated_image = copy.deepcopy(image)
    draw = ImageDraw.Draw(annotated_image)

    w,h = image.size
    colors = ['red', 'orange', 'yellow', 'green', 'blue', 'white']

    boxes = preds['boxes']
    scores = preds['scores']

    for i in range(len(scores)):
        class_id = int(np.argmax(scores[i]))
        score = scores[i, class_id]

        xc, yc, w, h = boxes[i]
        xc = xc * 416
        yc = yc * 416
        w = w * 416
        h = h * 416

        x0 = xc - (w / 2)
        y0 = yc - (h / 2)
        label = labels[class_id]
        color = ImageColor.colormap[colors[class_id % len(colors)]]

        draw.rectangle([(x0, y0), (x0 + w, y0 + h)], width=2, outline=color)
        draw.text((x0 + 5, y0 + 5), "{} {:0.2f}".format(label, score), fill=color)

    return annotated_image
现在我们可以回到Open Images 数据集,看看完成的模型在我们的最喜欢的图像上的效果
image = load_and_scale_image('https://c2.staticflickr.com/4/3393/3436245648_c4f76c0a80_o.jpg')
preds = model_pipeline.predict(data={'input.1': image})
annotate_image(image, preds)
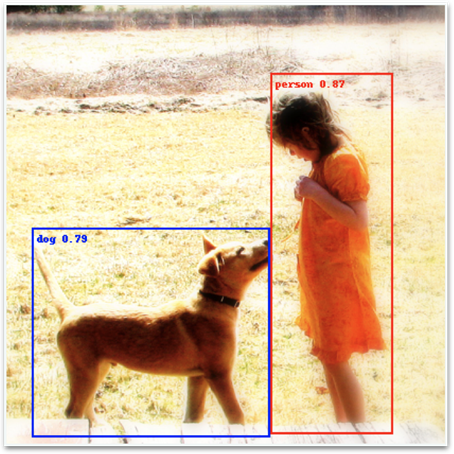
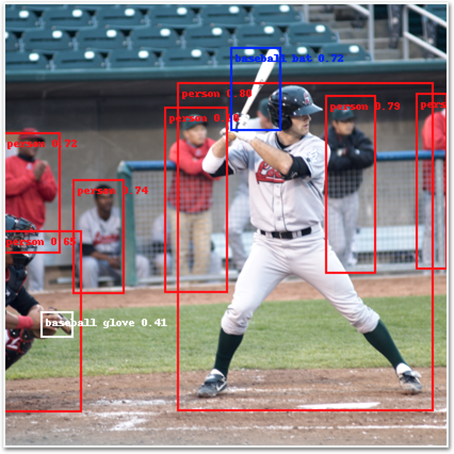
另外几个样本。

后续步骤
我们终于拥有了完成的模型,没有留下冗余检测。在下一篇文章中,我们将开始开发将使用该模型的 iOS 应用程序。