
使用 ESP32 的两个核心:使用 Esp32SynchronizationContext 轻松同步
4.85/5 (9投票s)
借鉴 .NET 的思路,轻松安全地在 ESP32 的线程之间传递信息
引言
调试物联网设备是很困难的。许多设备没有集成调试探针,即使有,也通过串行 UART 或最差情况下的 JTAG 等慢速接口进行调试。这意味着逐行调试要么不可行,要么太慢,弊大于利。
调试多线程代码更是雪上加霜。安全地访问线程间数据并非易事,任何错误的操作都可能导致间歇性问题,即使在具有集成调试环境的完整 PC 上,这些问题也极其难以追踪。
更不用说将两者结合起来,尤其是考虑到 ESP32 的串行接口导致漫长的开发和调试周期。这根本不经济。否则,你会抓狂的。
因此,您可能一直在使用单核运行您炫酷的双核 ESP32,而让另一个核心闲置。您不必这样。如果我告诉您,我们可以极大地简化一般情况下的同步,以便您可以轻松创建多线程代码,而无需所有的麻烦呢?
概念化这个混乱的局面
有许多方法可以同步对数据的访问,使其可以安全地从多个线程读取和写入。其中一些易于使用,一些则不然。有些是通用的,但大多数都特定于您正在做的事情。
对于同步的核心,我们将使用消息传递。我们将使用一个线程安全的环形缓冲区来排队消息。任何线程都可以将消息放入队列,然后检索消息以在目标线程(通常是主应用程序线程)上处理。
如果线程 A 想向线程 B 发送消息,它们都必须能够访问消息环形缓冲区 R。线程 A 将消息发送到缓冲区 R,而线程 B 通常会循环,在消息可用时检索消息。发送和检索消息都是线程安全的操作。
作为一个底层机制,这已经很好了,但还可以进一步简化。在这种情况下,我们将通过使用一种类型的消息来简化它,该消息可以执行一项操作。然而,这项操作非常灵活。
在我们深入研究之前,我们将探讨 .NET 中一种巧妙的消息传递编排方式,它能实现我们想要的功能,然后将其应用于 ESP32。
借鉴微软的设计
在 .NET 中,微软引入了 `SynchronizationContext`。它基本上是一个线程安全的、消息传递实现,其消息是委托。使用它,您可以从线程 A 发送一个匿名方法,以便由线程 B 调用,从而有效地使任何您想要的指定代码在目标线程 (B) 上执行,而不是在当前线程 (A) 上执行。
通常,当我们考虑同步时,我们会想到创建数据周围的读写屏障,但在这种模式下,我们完全绕过了这种形式的同步。取而代之的是,我们只是将代码从一个线程分派到另一个线程执行。我们可以使用此代码来传输我们线程操作的结果、状态和通知。
例如,这使得编写可以安全地从辅助线程更新 UI 的代码变得非常容易。以下是一个 .NET 控制台应用程序中使用它的示例,但您最常在 Windows Forms 或 WPF 应用程序中找到它们。
static MessagingSynchronizationContext _syncContext = new MessagingSynchronizationContext();
static ulong _count;
static void Main()
{
    ThreadPool.QueueUserWorkItem((state) => {
        while(true)
        {
            // This thread just posts Hello World 1! and a count
            // to the target thread over and over again, delaying
            // by 3/4 of a second each time

            // infinite loop
            // use Post() to execute code on the target thread
            // - does not block here
            _syncContext.Post(new SendOrPostCallback((state2) => {
                // BEGIN EXECUTE ON TARGET THREAD
                Console.WriteLine("Hello World 1! Count: {0}", _count);
                // normally we couldn't access _count
                // from a different thread safely
                // but this always runs on the target
                // thread so we're okay since _count
                // never gets touched by any other
                // thread
                ++_count;
                // END EXECUTE ON TARGET THREAD
            }),null);
            // EXECUTES ON THIS THREAD:
            Thread.Sleep(750);
        }
    });
    ThreadPool.QueueUserWorkItem((state) => {
        while (true)
        {
            // This thread just posts Hello World 1! and a count
            // to the target thread over and over again, delaying
            // by 3/4 of a second each time

            // infinite loop
            // use Send() to execute code on the target thread
            // - blocks here until the target function returns
            _syncContext.Send(new SendOrPostCallback((state2) => {
                // BEGIN EXECUTE ON TARGET THREAD
                Console.WriteLine("Hello World 2! Count: {0}", _count);
                // normally we couldn't access _count
                // from a different thread safely
                ++_count;
                // END EXECUTE ON TARGET THREAD
            }), null);
            // EXECUTES ON THIS THREAD:
            Thread.Sleep(1000);
        }
    });

    // start the main message loop:
    _syncContext.Start();
}
运行它会得到类似这样的结果
Hello World 1! Count: 0
Hello World 2! Count: 1
Hello World 1! Count: 2
Hello World 2! Count: 3
Hello World 1! Count: 4
Hello World 2! Count: 5
Hello World 1! Count: 6
Hello World 1! Count: 7
Hello World 2! Count: 8
...
这里,关键是我们有两个线程访问 `_count` 并写入 `Console`,对吗?
不,我们没有。`_syncContext.Send()` 和 `_syncContext.Post()` 中包含的所有 lambda 内部的代码实际上都是在调用 `_syncContext.Start()` 的线程上分派的。
这样做是因为 `Send()` 和 `Post()` 实际上并不执行它们接收到的委托。相反,它们将它们打包成消息并放入消息队列。同时,`Start()` 在后台运行一个循环,从队列中检索消息,然后调用其中包含的委托!
因此,委托只在一个线程上执行,并且按照它们在队列中的顺序执行。诀窍在于,在辅助线程中执行大部分工作,然后使用 `Send()` 或 `Post()` 将长时间运行操作的结果更新到主线程。
`Send()` 和 `Post()` 之间的区别在于 `Send()` 会阻塞,直到委托在目标线程上执行并返回。`Send()` 实际上比完全异步的 `Post()` 更耗费 CPU 资源,所以如果可以的话,请使用 `Post()`。
请注意,`Send()` 和 `Post()` 是我们介绍的 `SynchronizationContext` 本身定义的唯一成员。其余成员是特定于实现的,在本例中,它们特定于我称之为 `MessagingSynchronizationContext` 的自定义 `SynchronizationContext` 实现。
这很好,但这只是 .NET。我们这里不是处理 .NET,但一点点借鉴可以走很远。我们将使用 Arduino 框架和 ESP32 上的 FreeRTOS 来重现这个概念。在这个过程中,我们将得到一个与 `MessagingSynchronizationContext` 非常相似的东西,但适用于 ESP32,使用 C++,并且是“Arduino 化”的。
我将首先介绍 `MessagingSynchronizationContext` 的 .NET 实现,因为我们将要重现它。
编写这个混乱的程序
`MessagingSynchronizationContext` 类使用 `MessageQueue` 来处理将消息发布到线程安全队列。我们不会详细介绍 `MessageQueue`,因为它超出了范围。它只是一个线程安全的队列,直到有更多消息可用才会阻塞。
发布到队列的所有消息都采用以下形式
private struct Message
{
    public readonly SendOrPostCallback Callback;
    public readonly object State;
    public readonly ManualResetEventSlim FinishedEvent;
    public Message
    (SendOrPostCallback callback, object state, ManualResetEventSlim finishedEvent)
    {
        Callback = callback;
        State = state;
        FinishedEvent = finishedEvent;
    }
    public Message(SendOrPostCallback callback, object state) : this(callback, state, null)
    {
    }
}
在这里,`Callback` 是一个指向我们处理程序中代码的委托——通常是一个 lambda。`State` 是应用程序定义的要随调用一起传递的状态,我们不使用它。`FinishedEvent` 用于在 `Callback` 委托完成执行时发出信号。这由 `Send()` 使用,但不由 `Post()` 使用,后者中的 `FinishedEvent` 始终为 `null`。
实现 post 和 send 的代码如下
/// <summary>
/// Sends a message and does not wait
/// </summary>
/// <param name="callback">The delegate to execute</param>
/// <param name="state">The state associated with the message</param>
public override void Post(SendOrPostCallback callback, object state)
{
    _messageQueue.Post(new Message(callback, state));
}
/// <summary>
/// Sends a message and waits for completion
/// </summary>
/// <param name="callback">The delegate to execute</param>
/// <param name="state">The state associated with the message</param>
public override void Send(SendOrPostCallback callback, object state)
{
    var ev = new ManualResetEventSlim(false);
    try
    {
        _messageQueue.Post(new Message(callback, state, ev));
        ev.Wait();
    }
    finally
    {
        ev.Dispose();
    }
}
`Post()` 方法非常直接。`Send()` 也差不多直接,但它有额外的代码来等待,然后处理消息关联的 `FinishedEvent`。
以下是主要的 `Start()` 实现。这是消息被分派和委托被执行的地方
/// <summary>
/// Starts the message loop
/// </summary>
public void Start()
{
    while (Step()) ;
}
public bool Step()
{
    if (_messageQueue.IsEmpty)
        return true;
    // blocks until a message comes in:
    Message msg = _messageQueue.Receive();
    // execute the code on this thread
    msg.Callback?.Invoke(msg.State);
    // let Send() know we're done:
    if (null != msg.FinishedEvent)
        msg.FinishedEvent.Set();
    return null != msg.Callback;
}
在这里,它在循环中委托给 `Step()`,直到获得 `false` 结果。`Step()` 从队列中取出下一个 `Message`,执行 `Callback` 委托(如果存在),然后如果存在 `FinishedEvent`(表示调用了 `Send()`),它会设置它,允许之前的 `Wait()` 完成。如果不存在委托,则返回 `false`,表示该消息是一个“quit”消息,这是一个特殊的“quit”消息,在调用 `Stop()` 时会被发布。这允许您从另一个线程调用 `Stop()` 来退出循环。
这就是全部的魔法了。现在让我们用 C++ 为 ESP32 重现它。
ESP32 的实现
我们将不得不深入研究 FreeRTOS,这是 ESP32 用于处理线程调度、基本 I/O 等的实时操作系统。它不是 ESP-IDF,但如果您使用 ESP-IDF,您很可能会在同一代码中使用 FreeRTOS 调用。当您在 ESP32 上使用 Arduino 框架时,您也是在底层使用 ESP-IDF 和 FreeRTOS,通过 Arduino 代码来包装它。在这种情况下,我们将直接使用其中一些,因为 Arduino 框架本身并不特别关注线程,而且据我所知,它也没有提供对我们将使用的那个漂亮环形缓冲区实现的访问。幸运的是,我们使用的东西,虽然对不习惯使用它的人来说有点笨拙,但很简单!
我们的 `Esp32SynchronizationContext` 类将使用一个基于 FreeRTOS 的环形缓冲区来代替我们之前使用的 `MessageQueue`,并使用 FreeRTOS 的“任务”API 来处理繁重的工作。
请不要将这里的 FreeRTOS 任务与 .NET 的 `Task` 类混淆。它们是截然不同的。FreeRTOS 中的任务基本上是纤程(协作式调度)或线程(由操作系统抢占式调度或在另一个核心上运行)。我们将把它们用作线程。
实时细微之处:超时
我们将努力使代码和概念尽可能地保持一致。然而,一个显著的区别是,实时操作系统必须保证延迟,或者至少是最大延迟。这意味着您不能仅仅等待某事永远完成。您必须设置超时,因为它根本不会无限期地等待。我在适当的地方添加了超时参数。其中一个实例使事情变得有趣。
Arduino 风格:生命周期和更新
Arduino 库通常会省略 C++ 的 RAII 模式,而是使用 `begin()` 方法进行主要初始化,可能还会接受初始化参数。无论您或我对此有何看法,这通常是 Arduino 代码的处理方式,也是人们通常的期望。此方法有时会伴随一个 `end()` 方法来卸载。有时,库会忽略它,因为这些平台在框架中没有优雅的关机机制。`begin()` 方法通常在 `setup()` 中调用。如果一个库是协作式“多线程”的,它可能在 `loop()` 调用期间也需要一些 CPU 时间。我不知道是否有标准的方法来命名这个,但我的使用 `begin()`/`end()` 范例的类也会使用 `update()`,如果它们需要在 `loop()` 中运行某些内容的话。
`Esp32SynchronizationContext` 也不例外。如果您想在代码的主线程中使用同步上下文,请使用 `begin()`——通常在 `setup()` 中——来初始化同步上下文。如果您想取消初始化它,请使用 `end()`,尽管根据您的情况,这可能永远不需要被调用。在 `loop()` 中调用 `update()`。
您也可以使用同步上下文来定位其他线程。只需在相应线程的主循环中调用 `update()`。除非您的场景比物联网设备通常需要的要复杂得多,否则您通常不需要这样做。
重温初始示例,ESP32 风格
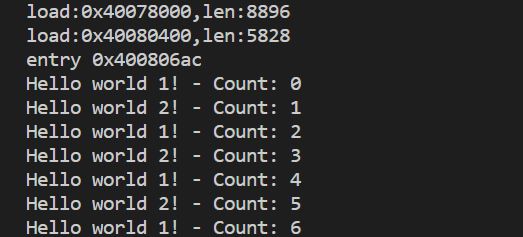
这是 ESP32 示例代码,它相当于我们在文章开头探索过的第一段 C# 代码。
#include <Arduino.h>
#include "Esp32SynchronizationContext.h"

// use this to synchronize calls by executing functors on the target thread
Esp32SynchronizationContext g_mainSync;
// just something we can increment
unsigned long long g_count;
void thread1(void * state){
  // This task just posts Hello World 1! and a count
  // to the target thread over and over again, delaying
  // by 3/4 of a second each time

  // infinite loop or stop if error
  // use post() to execute code on the target thread
  // - does not block here
  while(g_mainSync.post([](void*state){
    // BEGIN EXECUTE ON TARGET THREAD
    Serial.printf("Hello world 1! - Count: %llu\r\n",g_count);
    // normally we couldn't access g_count
    // from a different task/thread safely
    // but this always runs on the target
    // thread so we're okay since g_count
    // never gets touched by any other
    // thread
    ++g_count;
    // END EXECUTE ON TARGET THREAD
    })) {
      // EXECUTES ON THIS THREAD:
      delay(750);
    }

  // never executes unless error, but if
  // we get here, delete the task
  vTaskDelete( NULL );
}
void thread2(void * state){
  // This task just sends Hello World 2! and a count
  // to the target thread over and over again, delaying
  // by 1 second each time

  // infinite loop or stop if error
  // use send() to execute code on the target thread
  // - blocks here until method returns
  while(g_mainSync.send([](void*state){
    // BEGIN EXECUTE ON TARGET THREAD
    Serial.printf("Hello world 2! - Count: %llu\r\n",g_count);
    // normally we couldn't access g_count
    // from a different task/thread safely
    ++g_count;
    // END EXECUTE ON TARGET THREAD
    })) {
      // EXECUTES ON THIS THREAD:
      delay(1000);
    }

  // never executes unless error, but if
  // we get here, delete the task
  vTaskDelete( NULL );
}

void setup()
{
  g_count = 0;
  Serial.begin(115200);
  // initialize our synchronization context
  if(!g_mainSync.begin()) {
    Serial.println("Error initializing synchronization context");
    while(true);          // halt
  }
  // create a task on the first core (the one that FreeRTOS runs on)
  xTaskCreatePinnedToCore(
    thread1,              // Function that should be called
    "Message feeder 1",   // Name of the task (for debugging)
    1000,                 // Stack size (bytes)
    NULL,                 // Parameter to pass
    1,                    // Task priority
    NULL,                 // Task handle
    0                     // core
  );
  // create a task on the second core (the one setup()/loop() run on,
  // and the one the Arduino framework runs on)
  xTaskCreatePinnedToCore(
    thread2,              // Function that should be called
    "Message feeder 2",   // Name of the task (for debugging)
    1000,                 // Stack size (bytes)
    NULL,                 // Parameter to pass
    1,                    // Task priority
    NULL,                 // Task handle
    1                     // core
  );
}

void loop()
{
  // This simply dispatches calls made by send() or post()
  // by executing them here. Note that long running methods
  // or a backlogged queue can cause this to block for a
  // significant amount of time. Try to avoid putting long
  // running calls into the synchronization context themselves
  // that's what tasks are for anyway.
  if(!g_mainSync.update()) {
    Serial.println("Could not update synchronization context");
  }
}
整体代码基本相同。在 C# 中使用 lambda 的地方,我们使用 C++ lambda。虽然 C# lambda 使用委托支持,但我们的 lambda 由 C++ 中的函数对象支持。唯一的真正区别是我们没有使用异常处理,并且我们将两个线程固定到两个不同的核心,而在 .NET 版本中,我们允许 `ThreadPool` 分配每个线程运行的核心。
实现 Message(再次)
这次用 C++ 来看一下 `Message`。
struct Message {
    std::function<void(void*)> callback;
    void* state;
    TaskHandle_t finishedNotifyHandle;
};
这与我们之前的内容非常相似。我们使用 `std::function
通过环形缓冲区发送和发布
让我们再次看一下 send 和 post,这次使用 FreeRTOS 环形缓冲区 API。
// posts a message to the thread update() is called from. This method does not block
bool post(std::function<void(void *)> fn, void *state = nullptr, uint32_t timeoutMS = 10000)
{
    Message msg;
    msg.callback = fn;
    msg.state = state;
    msg.finishedNotifyHandle = nullptr;
    UBaseType_t res = xRingbufferSend
    (m_messageRingBufferHandle, &msg, sizeof(msg), pdMS_TO_TICKS(timeoutMS));
    return (res == pdTRUE);
}
// sends a message to the thread update() is called from.
// This method blocks until the update thread executes the method and it returns.
bool send(std::function<void(void *)> fn, void *state = nullptr, uint32_t timeoutMS = 10000)
{
    Message msg;
    msg.callback = fn;
    msg.state = state;
    msg.finishedNotifyHandle = xTaskGetCurrentTaskHandle();
    uint32_t mss = millis();
    UBaseType_t res = xRingbufferSend
    (m_messageRingBufferHandle, &msg, sizeof(msg), pdMS_TO_TICKS(timeoutMS));
    mss = millis() - mss;
    if (timeoutMS >= mss)
        timeoutMS -= mss;
    else
        timeoutMS = 0;
    if (res == pdTRUE)
    {
        ulTaskNotifyTake(pdTRUE, pdMS_TO_TICKS(timeoutMS));
        return true;
    }
    return false;
}
`post()` 非常简单,应该显而易见,尽管 `xRingBufferSend()` 的类型有些奇怪。基本上,我们构造一个消息,然后将其发布到环形缓冲区。它将最多阻塞 `timeoutMS` 时间,以等待环形缓冲区中有更多空间。之后,它就会失败。如果这在您的代码中发生,说明您有长时间运行的代码被发布或发送。不要这样做。
`send()` 涉及的更多一些。它还必须获取当前线程的 ID,称为“任务句柄”,以便我们稍后可以对其发出信号。注意我们对超时的处理。这里的想法是我们不希望执行此操作的总时间超过 `timeoutMS`。这包括将消息发布到环形缓冲区的时间。因此,我们必须减去发布消息所花费的时间,并将结果用作完成信号的超时。
`ulTaskNotifyTake()` 是 `manualResetEvent.Wait()` 的一种花哨说法。
从环形缓冲区分派
我们快完成了。最后一步是处理环形缓冲区中可用的消息,并执行它们指向的代码。
// processes pending messages in the message queue.
// This should be called in a loop on the target thread.
bool update()
{
    //Receive an item from no-split ring buffer
    size_t size = sizeof(Message);
    Message *pmsg = (Message *)xRingbufferReceive(m_messageRingBufferHandle, &size, 0);
    // no messages available, return success, doing nothing:
    if (nullptr == pmsg)
        return true;
    // something is very wrong:
    if (size != sizeof(Message))
        return false;
    Message msg = *pmsg;
    // tell the ring buffer we're done with the current message
    vRingbufferReturnItem(m_messageRingBufferHandle, pmsg);
    // call the callback, with the state as the argument
    msg.callback(msg.state);
    // if this was a send()...
    if (nullptr != msg.finishedNotifyHandle)
    {
        // signal that it's finished
        xTaskNotifyGive(msg.finishedNotifyHandle);
    }
    return true;
}
下一步
下一步很明显是为 ESP32 创建类似微软 TPL(又名任务框架)库的东西,也许可以使用新的 C++ awaitable 特性,前提是您可以说服您的 ESP32 工具链使用最新的 C++ 编译器。即使没有这些,这种技术也应该能让您更轻松地使用那个孤独的第二个核心。祝您编码愉快!
历史
- 2021 年 2 月 25 日 - 首次提交