
使用 OpenID Connect 进行 Azure Active Directory 身份验证和使用应用角色进行授权
5.00/5 (6投票s)
使用 Azure AD 对网站用户进行身份验证和授权
本项目演示了如何使用 Azure Active Directory (Azure AD) 通过 OpenID Connect 和 Azure 应用角色对您的网站和 API 用户进行身份验证和授权。
本项目以分页和排序项目为起点构建。
OpenID Connect 和 OAuth 2.0 概述
以下序列图展示了使用 OpenID Connect 和 OAuth 2.0 授权码 + PKCE 流程在不同参与方之间的通信
- 用户浏览器
- 客户端应用程序 – 前端 Web 应用程序
- 身份提供者 – 支持 OpenID Connect 协议的 Azure Active Directory
- API – 客户端应用程序调用的 API

在步骤 6 中用户通过身份提供者进行身份验证后,代表用户身份的代码在步骤 7 中发送到客户端应用程序。
在步骤 8 中,客户端应用程序将其clientId和clientSecret以及代码发送到身份提供者 (IDP),以便 IDP 知道哪个应用程序正在请求访问。
在步骤 9 中,Id 令牌(用于为客户端应用程序构建 ID/声明)和访问令牌(用于为 API 构建 ID/声明)从 IDP 传递到客户端应用程序。此时,客户端应用程序可以检查自身的授权。为了调用 API,客户端应用程序会将访问令牌传递给 API,以便 API 可以检查授权。
请注意,API 不与身份提供者交互,它只检查客户端应用程序提供的访问令牌(称为不记名令牌)。
客户端应用程序和 API 都需要向身份提供者注册。
要使用 Azure 应用角色进行授权,需要将用户和角色添加到 Azure AD 中,我们稍后会展示如何操作。
Azure AD 身份验证设置
在 Azure 中,如果需要,您可以创建自己的 Azure Active Directory 实例。在 Azure AD 内部,您首先通过“应用注册”注册客户端应用程序

重定向 URI 用于序列图中的步骤 7,它应该以“signin-oidc”结尾,以便您的客户端应用程序能够接收它。
注册完成后,您将看到
- 应用程序(客户端)ID – 这是客户端应用程序的 ID
- 目录(租户)ID – 这是 Azure AD 的 ID
- OAuth2 协议的端点

接下来,转到“身份验证”选项卡以指定注销 URL

注销 URL 应以“signout-oidc”结尾。
接下来,转到“证书和机密”选项卡以创建新的客户端机密,该机密将用于序列图的步骤 8

这就是客户端应用程序的全部内容。
接下来,通过“应用注册”注册 API。完成后,转到“公开 API”选项卡以添加一个作用域并输入来自“客户端应用程序”的客户端 ID(以便 API 可以在序列图的步骤 10 中接受来自客户端应用程序的请求)
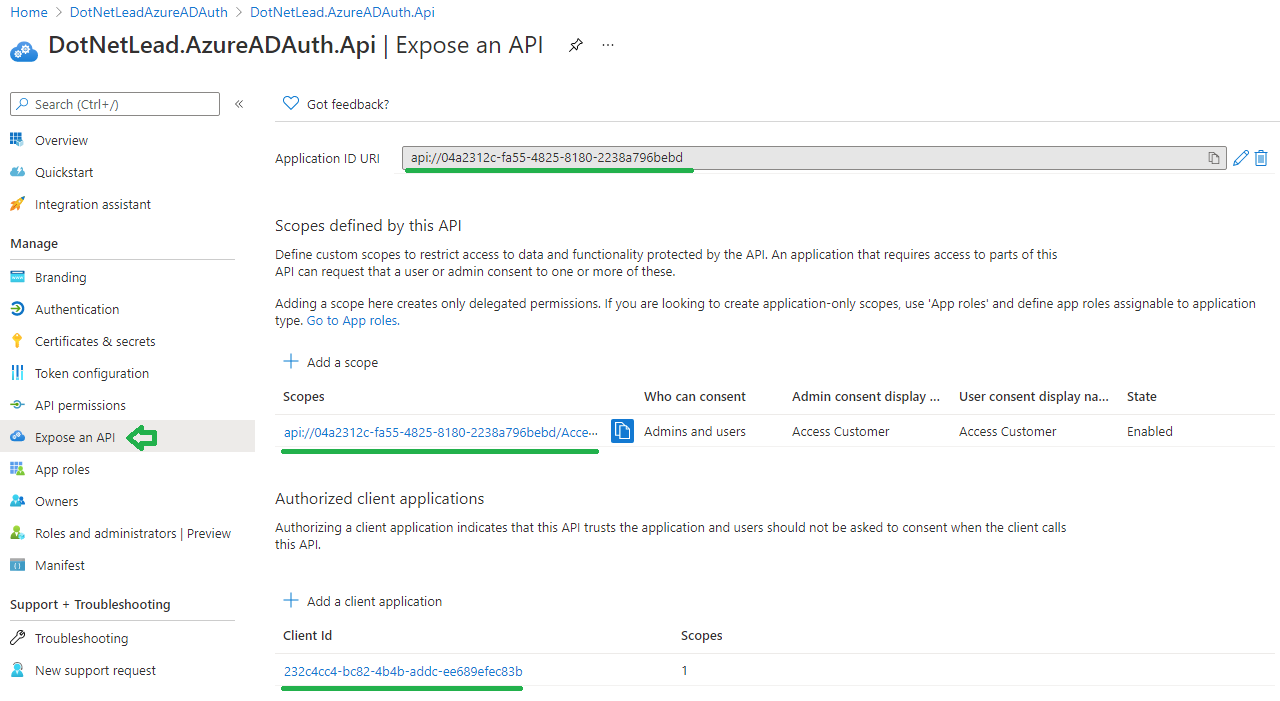
返回客户端应用程序,点击“API 权限”选项卡,添加 API 中的作用域(以便 API 可以在序列图的步骤 10 中接受来自客户端应用程序的请求)

Azure AD 授权设置
接下来,我们需要在客户端应用程序和 API 中定义角色。转到“Azure AD”->“应用注册”-> 选择您创建的应用程序(客户端应用程序或 API)->“清单”,然后按如下所示添加角色。对于“id”字段,它只需要一个唯一的标识符,您可以为每个角色自行创建。请务必为客户端应用程序和 API 都进行此更新。

在此项目中,我们为客户端应用程序定义了“User”角色和“CustomerService”角色,为 API 定义了“CustomerAPI”角色。CustomerService和CustomerAPI角色都要求访问客户数据。
接下来,通过转到“应用角色”选项卡,再次检查添加的角色是否已启用

要将用户分配到角色,请转到“Azure AD”->“企业应用程序”-> 选择您创建的应用程序(客户端应用程序或 API)->“用户和组”->“添加用户/组”(或“编辑现有用户”)

请注意,每一行都是一个用户/角色组合。如果一个用户有两个角色,您需要添加两次。在我们的示例中,Kendall拥有Customer Service角色,而Mark没有,因此只有Kendall可以管理客户。请务必为客户端应用程序和 API 都进行此更新。
客户端应用程序代码
首先,添加以下 NuGet 包
IdentityModelMicrosoft.AspNetCore.Authentication.OpenIdConnect
在客户端应用程序的Startup.ConfigureServices方法中,我们有以下代码来
- 添加
HttpHandler,称为BearerTokenHandler,用于将访问令牌传递给 API。BearerTokenHandler的代码稍后显示。 - 注册将使用
HttpHandler的 API 客户端,以便对 API 的任何调用都自动包含访问令牌。 - 提供访问拒绝页面的路径。
- 通过指定以下内容注册使用 OpenID Connect
- 颁发机构 (Authority) – 指定 IDP,通过转到 Azure AD -> 应用注册 -> 选择客户端应用程序 -> 点击端点获取。请务必像所示那样以“
v2.0”结尾 URL。 - 客户端 ID (Client Id) – 客户端应用程序的客户端 ID
- 客户端机密 (Client Secret) – 客户端应用程序的客户端机密
- 响应类型 (ResponseType) – 指定“code”将使用带有 PKCE 保护的 OpenID Connect 授权码流程
- 作用域 (Scope) – 添加作用域以访问 API。该值从在 Azure 中注册 API 时的“公开 API”选项卡中获取
- 颁发机构 (Authority) – 指定 IDP,通过转到 Azure AD -> 应用注册 -> 选择客户端应用程序 -> 点击端点获取。请务必像所示那样以“
//make http bearer token handler available
            services.AddTransient<BearerTokenHandler>();

            //add http client
            services.AddHttpClient("API", client =>
            {
                client.BaseAddress = new Uri(this.Configuration["APIurl"]);
                client.DefaultRequestHeaders.Clear();
                client.DefaultRequestHeaders.Add(HeaderNames.Accept, "application/json");
            }).AddHttpMessageHandler<BearerTokenHandler>();  //add the bearer token in request

            services.AddAuthentication(options =>
            {
                options.DefaultScheme = CookieAuthenticationDefaults.AuthenticationScheme;
                options.DefaultChallengeScheme = OpenIdConnectDefaults.AuthenticationScheme;
            })
            .AddCookie(CookieAuthenticationDefaults.AuthenticationScheme, options =>
            {
                //set path to access denied from authorization
                options.AccessDeniedPath = "/AccessDenied";
            })
            .AddOpenIdConnect(OpenIdConnectDefaults.AuthenticationScheme, options =>
            {
                options.SignInScheme = CookieAuthenticationDefaults.AuthenticationScheme;
                //the identity provider
                options.Authority =
                 "https://login.microsoftonline.com/b0ea34f0-13bb-49aa-a7f0-9f34136ad44e/v2.0";
                //this application
                options.ClientId = "232c4cc4-bc82-4b4b-addc-ee689efec83b";
                options.ClientSecret = "gowrq2SNgbe.XhGGh5a9Nm-4DPi.o9__OI";
                //OpenId Connect flow
                options.ResponseType = "code";
                //the "code" flow will use PKCE by default,
                //below line is not required but we can be explicit
                options.UsePkce = true;
                //"openid" and "profile" scopes are included by default by the middleware,
                //it's not required but we can be explicit
                options.Scope.Add("openid");
                options.Scope.Add("profile");
                //add the scope to access the API
                options.Scope.Add("api://04a2312c-fa55-4825-8180-2238a796bebd/AccessCustomer");
                options.SaveTokens = true;
            });
在Startup.Configure方法中,添加身份验证和授权要求
app.UseAuthentication();
            app.UseAuthorization();
HttpHandler类定义如下,用于在调用 API 时自动包含访问令牌
//for passing the access token to the API
    public class BearerTokenHandler : DelegatingHandler
    {
        private readonly IHttpContextAccessor _httpContextAccessor;

        public BearerTokenHandler(IHttpContextAccessor httpContextAccessor)
        {
            _httpContextAccessor = httpContextAccessor ??
                throw new ArgumentNullException(nameof(httpContextAccessor));
        }

        protected override async Task<HttpResponseMessage> SendAsync(
            HttpRequestMessage request,
            CancellationToken cancellationToken)
        {
            //get the access token from HttpContext
            var accessToken = await _httpContextAccessor
                .HttpContext.GetTokenAsync(OpenIdConnectParameterNames.AccessToken);

            //add the access token to the request
            if (!string.IsNullOrWhiteSpace(accessToken))
            {
                request.SetBearerToken(accessToken);
            }

            return await base.SendAsync(request, cancellationToken);
        }
    }
完成设置后,当您为页面添加带有所需角色的Authorize属性时,它将自动检查令牌或开始登录过程
[Authorize(Roles = "CustomerService")]
    public class ListModel : PageModel
为了在登录后显示用户名,我们创建了一个ViewComponent,它从User.Identity.Claims中获取Type为“name”的名称,以便在前端显示
public class LoginViewComponent : ViewComponent
    {
        public LoginViewComponent(){}

        public IViewComponentResult Invoke()
        {
            //get the user name from claims
            if (User.Identity.IsAuthenticated)
            {
                var identity = (ClaimsIdentity)User.Identity;
                var claims = identity.Claims;
                string userName = identity.Claims.FirstOrDefault(i => i.Type == "name").Value;

                LoginModel model = new LoginModel
                {
                    IsLoggedIn = User.Identity.IsAuthenticated,
                    UserName = userName
                };
                return View(model);
            }
            else
                return View(new LoginModel());
        }
    }
API 代码
首先,添加以下 NuGet 包
Microsoft.AspNetCore.Authentication.JwtBearer
在 API 的Startup.ConfigureServices方法中,我们有以下代码使用 Json Web Token (JWT) 作为身份验证方式
//use "Bearer" as the authentication scheme
         services.AddAuthentication("Bearer")
             .AddJwtBearer("Bearer", options =>
             {
                 //the identity provider
                 options.Authority =
                 "https://login.microsoftonline.com/b0ea34f0-13bb-49aa-a7f0-9f34136ad44e/v2.0";
                 //the Application ID URI
                 options.Audience = "api://04a2312c-fa55-4825-8180-2238a796bebd";
                 //allow token issuer from Client
                 options.TokenValidationParameters.ValidIssuer =
                 "https://sts.windows.net/b0ea34f0-13bb-49aa-a7f0-9f34136ad44e/";
                 options.SaveToken = true;
             });
下面是指定的选项
Authority– 指定 IDP,通过转到 Azure AD -> 应用注册 -> 选择 API -> 点击端点获取。请务必像所示那样以“v2.0”结尾 URL。Audience– 指定 API,通过转到 Azure AD -> 应用注册 -> 选择 API -> 概述选项卡获取。它是应用程序 ID URI。TokenValidationParameters.ValidIssuer– 身份验证还会检查令牌的颁发者。该值可以通过在客户端应用程序的BearerTokenHandler类中跳到下面这行来获取 JWT 的值,然后访问网站https://jwt.net.cn并粘贴 JWT 以查看颁发者。-
var accessToken = await _httpContextAccessor
                .HttpContext.GetTokenAsync(OpenIdConnectParameterNames.AccessToken);
-

在Startup.Configure方法中,添加身份验证和授权要求
app.UseAuthentication();

            app.UseAuthorization();
完成设置后,当您为页面添加带有所需角色的Authorize属性时,它将检查用户的角色
[Authorize(Roles = "CustomerAPI")]
    public class CustomerController : ControllerBase
您可以通过检查CustomerController.GetCustomers中的声明来验证角色是否已传递给 API

就是这样!希望您觉得使用 Azure AD 进行用户身份验证和授权很有用。