
如何开始任何 .NET Core Web API 项目
4.96/5 (25投票s)
这是我在 .NET Core 3.1 中创建新的 Web API 项目时通常会经历的过程。
目录
引言
本文描述了我创建 .NET Core 3.1 样板 Web API 时通常经历的过程。从目录中,您可以看到我设置的所有不同部分。
步骤
在 Visual Studio 中创建 Web API 项目
选项 1

上面的截图是您右键单击 Visual Studio 2019 并选择“以管理员身份运行”时获得的结果,您可能需要这样做才能调试 Web API 项目。这将为您提供模板列表,然后您需要选择 ASP.NET Core Web API。

最后一个屏幕(带有创建按钮)有以下选项:

- 我不会选择身份验证类型,因为我编写的大多数 Web API 都使用自定义身份验证例程,这将在下面讨论。
- 我也不会为 HTTPS 配置 Web API,因为 Web API 将在 IIS 下运行,而 IIS 已为生产环境中的 HTTPS 配置好。
选项 2
或者,在 VS2019 中,选择文件=>新建项目,然后选择“已安装”和“ASP.NET Core Web 应用程序”。

然后,您将看到一些选项,包括“API”。

奇怪的是,这种方法不会提示您输入身份验证类型和“配置 HTTPS”。
配置 IIS
右键单击解决方案,然后从弹出菜单中点击“属性”。
![]()
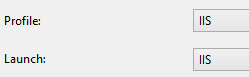
创建一个名为“IIS”的新配置文件,然后选择 IIS 作为启动选项。
![]()


您现在应该看到:
将选项更改为使用“weatherforecast”页面启动浏览器。
![]()
验证是否勾选了匿名身份验证,并且未勾选 Windows 身份验证。

重要!我发现我还需要编辑 launchSettings.json 文件,完全删除对 iisExpress 的引用,否则 Visual Studio 会继续通过 IIS Express 启动 Web API,所以现在我的 launchSettings.json 文件看起来是这样的:
{
  "iisSettings": {
    "windowsAuthentication": false,
    "anonymousAuthentication": true,
    "iis": {
      "applicationUrl": "https:///Demo",
      "sslPort": 0
    }
  },
  "$schema": "http://json.schemastore.org/launchsettings.json",
  "profiles": {
    "IIS": {
      "commandName": "IIS",
      "launchBrowser": true,
      "launchUrl": "weatherforecast",
      "sqlDebugging": true
    }
  }
}
为什么会这样,我不知道!
现在您可以运行 Visual Studio 为您创建的样板 WeatherForecast Web API,当然,我们稍后会删除它。

Visual Studio 会自动为您配置 IIS - 我真的很喜欢这个功能!
配置 Swashbuckle / Swagger
在项目的生成选项中:

启用 XML 文档。

另外,忽略警告 1591
![]()
否则 IDE 会不断提示您缺少 XML 注释。
添加 Swashbuckle
Swashbuckle 可用于生成描述所有 API 终结点以及以某种笨拙的方式测试这些终结点的页面。尽管如此,我还是觉得它很有用,特别是其他开发人员几乎总是会使用这些 API 来编写前端代码。您还可以为每个 API 添加属性标签,并使用 Swashbuckle 提供的各种前端“调用 API”实用程序之一来自动生成前端方法。但请注意,其中一些实用程序会生成非常奇怪的代码。
包含 Swashbuckle 文档非常简单。右键单击项目依赖项,然后选择管理 NuGet 包。
![]()
搜索“Swash”。

并安装包“Swashbuckle.AspNetCore”(版本可能大于 6.1.4)。

在 Startup.cs 文件中,将 Swagger 服务添加到 ConfigureServices 方法中,如下所示:
public void ConfigureServices(IServiceCollection services)
{
  services.AddControllers();

  // ADD THIS:
  services.AddSwaggerGen(c =>
  {
    var xmlFile = $"{Assembly.GetExecutingAssembly().GetName().Name}.xml";
    var xmlPath = Path.Combine(AppContext.BaseDirectory, xmlFile);
    c.IncludeXmlComments(xmlPath);
  });
}
在 Configure 方法中,在 app.UseRouting(); 之后,将指示的代码添加到应用程序构建器中。
public void Configure(IApplicationBuilder app, IWebHostEnvironment env)
{
  if (env.IsDevelopment())
  {
    app.UseDeveloperExceptionPage();
  }

  app.UseRouting();

  // ------ ADD THIS ------
  app.UseSwagger()
    .UseSwaggerUI(c =>
    {
      c.SwaggerEndpoint("/demo/swagger/v1/swagger.json", "Demo API V1");
    });
  // ======================

  app.UseAuthorization();

  app.UseEndpoints(endpoints =>
  {
    endpoints.MapControllers();
  });
}
请注意,终结点路径中的第一个元素与应用程序名称“demo”相同。
启动应用程序后,您现在可以导航到 Demo/swagger(或者您给项目命名的任何名称),您将看到:

添加 Newtonsoft.Json
我更喜欢 Newtonsoft.Json,因为在我看来,它比 .NET Core 内置的默认 JSON 序列化器要好。一方面,它能够处理枚举的序列化/反序列化,根据模型属性保持大小写,无需特殊代码即可处理自引用循环等等。我还喜欢对返回的 JSON 进行漂亮格式化,因为它在调试时更容易阅读。同样,在 NuGet 包管理器中,安装 Microsoft.AspNetCore.Mvc.Newtonsoft.JSON,*确保您选择最新的 3.1.x 版本*。

在 Startup.cs 中,修改 ConfigureServices 方法,指示它使用 NewtonsoftJson。
public void ConfigureServices(IServiceCollection services)
{
  services.AddControllers()
    // must be version 3.1.13 -- version 5's support .NET 5 only.
    // <a href="https://anthonygiretti.com/2020/05/10/why-model-binding-to-jobject-
    // from-a-request-doesnt-work-anymore-in-asp-net-core-3-1-and-whats-the-alternative/">
    // https://anthonygiretti.com/2020/05/10/why-model-binding-to-jobject-from-a-request-
    // doesnt-work-anymore-in-asp-net-core-3-1-and-whats-the-alternative/</a>
    .AddNewtonsoftJson();

  services.AddSwaggerGen(c =>
  {
    var xmlFile = $"{Assembly.GetExecutingAssembly().GetName().Name}.xml";
    var xmlPath = Path.Combine(AppContext.BaseDirectory, xmlFile);
    c.IncludeXmlComments(xmlPath);
  });
}
显然,如果您愿意,可以省略我的注释。
添加异常处理服务
尤其是在调试时,我不仅想要一个 500 内部服务器错误,我更希望获得一致且格式良好的响应,指示错误和堆栈跟踪,所以我总是添加一个异常处理服务,该服务利用我的异常报告库。
在项目的属性的“调试”部分,添加环境变量 ASPNETCORE_ENVIRONMENT,其值为 Development。

根据这篇博文,ASP.NET Core 使用 ASPNETCORE_ENVIRONMENT 变量来确定当前环境。
添加一个 MiddlewareExceptionHandler,我通常在 Services 文件夹中的 ExceptionService.cs 文件中完成。
![]()
这是代码
// Borrowed from here: http://netitude.bc3tech.net/2017/07/31/
// using-middleware-to-trap-exceptions-in-asp-net-core/
// Note that middleware exception handling is different from exception filters:
// https://damienbod.com/2015/09/30/asp-net-5-exception-filters-and-resource-filters/
// https://docs.microsoft.com/en-us/aspnet/core/mvc/controllers/filters?
// view=aspnetcore-2.2#exception-filters
// Exception filters do NOT catch exceptions that occur in the middleware.
public class MiddlewareExceptionHandler
{
  private readonly RequestDelegate _next;

  public MiddlewareExceptionHandler(RequestDelegate next)
  {
    _next = next ?? throw new ArgumentNullException(nameof(next));
  }

  public async Task Invoke(HttpContext context)
  {
    try
    {
      await _next(context);
    }

    // This handles the problem when the AUTHORIZATION token doesn't
    // actually validate and ASP.NET Core middleware generates this:
    // An unhandled exception occurred while processing the request.
    // InvalidOperationException: No authenticationScheme was specified,
    // and there was no DefaultChallengeScheme found.
    // We want to handle this error as a "not authorized" response.
    catch (InvalidOperationException)
    {
      if (context.Response.HasStarted)
      {
        throw;
      }

      context.Response.Clear();
      context.Response.StatusCode = 401;
      context.Response.ContentType = "application/json";

      await context.Response.WriteAsync("{\"status\":401,\"message\":\"Not authorized.\"}");
    }
    catch (Exception ex)
    {
      if (context.Response.HasStarted)
      {
        throw;
      }

      context.Response.Clear();
      context.Response.StatusCode = 500;
      context.Response.ContentType = "application/json";

      var exReport = new ExceptionReport(ex);
      var exJson = JsonConvert.SerializeObject(exReport, Formatting.Indented);
      await context.Response.WriteAsync(exJson);
    }
  }
}

// Extension method used to add the middleware to the HTTP request pipeline.
public static class MiddlewareExceptionExtensions
{
  public static IApplicationBuilder UseHttpStatusCodeExceptionMiddleware
               (this IApplicationBuilder builder)
  {
    return builder.UseMiddleware<MiddlewareExceptionHandler>();
  }
}
其余的“异常报告”代码,也在该文件中,是:
public static class ExceptionReportExtensionMethods
{
  public static ExceptionReport CreateReport(this Exception ex)
  {
    return new ExceptionReport(ex);
  }

  public static T[] Drop<T>(this T[] items, int n = 0)
  {
    // We could use C# 8's ^ operator to take all but the last n...
    return items.Take(items.Length - (1 + n)).ToArray();
  }
}

public class ExceptionReport
{
  public DateTime When { get; } = DateTime.Now;

  [JsonProperty(NullValueHandling = NullValueHandling.Ignore)]
  public string ApplicationMessage { get; set; }

  public string ExceptionMessage { get; set; }

  public List<StackFrameData> CallStack { get; set; } = new List<StackFrameData>();

  [JsonProperty(NullValueHandling = NullValueHandling.Ignore)]
  public ExceptionReport InnerException { get; set; }

  public ExceptionReport(Exception ex, int exceptLastN = 0)
  {
    ExceptionMessage = ex.Message;
    var st = new StackTrace(ex, true);
    var frames = st.GetFrames()?.Drop(exceptLastN) ?? new StackFrame[0];
    CallStack.AddRange(
      frames
        .Where(frame => !String.IsNullOrEmpty(frame.GetFileName()))
        .Select(frame => new StackFrameData(frame)));
    InnerException = ex.InnerException?.CreateReport();
  }
}

public class StackFrameData
{
  public string FileName { get; private set; }
  public string Method { get; private set; }
  public int LineNumber { get; private set; }

  public StackFrameData(StackFrame sf)
  {
    FileName = sf.GetFileName();
    Method = sf.GetMethod().Name;
    LineNumber = sf.GetFileLineNumber();
  }

  public override string ToString()
  {
    return $"File: {FileName}\r\nMethod: {Method}\r\nLine: {LineNumber}";
  }
}
然后,在 Startup.cs 中,修改 Configure 方法中 if env.IsDevelopment() 的处理方式。
public void Configure(IApplicationBuilder app, IWebHostEnvironment env)
{
  if (env.IsDevelopment())
  {
    // Do not halt execution. I don't fully understand this.
    // See http://netitude.bc3tech.net/2017/07/31/
    // using-middleware-to-trap-exceptions-in-asp-net-core/
    // "Notice the difference in order when in development mode vs not.
    // This is important as the Developer Exception page
    // passes through the exception to our handler so in order to get the
    // best of both worlds, you want the Developer Page handler first.
    // In production, however, since the default Exception Page halts execution,
    // we definitely to not want that one first."
    app.UseDeveloperExceptionPage();
    app.UseHttpStatusCodeExceptionMiddleware();
  }
  else
  {
    app.UseHttpStatusCodeExceptionMiddleware();
    app.UseExceptionHandler("/Home/Error");
  }
  ...
因为我在开发模式下,所以我没有实现错误页面。
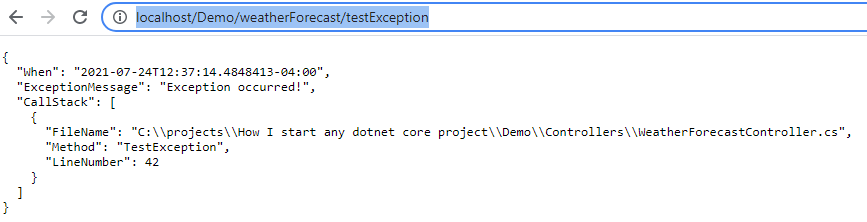
通过在 WeatherForecastController.cs 文件中添加一个抛出异常的 GET 方法来测试异常处理。
[HttpGet("TestException")]
public void TestException()
{
  throw new Exception("Exception occurred!");
}
运行应用程序并导航到 https:///Demo/weatherForecast/testException,您应该看到:
如果异常发生在您代码的深处,您会看到更多的堆栈跟踪。
设置 CORS 策略
我们通常希望启用某种形式的 CORS(跨域资源共享)策略(在此处了解更多),尽管对于大多数应用程序,我将其设置为任何来源。在 Startup.cs 文件的 ConfigureServices 方法中,添加以下内容:
services.AddCors(options =>
  options.AddDefaultPolicy(builder => builder
    .AllowAnyMethod()
    .AllowAnyHeader()
    .AllowCredentials()
    // Needed because we can't use AllowAnyOrigin with AllowCredentials
    // https://jasonwatmore.com/post/2020/05/20/
    // aspnet-core-api-allow-cors-requests-from-any-origin-and-with-credentials
    // https://docs.microsoft.com/en-us/aspnet/core/security/cors?view=aspnetcore-5.0
    .SetIsOriginAllowed(origin => true)
    .WithExposedHeaders(EXPOSED_HEADERS)
  )
);
在 Configure 方法中,*在 UseRouting() 之后*,添加对 UseCors() 的调用。
 app
  .UseRouting()
  .UseCors();
设置 CORS 非常、非常棘手。我最终处理的大多数生产问题都与 CORS 的棘手性质有关,所以要小心。如果一个终结点失败,请使用浏览器的调试器来确定是预检 CORS 测试失败,还是您有终结点问题或 CORS 问题。
添加身份验证服务
大多数 API 都需要身份验证(可能还有授权,但我通常不实现用户角色授权)。要添加身份验证,我在 Services 文件夹中创建一个 AuthenticationService.cs 文件,其中包含此模板:
public class TokenAuthenticationSchemeOptions : AuthenticationSchemeOptions
{
}

public class AuthenticationService : AuthenticationHandler<TokenAuthenticationSchemeOptions>
{
  private SessionService sessionService;

  public AuthenticationService(
    IOptionsMonitor<TokenAuthenticationSchemeOptions> options,
    ILoggerFactory logger,
    UrlEncoder encoder,
    ISystemClock clock) : base(options, logger, encoder, clock)
  {
    this.sessionService = sessionService;
  }

  protected override Task<AuthenticateResult> HandleAuthenticateAsync()
  {
    Task<AuthenticateResult> result =
        Task.FromResult(AuthenticateResult.Fail("Not authorized."));

    // Authentication confirms that users are who they say they are.
    // Authorization gives those users permission to access a resource.

    if (Request.Headers.ContainsKey("yourAuthKey"))
    {
      // Verify the key...

      // If verified, optionally add some claims about the user...
      var claims = new[]
      {
        new Claim("[key]", "value"),
      };

      // Generate claimsIdentity on the name of the class:
      var claimsIdentity = new ClaimsIdentity(claims, nameof(AuthenticationService));

      // Generate AuthenticationTicket from the Identity
      // and current authentication scheme.
      var ticket = new AuthenticationTicket(new ClaimsPrincipal(claimsIdentity), Scheme.Name);

      result = Task.FromResult(AuthenticateResult.Success(ticket));
    }

    return result;
  }
}
在构造函数中,您可能还希望传入某种“帐户服务”——一个允许您连接到数据库以验证用户帐户的服务。
同样,在 Startup.cs 文件中,将身份验证方案添加到 ConfigureServices 方法中:
 services
  .AddAuthentication("tokenAuth")
  .AddScheme<TokenAuthenticationSchemeOptions, AuthenticationService>("tokenAuth", ops => { });
考虑到上面的代码除非我们提供带有“yourAuthKey”键的标头,否则将失败身份验证,我们可以通过 API 终结点(参见下文)进行测试。
最后,在 Configure 方法中添加 UseAuthentication()。
app
  .UseAuthentication()
  .UseRouting()
  .UseCors();
读取 appsettings.json
您可以在此处阅读有关 ASP.NET Core 中配置的信息。就我们而言,我将仅设置一个简单的配置文件。演示中的配置文件包含 applications.json 和 appsettings.Development.json,它们与 ASPNETCORE_ENVIRONMENT 环境变量值相关联。包含环境值的 appsettings 会覆盖 applications.json 中的内容。例如,在 appsetting.json 中,我将定义几个设置:Key1 和 Key2。
{
  "Logging": {
    "LogLevel": {
      "Default": "Information",
      "Microsoft": "Warning",
      "Microsoft.Hosting.Lifetime": "Information"
    }
  },
  "AllowedHosts": "*",

  // I've added these keys:
  "Key1": "first key",
  "Key2": "second key"
}
而在 appsettings.Development.json 中,我将覆盖 Key2。
{
  "Logging": {
    "LogLevel": {
      "Default": "Information",
      "Microsoft": "Warning",
      "Microsoft.Hosting.Lifetime": "Information"
    }
  },

  // I'm overriding Key2:
  "Key2": "Key2 override"
}
为了将这些值获取到一个对象中,以便我们不必引用配置设置,例如使用硬编码字符串 Configuration("Key1"),我们可以创建一个包含所需配置键的类,并将该类绑定到配置。例如,给定:
public class AppSettings
{
  public static AppSettings Settings { get; set; }

  public AppSettings()
  {
    Settings = this;
  }

  public string Key1 { get; set; }
  public string Key2 { get; set; }
}
然后我们在 Startup 构造函数中进行绑定。
public AppSettings AppSettings { get; } = new AppSettings();

public Startup(IConfiguration configuration)
{
  Configuration = configuration;
  Configuration.Bind(AppSettings);
}
由于构造函数设置了 public static 变量 Settings,我们可以在应用程序的任何地方访问这些设置。例如,我们可以创建一个返回应用程序设置的终结点(有关添加更多基本测试终结点,请参见下文)。
[AllowAnonymous]
[HttpGet("AppSettings")]
public object GetAppSettings()
{
  return AppSettings.Settings;
}
我们看到

重要!通常您不希望公开您的应用设置,因为它们可能包含敏感信息,如数据库密码等。
可选:添加数据库上下文
大多数 Web API 需要连接到数据库,由于我只使用 SQL Server,我将添加一行或多行来注册数据库上下文,具体取决于我拥有的上下文数量。
services.AddDbContext<MyDbContext>(options => options.UseSqlServer("myConnectionString"));
您通常不会硬编码您的连接字符串,而是根据环境从应用程序设置中获取它们(参见下文)。此外,这需要添加适当的数据库支持,例如 Microsoft.EntityFrameworkCore.SqlServer。然后可以将 DB 上下文添加到服务的构造函数中。
public SomeService(MyDbContext context)
并且 .NET Core 将处理实例创建和依赖项注入。
可选:添加 RestSharp
如果您的服务调用其他 API,我更喜欢使用 RestSharp。再次在 NuGet 包管理器中,添加最新版本的 RestSharp。

可选:格式化 JSON
如果我们修改注册 NewtonsoftJson 的方式:
services.AddControllers()
  .AddNewtonsoftJson(options => options.SerializerSettings.Formatting = Formatting.Indented);
我们可以*全局*添加格式化到返回的 JSON 中,例如我们看到:

我发现这在不使用 Postman(它有自己的格式化)来调试终结点时特别有用。
添加更多基本测试终结点
虽然我们之前添加了一个 ExceptionTest API,但我不希望它在“demo”控制器中。对于添加版本终结点也是如此。因此,这两个终结点被添加到“public”控制器中,因为我通常不打算为它们要求身份验证。
[ApiController]
[Route("[controller]")]
public class Public : ControllerBase
{
  [AllowAnonymous]
  [HttpGet("Version")]
  public object Version()
  {
    return new { Version = "1.00" };
  }

  [AllowAnonymous]
  [HttpGet("TestException")]
  public void TestException()
  {
    throw new Exception("Exception occurred!");
  }
}
请注意,我的这个类派生自 ControllerBase,因此我们可以利用常见的响应,例如 Ok()。
对于 Version API,您现在将看到:

请注意 AllowAnonymous 属性,因为我们现在在其他地方使用身份验证。并且可以对 Version API 终结点进行任何您喜欢的操作来获取版本。例如,我经常添加一个检查,以确保必要的数据库连接也成功。
身份验证测试
让我们测试身份验证服务——是的,我将此终结点放在“public”控制器中。
[Authorize]
[HttpGet("TestAuthentication")]
public ActionResult TestAuthentication()
{
  return Ok();
}
我们看到

如果我们使用 Postman 调用此终结点,并将“yourAuthKey”值设置好:
curl --location --request GET 'https:///Demo/public/testauthentication' \
--header 'yourAuthKey: Somevalue'
我们看到终结点返回了OK。

其他注意事项
通用文件夹结构
我倾向于设置此文件夹结构:

- Common - 通用类,例如帮助类。
- Controllers - 应用程序支持的所有控制器。如果某个控制器文件变得过大,我将为该控制器创建一个文件夹,其中包含该控制器的
partial类,以组织终结点。 - Extensions - 我在代码中使用各种扩展方法,这些文件放在此文件夹中。
- Interfaces - 我需要的任何接口定义(参见下文)。
- Models - 数据库上下文和模型。
- Requests - 定义入站请求的类。
- Responses - 定义出站响应的类。
- Services - 我需要的任何服务(参见下文)。
服务接口还是具体服务类?
我在其他人代码中看到的一个常见模式是过度使用接口来注册服务。例如:
services.AddSingleton<IUserCacheService, UserCacheService>();
结果是每个服务都实现了一个接口,并且控制器或服务构造函数中的依赖项注入依赖于接口而不是具体服务。例如:
public SomeControllerOrService(IUserCacheService userCacheService)
接口的目的是抽象实现。如果您知道实现永远不会被抽象,那么添加接口就毫无意义——它只会混淆代码,创建更多输入,并且在更新具体服务的方法时需要维护更多东西。这是完全没有意义的——随着项目的增长,越来越多的服务被添加(通常只是为了定义逻辑边界),接口文件的数量会增加,并最终成为代码异味。您可以改为编写:
services.AddSingleton<CacheServices.UsersCacheService>();
和
public SomeControllerOrService(UserCacheService userCacheService)
实现服务作为接口的一个论点是为了模拟服务来测试控制器。这听起来合理,但我发现这个理由不够充分。大多数,如果不是全部的业务规则和通用代码逻辑不在控制器终结点代码中,而是在服务中——事实上,通常有多个业务规则服务来解耦控制器和其他服务与应用程序特定的逻辑是有意义的。鉴于此,当我编写集成测试时,我不想针对模拟服务进行测试,我想要针对实际服务进行测试!像任何事物一样,都有合理的例外,例如当服务与其他组件(数据库、第三方 API 等)交互时,而这些组件仅在“实时”暂存或生产环境中可用。那么,是的,实现服务并使其可模拟是有意义的,但需要注意不要在服务之外实现任何业务逻辑。因此,请考虑该服务是否将永远被抽象,如果您合理地(或非常)确定它不会,那么就不要费心为服务添加接口。
Singleton、Scoped 和 Transient 服务生命周期
在此处有一篇关于不同类型服务的优秀文章。总结如下:
- Singleton:“Singleton 范围在第一次请求服务时创建该服务的单个实例。之后,对于每个后续请求,它将使用相同的实例。新请求不会创建服务的新实例,而是重用现有实例。”
- Scoped:“具有 Scoped 生命周期(范围)的服务仅在每个请求(范围)内创建一次,即,它为每个请求创建一个新实例,并在该请求内重用该实例。”例如,如果您的控制器需要一个服务,而您控制器中的其他代码也需要该服务,那么 Scoped 服务将被重用,因为它属于同一请求。
- Transient:“Transient 服务在每次请求时始终创建一个新实例。”与 Scoped 服务相反,在请求期间,其他服务对 Transient 服务的任何需求都将获得新的实例。
我们为什么要有这些类型的服务生命周期?主要答案是有些服务可能很少使用,并且可能占用大量内存,尽管我辩称,如果是这样,您就没有设计良好的服务。无论如何,您可能不希望服务在请求的生命周期之外停留,因此 Singleton 服务可能不合适。我真的想不出 Transient 服务的用例(您能想到吗?)它们会消耗内存(尽管生命周期很短),但还需要依赖注入系统为每个引用的 Transient 服务创建新实例,这会降低应用程序性能。我通常只使用 Singleton 服务,因为我的服务不包含静态变量或状态信息。如果我需要在请求内维护状态,那么 Scoped 服务将是正确的服务。
正如上面提到的文章所指出的,在混合不同生命周期的服务时必须小心。如果一个 Singleton 服务持久化了 Scoped 或 Transient 服务,那么 Scoped 或 Transient 服务就会被持久化,从而失去了“请求期间或每次访问的生命周期”的目的。
服务还是控制器作为服务?
另一个考虑因素是,“我需要一个服务,还是可以将代码放入控制器?”例如,Version 是否需要一个服务?
[AllowAnonymous]
[HttpGet("Version")]
public object Version()
{
  return new { Version = "1.00" };
}
我想应该不用!它可能访问一个服务,例如验证数据库连接。我倾向于编写这样的终结点:
- 一个依赖于其他服务的简单操作/响应。
- 一个包含基于请求或数据库中数据状态的业务规则的操作。
后者是更难解决的一个。业务规则是否应该与控制器解耦,并放入服务或其他“业务规则”容器中?如果终结点执行大量操作(无论是否有规则),是否应该将其解耦到例如工作流服务中?请求验证应该放在哪里?业务规则、工作流和验证是否应该根据其他应用程序配置设置或运行时用户选项进行抽象?当您注意到终结点中的代码变得相当冗长时,应该问自己这些问题。
结论
好了——这就是我在创建 ASP.NET Web API 项目时通常经历的过程。希望这对您创建自己的 Web API 项目有所帮助!
历史
- 2021 年 8 月 5 日:初始版本