
Java 开发人员的跨解决方案 Microsoft 身份验证,第 2 部分:将 MSAL 与 Microsoft Graph 和 Office 365 数据结合使用
5.00/5 (2投票s)
在本文中,我们将使用此应用程序收到的访问令牌向另一个基于 Spring 的微服务发出请求。
在本三部分系列的上一篇文章中,我们使用 Azure AD 注册了一个应用程序,并编写了一个简单的 Web 应用程序,通过用户的 Azure 凭据对用户进行身份验证。此身份验证为保护我们的 Web 应用程序提供了一种便捷的方法。尽管如此,我们还可以使用我们收到的凭据来做更多的事情,而不仅仅是锁定网页。
Azure AD 使我们能够附加权限来访问由Microsoft Graph API公开的各种外部数据和应用程序。这些权限允许我们的应用程序与电子邮件、日历、便笺等服务无缝交互,以及更多。
在本教程中,我们将创建一个 Spring Boot 微服务,该服务代表登录用户查询日历事件,并将结果返回给我们的前端 Web 应用程序。
您可以在 mcasperson/SpringMSALDemo GitHub 仓库的 events-microservice 分支中找到本教程前端应用程序的源代码,在 mcasperson/SpringMSALCalendarMicroervice GitHub 仓库中找到日历微服务。
注册新应用程序
Azure AD 将微服务表示为一个新应用程序。首先,我们打开Azure Active Directory资源,单击应用程序注册链接,然后单击新注册按钮。

然后,我们将应用程序命名为“CalendarAPI”并单击注册按钮。

请记下您的应用程序(客户端)ID和目录(租户)ID,因为您稍后在启动 Spring 应用程序时将需要它们。
我们还需要生成一个密码。我们单击客户端凭据链接。

接下来,我们单击新建客户端密码按钮,为新密码命名,然后单击添加按钮。

请注意值,因为 Azure 不会再次显示它。

为了允许前端 Web 应用程序调用我们的微服务,我们需要将注册应用程序公开为 API。为此,我们单击左侧菜单中的公开 API链接。

我们的 API 需要一个 ID 供前端 Web 应用程序引用。我们单击应用程序 ID URI旁边的设置按钮,然后单击保存按钮以接受默认值。
请注意 URI,因为您稍后将需要它。

范围指示 API 公开的数据或功能。我们需要定义一个范围,指示此 API 代表用户访问日历信息。
首先,我们单击添加范围按钮。然后,我们在范围名称字段中输入 ReadCalendar,并选择管理员和用户选项。接下来,我们在管理员同意显示名称字段中输入 Read user calendar events,在管理员同意说明字段中输入 Allow the application to read the user’s calendar events,然后单击添加范围按钮。

Azure 然后显示新的范围。

我们的应用程序使用 Microsoft Graph API 来访问用户的日历。要执行此操作,我们需要授予 API 其他权限。
我们单击左侧菜单中的API 权限链接,然后单击添加权限按钮。

接下来,我们从 API 列表中选择Microsoft Graph。展开日历选项,选择Calendar.Read权限,然后单击添加权限按钮。

由于此微服务是一个无头应用程序,最终用户不会直接登录到它。这意味着最终用户没有方便的机会授予这些新权限。
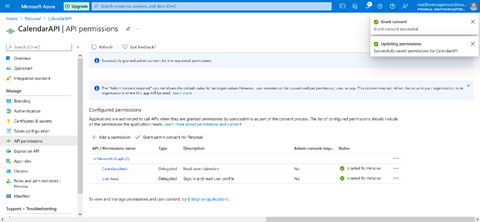
作为管理员,我们可以代表用户授予此权限。为此,我们单击代表 <Organization name> 授予管理员同意按钮。

然后选择是。

我们现在已授予权限。
构建 Spring Boot 微服务
我们将使用 Spring Initializr 来引导我们的日历 API 微服务。首先,让我们将以下依赖项添加到模板中:
- Spring Web,提供内置 Web 服务器。
- OAuth2 资源服务器,允许我们将应用程序配置为资源服务器。
- OAuth2 客户端,提供用于发出 OAuth2 身份验证 HTTP 请求的类。
- Azure Active Directory,提供与 Azure AD 的集成。

然后,我们单击生成。
配置 Spring Security
与我们的前端 Web 应用程序需要选择性规则来确定哪些资源需要身份验证不同,我们的微服务具有简单的规则,要求对所有资源请求进行身份验证。
我们在 AuthSecurityConfig 类中配置这些设置。
// src/main/java/com/matthewcasperson/calendarapi/configuration/AuthSecurityConfig.java

package com.matthewcasperson.calendarapi.configuration;

import com.azure.spring.aad.webapi.AADResourceServerWebSecurityConfigurerAdapter;
import org.springframework.security.config.annotation.web.builders.HttpSecurity;
import org.springframework.security.config.annotation.web.configuration.EnableWebSecurity;

@EnableWebSecurity
public class AuthSecurityConfig extends AADResourceServerWebSecurityConfigurerAdapter {

    @Override
    protected void configure(HttpSecurity http) throws Exception {
        super.configure(http);
        // @formatter:off
        http
            .authorizeRequests()
                .anyRequest()
                .authenticated();
        // @formatter:on
    }
}
我们的类扩展了 AADResourceServerWebSecurityConfigurerAdapter 类,该类启用了基于 JSON Web Token (JWT) 的身份验证。然后,我们调用 HttpSecurity 类公开的流畅接口,以确保我们的应用程序对所有请求进行身份验证。
提供 OAuth2 Web 客户端
我们的微服务将向其他 OAuth2 资源服务器(特别是 Microsoft Graph API)发出 HTTP 调用。这些 HTTP 调用需要正确的标头才能成功。我们可以自己构建标头,但更便捷的解决方案是让 Spring 为我们构建适当的请求。
为此,我们需要为我们的控制器注册一个 WebClient 实例以供其使用。WebClient 是一个现代的、非阻塞的 HTTP 客户端,RestTemplate API 文档建议使用它,而不是旧的 RestTemplate,因为它有效地支持同步、异步和流式处理。
WebClientConfig 类定义了一个名为 webClient 的方法,该方法创建一个带有 OAuth 授权过滤器的 WebClient 实例。此方法带有 @Bean 注释,允许我们将 WebClient 实例注入到其他 Spring 类中。
package com.matthewcasperson.calendarapi.configuration;

import org.springframework.context.annotation.Bean;
import org.springframework.context.annotation.Configuration;
import org.springframework.security.oauth2.client.OAuth2AuthorizedClientManager;
import org.springframework.security.oauth2.client.web.reactive.function.client.ServletOAuth2AuthorizedClientExchangeFilterFunction;
import org.springframework.web.reactive.function.client.WebClient;

@Configuration
public class WebClientConfig {
    @Bean
    public static WebClient webClient(OAuth2AuthorizedClientManager oAuth2AuthorizedClientManager) {
        ServletOAuth2AuthorizedClientExchangeFilterFunction function =
                new ServletOAuth2AuthorizedClientExchangeFilterFunction(oAuth2AuthorizedClientManager);
        return WebClient.builder()
                .apply(function.oauth2Configuration())
                .build();
    }
}
创建 REST 控制器
我们的微服务公开了一个名为 /events 的单个端点,该端点在 CalendarController 类中定义。CalendarController 类的完整代码如下:
// src/main/java/com/matthewcasperson/calendarapi/controllers/CalendarController.java

package com.matthewcasperson.calendarapi.controllers;

import org.springframework.beans.factory.annotation.Autowired;
import org.springframework.security.oauth2.client.OAuth2AuthorizedClient;
import org.springframework.security.oauth2.client.annotation.RegisteredOAuth2AuthorizedClient;
import org.springframework.web.bind.annotation.GetMapping;
import org.springframework.web.bind.annotation.RestController;
import org.springframework.web.reactive.function.client.WebClient;

import static org.springframework.security.oauth2.client.web.reactive.function.client.ServerOAuth2AuthorizedClientExchangeFilterFunction.oauth2AuthorizedClient;


@RestController
public class CalendarController {

    private static final String GRAPH_CALENDAR_ENDPOINT = "https://graph.microsoft.com/v1.0/me/calendar/events";

    @Autowired
    private WebClient webClient;

    @GetMapping(value = "/events", produces = "application/json")
    public String events(@RegisteredOAuth2AuthorizedClient("graph") OAuth2AuthorizedClient graph) {
        return callMicrosoftGraphEndpoint(graph);
    }

    private String callMicrosoftGraphEndpoint(OAuth2AuthorizedClient graph) {
        if (null != graph) {
            String body = webClient
                    .get()
                    .uri(GRAPH_CALENDAR_ENDPOINT)
                    .attributes(oauth2AuthorizedClient(graph))
                    .retrieve()
                    .bodyToMono(String.class)
                    .block();
            return body;
        } else {
            return "Graph request failed.";
        }
    }
}
让我们分解一下这段代码。
我们使用 @RestController 注释该类,以公开 RESTful API。
@RestController
public class CalendarController {
GRAPH_CALENDAR_ENDPOINT 常量定义了要从中查询 Microsoft Graph API 的资源的 URL。您可以在列出事件文档中找到这些 URL。
private static final String GRAPH_CALENDAR_ENDPOINT = "https://graph.microsoft.com/v1.0/me/calendar/events";
我们将上一个部分创建的 WebClient 注入为一个属性。
    @Autowired
    private WebClient webClient;
我们还定义了 /events 端点。它接受 OAuth2AuthorizedClient 的实例作为第一个参数。@RegisteredOAuth2AuthorizedClient("graph") 注释定义了用于向 Microsoft Graph API 发出请求的客户端。此处,名称 graph 指的是我们将在下一节的 *application.yml* 文件中介绍的客户端。
在后台,此代码将前端传入的 JWT 令牌交换为第二个代表(OBO)令牌。OBO 令牌允许我们的微服务代表原始用户与下游资源服务器进行交互。它们在执行此操作时,将此微服务标识为执行请求的客户端。
然后,我们调用 callMicrosoftGraphEndpoint 来执行与 Graph API 的网络请求。
    @GetMapping(value = "/events", produces = "application/json")
    public String events(@RegisteredOAuth2AuthorizedClient("graph") OAuth2AuthorizedClient graph) {
        return callMicrosoftGraphEndpoint(graph);
    }
callMicrosoftGraphMeEndpoint 函数执行与 Graph API 的网络请求,并将结果作为字符串返回。
    private String callMicrosoftGraphEndpoint(OAuth2AuthorizedClient graph) {
        if (null != graph) {
            String body = webClient
                    .get()
                    .uri(GRAPH_CALENDAR_ENDPOINT)
                    .attributes(oauth2AuthorizedClient(graph))
                    .retrieve()
                    .bodyToMono(String.class)
                    .block();
            return body;
        } else {
            return "Graph request failed.";
        }
    }
配置 Spring Boot 微服务
配置微服务的最后一步是编辑 application.yml 文件。完整文件如下:
server:
  port: 8081
azure:
  activedirectory:
    client-id: ${CLIENT_ID}
    client-secret: ${CLIENT_SECRET}
    app-id-uri: ${API_URL}
    tenant-id: ${TENANT_ID}
    authorization-clients:
      graph:
        scopes:
          - https://graph.microsoft.com/User.Read
          - https://graph.microsoft.com/Calendars.Read
logging:
  level:
    org:
      springframework:
        security: DEBUG
我们将此微服务暴露在 8081 端口上,以允许它与前端 Web 应用程序一起运行。
server:
  port: 8081
然后,我们定义 Azure AD 应用程序的详细信息。我们在此处定义的属性与我们在本系列第一篇文章中注意到的相同。唯一的例外是 app-id-uri 属性,它是我们在本教程前面创建的应用程序 ID URI。
azure:
  activedirectory:
    client-id: ${CLIENT_ID}
    client-secret: ${CLIENT_SECRET}
    app-id-uri: ${API_URL}
    tenant-id: ${TENANT_ID}
接下来,我们定义一个名为 graph 的客户端,它需要读取用户的详细信息和日历事件。这些范围与我们之前添加到 Azure AD 应用程序的范围相匹配。我们在 @RegisteredOAuth2AuthorizedClient 注释中引用此客户端名称。
    authorization-clients:
      graph:
        scopes:
          - https://graph.microsoft.com/User.Read
          - https://graph.microsoft.com/Calendars.Read
运行微服务
要构建并运行应用程序,我们运行以下 PowerShell 命令:
$env:CLIENT_SECRET="Application client secret"
$env:CLIENT_ID="Application client ID"
$env:TENANT_ID="Azure AD tenant ID"
$env:API_URL="Application API URI"
.\mvnw spring-boot:run
或 Bash 命令:
export CLIENT_SECRET="Application client secret"
export CLIENT_ID="Application client ID"
export TENANT_ID="Azure AD tenant ID"
export API_URL="Application API URI"
./mvnw spring-boot:run
我们的微服务现在已准备好从前端 Web 应用程序调用。
从前端应用程序调用微服务
我们需要更新前端 Web 应用程序以调用微服务,并在网页上显示生成的日历事件。
创建 WebClient
为了向微服务发出网络请求,我们必须创建一个 WebClient 类的实例。与微服务应用程序一样,我们在 WebClientConfig 类中执行此操作。
package com.matthewcasperson.demo.configuration;

import org.springframework.context.annotation.Bean;
import org.springframework.context.annotation.Configuration;
import org.springframework.security.oauth2.client.OAuth2AuthorizedClientManager;
import org.springframework.security.oauth2.client.OAuth2AuthorizedClientProvider;
import org.springframework.security.oauth2.client.OAuth2AuthorizedClientProviderBuilder;
import org.springframework.security.oauth2.client.registration.ClientRegistrationRepository;
import org.springframework.security.oauth2.client.web.DefaultOAuth2AuthorizedClientManager;
import org.springframework.security.oauth2.client.web.OAuth2AuthorizedClientRepository;
import org.springframework.security.oauth2.client.web.reactive.function.client.ServletOAuth2AuthorizedClientExchangeFilterFunction;
import org.springframework.web.reactive.function.client.WebClient;

@Configuration
public class WebClientConfig {
    @Bean
    public OAuth2AuthorizedClientManager authorizedClientManager(
            ClientRegistrationRepository clientRegistrationRepository,
            OAuth2AuthorizedClientRepository authorizedClientRepository) {

        OAuth2AuthorizedClientProvider authorizedClientProvider =
                OAuth2AuthorizedClientProviderBuilder.builder()
                        .clientCredentials()
                        .build();

        DefaultOAuth2AuthorizedClientManager authorizedClientManager =
                new DefaultOAuth2AuthorizedClientManager(
                        clientRegistrationRepository, authorizedClientRepository);
        authorizedClientManager.setAuthorizedClientProvider(authorizedClientProvider);

        return authorizedClientManager;
    }

    @Bean
    public static WebClient webClient(OAuth2AuthorizedClientManager oAuth2AuthorizedClientManager) {
        ServletOAuth2AuthorizedClientExchangeFilterFunction function =
                new ServletOAuth2AuthorizedClientExchangeFilterFunction(oAuth2AuthorizedClientManager);
        return WebClient.builder()
                .apply(function.oauth2Configuration())
                .build();
    }
}
创建事件控制器
接下来,我们创建一个名为 EventsController 的新控制器,以响应对 /events 路径的请求。与微服务 REST 控制器一样,events 函数注入一个包含 OBO 令牌的客户端以调用微服务。
// src/main/java/com/matthewcasperson/demo/controllers/EventController.java

package com.matthewcasperson.demo.controllers;

import com.matthewcasperson.demo.model.GraphEvent;
import com.matthewcasperson.demo.model.GraphValues;
import org.springframework.beans.factory.annotation.Autowired;
import org.springframework.http.*;
import org.springframework.security.oauth2.client.OAuth2AuthorizedClient;
import org.springframework.security.oauth2.client.annotation.RegisteredOAuth2AuthorizedClient;
import org.springframework.stereotype.Controller;
import org.springframework.web.bind.annotation.GetMapping;
import org.springframework.web.client.RestTemplate;
import org.springframework.web.reactive.function.client.WebClient;
import org.springframework.web.servlet.ModelAndView;

import java.util.List;

import static org.springframework.security.oauth2.client.web.reactive.function.client.ServerOAuth2AuthorizedClientExchangeFilterFunction.oauth2AuthorizedClient;

@Controller
public class EventsController {

    @Autowired
    private WebClient webClient;

    @GetMapping("/events")
    public ModelAndView events(
            @RegisteredOAuth2AuthorizedClient("calendar-api") OAuth2AuthorizedClient client) {

        List<graphevent> events = getEvents(client).value();
        ModelAndView mav = new ModelAndView("events");
        mav.addObject("events", events);
        return mav;
    }

    private GraphValues getEvents(OAuth2AuthorizedClient client) {
        try {
            if (null != client) {
                return webClient
                        .get()
                        .uri("https://:8081/events")
                        .attributes(oauth2AuthorizedClient(client))
                        .retrieve()
                        .bodyToMono(GraphValues.class)
                        .block();
            }
        } catch (Exception ex) {
            System.out.println(ex);
        }

        return new GraphValues(List.of());
    }
}</graphevent>
微服务返回的 JSON 响应由三个记录表示:GraphValues、GraphEvent 和 GraphEventDate。
// src/main/java/com/matthewcasperson/demo/model/GraphValues.java

package com.matthewcasperson.demo.model;

import java.util.List;

public record GraphValues(List<graphevent> value) {}

// src/main/java/com/matthewcasperson/demo/model/GraphEventDate.java

package com.matthewcasperson.demo.model;

import java.text.ParseException;
import java.text.SimpleDateFormat;
import java.util.Date;
import java.util.Locale;
import java.util.TimeZone;

public record GraphEventDate(String dateTime, String timeZone) {
    public Date getFormattedDateTime() throws ParseException {
        SimpleDateFormat formatter = new SimpleDateFormat("yyyy-MM-dd'T'hh:mm:ss.SSS", Locale.ENGLISH);
        formatter.setTimeZone(TimeZone.getTimeZone(timeZone));
        return formatter.parse(dateTime);
    }
}

// src/main/java/com/matthewcasperson/demo/model/GraphEvent.java

package com.matthewcasperson.demo.model;

public record GraphEvent(String subject, GraphEventDate start) {}</graphevent>
创建事件模板
接下来,我们创建一个 Thymeleaf 模板,名为 events.html,该模板循环遍历事件并构建一个 HTML 表。
<!doctype html>
<html lang="en">
<head>
    <meta charset="utf-8">
    <title>MSAL and Spring Demo</title>
    <link href="bootstrap.min.css" rel="stylesheet">
    <link href="cover.css" rel="stylesheet">
</head>

<body class="text-center">

<div class="cover-container d-flex h-100 p-3 mx-auto flex-column">
    <header class="masthead mb-auto">
        <div class="inner">
            <nav class="nav nav-masthead justify-content-center">
                <a class="nav-link" href="/">Home</a>
                <a class="nav-link" href="/profile">Profile</a>
                <a class="nav-link active" href="/events">Events</a>
            </nav>
        </div>
    </header>

    <main role="main" class="inner cover">
        <h2>Outlook Events</h2>
        <table>
            <tr th:each="event: ${events}">
                <td th:text="${event.subject}" />
                <td th:text="${event.start.formattedDateTime}" />
            </tr>
        </table>
    </main>
</div>

<script src="jquery-3.6.0.min.js"></script>
<script src="bootstrap.min.js"></script>
</body>
</html>
更新应用程序配置
最后,我们使用一个新客户端来调用日历 API 微服务,来更新 application.yaml 文件。我们将 CALENDAR_SCOPE 环境变量设置为类似 api://2e6853d4-90f2-40d9-a97a-3c40d4f7bf58/ReadCalendar 的值,这是日历 API 应用程序公开的范围。
# src/main/resources/application.yml

azure:
  activedirectory:
    tenant-id: ${TENANT_ID}
    client-id: ${CLIENT_ID}
    client-secret: ${CLIENT_SECRET}
    authorization-clients:
      calendar-api:
        scopes:
          - ${CALENDAR_SCOPE}

logging:
  level:
    org:
      springframework:
        security: DEBUG
运行前端应用程序
要构建并运行应用程序,我们运行以下 PowerShell 命令:
$env:CLIENT_SECRET="Application client secret"
$env:CLIENT_ID="Application client ID"
$env:TENANT_ID="Azure AD tenant ID"
$env:CALENDAR_SCOPE="The Calendar API ReadCalendar scope e.g. api://2e6853d4-90f2-40d9-a97a-3c40d4f7bf58/ReadCalendar"
.\mvnw spring-boot:run
或 Bash 命令:
export CLIENT_SECRET="Application client secret"
export CLIENT_ID="Application client ID"
export TENANT_ID="Azure AD tenant ID"
export CALENDAR_SCOPE="The Calendar API ReadCalendar scope e.g. api://2e6853d4-90f2-40d9-a97a-3c40d4f7bf58/ReadCalendar"
./mvnw spring-boot:run
然后,我们打开 https://:8080/events 并登录。请注意,登录提示现在要求允许读取日历事件的权限。

当我们单击接受时,我们的前端应用程序会显示即将发生的日历事件。

后续步骤
在本教程中,我们创建了一个 Spring Boot 微服务,以代表前端应用程序用户查询 Microsoft Graph API。我们在 Azure AD 中配置了该微服务,并授予了其他权限,使其能够访问 Microsoft Graph API,并公开登录前端时请求的范围。
结果是一个分布式微服务架构,它将资源请求转发到多个 OAuth 资源服务器,同时维护原始用户的身份以及参与事务的单个资源服务器的身份。
在本系列的下一篇也是最后一篇文章《使用 MSAL 访问 Azure API》中,我们将使用 OBO OAuth 流调用 Azure 中的服务。然后,我们将通过共享数据库将结果传回前端应用程序。