
JavaScript 中的内容感知图像缩放
所谓的 Seam Carving 算法的 JavaScript 实现,用于内容感知图像缩放。
简而言之
关于Seam Carving算法的文章已经有很多了,但我无法抗拒自己探索这个优雅、强大且仍显简单的算法的诱惑,并写下我的个人经历。另一个吸引我注意的是动态规划(DP)方法可以平滑地应用于解决它。而且,如果你像我一样,还在“学习算法”的旅程中,这个算法解决方案可能会丰富你的个人DP武器库。
因此,本文我想做三件事:
- 为你提供一个交互式内容感知缩放器,以便你可以调整自己的图像大小。
- 解释Seam Carving算法背后的思想。
- 解释实现该算法的动态规划方法(我们将为此使用TypeScript)。
内容感知图像缩放
当需要改变图像比例(例如,在保持高度不变的情况下减小宽度)并且不希望丢失图像的某些部分时,可以使用内容感知图像缩放。在这种情况下,直接进行图像缩放会扭曲图像中的对象。为了在改变图像比例的同时保持对象比例,我们可以使用由Shai Avidan和Ariel Shamir提出的Seam Carving算法。
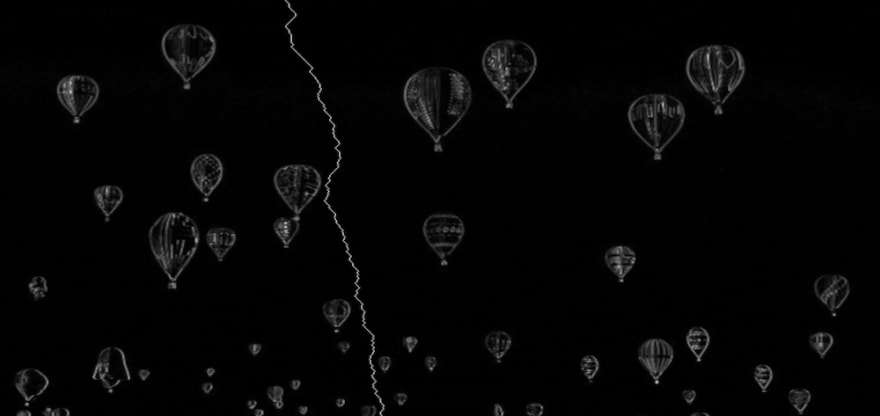
下面的示例显示了如何使用内容感知缩放(左图)和直接缩放(右图)将原始图像宽度减小50%。在这种特定情况下,左图看起来更自然,因为气球的比例得以保留。

Seam Carving算法的思想是找到对图像内容贡献最低的缝线(连续的像素序列),然后将其切除(移除)。这个过程一遍又一遍地重复,直到获得所需的图像宽度或高度。在下面的示例中,您可以看到热气球像素对图像内容的贡献大于天空像素。因此,天空像素首先被移除。

找到能量最低的缝线是一项计算密集型任务(尤其是对于大型图像)。为了加快缝线搜索速度,可以应用动态规划方法(我们将在下文详细介绍实现细节)。
对象移除
每个像素的重要性(所谓的像素能量)是根据它与两个邻近像素之间的颜色(R、G、B、A)差异来计算的。现在,如果我们人为地将像素能量设置为非常低的水平(例如,通过在其上方绘制遮罩),Seam Carving算法将免费为我们执行对象移除。

JS IMAGE CARVER 演示
我创建了JS IMAGE CARVER Web应用程序,您可以使用它来调整自定义图像的大小。
更多示例
以下是该算法如何处理更复杂背景的一些更多示例。
背景中的山脉平滑缩小,没有明显的接缝。

海洋波浪也是如此。该算法保留了波浪结构,而没有扭曲冲浪者。

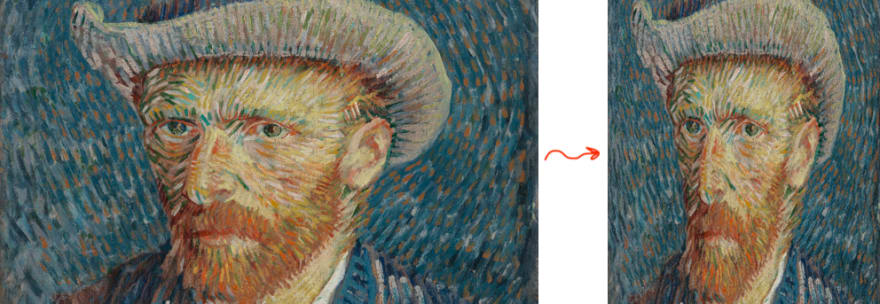
我们需要记住,Seam Carving算法并非万能药,它可能无法调整图像大小,其中大多数像素是边缘(对算法而言看起来很重要)。在这种情况下,它甚至会开始扭曲图像的重要部分。在下面的示例中,内容感知图像缩放看起来与直接缩放非常相似,因为对算法而言,所有像素看起来都很重要,并且它很难区分梵高的人脸与背景。
Seam Carving算法如何工作
想象一下我们有一张1000 x 500 px的图片,我们想将其尺寸更改为500 x 500 px以使其成为方形(假设方形比例更适合Instagram提要)。在这种情况下,我们可能希望为缩放过程设定几个要求:
- 保留图像的重要部分(即,如果调整大小前有5棵树,我们希望调整大小后仍有5棵树)。
- 保持重要部分的比例(即,圆形车轮不应被压扁成椭圆形车轮)。
为了避免改变图像的重要部分,我们可以找到一个从上到下延伸的连续像素序列(缝线),该序列具有对图像内容贡献最低(避开重要部分)的特点,然后将其移除。缝线移除将使图像缩小1像素。然后,我们将重复此步骤,直到图像达到所需的宽度。
问题在于如何定义像素的重要性及其对内容(在原始论文中,作者使用了像素能量一词)的贡献。一种方法是将所有构成边缘的像素都视为重要像素。如果一个像素是边缘的一部分,那么它与邻近像素(左侧和右侧像素)的颜色差异将比不是边缘一部分的像素更大。
![]()
假设像素的颜色由4个数字表示(R - 红色,G - 绿色,B - 蓝色,A - Alpha),我们可以使用以下公式计算颜色差异(像素能量):

其中
mEnergy- 中间像素的能量(重要性)(如果四舍五入,则为[0..626])lR- 左侧像素的红色通道值([0..255])mR- 中间像素的红色通道值([0..255])rR- 右侧像素的红色通道值([0..255])lG- 左侧像素的绿色通道值([0..255])- 等等...
在上面的公式中,我们暂时省略了Alpha(透明度)通道,假设图像中没有透明像素。稍后,我们将使用Alpha通道进行遮罩和对象移除。
![]()
现在,既然我们知道如何计算单个像素的能量,我们就可以计算所谓的能量图,该图将包含图像中每个像素的能量。在每次缩放步骤中,都应重新计算能量图(至少部分重新计算,下文将详细介绍),并且它的大小将与图像相同。
例如,在第1次缩放步骤中,我们将拥有一个1000 x 500的图像和一个1000 x 500的能量图。在第2次缩放步骤中,我们将从图像中移除缝线,并根据新的缩小图像重新计算能量图。因此,我们将获得一个999 x 500的图像和一个999 x 500的能量图。
像素的能量越高,它就越有可能是边缘的一部分,对图像内容越重要,我们越不可能需要移除它。
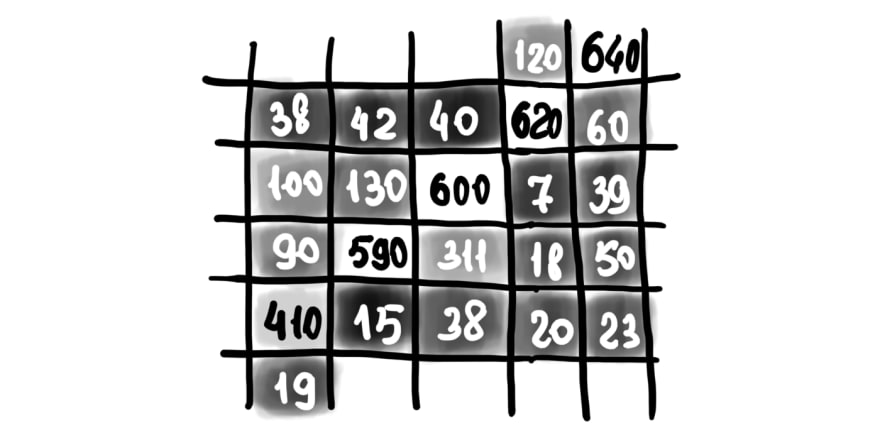
为了可视化能量图,我们可以为能量较高的像素分配更亮的颜色,为能量较低的像素分配更暗的颜色。这是一个随机部分能量图可能外观的人工示例。您可以看到代表边缘的亮线,我们希望在缩放过程中保留它。
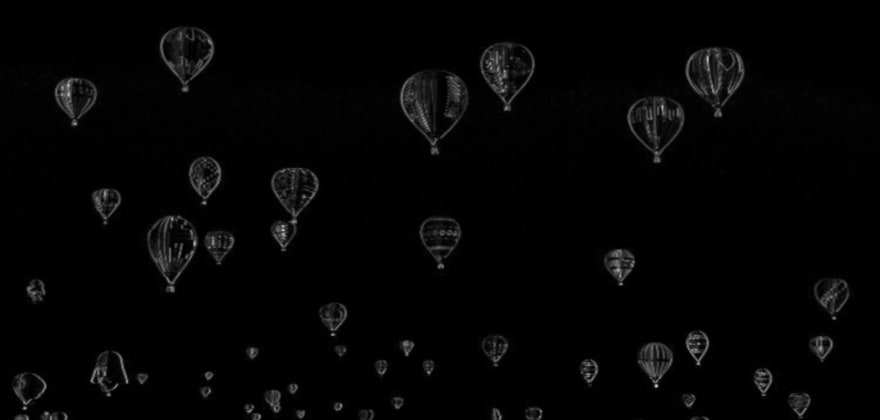
这是您上面看到的演示图像(带有热气球)的能量图的真实示例。
我们可以使用能量图查找能量最低的缝线(一个接一个),从而决定哪些像素最终应该被删除。
找到能量最低的缝线并非易事,它需要探索许多可能的像素组合才能做出决定。我们将应用动态规划方法来加快速度。
在下面的示例中,您可以看到能量图和为它找到的第一个最低能量缝线。
在上面的示例中,我们减小了图像的宽度。也可以采用类似的方法来减小图像的高度。但我们需要“旋转”该方法:
- 开始使用顶部和底部像素邻居(而不是左侧和右侧)来计算像素能量。
- 在搜索缝线时,我们需要从左侧到右侧移动(而不是从上到下)。
TypeScript 实现
为了实现该算法,我们将使用TypeScript。如果您想要JavaScript版本,可以忽略(删除)类型定义及其用法。
出于简便性,我们仅为图像宽度缩减实现Seam Carving算法。
内容感知宽度缩放(入口函数)
首先,让我们定义一些将在实现算法时使用的通用类型。
// Type that describes the image size (width and height).
type ImageSize = { w: number, h: number };

// The coordinate of the pixel.
type Coordinate = { x: number, y: number };

// The seam is a sequence of pixels (coordinates).
type Seam = Coordinate[];

// Energy map is a 2D array that has the same width and height
// as the image the map is being calculated for.
type EnergyMap = number[][];

// Type that describes the image pixel's RGBA color.
type Color = [
  r: number, // Red
  g: number, // Green
  b: number, // Blue
  a: number, // Alpha (transparency)
] | Uint8ClampedArray;
从高层来看,该算法包括以下步骤:
- 计算当前图像版本的能量图。
- 根据能量图找到具有最低能量的缝线(这里我们将应用动态规划)。
- 删除具有最低能量的缝线。
- 重复,直到图像宽度减小到所需值。
type ResizeImageWidthArgs = {
  img: ImageData,  // Image data we want to resize.
  toWidth: number, // Final image width we want the image to shrink to.
};

type ResizeImageWidthResult = {
  img: ImageData,  // Resized image data.
  size: ImageSize, // Resized image size (w x h).
};

// Performs the content-aware image width resizing using the seam carving method.
export const resizeImageWidth = (
  { img, toWidth }: ResizeImageWidthArgs,
): ResizeImageWidthResult => {
  // For performance reasons, we want to avoid changing the img data array size.
  // Instead, we'll just keep the record of the resized image width and height separately.
  const size: ImageSize = { w: img.width, h: img.height };

  // Calculating the number of pixels to remove.
  const pxToRemove = img.width - toWidth;
  if (pxToRemove < 0) {
    throw new Error('Upsizing is not supported for now');
  }

  let energyMap: EnergyMap | null = null;
  let seam: Seam | null = null;

  // Removing the lowest energy seams one by one.
  for (let i = 0; i < pxToRemove; i += 1) {
    // 1. Calculate the energy map for the current version of the image.
    energyMap = calculateEnergyMap(img, size);

    // 2. Find the seam with the lowest energy based on the energy map.
    seam = findLowEnergySeam(energyMap, size);

    // 3. Delete the seam with the lowest energy seam from the image.
    deleteSeam(img, seam, size);

    // Reduce the image width, and continue iterations.
    size.w -= 1;
  }

  // Returning the resized image and its final size.
  // The img is actually a reference to the ImageData, so technically
  // the caller of the function already has this pointer. But let's
  // still return it for better code readability.
  return { img, size };
};
需要调整大小的图像以ImageData格式传入函数。您可以将图像绘制到画布上,然后像这样从canvas中提取ImageData:
const ctx = canvas.getContext('2d');
const imgData = ctx.getImageData(0, 0, imgWidth, imgHeight);
让我们逐一分解每个步骤,并实现calculateEnergyMap()、findLowEnergySeam()和deleteSeam()函数。
计算像素的能量
在这里,我们应用了前面描述的颜色差异公式。对于左侧和右侧边界(当没有左侧或右侧邻居时),我们会忽略邻居,在能量计算时不考虑它们。
// Calculates the energy of a pixel.
const getPixelEnergy = (left: Color | null, middle: Color, right: Color | null): number => {
  // Middle pixel is the pixel we're calculating the energy for.
  const [mR, mG, mB] = middle;

  // Energy from the left pixel (if it exists).
  let lEnergy = 0;
  if (left) {
    const [lR, lG, lB] = left;
    lEnergy = (lR - mR) ** 2 + (lG - mG) ** 2 + (lB - mB) ** 2;
  }

  // Energy from the right pixel (if it exists).
  let rEnergy = 0;
  if (right) {
    const [rR, rG, rB] = right;
    rEnergy = (rR - mR) ** 2 + (rG - mG) ** 2 + (rB - mB) ** 2;
  }

  // Resulting pixel energy.
  return Math.sqrt(lEnergy + rEnergy);
};
计算能量图
我们正在处理的图像是ImageData格式。这意味着所有像素(及其颜色)都存储在一个平坦的(1D)Uint8ClampedArray数组中。为了提高可读性,让我们引入几个辅助函数,使我们能够将Uint8ClampedArray数组用作2D矩阵。
// Helper function that returns the color of the pixel.
const getPixel = (img: ImageData, { x, y }: Coordinate): Color => {
  // The ImageData data array is a flat 1D array.
  // Thus, we need to convert x and y coordinates to the linear index.
  const i = y * img.width + x;
  const cellsPerColor = 4; // RGBA
  // For better efficiency, instead of creating a new sub-array, we return
  // a pointer to the part of the ImageData array.
  return img.data.subarray(i * cellsPerColor, i * cellsPerColor + cellsPerColor);
};

// Helper function that sets the color of the pixel.
const setPixel = (img: ImageData, { x, y }: Coordinate, color: Color): void => {
  // The ImageData data array is a flat 1D array.
  // Thus, we need to convert x and y coordinates to the linear index.
  const i = y * img.width + x;
  const cellsPerColor = 4; // RGBA
  img.data.set(color, i * cellsPerColor);
};
为了计算能量图,我们遍历每个图像像素,并对其调用上面描述的getPixelEnergy()函数。
// Helper function that creates a matrix (2D array) of specific
// size (w x h) and fills it with specified value.
const matrix = <T>(w: number, h: number, filler: T): T[][] => {
  return new Array(h)
    .fill(null)
    .map(() => {
      return new Array(w).fill(filler);
    });
};

// Calculates the energy of each pixel of the image.
const calculateEnergyMap = (img: ImageData, { w, h }: ImageSize): EnergyMap => {
  // Create an empty energy map where each pixel has infinitely high energy.
  // We will update the energy of each pixel.
  const energyMap: number[][] = matrix<number>(w, h, Infinity);
  for (let y = 0; y < h; y += 1) {
    for (let x = 0; x < w; x += 1) {
      // Left pixel might not exist if we're on the very left edge of the image.
      const left = (x - 1) >= 0 ? getPixel(img, { x: x - 1, y }) : null;
      // The color of the middle pixel that we're calculating the energy for.
      const middle = getPixel(img, { x, y });
      // Right pixel might not exist if we're on the very right edge of the image.
      const right = (x + 1) < w ? getPixel(img, { x: x + 1, y }) : null;
      energyMap[y][x] = getPixelEnergy(left, middle, right);
    }
  }
  return energyMap;
};
每次缩放迭代都会重新计算能量图。这意味着,如果我们想将图像缩小500像素,那么它将被重新计算,比如说500次,这并不理想。为了加快第二次、第三次及后续步骤的能量图计算速度,我们可以只重新计算那些位于即将被移除的缝线周围的像素的能量。
寻找具有最低能量的缝线(动态规划方法)
我们现在需要解决的问题是在能量图上找到一条从上到下延伸且像素能量总和最小的路径(缝线)。
朴素方法
朴素的方法是逐一检查所有可能的路径。
从上到下,对于每个像素,我们有3种选择(↙︎ 向下左,↓ 向下,↘︎ 向下右)。这导致时间复杂度为O(w * 3^h)或简称为O(3^h),其中w和h是图像的宽度和高度。这种方法看起来很慢。
贪婪方法
我们也可以尝试选择下一个像素作为能量最低的像素,希望最终的缝线能量会是最小的。

这种方法不能保证找到最佳可用解决方案,尽管它并非最差的解决方案。在上面的图像中,您可以看到贪婪方法一开始选择了5而不是10,从而错过了最优像素链。
这种方法的优点是它速度快,时间复杂度为O(w + h),其中w和h是图像的宽度和高度。在这种情况下,速度的代价是缩放质量较低。我们需要找到第一行的最小值(遍历w个单元格),然后对于每一行,我们只探索3个邻近像素(遍历h行)。
动态规划方法
您可能已经注意到,在朴素方法中,我们在计算最终缝线能量时反复累加了相同的像素能量。
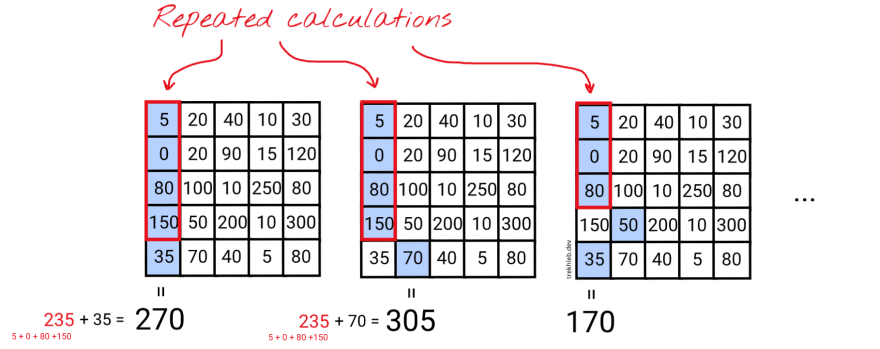
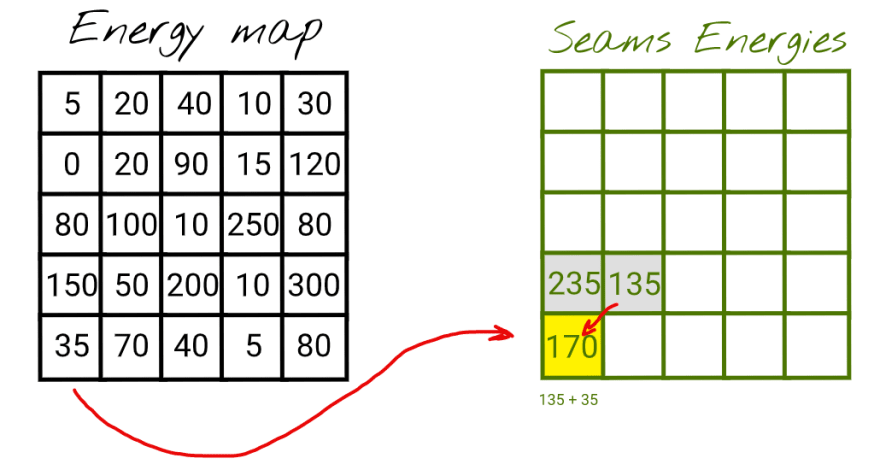
在上面的示例中,您可以看到对于前两条缝线,我们重用了较短缝线的能量(能量为235)。而不是只进行一次操作235 + 70来计算第二条缝线的能量,我们进行了四次操作(5 + 0 + 80 + 150) + 70。
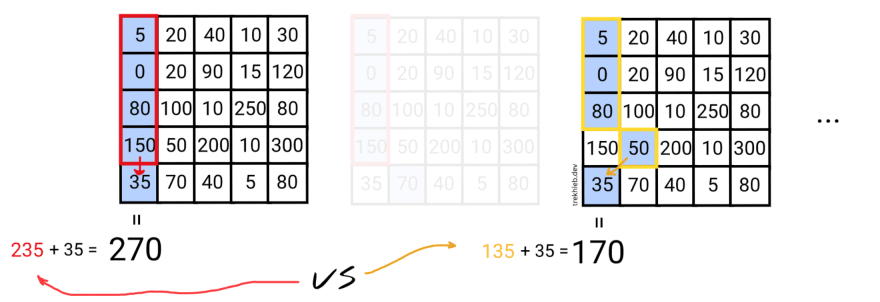
由于我们重用了前一条缝线的能量来计算当前缝线的能量,因此可以将此事实递归地应用于所有较短的缝线,直到最上面的第一行缝线。当存在这种重叠子问题时,这表明通用问题可能可以通过动态规划方法进行优化。
因此,我们可以将当前缝线的能量保存在附加的seamsEnergies表中,以使其可重用,从而更快地计算下一条缝线(seamsEnergies表的大小将与能量图和图像本身相同)。
同时请记住,对于图像上的某个特定像素(例如,左下角像素),我们可能有几个先前缝线能量的值。
由于我们正在寻找能量最低的缝线,因此同样明智的做法是选择先前能量最低的缝线。
一般来说,我们有三种可能的先前缝线可供选择:
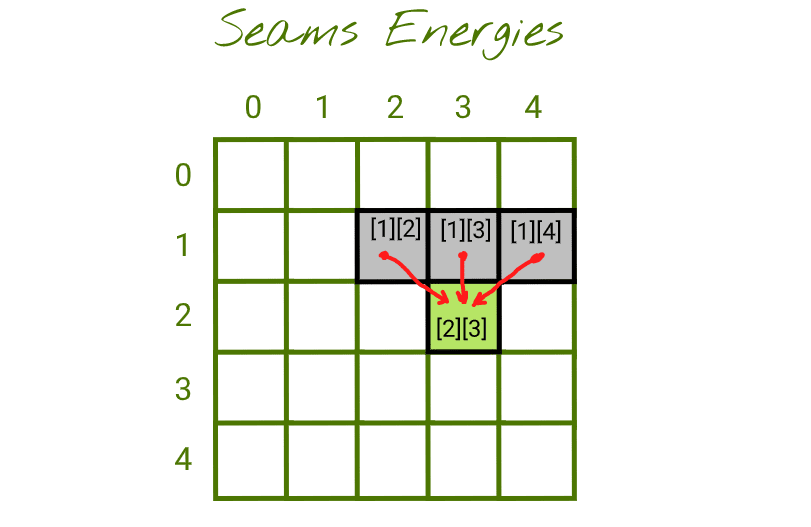
您可以这样理解:
- 单元格
[1][x]:包含从行[0][?]的某个位置开始并终止于单元格[1][x]的缝线的最低可能能量。 - 当前单元格
[2][3]:包含从行[0][?]的某个位置开始并终止于单元格[2][3]的缝线的最低可能能量。为了计算它,我们需要将当前像素[2][3](来自能量图)的能量与min(seam_energy_1_2, seam_energy_1_3, seam_energy_1_4)相加。
如果我们完全填充seamsEnergies表,那么最低一行中的最小数字就是最低可能的缝线能量。
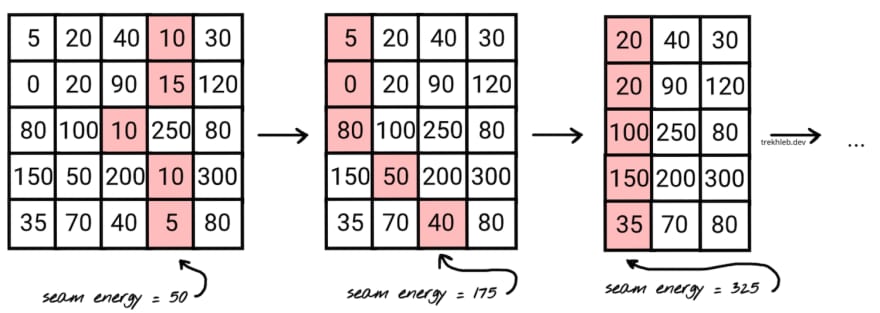
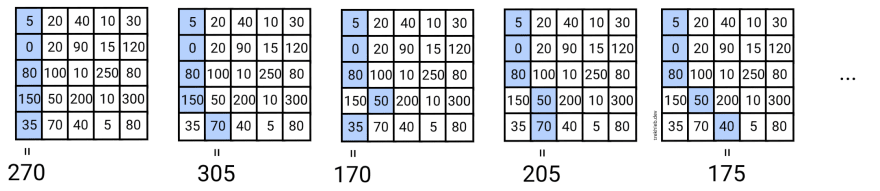
让我们尝试填充此表的几个单元格,看看它是如何工作的。
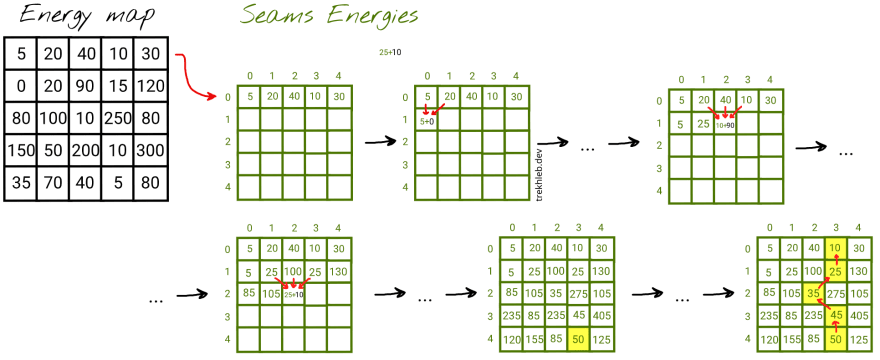
填充seamsEnergies表后,我们可以看到能量最低的像素的能量为50。为了方便起见,在生成每个像素的seamsEnergies时,我们不仅可以保存缝线的能量,还可以保存先前最低能量缝线的坐标。这将使我们能够轻松地从下往上重建缝线路径。
DP方法的时间复杂度将为O(w * h),其中w和h是图像的宽度和高度。我们需要计算图像每个像素的能量。
这是此逻辑可能实现的示例:
// The metadata for the pixels in the seam.
type SeamPixelMeta = {
  energy: number,              // The energy of the pixel.
  coordinate: Coordinate,      // The coordinate of the pixel.
  previous: Coordinate | null, // The previous pixel in a seam.
};

// Finds the seam (the sequence of pixels from top to bottom) that has the
// lowest resulting energy using the Dynamic Programming approach.
const findLowEnergySeam = (energyMap: EnergyMap, { w, h }: ImageSize): Seam => {
  // The 2D array of the size of w and h, where each pixel contains the
  // seam metadata (pixel energy, pixel coordinate and previous pixel from
  // the lowest energy seam at this point).
  const seamsEnergies: (SeamPixelMeta | null)[][] = matrix<SeamPixelMeta | null>(w, h, null);

  // Populate the first row of the map by just copying the energies
  // from the energy map.
  for (let x = 0; x < w; x += 1) {
    const y = 0;
    seamsEnergies[y][x] = {
      energy: energyMap[y][x],
      coordinate: { x, y },
      previous: null,
    };
  }

  // Populate the rest of the rows.
  for (let y = 1; y < h; y += 1) {
    for (let x = 0; x < w; x += 1) {
      // Find the top adjacent cell with minimum energy.
      // This cell would be the tail of a seam with lowest energy at this point.
      // It doesn't mean that this seam (path) has lowest energy globally.
      // Instead, it means that we found a path with the lowest energy that may lead
      // us to the current pixel with the coordinates x and y.
      let minPrevEnergy = Infinity;
      let minPrevX: number = x;
      for (let i = (x - 1); i <= (x + 1); i += 1) {
        if (i >= 0 && i < w && seamsEnergies[y - 1][i].energy < minPrevEnergy) {
          minPrevEnergy = seamsEnergies[y - 1][i].energy;
          minPrevX = i;
        }
      }

      // Update the current cell.
      seamsEnergies[y][x] = {
        energy: minPrevEnergy + energyMap[y][x],
        coordinate: { x, y },
        previous: { x: minPrevX, y: y - 1 },
      };
    }
  }

  // Find where the minimum energy seam ends.
  // We need to find the tail of the lowest energy seam to start
  // traversing it from its tail to its head (from the bottom to the top).
  let lastMinCoordinate: Coordinate | null = null;
  let minSeamEnergy = Infinity;
  for (let x = 0; x < w; x += 1) {
    const y = h - 1;
    if (seamsEnergies[y][x].energy < minSeamEnergy) {
      minSeamEnergy = seamsEnergies[y][x].energy;
      lastMinCoordinate = { x, y };
    }
  }

  // Find the lowest energy energy seam.
  // Once we know where the tail is, we may traverse and assemble the lowest
  // energy seam based on the "previous" value of the seam pixel metadata.
  const seam: Seam = [];
  if (!lastMinCoordinate) {
    return seam;
  }

  const { x: lastMinX, y: lastMinY } = lastMinCoordinate;

  // Adding new pixel to the seam path one by one until we reach the top.
  let currentSeam = seamsEnergies[lastMinY][lastMinX];
  while (currentSeam) {
    seam.push(currentSeam.coordinate);
    const prevMinCoordinates = currentSeam.previous;
    if (!prevMinCoordinates) {
      currentSeam = null;
    } else {
      const { x: prevMinX, y: prevMinY } = prevMinCoordinates;
      currentSeam = seamsEnergies[prevMinY][prevMinX];
    }
  }

  return seam;
};
移除最低能量缝线
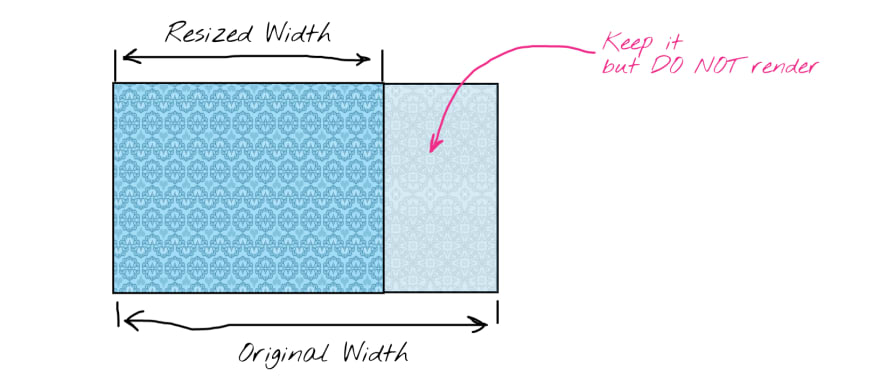
一旦找到最低能量缝线,我们就需要从图像中移除(切除)构成它的像素。移除是通过将缝线右侧的像素向左移动1px来实现的。出于性能考虑,我们实际上不会删除最后一列。相反,渲染组件将仅忽略位于调整后图像宽度之外的图像部分。
// Deletes the seam from the image data.
// We delete the pixel in each row and then shift the rest of the row pixels to the left.
const deleteSeam = (img: ImageData, seam: Seam, { w }: ImageSize): void => {
  seam.forEach(({ x: seamX, y: seamY }: Coordinate) => {
    for (let x = seamX; x < (w - 1); x += 1) {
      const nextPixel = getPixel(img, { x: x + 1, y: seamY });
      setPixel(img, { x, y: seamY }, nextPixel);
    }
  });
};
对象移除
Seam Carving算法尝试首先移除由低能量像素组成的缝线。我们可以利用这一点,通过手动为某些像素分配低能量(例如,通过在图像上绘图并遮罩掉其中的某些区域),使Seam Carving算法能够免费为我们执行对象移除。
目前,在getPixelEnergy()函数中,我们仅使用R、G、B颜色通道来计算像素的能量。但还有一个我们尚未使用的颜色的A(Alpha,透明度)参数。我们可以使用透明度通道来告诉算法透明像素是我们想要移除的像素。
这是算法如何进行对象移除的:
问题与后续
当然,JS IMAGE CARVER Web应用程序远非一个生产就绪的缩放器。它的主要目的是交互式地实验Seam Carving算法。因此,未来的计划是继续进行实验。
该原始论文描述了Seam Carving算法不仅可用于下采样,还可用于图像的upscaling。upscaling反过来可以用于在移除对象后将图像upscale回其原始宽度。
另一个有趣的实验领域可能是让算法在实时中工作。
这些是未来的计划,但目前,我希望图像缩小示例对您来说有趣且有用。我也希望您已经了解了使用动态规划来实现它的想法。
那么,祝您在自己的实验中一切顺利!
历史
- 2022 年 1 月 18 日:初始版本