使用 Python 和 CodeProject.AI 服务器进行 IP 摄像头对象检测
5.00/5 (14投票s)
关于检测对象和邪恶啮齿动物的两部分系列的第一部分。

引言
我们中的许多人都使用 IP 摄像头进行监控。市面上有数百种摄像头,从便宜(且不太好用)的到功能强大且昂贵的都有。我比较穷,所以我用 Wyze 摄像头。它们售价 30 美元,防水且无线。
我的目标——我的需求,更确切地说——是拥有一个系统,能够在浣熊出现在我阳台时检测到它,这样我就可以向那个毛茸茸的小破坏者降下烈火和硫磺。
我曾与一个驼背的恶魔搏斗过。它盯着我,躲在角落里嘶嘶作响;我盯着它,手里拿着一块大木头,不知道要用它做什么。澳大利亚没有浣熊。我知道这东西是个麻烦,但我就是不确定麻烦有多大。
微风轻轻吹拂。一只黄蜂飞过。然后又飞回来,落在那个生物奇怪地像孩子一样的手上。我想,这会很有趣。它甚至没眨眼。相反,它向下 flick 了它带胡须的鼻子,用它泛黄的牙齿从手上拔下黄蜂,然后开始咀嚼。整个过程中,它一直没有离开我的视线。你觉得你运气好吗,小子?是吗?
本文将为我们使用 CodeProject.AI 服务器检测浣熊提供基础知识。我们将设置一个 Wyze 摄像头,使用 Beta 固件暴露 RTSP 流,用少量 Python 代码获取该流,然后将视频流的帧发送到 CodeProject.AI 服务器 来执行对象检测。第二部分将涉及专门训练一个模型来检测浣熊。
后续操作就留给勇敢的读者了。
设置 Wyze 摄像头以提供 RTSP 视频流
Wyze 开箱即用并不提供对其摄像头的视频流的访问,但它们提供 Beta 固件 以启用 RTSP(实时流协议)。 RTSP 是一种流媒体协议,Wyze 摄像头的实现最初发布为 Beta 版,但由于稳定性问题而被移除,然后重新发布,更新,为 v3 发布,然后又被移除。它现在处于一种奇怪的模糊状态,但仍可使用下面的链接从 Wyze 下载固件。
要更新您的摄像头,请下载相应的固件并 按照说明操作。只需记住将 *bin* 文件重命名为 *demo.bin* (V2) 或 *demo_wcv3.bin* (V3),并将文件放在 SD 卡的根目录下。
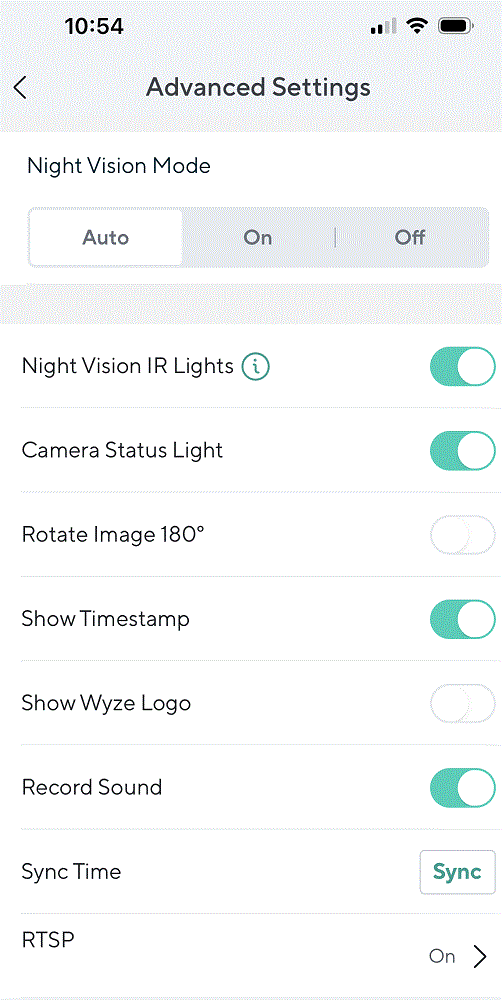
一旦您刷新了更新固件并重启了摄像头,您将在 Wyze 应用中看到 RTSP 选项。只需选择摄像头,然后转到 设置 → 高级设置 ,RTSP 设置就在最底部。

使用 Python 处理 RTSP 视频流
流的位置
RTSP 流的位置由以下形式的 URL 指定
rtsp://<用户名>:<密码>@<IP 地址>:<端口>/<端点>
在 Wyze 应用中的摄像头设置的“高级设置”中选择“RTSP”,系统将提示您生成一个 URL。选择一个用户名和密码,您的 URL 将显示类似以下的内容:
rtsp://user:pass@192.168.0.189/live
在这里,我选择了“user”和“pass”作为我的超安全凭证。摄像头位于 IP 地址 192.160.0.189,并将使用默认端口。
查看流
我们使用 `imutils.video` 来捕获流,并使用 `OpenCV` 来显示每一帧。代码极其简单。
import cv2
import imutils
from imutils.video import VideoStream

rtsp_url = "rtsp://user:pass@192.168.0.189/live"

def main():

    vs = VideoStream(rtsp_url).start()    # Open the RTSP stream

    while True:

        # Grab a frame at a time
        frame = vs.read()
        if frame is None:
            continue

        # Resize and display the frame on the screen
        frame = imutils.resize(frame, width = 1200)
        cv2.imshow('WyzeCam', frame)

        # Wait for the user to hit 'q' for quit
        key = cv2.waitKey(1) & 0xFF
        if key == ord('q'):
            break

    # Clean up and we're outta here.
    cv2.destroyAllWindows()
    vs.stop()

if __name__ == "__main__":
    main()
处理流
查看是一回事,但让我们让它做些有用的事情:添加对象检测。
- 步骤 1. 安装 CodeProject.AI 服务器。
- 步骤 2. 将我们视频中的每一帧发送到 CodeProject.AI 服务器进行处理。
- 步骤 3. 显示结果
首先,在代码中添加一个 `do_detection` 方法。此方法将接收一帧,将其转换为适合发送到 CodeProject.AI 服务器的格式,执行检测,然后用检测到的物品的标签和边界框注释该帧。
import io
import requests
import numpy as np
from PIL import Image, ImageDraw

codeprojectai_api_url = 'https://:32168/v1/vision/detection'

def do_detection(image):

    # Convert to format suitable for a POST
    buf = io.BytesIO()
    image.save(buf, format='PNG')
    buf.seek(0)

    # Send the image to CodeProject.AI Server and do some object detection.
    # Better to have a session object created once at the start and closed at
    # the end, but we keep the code simpler here for demo purposes
    with requests.Session() as session:
        response = session.post(codeprojectai_api_url,
                                files={"image": ('image.png', buf, 'image/png') },
                                data={"min_confidence": 0.5}).json()

    # Get the predictions (but be careful of a null return)
    predictions = response["predictions"]
    if (predictions is None):
        predictions = []

    # Draw each bounding box that was returned by the AI engine
    draw = ImageDraw.Draw(image)
    for object in predictions:
        label = object["label"]
        conf  = object["confidence"]
        y_max = int(object["y_max"])
        y_min = int(object["y_min"])
        x_max = int(object["x_max"])
        x_min = int(object["x_min"])

        draw.rectangle([(x_min, y_min), (x_max, y_max)], outline="red", width=5)
        draw.text((x_min, y_min), f"{label}")
        draw.text((x_min, y_min - 10), f"{round(conf*100.0,0)}")

    # ...and we're done
    return image
接下来,我们将获取从 RTSP 流中检索到的每一张图像,将其转换为可 POST 到 CodeProject.AI 服务器检测 API 的格式,然后将结果转换回我们最初接收帧的格式。
我们的 `main` 代码如下:
def main():

   # Open the RTSP stream
   vs = VideoStream(rtsp_url).start()

   while True:

       # Grab a frame at a time
       frame = vs.read()
       if frame is None:
           continue

       # Convert the frame to an image, pass to the detector, then convert back
       # to the original format so we can draw it
       image = Image.fromarray(frame)
       image = do_detection(image)
       frame = np.asarray(image)

       # Resize and display the frame on the screen
       frame = imutils.resize(frame, width = 1200)
       cv2.imshow('WyzeCam', frame)

       # Wait for the user to hit 'q' for quit
       key = cv2.waitKey(1) & 0xFF
       if key == ord('q'):
           break

   # Clean up and we're outta here.
   cv2.destroyAllWindows()
   vs.stop()
就这样,大功告成。

结论
通过使用标准的 Wyze 摄像头并更新其固件,我们能够访问 RTSP 流进行处理。少量 Python 代码可以从该流中提取帧,使我们能够将帧发送到 CodeProject.AI 服务器进行对象检测。
代码包含在 CodeProject.AI 服务器的源代码中(位于 *Demos/Python/ObjectDetect* 下)。整个文件不到 100 行。
我们编写 CodeProject.AI 服务器是为了消除设置 AI 系统和项目的痛苦。我们处理运行时、包以及所有组件的到位,以便我们可以直接跳到有趣的部分,比如检测垃圾熊猫。
请 下载 CodeProject.AI 并试用。添加您自己的模块,将其集成到您的应用程序中,训练一些自定义模型,并使用它来学习一些关于人工智能的知识。
