
SVG 网格:带有滚动、精灵和简单动画示例的方格、三角形和六边形网格
4.86/5 (4投票s)
创建带有滚动、动画和“精灵”拖动的方格、三角形和六边形网格
目录
简介 - SVG 网格:方格、三角形和六边形

“可缩放矢量图形 (SVG) 是一种基于 XML 的矢量图像格式,用于定义二维图形,支持交互性和动画。SVG 规范是万维网联盟自 1999 年以来开发的开放标准。”——在此阅读更多。
我一直对基于网格的游戏很感兴趣,比如使用六边形地图的星际舰队战役,或者例如克林贡人的屏幕,它是一个三角形网格

在本文中,我演示了方格、三角形和六边形网格。对于六边形网格,我添加了一些对象,例如星星、属性和几艘飞船。
此演示的功能包括
- 表面可以通过鼠标按下拖动进行滚动。
- 有些对象是固定的,例如绿色的六边形或带有红色边框的六边形。
- 有些对象是可移动的,例如飞船。
- 一些简单的动画。
这些都是基本的东西,主要的挑战是
- 拖动项目时,用户快速移动鼠标,导致鼠标移动事件从在对象上发生变为在表面或其他对象上发生。
- 选择对象时,SVG 路径会导致点击事件在表面上发生,因为实际上点击的是 SVG 元素的“透明”部分。
关于代码的另外几点
- 因为我打算用这个做更多的事情,所以演示应用程序实际上是一个 .NET 7 ASP.NET Core Web API 应用程序。没有端点 API。
- 前端使用 TypeScript 实现。
- Require.js 用作使用 AMD 格式/语法的模块加载器。
- 动画是通过编程方式完成的,而不是使用
animateSVG 元素。
HTML
HTML 由三部分组成
- 一些简单的 UI 元素用于控制 UI。
- 硬编码渐变和网格图案的 SVG 定义。
- 表面对象和网格上的覆盖对象。
请注意,标头中的 script 元素将 AppConfig 定义为起始模块。
<!DOCTYPE html>

<html lang="en">
<head>
  <meta charset="utf-8" />
  <title>TypeScript HTML App</title>
  <script data-main="js/AppConfig" type="text/javascript" src="lib/require.js"></script>
</head>
<body>
  <div>
    <input id="rbSquares" type="radio" name="gridType" checked />
    <label for="squares">Squares</label>
    <input id="rbTriangles" type="radio" name="gridType" />
    <label for="triangles">Triangles</label>
    <input id="rbHexagons" type="radio" name="gridType" checked />
    <label for="hexagons">Hexagons</label>
    <button id="btnSpin">Spin</button>
    <button id="btnMove">Move</button>
  </div>
  <div style="margin-top:20px">
    <svg id="svg" width="400" height="400" xmlns="http://www.w3.org/2000/svg">
      <defs>
        <radialGradient id="radialBlueGradient">
          <stop offset="0%" stop-color="blue" />
          <stop offset="100%" stop-color="white" />
        </radialGradient>
        <radialGradient id="radialRedGradient">
          <stop offset="0%" stop-color="red" />
          <stop offset="100%" stop-color="white" />
        </radialGradient>
        <pattern id="largeGrid" width="80" height="80" patternUnits="userSpaceOnUse">
          <path id="gridPath" d="M 0 0" fill="none" stroke="gray" />
        </pattern>
      </defs>
      <g id="surface" transform="translate(0, 0)" x="0" y="0" width="400" height="400">
        <rect id="grid" width="0" height="0" fill="url(#largeGrid)" />
      </g>
      <g id="objectGroup">
      </g>
    </svg>
  </div>
</body>
</html>
svg 元素包含一个 defs 部分,该部分定义了两个径向渐变和一个用于网格瓦片的 pattern 元素。由 d 属性表示的路径是程序化确定的,这就是为什么在 HTML 中,它只是 M 0 0。有关路径的教程,请参阅:路径 - SVG:可缩放矢量图形 | MDN (mozilla.org)
此外,还有两个 g 元素。g 元素只是一个用于分组 SVG 元素的容器,以便可以将转换(例如平移、旋转、缩放等)应用于组中的所有元素。在此演示应用程序中,表面表示为一个具有重复填充的“组”,由图案定义 largeGrid 确定。第二个 g 元素是添加固定和可移动对象的位置。请注意,对象的渲染由它们的顺序决定——没有 z 轴控制。如果想在渲染顺序中向上或向下移动元素,则必须直接操作元素顺序。
有关 SVG 元素的完整列表,请参阅SVG 元素参考 - SVG:可缩放矢量图形 | MDN (mozilla.org)。
基本应用程序启动
程序在 HTML 脚本中指定的 AppConfig 模块中开始,实例化 App 对象并执行 run 方法。
import { App } from "./App"

require(['App'],
  () => {
    const appMain = new App();
    appMain.run();
  }
);
App 类非常简单
import { Controllers } from "./Controllers/Controllers";

export class App {

  public run() {
    Controllers.appController.init();
    Controllers.appController.selectHexagons();
    Controllers.appController.createObjects();
  }
}
此类别使用一个名为 Controllers 的容器
import { AppController } from "./AppController"
import { MouseController } from "./MouseController";

export class Controllers {
  public static appController = new AppController();
  public static mouseController = new MouseController();
}
Controllers 类由其他控制器用于跨控制器访问方法。
SVG 控制器
主要工作在控制器中执行。我们将从 SVG 控制器开始。
SvgElementController
SvgElementController 是所有控制器的 abstract 基类,维护状态信息并提供几个有用的方法。
import { Constants } from "../Constants";

// Do not reference object or surface controllers here, as this creates a circular
// dependency and you get TypeError: Class extends value undefined is not a function
// or null
// type SvgInHtml = HTMLElement & SVGElement;

export abstract class SvgElementController {
  public elementID = "";
  public scale = "";
  public rotate = "";
  public x = 0;
  public y = 0;
  public w = 0;
  public r = 0;
  public h = 0;

  // These four properties are used by the surface.
  public dx = 0;
  public dy = 0;
  public tx = 0;
  public ty = 0;

  public isDragging = false;

  abstract update(e: MouseEvent);
  abstract translate();
  abstract set(e: MouseEvent);
  abstract onMouseLeave();
  abstract init(el: HTMLElement);

  public stopDrag(): void {
    this.isDragging = false;
  }

  public static createElement(name: string, attributes: {}, id?: string): HTMLElement {
    const el = this.intCreateElement(name, attributes, id) as HTMLElement;
    const svgObjects = document.getElementById(Constants.SVG_OBJECTS);
    svgObjects.appendChild(el);

    return el;
  }

  private static intCreateElement(elementName, attributes, id?: string) {
    const eid = id ?? this.uuidv4();
    var el = document.createElementNS(Constants.SVG_NS, elementName);

    // Create a unique ID for the element so we can acquire the correct shape controller
    // when the user drags the shape, or use the provided ID which the caller
    // guarantees as unique.
    el.setAttributeNS(null, "id", eid);

    // Add the attributes to the element.
    Object.entries(attributes).map(([key, val]) => {
      if (key == "href") {
        el.setAttributeNS("http://www.w3.org/1999/xlink", key, val as string);
      } else {
        el.setAttributeNS(null, key, val as string);
      }
    });

    return el;
  }

  // From SO:
  //<a href="https://stackoverflow.com/questions/105034/create-guid-uuid-in-javascript">
  //https://stackoverflow.com/questions/105034/create-guid-uuid-in-javascript</a>
  private static uuidv4(): string {
    return (1e7.toString() + -1e3.toString() + -4e3.toString() +
           -8e3.toString() + -1e11.toString()).replace(/[018]/g,
      c => (c as any ^ crypto.getRandomValues(new Uint8Array(1))[0] & 15 >>
          (c as any) / 4).toString(16))
  }
}
这里有用的方法是 static 方法 createElement,我们将在演示中看到它用于创建各种 SVG 元素。它封装了一个内部方法 intCreateElement,该方法负责以编程方式创建具有调用者指定属性的 HTML 元素。
请注意,创建元素会分配一个唯一的 GUID 作为元素 ID,除非由调用者指定
const eid = id ?? this.uuidv4();
此唯一 ID 对于获取与 SVG 元素关联的控制器至关重要。
SurfaceController
表面控制器负责在用户移动表面时平移表面。这里的概念是包含表面的矩形延伸到可见区域之外,以便可以对网格宽度和高度执行平移模数,从而产生表面在所有方向上无限延伸的错觉。
import { Constants } from "../Constants";
import { Controllers } from "./Controllers";
import { SvgElementController } from "./SvgElementController";

export class SurfaceController extends SvgElementController {
  public init(el: HTMLElement): void { }

  public update(e: MouseEvent): void {
    this.dx = e.clientX - this.x;
    this.dy = e.clientY - this.y;
    this.x = e.clientX;
    this.y = e.clientY;
  }

  public set(e: MouseEvent): void {
    this.x = e.clientX;
    this.y = e.clientY;
  }

  public translate(): void {
    this.tx += this.dx;
    this.ty += this.dy;
    const dxa = this.tx % Controllers.appController.gridCellW;
    const dya = this.ty % Controllers.appController.gridCellH;

    const svgSurface = document.getElementById(Constants.SVG_SURFACE_ID)
                      as any as SVGElement;
    svgSurface.setAttribute("transform", `translate(${dxa},${dya})`);

    const svgObjects = document.getElementById(Constants.SVG_OBJECTS);
    svgObjects.setAttribute("transform", `translate(${this.tx},${this.ty})`);
  }

  public onMouseLeave(): void {
    Controllers.appController.getController(this.elementID).isDragging = false;
  }
}
我们在这里看到了模数运算
const dxa = this.tx % Controllers.appController.gridCellW;
const dya = this.ty % Controllers.appController.gridCellH;
我们注意到 translate 方法通过模数 dxa, dya 更新表面
const svgSurface = document.getElementById(Constants.SVG_SURFACE_ID) as any as SVGElement;
svgSurface.setAttribute("transform", `translate(${dxa},${dya})`);
以及表面上的对象,通过绝对坐标变换 tx, ty
const svgObjects = document.getElementById(Constants.SVG_OBJECTS);
svgObjects.setAttribute("transform", `translate(${this.tx},${this.ty})`);
因此,表面网格显示为无限,并且对象根据网格的绝对坐标进行平移。
每个 SVG 元素都有机会根据其要求处理鼠标事件。例如,圆使用属性 cx, cy,路径需要平移来移动对象,而不是设置绝对 x, y 坐标。
FixedObjectController
FixedObjectController 是一个派生类,用于用户无法移动的对象,例如绿色六边形和两个“星星”

这里的重点是,当用户点击其中一个对象时,鼠标移动事件发生在该对象上,而不是表面上。因为我们不想改变固定对象的位置,所以我们通过将鼠标事件调用传递给表面控制器来拖动表面。
import { Constants } from "../Constants";
import { Controllers } from "./Controllers";
import { SvgElementController } from "./SvgElementController";

// Dragging a fixed object is like dragging the surface,
// so route all methods to the surface controller.
export class FixedObjectController extends SvgElementController {
  public init(el: HTMLElement): void { }

  public update(e: MouseEvent): void {
    const ctrl = Controllers.appController.getController(Constants.SVG_SURFACE_ID);
    ctrl.update(e);
  }

  public set(e: MouseEvent): void {
    const ctrl = Controllers.appController.getController(Constants.SVG_SURFACE_ID);
    ctrl.set(e);
  }

  public translate(): void {
    const ctrl = Controllers.appController.getController(Constants.SVG_SURFACE_ID);
    ctrl.translate();
  }

  public onMouseLeave(): void {
    const ctrl = Controllers.appController.getController(Constants.SVG_SURFACE_ID);
    ctrl.onMouseLeave();
  }
}
CircleController
基本圆在演示中用作“星星”。因此,CircleController 只是 FixedObjectController 的一个实例,所以它所做的唯一事情就是用圆的 cx,cy 属性初始化我们的 x,y 属性。
import { FixedObjectController } from "./FixedObjectController";

// Because circles use cx,cy, not x,y
export class CircleController extends FixedObjectController {
  public init(el: HTMLElement): void {
    this.x = parseInt(el.getAttribute("cx")) - this.r / 2;
    this.y = parseInt(el.getAttribute("cy")) - this.r / 2;
    this.w = this.r;
    this.h = this.r;
  }

  // If it's not a fixed object.
  /*
  public update(e: MouseEvent): void {
    this.x += e.movementX;
    this.y += e.movementY;
  }

  public translate(): void {
    const svgObject = document.getElementById(this.elementID);
    svgObject.setAttribute("cx", this.x.toString());
    svgObject.setAttribute("cy", this.y.toString());
  }

  public onMouseLeave(): void {
    // If the user moves the mouse to fast, we will get a mouse leave on the object.
    // So we do nothing here.
  }
  */
}
如注释掉的代码所示,如果我们希望圆是可移动的,我们将包含附加代码来更新圆的物理位置并在我们的 x,y 属性和 cx,cy 属性之间进行转换。另请注意,x,y 坐标是从圆心及其半径计算的。
PathController
作为路径的对象,而不是例如 circle 或 rect 元素,必须进行平移,因为它们没有 x,y 坐标。
import { SvgElementController } from "./SvgElementController";

// Because paths need to be translated.
export class PathController extends SvgElementController {
  public init(el: HTMLElement): void {
    this.x = parseInt(el.getAttribute("x"));
    this.y = parseInt(el.getAttribute("y"));
  }

  public set(e: MouseEvent) { }

  public update(e: MouseEvent): void {
    this.x += e.movementX;
    this.y += e.movementY;
  }

  public translate(): void {
    const svgObject = document.getElementById(this.elementID);
    svgObject.setAttribute("transform",
             `translate(${this.x},${this.y}) ${this.scale} ${this.rotate}`);
  }

  public onMouseLeave(): void {
    // If the user moves the mouse to fast, we will get a mouse leave on the object.
    // So we do nothing here.
  }
}
MouseController
MouseController 处理表面和所有对象的鼠标事件。
import { Controllers } from "./Controllers";

export class MouseController {
  public wireUpEvents(elName: string) {
    const svgElement = document.getElementById(elName);
    svgElement.addEventListener("mousedown", e => this.mouseDown(e, svgElement));
    svgElement.addEventListener("mouseup", e => this.mouseUp(e, svgElement));
    svgElement.addEventListener("mousemove", e => this.mouseMove(e, svgElement));
    svgElement.addEventListener("mouseleave", e => this.mouseLeave(e, svgElement));
  }

  public mouseDown(e: MouseEvent, el: HTMLElement): void {
    e.preventDefault();
    Controllers.appController.getActualController
               (e.clientX, e.clientY, el.id).isDragging = true;
  }

  public mouseUp(e: MouseEvent, el: HTMLElement): void {
    e.preventDefault();
    Controllers.appController.clearDraggingForAllObjects();
  }

  public mouseLeave(e: MouseEvent, el: HTMLElement): void {
    e.preventDefault();
    Controllers.appController.getActualController
               (e.clientX, e.clientY, el.id).onMouseLeave();
  }

  public mouseMove(e: MouseEvent, el: HTMLElement): void {
    e.preventDefault();

    // This handles dragging an object when the user moves the mouse to fast
    // and the mouseMove events start coming in on the surface not the object.
    const controller = Controllers.appController.getObjectBeingDragged(el);

    if (controller.isDragging) {
      controller.update(e);
      controller.translate();
    } else {
      // Update our current mouse (x, y)
      // so the grid doesn't jump when we start dragging.
      controller.set(e);
    }
  }
}
这里的“技巧”是处理用户拖动可移动对象并快速移动鼠标以致鼠标指针离开对象的情况。在这种情况下,鼠标移动事件开始在表面或可能在另一个对象上触发!这实际上是在 AppController 中解决的,因为 AppController 维护对象列表,我们在这里看到
const controller = Controllers.appController.getObjectBeingDragged(el);
预告一下,AppController 所做的是返回正在拖动的对象,或者如果没有对象正在拖动,则返回当前与接收鼠标鼠标事件的 HTML 元素关联的控制器实例
public getObjectBeingDragged(el: HTMLElement): SvgElementController {
  // Return the controller being dragged, and if nothing is being dragged,
  // return the element's controller.
  const controller = Object.entries(this.objects).find
                    (([key, val]) => val.isDragging)?.[1]
                     ?? Controllers.appController.getController(el.id);

  return controller;
}
请注意,鼠标控制器将如何处理鼠标离开和鼠标移动留给每个对象控制器来决定
controller.update(e);
controller.translate();
这允许对象控制器处理不同的 SVG 元素以及它们的移动方式。
另请注意闭包的乐趣,它允许我们将 SVG 元素传递给处理程序
const svgElement = document.getElementById(elName);
svgElement.addEventListener("mousedown", e => this.mouseDown(e, svgElement));
从技术上讲,我可以将控制器传递给 wireUpEvents,并在将来为此重构代码,因为它可以避免处理程序中的 getController 调用。
带孔对象
这里需要解决的另一个问题是,当对象的路径有“孔”导致鼠标按下(和其他事件)在表面而不是对象上触发时,点击的是哪个对象?这由调用处理
Controllers.appController.getActualController(e.clientX, e.clientY, el.id)
此调用根据其尺寸定位对象,考虑对象和表面变换,并在 AppController 部分详细描述。
AppController
AppController 有点像一个杂物袋,对于不仅仅是演示的东西来说,它会更像一个厨房水槽。它的主要目的是管理对象列表,包括表面
type uuid = string;

export interface IObjectInfoMap {
  [key: uuid]: SvgElementController;
}

export class AppController {
  public gridCellW = 80;
  public gridCellH = 160;
  public objects: IObjectInfoMap = {};

  public init() {
    this.registerSvgElementController(Constants.SVG_SURFACE_ID, new SurfaceController());
    Controllers.mouseController.wireUpEvents(Constants.SVG_SURFACE_ID);
    this.wireUpUIButtons();
  }

  public getController(name: string): SvgElementController {
    return this.objects[name];
  }

  public getActualController
        (mx: number, my: number, name: string): SvgElementController {
    let ctrl = this.objects[name];
    const sfc = this.getController(Constants.SVG_SURFACE_ID);

    // If the coordinate is contained within a non-surface object, return it instead.
    let obj = Object.entries(this.objects).filter
    (([key, val]) => key !== Constants.SVG_SURFACE_ID).find(([key, val]) =>
    val.x + sfc.tx + val.tx <= mx &&
    val.x + sfc.tx + val.tx + val.w >= mx &&
    val.y + sfc.ty + val.ty <= my &&
    val.y + sfc.ty + val.ty + val.h >= my);

    return obj?.[1] ?? ctrl;
  }

  public registerSvgElementController
 (name: string, svgController: SvgElementController): SvgElementController {
    svgController.elementID = name;
    this.objects[name] = svgController;

    return svgController;
  }

  public clearDraggingForAllObjects(): void {
    Object.entries(this.objects).forEach(([key, val]) => val.stopDrag());
  }

  public getObjectBeingDragged(el: HTMLElement): SvgElementController {
    // Return the controller being dragged, and if nothing is being dragged,
    // return the element's controller.
    const controller = Object.entries(this.objects).find
   (([key, val]) => val.isDragging)?.[1] ??
   Controllers.appController.getController(el.id);

    return controller;
  }
请注意 getActualController,它根据发生鼠标按下的元素的名称确定对象控制器,并且由于路径中的“孔”可以被覆盖,具体取决于其扩展在鼠标按下坐标内的对象。
但它还做了一些其他事情,例如初始化表面控制器及其鼠标事件
this.registerSvgElementController(Constants.SVG_SURFACE_ID, new SurfaceController());
Controllers.mouseController.wireUpEvents(Constants.SVG_SURFACE_ID);
连接 UI 按钮
public wireUpUIButtons(): void {
  document.getElementById("rbSquares").addEventListener
  ("click", _ => this.selectSquares());
  document.getElementById("rbTriangles").addEventListener
          ("click", _ => this.selectTriangles());
  document.getElementById("rbHexagons").addEventListener
          ("click", _ => this.selectHexagons());

  document.getElementById("btnSpin").addEventListener("click", _ => this.spin());
  document.getElementById("btnMove").addEventListener("click", _ => this.move());
}
初始化不同的网格路径和属性需要根据对象的尺寸设置水平和垂直溢出。例如,正方形是 80x80,因此实际绘图区域的 x,y 必须是 -80,-80,尺寸是对象的宽度 * 2 + 观察器宽度,即 80 * 2 + 400 = 560。
const elg = document.getElementById("largeGrid");
elg.setAttribute("width", "80");
elg.setAttribute("height", "80");

const elsg = document.getElementById("grid");
elsg.setAttribute("x", "-80");
elsg.setAttribute("y", "-80");
elsg.setAttribute("width", "560");
elsg.setAttribute("height", "560");
正方形

public selectSquares(): void {
  this.clearChildren();
  const elgp = document.getElementById("gridPath");
  elgp.setAttribute("d", "M 0 0 H 80 V 80");
  elgp.setAttribute("stroke-width", "2");

  const elg = document.getElementById("largeGrid");
  elg.setAttribute("width", "80");
  elg.setAttribute("height", "80");

  const elsg = document.getElementById("grid");
  elsg.setAttribute("x", "-80");
  elsg.setAttribute("y", "-160");
  elsg.setAttribute("width", "560");
  elsg.setAttribute("height", "660");

  this.gridCellW = 80;
}
有趣的是,要渲染一个正方形网格,路径只指定顶部和右侧边缘

依靠重复填充来提供左侧和底部边缘。
三角形
三角形有点奇怪——路径实际上描述了两个三角形,因此高度是 160。指向上方的三角形是 M 40,0 L 80,80 L 0,80 z

指向下方的三角形,添加 M 80,80 L 40,160 L 0 80

以及将下方三角形与上方三角形连接所需的水平线,添加 M 0,159 L 80,159,结果是

public selectTriangles(): void {
  this.clearChildren();
  const elgp = document.getElementById("gridPath");
  elgp.setAttribute("d", "M 40,0 L 80,80 L 0,80 z M 80,
                    80 L 40,160 L 0 80 M 0,159 L 80,159");
  elgp.setAttribute("stroke-width", "1");

  const elg = document.getElementById("largeGrid");
  elg.setAttribute("width", "80");
  elg.setAttribute("height", "160");

  const elsg = document.getElementById("grid");
  elsg.setAttribute("x", "-80");
  elsg.setAttribute("y", "-160");
  elsg.setAttribute("width", "640");
  elsg.setAttribute("height", "720");

  this.gridCellW = 80;
  this.gridCellH = 160;
}
六边形
六边形也很有趣,因为我们需要一条连接线来填充“空隙”以模拟未实际绘制的六边形。因此,仅使用六边形路径 M 0 40 L 22.5 0 L 67.5 0 L 90 40 L 67.5 80 L 22.5 80 Z,我们看到

这需要添加连接线:M 90,40 130,40,因此渲染的形状实际宽度为 130。

public selectHexagons(): void {
  const elgp = document.getElementById("gridPath");
  elgp.setAttribute
  ("d", "M 0 40 L 22.5 0 L 67.5 0 L 90 40 L 67.5 80 L 22.5 80 Z M 90,40 130,40");
  elgp.setAttribute("stroke-width", "1");

  const elg = document.getElementById("largeGrid");
  elg.setAttribute("width", "130");
  elg.setAttribute("height", "80");

  const elsg = document.getElementById("grid");
  elsg.setAttribute("x", "-130");
  elsg.setAttribute("y", "-80");
  elsg.setAttribute("width", "660");
  elsg.setAttribute("height", "560");

  this.gridCellW = 130;
  this.gridCellH = 80;

  this.createObjects();
}
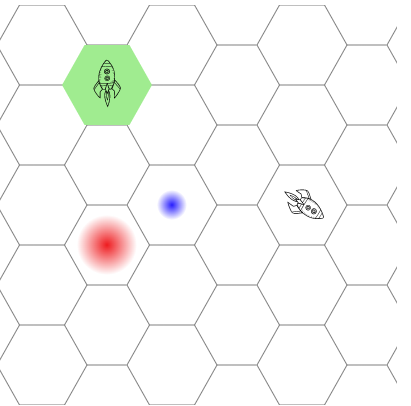
创建放置在六边形网格上的对象(仅用于此演示的目的)
public createObjects() {
  let hcoord = this.hexCoord(1, 0);
  this.createFilledHexagon(hcoord[0], hcoord[1], "lightgreen");

  hcoord = this.hexCoord(7, 3);
  this.createBorderHexagon(hcoord[0], hcoord[1], "red", 5);
  hcoord = this.hexCoord(8, 4);
  this.createBorderHexagon(hcoord[0], hcoord[1], "red", 5);
  hcoord = this.hexCoord(9, 3);
  this.createBorderHexagon(hcoord[0], hcoord[1], "red", 5);

  this.createStar(175, 200, 15, "radialBlueGradient");
  this.createStar(110, 240, 30, "radialRedGradient");

  // Moveable objects.
  this.createSpaceship(92, 62, 45, "spinningShip");
  this.createSpaceship(287, 182, 170, "movingShip");
}
创建对象
AppController 还封装了创建四种对象的方法。
一颗星星

private createStar(x: number, y: number, r: number, gradient: string):
                  SvgElementController {
  const el = SvgElementController.createElement("circle", { r: `${r}`,
  fill: `url(#${gradient})`, stroke: "none", "stroke-width": 1, cx: `${x}`, cy: `${y}` });
  const ctrl = Controllers.appController.registerSvgElementController
              (el.id, new CircleController());
  ctrl.init(el);
  Controllers.mouseController.wireUpEvents(el.id);

  return ctrl;
}
一个填充的六边形

private createFilledHexagon(x: number, y: number, color: string): SvgElementController {
  const el = SvgElementController.createElement("path",
  { d: "M 0 40 L 22.5 0 L 67.5 0 L 90 40 L 67.5 80 L 22.5 80 Z",
  stroke: "none", "stroke-width": 1, fill: `${color}`, width: "130", height: "80" });
  el.setAttribute("transform", `translate(${x},${y})`);
  const ctrl = Controllers.appController.registerSvgElementController
              (el.id, new FixedObjectController());
  ctrl.init(el);
  Controllers.mouseController.wireUpEvents(el.id);

  return ctrl;
}
一个带轮廓的六边形

private createOutlinedHexagon(x: number, y: number, color: string, sw: number):
  SvgElementController {
  const el = SvgElementController.createElement("path",
  { d: "M 0 40 L 22.5 0 L 67.5 0 L 90 40 L 67.5 80 L 22.5 80 Z",
   stroke: `${color}`, "stroke-width": `${sw}`, fill: `none`,
   width: "130", height: "80" });
  el.setAttribute("transform", `translate(${x},${y})`);
  const ctrl = Controllers.appController.registerSvgElementController
              (el.id, new FixedObjectController());
  ctrl.init(el);
  Controllers.mouseController.wireUpEvents(el.id);

  return ctrl;
}
奇怪的是,虽然 hexCoord 方法应该给我们网格上六边形的精确位置
private hexCoord(x: number, y: number): [number, number] {
  const hx = x * 65;
  const hy = y * 80 + (x % 2 * 40);

  return [hx, hy];
}
如果我将描边宽度设置为 1,我们会看到叠加的六边形不完全匹配

这很烦人,我无法很好地解释为什么填充过程不会导致精确的坐标匹配。
一艘飞船

此 SVG 已裁剪,因为它很大。此 SVG 的参考来自 https://freesvg.org/simple-spaceship-vector-image。
// https://freesvg.org/simple-spaceship-vector-image
private createSpaceship
        (x: number, y: number, r: number, id: string): SvgElementController {
  const el = SvgElementController.createElement(
    "path",
    { d: "m1378 1340.5 etc..." },
    id);
  el.setAttribute("transform",
                 `translate(${x},${y}) scale(0.025) rotate(${r}, 750, 700)`);
  const ctrl = Controllers.appController.registerSvgElementController
              (el.id, new PathController());
  ctrl.init(el);

  // Because these aren't part of the path attributes.
  ctrl.x = x;
  ctrl.y = y;

  // Magic numbers.
  ctrl.w = 48;
  ctrl.h = 48;
  ctrl.tx = 6;
  ctrl.ty = 41;

  ctrl.scale = "scale(0.025)";
  ctrl.rotate = `rotate(${r}, 750, 700)`;
  Controllers.mouseController.wireUpEvents(el.id);

  return ctrl;
飞船动画
用户可以旋转其中一艘飞船
private spin(): void {
  const spinningShip = this.getController("spinningShip");

  var animate = new Interval(5, () => {
    const r = (animate.counter + 45) % 360;
    spinningShip.rotate = `rotate(${r}, 750, 700)`;
    spinningShip.translate();
  }, 360).start();
}
用户可以点击移动按钮,这将平移表面和飞船,使其穿过“敌方领土”
private move(): void {
  const movingShip = this.getController("movingShip");

  new Interval(20, () => {
    const sfc = Controllers.appController.getController(Constants.SVG_SURFACE_ID);
    sfc.dx = -1;
    sfc.dy = -0.5;

    ++movingShip.x;
    movingShip.y += 0.63;

    sfc.translate();
    movingShip.translate();
  }, 320).start();
}
开始
结束(右下方)

使用 Interval 类进行动画
Interval 类是 setInterval JavaScript 函数的简单包装器,用于执行回调。在我们的例子中,回调执行一些简单的动画——旋转其中一艘飞船 360 度,并让另一艘飞船穿过“敌方领土”。
export class Interval {
  public counter = 0;
  private id: number;
  private ms: number;
  private callback: () => void;
  private stopCount?: number;

  constructor(ms: number, callback: () => void, stopCount?: number) {
    this.ms = ms;
    this.callback = callback;
    this.stopCount = stopCount;
  }

  public start(): Interval {
    this.id = setInterval(() => {
      ++this.counter;
      this.callback();

      if (this.stopCount && this.stopCount == this.counter) {
        this.stop();
      }
    }, this.ms);

    return this;
  }

  public stop(): Interval {
    clearInterval(this.id);

    return this;
  }
}
动画是通过编程方式完成的,而不是使用 animate SVG 元素。使用代码比操作 DOM 来添加和删除 animate 元素更简单。更重要的是,就像这里的情况一样,我们经常需要更新对象的状态,例如它在网格上的位置。
结论
我们得到了
- 一个无限的表面
- 固定位置对象
- 可拖动对象
- 动画
- 方格、三角形和六边形网格
有一些重构活动需要考虑,当然,还有更多有趣的工作可以将其制作成一个用于基于网格的游戏的库!
历史
- 2023 年 1 月 29 日:初始版本