
将 Python 应用程序嵌入 Gidon C# 插件框架
5.00/5 (10投票s)
如何在 C# 程序中显示 Python 图形。
引言
Python 的优势
最近,我一直在大量使用 Python。在我看来,Python 是一种非常适合个人科学家和开发人员的语言。它可能拥有比任何其他语言或包更多的内置科学和绘图库,而且大多数广泛使用的 Python 库都是免费的。
Python 被认为非常简单,科学家们喜欢这一点,因为他们想专注于自己的专业领域,而不是花费大量时间学习一门软件语言。
Python 的另一个巨大优势是它是跨平台的,并且在 Windows、Linux 和 MacOS 上运行完全相同。
Python 拥有出色的交互式环境,允许在构建和调整 Python 程序时试验软件和数据。
Python 是一种解释型语言,无需编译。
Python 的缺点
总的来说,Python 是一种解释型语言,因此速度相当慢。有一些 Python 版本是编译过的,运行速度快得多,但很少有人使用它们。我猜想对于这些版本来说,编译时间随着编译代码性能的提高而变得越来越麻烦。
由于 Python 缺乏强类型,其智能感知类似于 JavaScript,远不如 C# 或 Java 等强类型语言。因此,Python 库可能更难学习。
如上所述,Python 是个人开发的绝佳语言,尽管它在团队开发、插件和关注点分离方面能力不足。
使用 C# Avalonia Gidon 插件框架托管 Python 应用程序
Gidon MVVM 插件框架已在 Gidon - Avalonia 基于 MVVM 的插件 IoC 容器 中进行了描述。在那篇文章中,我介绍了一种创建动态加载的 C# 插件的方法。
最近,我为 Gidon 添加了托管作为独立 Python 进程运行的 Python 窗口的功能。
Python 窗口通过使用 Gidon 的一部分——跨平台 Avalonia UniDock 窗口停靠框架——嵌入到 C# 中。因此,Python 窗口可以相互停靠或选项卡化,或者拖入独立的浮动窗口。
各种 Python 和 C# 进程之间的通信通过 RelayServer 进行,该服务器在 具有关注点分离的发布/订阅 gRPC 中继服务器 中进行了描述,并由托管主 Avalonia 窗口的 C# 进程运行。
这是 Gidon 示例及其三个嵌入的 Python 窗口的样子
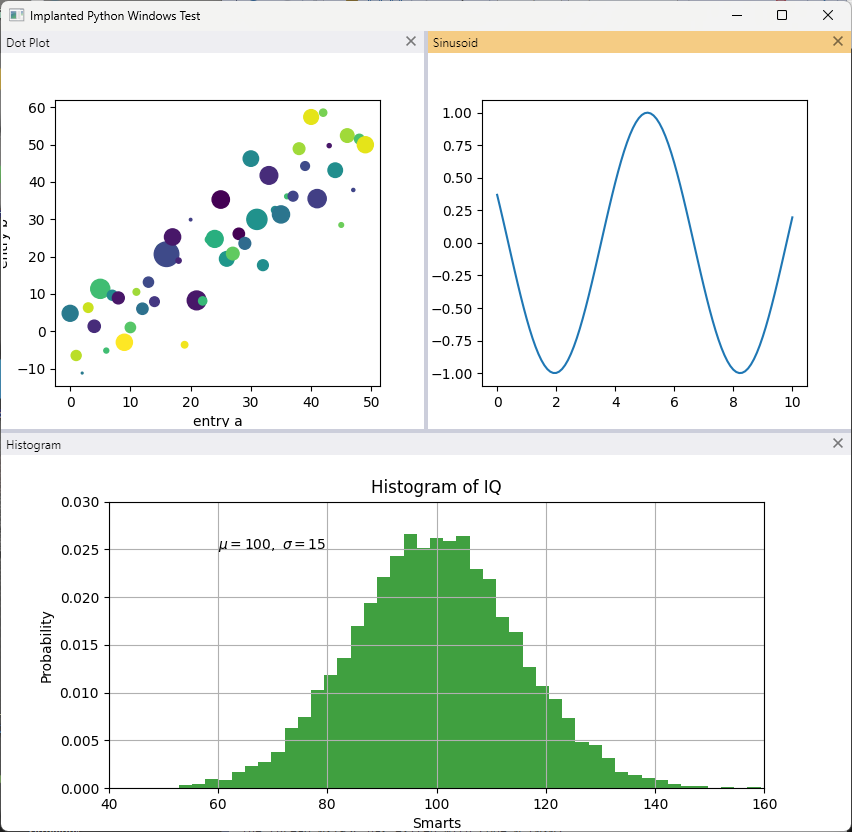
此示例的代码将在下面详细描述。
绘图的 Python 代码取自 matplotlib 教程,并添加了 PySide6 代码,以使它们成为独立的窗口。
可以利用 Python 图的标题栏来重新排列它们,将其中一些拖出成为独立的浮动窗口或将它们选项卡化,例如

在上图中,直方图与点图选项卡化在一起,而正弦波则停靠在它们旁边。
文章中使用的软件
在 C# 端,开源的 Gidon MVVM 插件包 现在包含了嵌入 Python 窗口所需的所有其他功能。
作为 Gidon 的一部分,我使用 Avalonia - WPF 的开源 C# 跨平台版本来创建 Shell 的 UI,Python 窗口将嵌入其中。
Gidon 窗口停靠功能由基于 Avalonia 的 UniDock 框架 提供支持。
对于单独的绘图,我使用 Python matplotlib 库以及 PySide6 Python UI 库。
对于不同进程之间的通信,我使用基于 Grpc 的 Relay Server(它已成为 Gidon 框架的一部分)。
示例代码位置
示例代码位于 NP.Avalonia.Demos 仓库的 Gidon/DockableAppsDemo 文件夹下。
Visual Studio 解决方案文件(包含 C# 和 Python 代码)位于 Gidon/DockableAppsDemo/DockableAppImplantsDemo 文件夹下,路径为 DockableAppImplantsDemo.sln。
在 Windows 上运行示例代码
必备组件
要在 Windows 上运行示例代码,您需要具备以下先决条件:
- Visual Studio 2022,具有 Python 功能。我使用的是专业版(不确定社区版是否有效,但很可能有效)。
- 您应该在 Windows 计算机上安装最新的 Python3 和 Pip3 版本(Python 的 Pip 用于安装 Python 包 - 类似于 C# 的 nuget)。
- 您应该具备可用的互联网连接,用于安装 C# 和 Python 包。
示例代码结构
示例代码由一个主要的 C# 项目 - DockableAppImplantsDemo - 和Apps 解决方案文件夹下的四个 Python 项目组成:
CommonPythonDotPyMatPlotHistogramPlotSinusoidPyMatPlot

如果您想使用 Python 虚拟环境,则需要 CommonPython 项目,如下文所述。
其余的 Python 项目与示例中的各个绘图一一对应。
在您的 Windows 机器上的主 Python 环境中运行示例(不使用 Python 虚拟环境)
使用主 Python 环境运行示例(而不是创建特殊的虚拟环境)更简单,但它会将一些 Python 包添加到您的主 Python 环境中。
因此,如果您想保持主 Python 环境不变,请跳过此小节,然后查看下一节,其中解释了如何创建虚拟 Python 环境并将其用于示例。
由于您使用的是主 Python 环境,请为每个 Python 项目选择它(如果您只有一个环境,Visual Studio 应该已经为您完成了)。

在其中一个项目(例如 DotPyMatPlot)中,右键单击主环境,然后选择“从 requirements.txt 安装”选项。

由于每个项目中的 requirements.txt 文件都相同,并且您正在更新同一个全局可用的环境,因此选择哪个项目并不重要。
这是任一 requirement.txt 文件的内容,列出了运行 Python 示例所需的所有包:
cycler==0.11.0
grpcio==1.51.3
kiwisolver==1.4.4
matplotlib==3.7.0
NP.Grpc.PythonMessages==0.99.2
NP.Grpc.PythonRelayInterfaces==0.99.2
numpy==1.24.2
packaging==23.0
Pillow==9.4.0
pip==22.3.1
protobuf==4.22.0
pyparsing==3.0.9
PySide6==6.4.2
PySide6-Addons==6.4.2
PySide6-Essentials==6.4.2
python-dateutil==2.8.2
setuptools==65.5.0
shiboken6==6.4.2
six==1.16.0
关键包是:
matplotlib- 用于创建绘图numpy- 用于计算绘图数据PySide6- 用于构建 UI 窗口(如果需要,还可以添加按钮和其他通用 UI 控件)NP.Grpc.PythonRelayInterfaces- 用于与 RelayServer 进行通用通信机制NP.Grpc.PythonMessages- 用于携带窗口句柄到 Relay Server 的特定WindowInfo消息
安装 Python 包后,可以通过右键单击 DotPyMatPlot 并选择“调试”->“启动新实例”来检查各个 Python 项目是否运行。

包含相应绘图的 Python 应用程序应该会弹出。

Python 应用程序检测到它是独立的(由于缺少命令行参数),并且不会尝试调用 Relay Server,而 Relay Server 是 C# 项目的一部分,在仅启动 Python 项目时未运行。
终止 Python 程序(如果仍在运行)。
右键单击主项目 DockableAppImplantsDemo,然后选择“重新生成”。
等待生成成功,然后运行主项目。
现在您可以拖出、停靠和选项卡化绘图,以不同的顺序进行操作。
使用 Python 项目的虚拟环境
如果您不想修改主 Python 环境,仍然可以在 CommonPython 项目中创建一个名为 env 的虚拟环境,激活它,将 requirements.txt 中的包安装到其中,所有 Python 项目都会通过 env 名称拾取它。
请注意,您必须创建一个名为 env 的特定虚拟环境,否则预定义的搜索路径将不起作用。如果您已经有一个全局可用的 env 环境并且不想更改它,您可以创建不同名称的虚拟环境,然后修改所有 Python 项目的搜索路径,例如:

您还需要稍微修改每个项目的代码 - 特别是以下行:
sys.path.append(r'..\CommonPython\env\Lib\site-packages')
必须修改以指向正确的环境路径。
要创建 CommonPython 项目下的新环境,请右键单击其“Python 环境”,然后选择“添加环境”。

在打开的对话框中,单击“在 Python 环境窗口中查看”,然后单击“创建”按钮。

您可能需要等待几秒钟,环境才会出现在项目的“Python 环境”下。右键单击它,然后选择“激活环境”。

新环境应自动从 requirements.txt 填充。展开它以检查其包内容,如果未填充 - 右键单击它并选择“从 requirements.txt 安装”。
现在,您可以单独测试 Python 项目,然后生成并启动主 C# 项目 DockableAppImplantsDemo,如前一小节所述。
代码说明
在此,我将解释允许将 Python 应用嵌入 C# Shell 的 C# 和 Python 代码。
主 C# 项目 DockableAppImplantsDemo 的代码
示例的主 C# 项目依赖于四个 nuget 包:
NP.Avalonia.Gidon- 主要依赖项NP.Grpc.RelayClient-RelayServer客户端的实现NP.Grpc.RelayServer-RelayServer的实现XamlNameReferenceGenerator- 用于解析 XAML 代码的 Avalonia 文件
在上述项目中,NP.Grpc.RelayClient 和 NP.Grpc.RelayServer 作为插件安装(如创建和安装作为 Nuget 包的插件中所述)。这意味着它们的实现代码对示例程序不可用,只有 NP.Avalonia.Gidon 包中的 NP.Grpc.CommonRelayInterfaces 提供的接口可用。
文件 App.axaml 包含(一如既往)对应用程序共享的通用样式的引用。
<Application xmlns="https://github.com/avaloniaui"
             xmlns:x="http://schemas.microsoft.com/winfx/2006/xaml"
             x:Class="DockableAppImplantsDemo.App">
    <Application.Styles>
		<StyleInclude Source="avares://Avalonia.Themes.Default/Accents/BaseLight.xaml"/>
		<StyleInclude Source="avares://Avalonia.Themes.Default/DefaultTheme.xaml"/>
		<StyleInclude Source="avares://NP.Avalonia.Visuals/Themes/CustomWindowStyles.axaml"/>
		<StyleInclude Source="avares://NP.Avalonia.UniDock/Themes/DockStyles.axaml"/>
    </Application.Styles>
</Application>
App.axaml.cs 文件则更有趣,因为它定义了一种从 IoC 提供的插件构建 RelayServer 和 RelayClient 对象的方式。它还创建了 WindowHandleMatcher 对象,该对象观察来自 Python 程序的以下类型的对象:
public class WindowInfo
{
   long WindowHandle { get; }
   string UniqueWindowHostId { get; }
}
。WindowHandleMatcher 的引用包含在 MultiPlatformProcessInitInfoWithMatcher 对象中,该对象用于将具有正确句柄的窗口插入到其主机对象中(当我们将查看 MainWindow.axaml 文件时会解释)。
这是 App.axaml.cs 文件中记录的有趣部分:
public class App : Application
{
    // IoC Container
    private static IDependencyInjectionContainer<Enum> IoCContainer { get; }

    // IRelayServer (provided so that we could shut it down when the program shuts down)
    private static IRelayServer TheRelayServer { get; }

    // IRelayClient used for getting WindowHandles from the python windows
    // started in different processes
    private static IRelayClient TheRelayClient { get; }

    // Window handle matcher - matches the window handle with the unique
    // window host id
    public static WindowHandleMatcher TheWindowHandleMatcher { get; }

    static App()
    {
        // create the container builder
        IContainerBuilderWithMultiCells<Enum> containerBuilder =
                                              new ContainerBuilder<Enum>();

        // register a multicell that can container several different Enum values
        // corresponding to the various topics of the RelayServer.
        // Here we use only one topic - WindowInfoTopic the allows to publish
        // and subscribe object of WindowInfo type
        // (contained within NP.Gidon.Message package) that
        // provide the WindowHandle (of type long) and UniqueWindowHostId
        // (or type string)
        containerBuilder.RegisterMultiCell(typeof(Enum), IoCKeys.Topics);

        // provides an object for determining Grpc server host and port
        // (in our simple case they are hardcoded to "localhost"
        // and 5051 correspondingly)
        containerBuilder.RegisterType<IGrpcConfig, GrpcConfig>();

        // provides the topics MultiCell (only one topic WindowInfoTopic - in our case)
        containerBuilder.RegisterAttributedStaticFactoryMethodsFromClass
                         (typeof(MessagesTopicsGetter));

        // picks up the RelayServer and RelayClient implementations
        // as plugins from Plugins/Services folder
        containerBuilder.RegisterPluginsFromSubFolders("Plugins/Services");

        // builds the IoC Container
        IoCContainer = containerBuilder.Build();

        // gets a reference to the Relay Server from the container
        TheRelayServer = IoCContainer.Resolve<IRelayServer>();

        // gets a reference to the RelayClient from the container
        TheRelayClient = IoCContainer.Resolve<IRelayClient>();

        // gets the WindowHandleMatcher - an object that observes the
        // RelayServer from WindowInfo objects
        // and fires events matching the UniqueWindowHostId and the
        // WindowHandle every time
        // such objects arrive
        TheWindowHandleMatcher = new WindowHandleMatcher(TheRelayClient);
    }

    ...
}
然而,真正的核心内容位于 MainWindow.axaml 文件中。它定义了一个简单的 UniDock 组,其中包含三个 DockItems - 每个绘图一个。顶部有两个停靠项,底部有一个。
要了解更多关于 UniDock 框架的信息,请阅读 UniDock - 新的跨平台 UI 停靠框架。UniDock 强大功能。
每个 DockItems 的内容非常相似,只是用于调用不同的 Python 程序,因此我将只解释其中一个。
<np:DockItem Header="Dot Plot" DockId="DockPlot">
    <np:DockItemImplantedWindowHost x:Name="TheWindowHostContainer1"
                                    Margin="2"
                                    HorizontalAlignment="Stretch"
                                    VerticalAlignment="Stretch">
        <np:DockItemImplantedWindowHost.ProcessInitInfo>
            <np:MultiPlatformProcessInitInfoWithMatcher UniqueWindowHostId="DotPlot"
             TheWindowHandleMatcher="{x:Static local:App.TheWindowHandleMatcher}">
                <np:MultiPlatformProcessInitInfoWithMatcher.WindowsProcInitInfo>
                    <np:ProcessInitInfo ExePath="pythonw"
                     WorkingDir="../../../../Apps/DotPyMatPlot/" InsertIdx="1">
                        <np:ProcessInitInfo.Args>
                            <x:String>DotPyMatPlot.py</x:String>
                        </np:ProcessInitInfo.Args>
                    </np:ProcessInitInfo>
                </np:MultiPlatformProcessInitInfoWithMatcher.WindowsProcInitInfo>
                <np:MultiPlatformProcessInitInfoWithMatcher.LinuxProcInitInfo>
                    <np:ProcessInitInfo ExePath="python3"
                     WorkingDir="../../../../Apps/DotPyMatPlot/" InsertIdx="1">
                        <np:ProcessInitInfo.Args>
                            <x:String>DotPyMatPlot.py</x:String>
                        </np:ProcessInitInfo.Args>
                    </np:ProcessInitInfo>
                </np:MultiPlatformProcessInitInfoWithMatcher.LinuxProcInitInfo>
            </np:MultiPlatformProcessInitInfoWithMatcher>
        </np:DockItemImplantedWindowHost.ProcessInitInfo>
    </np:DockItemImplantedWindowHost>
</np:DockItem>
每个 DockItem 对象包含一个 DockItemImplantedWindowHost 类型的对象,该对象负责通过其 ProcessInitInfo 属性与 Relay Client 通信,该属性设置为包含 MultiPlatformProcessInitInfoWithMatcher 对象。后者包含 UniqueWindowHostId(应在应用程序中唯一)和一个 TheWindowHandleMatcher - 包含 WindowHandleMatcher 对象的引用。
它还具有几个属性,定义了如何在相应操作系统上启动进程。例如,WindowProcInitInfo 指定了如何在 Windows 上启动进程,而 LinuxProcInitInfo - 在 Linux 上。
例如,设置为:
<np:ProcessInitInfo ExePath="pythonw"
 WorkingDir="../../../../Apps/DotPyMatPlot/" InsertIdx="1">
    <np:ProcessInitInfo.Args>
        <x:String>DotPyMatPlot.py</x:String>
    </np:ProcessInitInfo.Args>
</np:ProcessInitInfo>
表示在 Windows 上启动 Python 进程的命令是 pythonw(这是一个可以启动无控制台的 Python 窗口的命令),启动 Python 进程的文件夹是 ../../../../Apps/DotPyMatPlot/,唯一窗口主机 ID 插入到索引 1,启动的 Python 程序是 DotPyMapPlot.py。
因此,启动 Python 进程的总行是:
pythonw ../../../../Apps/DotPyMatPlot/DotPyMatPlot.py DotPlot
其中 DotPlot 是当前 DockItem 的唯一窗口主机 ID。
请记住,与我们的 MultiPlatformProcessInitInfoWithMatcher 对象连接的 WindowHandleMatcher 的 static 实例会在 RelayServer(由 Python 进程发布到它)到达 WindowInfo 对象时触发一个事件。
MultiPlatformProcessInitInfoWithMatcher 对象将监视具有匹配 UniqueWindowHostId 属性的 WindowInfo 对象,当 such object 到达时,它将使用其 WindowHandle 属性将 Python 窗口插入到当前 DockItem 对象中。
Python 代码
所有三个 Python 项目都非常相似,因此,我将只描述其中一个 - DotPyMatPlog.py。
这是程序中记录的代码:
imports ...
class ApplicationWindow(QtWidgets.QMainWindow):
    def __init__(self):
        super().__init__()
        # create QWidget, its layout and canvas for the figure
        self._main = QtWidgets.QWidget()
        self.setCentralWidget(self._main)
        layout = QtWidgets.QVBoxLayout(self._main)
        layout.setContentsMargins(0,0,0,0)
        canvas = FigureCanvas()
        layout.addWidget(canvas)

        # generate data for the plot
        np.random.seed(19680801)
        data = {'a': np.arange(50),
                'c': np.random.randint(0, 50, 50),
                'd': np.random.randn(50)}
        data['b'] = data['a'] + 10 * np.random.randn(50)
        data['d'] = np.abs(data['d']) * 100
        #end generate data for the plot

        # create plot
        plt = canvas.figure.subplots()
        #paint the dots
        plt.scatter('a', 'b', c='c', s='d', data=data)

        #set the names of the axes of the plot
        plt.set_xlabel('entry a')
        plt.set_ylabel('entry b')

def main(argv):
    sys.path.append(r'..\CommonPython\env\Lib\site-packages')

    import Messages_pb2 as messages

    # Check whether there is already a running QApplication (e.g., if running
    # from an IDE).
    qapp = QtWidgets.QApplication.instance()
    if not qapp:
        qapp = QtWidgets.QApplication(sys.argv)

    #create and show the window
    app = ApplicationWindow()
    app.show()
    app.activateWindow()

    # get the handle of the window
    winhandle = int(app.winId())
    print(winhandle);

    # argument means that the Python program is started from the C# code
    if len(argv) > 0:
        app.unique_window_host_id = argv[0]; #unique window host id

        #create Relay Client
        broadcastingClient = BroadcastingRelayClient("localhost", 5051)

        # connect the relay client to the server
        broadcastingClient.connect_if_needed()

        # create the WindowInfo object containing the UniqueWindowHostId
        # and the WindowHandle
        winInfo = messages.WindowInfo(WindowHandle=winhandle,
                  UniqueWindowHostId=app.unique_window_host_id)

        #publish the WindowInfo object to the Relay Server
        broadcastingClient.broadcast_object(winInfo, "WindowInfoTopic", 1)

    app.raise_()
    qapp.exec()

if __name__ == "__main__":
    main(sys.argv[1:])
基本上,我们生成数据,然后在 QT 窗口中将其显示为(散点)图。
如果程序有命令行参数,我们假设它是 UniqueWindowHostId,连接到运行在“localhost:5051”的服务器,然后将 WindowInfo(包括 UniqueWindowHostId 和 WindowHandle)发布回服务器,我们通过调用 winhandle = int(app.winId()) 来确定 WindowHandle。
在 Linux 上运行示例(Ubuntu - fluxbox)
不幸的是,Linux 的 Gnome 环境在窗口嵌入方面给我们带来了麻烦。这是我正在 Avalonia 和我自己之间解决的问题。因此,目前,我只能在 fluxbox 上运行嵌入式应用程序。
首先,您需要在 Linux 上安装 dotnet 6.0、python3、pip3 和 python3-tk(用于 PySide6)。以下是在 Ubuntu 上安装它们的命令:
sudo apt-get install -y dotnet-sdk-6.0
sudo apt install python3
sudo apt install python3-pip
sudo apt-get install python3-tk
并在需要时提供密码。
然后通过键入以下命令安装 Linux 包:
pip3 install numpy
pip3 install matplotlib
pip3 install grpcio
pip3 install NP.Grpc.PythonRelayInterfaces
pip3 install NP.Grpc.PythonMessages
pip3 install PySide6
pip3 install --upgrade protobuf
不知道为什么,但 protobuf 在我的情况下需要升级。
要在 Linux 上运行示例,您需要将其在 Windows 上编译,然后将整个解决方案的文件夹结构复制到 Linux。
cd 到 <RootDir>DockableAppsDemo/DockableAppImplantsDemo/bin/Debug/net6.0 并运行:
dotnet DockableAppImplantsDemo.dll
您将看到:

由于用于构建应用程序(C# 和 Python)的所有组件都是跨平台的,因此整个应用程序在 Linux 上的显示方式与 Windows 非常相似。
不幸的是,UniDock 目前在 Linux 上移动可停靠窗口时存在一些问题,因此重新停靠单个绘图将不起作用。我计划尽快解决这些问题,以便窗口停靠可以在任何操作系统上正常工作。
历史
- 2023 年 2 月 27 日:初始版本