
使用 ASP.NET Core、Ocelot、MongoDB 和 JWT 构建微服务
4.99/5 (36投票s)
使用 ASP.NET Core、Ocelot、MongoDB 和 JWT 构建的微服务示例架构
目录
引言
随着 .NET 8 的发布,我着手编写一份关于使用 ASP.NET Core 8 构建微服务的全面指南。最新版本的 .NET 是一次重要的发布,它提供了许多新功能和增强功能,以及性能改进和长期支持。它在 .NET 7 引入的性能改进的基础上,进一步优化了即时 (JIT) 编译器、垃圾收集器和运行时。其结果是更快的启动时间、更好的整体应用程序性能以及更少的内存使用。您可以在 此处 了解有关所有新功能和增强功能的更多信息。现在,让我们专注于微服务。

微服务架构由一组小型、独立且松散耦合的服务组成。每个服务都是独立的,实现单一的业务能力,负责持久化自己的数据,拥有独立的代码库,并且可以独立部署。
API 网关是客户端的入口点。客户端不直接调用服务,而是调用 API 网关,API 网关会将调用转发给相应服务。
使用微服务架构有多种优势
- 开发人员可以更好地理解服务的功能。
- 一个服务的故障不会影响其他服务。
- 更容易管理错误修复和功能发布。
- 服务可以在多台服务器上部署以增强性能。
- 服务易于更改和测试。
- 服务易于快速部署。
- 允许选择适合特定功能的技术。
在选择微服务架构之前,这里有一些挑战需要考虑
- 服务是简单的,但整个系统作为一个整体更加复杂。
- 服务之间的通信可能很复杂。
- 更多的服务意味着更多的资源。
- 全局测试可能很困难。
- 调试可能更困难。
微服务架构非常适合大型公司,但对于需要快速创建和迭代,并且不想陷入复杂编排的小型公司来说,可能会很复杂。
本文提供了一份全面的指南,介绍如何使用 ASP.NET Core 构建微服务,使用 Ocelot 构建 API 网关,使用 MongoDB 建立存储库,在微服务中管理 JWT,使用 xUnit 和 Moq 对微服务进行单元测试,使用健康检查监控微服务,以及最后使用 Docker 部署微服务。
最佳实践
以下是一些最佳实践的细分
- 单一职责:每个微服务都应具有单一职责或目的。这意味着它应该做好一件事。这使得理解、开发、测试和维护每个微服务更加容易。
- 独立数据存储:微服务理想情况下应拥有自己的数据存储。这可以是一个独立的数据库,与其它微服务隔离。这种隔离可确保一个微服务数据中的更改或问题不会影响其他微服务。
- 异步通信:使用异步通信模式,如消息队列或发布/订阅系统,以实现通信。这使得系统更具弹性,并将服务彼此解耦。
- 容器化:使用 Docker 等容器化技术来打包和部署微服务。容器为您的微服务提供了一个一致且隔离的环境,使它们更容易管理和扩展。
- 编排:使用 Kubernetes 等容器编排工具来管理和扩展您的容器。Kubernetes 提供了负载均衡、扩展和监控功能,是编排微服务的绝佳选择。
- 构建和部署分离:保持构建和部署过程的分离。这意味着构建过程应该生成一个可部署的构件,例如 Docker 容器镜像,然后可以对其进行修改以在不同环境中进行部署。
- 无状态:微服务应尽可能无状态。任何必要的状态都应存储在数据库或外部数据存储中。无状态服务更容易扩展和维护。
- 微前端:如果您正在构建 Web 应用程序,请考虑使用微前端方法。这包括将用户界面分解为更小的、可独立部署的组件,这些组件可以由不同的团队开发和维护。
开发环境
- Visual Studio 2022 >= 17.8.0
- .NET 8.0
- MongoDB
- Postman
必备组件
- C#
- ASP.NET Core
- Ocelot
- Swashbuckle
- Serilog
- JWT
- MongoDB
- xUnit
- Moq
架构

有三个微服务
- 目录微服务:允许管理目录。
- 购物车微服务:允许管理购物车。
- 身份微服务:允许管理身份验证和用户。
每个微服务都实现一个单一的业务能力,并拥有自己专用的数据库。这被称为“数据库-每服务”模式。这种模式允许更好的关注点分离、数据隔离和可伸缩性。在微服务架构中,服务被设计成小型、专注且独立的,每个服务负责特定的功能。为了维护这种分离,确保每个微服务独立管理其数据至关重要。以下是该模式的其他优点:
- 可以在不影响其他微服务的情况下修改数据模式。
- 每个微服务都有自己的数据存储,防止意外或未经授权访问其他服务的数据。
- 由于每个微服务及其数据库都是独立的,因此可以根据其特定需求独立扩展它们。
- 每个微服务都可以选择最适合其需求的数据库技术,而不受限于单一的、单体式的数据库。
- 如果其中一个数据库服务器发生故障,这不会影响其他服务。
有两个 API 网关,一个用于前端,一个用于后端。
以下是前端 API 网关
- GET /catalog:检索目录项。
- GET /catalog/{id}:检索目录项。
- GET /cart:检索购物车项。
- POST /cart:添加购物车项。
- PUT /cart:更新购物车项。
- DELETE /cart:删除购物车项。
- POST /identity/login:执行登录。
- POST /identity/register:注册用户。
- GET /identity/validate:验证 JWT 令牌。
以下是后端 API 网关
- GET /catalog:检索目录项。
- GET /catalog/{id}:检索目录项。
- POST /catalog:创建目录项。
- PUT /catalog:更新目录项。
- DELETE /catalog/{id}:删除目录项。
- PUT /cart/update-catalog-item:更新购物车中的目录项。
- DELETE /cart/delete-catalog-item:删除购物车中的目录项引用。
- POST /identity/login:执行登录。
- GET /identity/validate:验证 JWT 令牌。
最后,有两个客户端应用程序。一个用于访问商店的前端,一个用于管理商店的后端。
前端允许注册用户查看可用的目录项,允许将目录项添加到购物车,并从购物车中删除目录项。
这是前端商店页面的截图

后端允许管理员用户查看可用的目录项,允许添加新的目录项,更新目录项,以及删除目录项。
这是后端商店页面的截图

源代码

CatalogMicroservice项目包含管理目录的微服务的源代码。CartMicroservice项目包含管理购物车的微服务的源代码。IdentityMicroservice项目包含管理身份验证和用户的微服务的源代码。Middleware项目包含微服务使用的通用功能的源代码。FrontendGateway项目包含前端 API 网关的源代码。BackendGateway项目包含后端 API 网关的源代码。Frontend项目包含前端客户端应用程序的源代码。Backend项目包含后端客户端应用程序的源代码。test解决方案文件夹包含所有微服务的单元测试。
微服务和网关使用 ASP.NET Core 和 C# 开发。客户端应用程序使用 HTML 和 Vanilla JavaScript 开发,以便专注于微服务。
微服务
目录微服务
让我们从最简单的微服务 CatalogMicroservice 开始。
CatalogMicroservice 负责管理目录。
以下是 CatalogMicroservice 使用的模型
public class CatalogItem
{
    public static readonly string DocumentName = nameof(CatalogItem);

    [BsonId]
    [BsonRepresentation(BsonType.ObjectId)]
    public string? Id { get; init; }
    public required string Name { get; set; }
    public string? Description { get; set; }
    public decimal Price { get; set; }
}
以下是存储库接口
public interface ICatalogRepository
{
    IList<CatalogItem> GetCatalogItems();
    CatalogItem? GetCatalogItem(string catalogItemId);
    void InsertCatalogItem(CatalogItem catalogItem);
    void UpdateCatalogItem(CatalogItem catalogItem);
    void DeleteCatalogItem(string catagItemId);
}
以下是存储库
public class CatalogRepository(IMongoDatabase db) : ICatalogRepository
{
    private readonly IMongoCollection<CatalogItem> _col =
                     db.GetCollection<CatalogItem>(CatalogItem.DocumentName);

    public IList<CatalogItem> GetCatalogItems() =>
        _col.Find(FilterDefinition<CatalogItem>.Empty).ToList();

    public CatalogItem GetCatalogItem(string catalogItemId) =>
        _col.Find(c => c.Id == catalogItemId).FirstOrDefault();

    public void InsertCatalogItem(CatalogItem catalogItem) =>
        _col.InsertOne(catalogItem);

    public void UpdateCatalogItem(CatalogItem catalogItem) =>
        _col.UpdateOne(c => c.Id == catalogItem.Id, Builders<CatalogItem>.Update
            .Set(c => c.Name, catalogItem.Name)
            .Set(c => c.Description, catalogItem.Description)
            .Set(c => c.Price, catalogItem.Price));

    public void DeleteCatalogItem(string catalogItemId) =>
        _col.DeleteOne(c => c.Id == catalogItemId);
}
以下是控制器
[Route("api/[controller]")]
[ApiController]
public class CatalogController(ICatalogRepository catalogRepository) : ControllerBase
{
    // GET: api/<CatalogController>
    [HttpGet]
    public IActionResult Get()
    {
        var catalogItems = catalogRepository.GetCatalogItems();
        return Ok(catalogItems);
    }

    // GET api/<CatalogController>/653e4410614d711b7fc953a7
    [HttpGet("{id}")]
    public IActionResult Get(string id)
    {
        var catalogItem = catalogRepository.GetCatalogItem(id);
        return Ok(catalogItem);
    }

    // POST api/<CatalogController>
    [HttpPost]
    public IActionResult Post([FromBody] CatalogItem catalogItem)
    {
        catalogRepository.InsertCatalogItem(catalogItem);
        return CreatedAtAction(nameof(Get), new { id = catalogItem.Id }, catalogItem);
    }

    // PUT api/<CatalogController>
    [HttpPut]
    public IActionResult Put([FromBody] CatalogItem? catalogItem)
    {
        if (catalogItem != null)
        {
            catalogRepository.UpdateCatalogItem(catalogItem);
            return Ok();
        }
        return new NoContentResult();
    }

    // DELETE api/<CatalogController>/653e4410614d711b7fc953a7
    [HttpDelete("{id}")]
    public IActionResult Delete(string id)
    {
        catalogRepository.DeleteCatalogItem(id);
        return Ok();
    }
}
ICatalogRepository 通过在 Startup.cs 中使用依赖注入来添加,以使微服务可测试
// This method gets called by the runtime.
// Use this method to add services to the container.
public void ConfigureServices(IServiceCollection services)
{
    services.AddControllers();
    services.AddMongoDb(Configuration);
    services.AddSingleton<ICatalogRepository>(sp =>
        new CatalogRepository(sp.GetService<IMongoDatabase>() ??
            throw new Exception("IMongoDatabase not found"))
    );
    services.AddSwaggerGen(c =>
    {
        c.SwaggerDoc("v1", new OpenApiInfo { Title = "Catalog", Version = "v1" });
    });

    // ...
}
以下是 AddMongoDB 扩展方法
public static void AddMongoDb
  (this IServiceCollection services, IConfiguration configuration)
{
    services.Configure<MongoOptions>(configuration.GetSection("mongo"));
    services.AddSingleton(c =>
    {
        var options = c.GetService<IOptions<MongoOptions>>();

        return new MongoClient(options.Value.ConnectionString);
    });
    services.AddSingleton(c =>
    {
        var options = c.GetService<IOptions<MongoOptions>>();
        var client = c.GetService<MongoClient>();

        return client.GetDatabase(options.Value.Database);
    });
}
以下是 Startup.cs 中的 Configure 方法
// This method gets called by the runtime.
// Use this method to configure the HTTP request pipeline.
public void Configure(IApplicationBuilder app, IWebHostEnvironment env)
{
    if (env.IsDevelopment())
    {
        app.UseDeveloperExceptionPage();
    }

    app.UseSwagger();

    app.UseSwaggerUI(c =>
    {
        c.SwaggerEndpoint("/swagger/v1/swagger.json", "Catalog V1");
    });

    var option = new RewriteOptions();
    option.AddRedirect("^$", "swagger");
    app.UseRewriter(option);

    // ...

    app.UseHttpsRedirection();

    app.UseRouting();

    app.UseAuthorization();

    app.UseEndpoints(endpoints =>
    {
        endpoints.MapControllers();
    });
}
以下是 appsettings.json
{
  "Logging": {
    "LogLevel": {
      "Default": "Information",
      "Microsoft": "Warning",
      "Microsoft.Hosting.Lifetime": "Information"
    }
  },
  "AllowedHosts": "*",
  "mongo": {
    "connectionString": "mongodb://127.0.0.1:27017",
    "database": "store-catalog"
  }
}
API 文档使用 Swashbuckle 生成。Swagger 中间件在 Startup.cs 的 ConfigureServices 和 Configure 方法中配置。
如果使用 IISExpress 或 Docker 运行 CatalogMicroservice 项目,您将在访问 https://:44326/ 时看到 Swagger UI。

身份微服务
现在,让我们继续 IdentityMicroservice。
IdentityMicroservice 负责身份验证和管理用户。
以下是 IdentityMicroservice 使用的模型
public class User
{
    public static readonly string DocumentName = nameof(User);

    [BsonId]
    [BsonRepresentation(BsonType.ObjectId)]
    public string? Id { get; init; }
    public required string Email { get; init; }
    public required string Password { get; set; }
    public string? Salt { get; set; }
    public bool IsAdmin { get; init; }

    public void SetPassword(string password, IEncryptor encryptor)
    {
        Salt = encryptor.GetSalt();
        Password = encryptor.GetHash(password, Salt);
    }

    public bool ValidatePassword(string password, IEncryptor encryptor) =>
        Password == encryptor.GetHash(password, Salt);
}
IEncryptor 中间件用于加密密码。
以下是存储库接口
public interface IUserRepository
{
    User? GetUser(string email);
    void InsertUser(User user);
}
以下是存储库实现
public class UserRepository(IMongoDatabase db) : IUserRepository
{
    private readonly IMongoCollection<User> _col =
                     db.GetCollection<User>(User.DocumentName);

    public User? GetUser(string email) =>
        _col.Find(u => u.Email == email).FirstOrDefault();

    public void InsertUser(User user) =>
        _col.InsertOne(user);
}
以下是控制器
[Route("api/[controller]")]
[ApiController]
public class IdentityController
  (IUserRepository userRepository, IJwtBuilder jwtBuilder, IEncryptor encryptor)
    : ControllerBase
{
    [HttpPost("login")]
    public IActionResult Login([FromBody] User user,
           [FromQuery(Name = "d")] string destination = "frontend")
    {
        var u = userRepository.GetUser(user.Email);

        if (u == null)
        {
            return NotFound("User not found.");
        }

        if (destination == "backend" && !u.IsAdmin)
        {
            return BadRequest("Could not authenticate user.");
        }

        var isValid = u.ValidatePassword(user.Password, encryptor);

        if (!isValid)
        {
            return BadRequest("Could not authenticate user.");
        }

        var token = jwtBuilder.GetToken(u.Id);

        return Ok(token);
    }

    [HttpPost("register")]
    public IActionResult Register([FromBody] User user)
    {
        var u = userRepository.GetUser(user.Email);

        if (u != null)
        {
            return BadRequest("User already exists.");
        }

        user.SetPassword(user.Password, encryptor);
        userRepository.InsertUser(user);

        return Ok();
    }

    [HttpGet("validate")]
    public IActionResult Validate([FromQuery(Name = "email")] string email,
                                  [FromQuery(Name = "token")] string token)
    {
        var u = userRepository.GetUser(email);

        if (u == null)
        {
            return NotFound("User not found.");
        }

        var userId = jwtBuilder.ValidateToken(token);

        if (userId != u.Id)
        {
            return BadRequest("Invalid token.");
        }

        return Ok(userId);
    }
}
IUserRepository、IJwtBuilder 和 IEncryptor 中间件通过在 Startup.cs 中使用依赖注入来添加
// This method gets called by the runtime.
// Use this method to add services to the container.
public void ConfigureServices(IServiceCollection services)
{
    services.AddControllers();
    services.AddMongoDb(Configuration);
    services.AddJwt(Configuration);
    services.AddTransient<IEncryptor, Encryptor>();
    services.AddSingleton<IUserRepository>(sp =>
        new UserRepository(sp.GetService<IMongoDatabase>() ??
            throw new Exception("IMongoDatabase not found"))
    );
    services.AddSwaggerGen(c =>
    {
        c.SwaggerDoc("v1", new OpenApiInfo { Title = "User", Version = "v1" });
    });

    // ...
}
以下是 AddJwt 扩展方法
public static void AddJwt(this IServiceCollection services, IConfiguration configuration)
{
    var options = new JwtOptions();
    var section = configuration.GetSection("jwt");
    section.Bind(options);
    services.Configure<JwtOptions>(section);
    services.AddSingleton<IJwtBuilder, JwtBuilder>();
    services.AddAuthentication()
        .AddJwtBearer(cfg =>
        {
            cfg.RequireHttpsMetadata = false;
            cfg.SaveToken = true;
            cfg.TokenValidationParameters = new TokenValidationParameters
            {
                ValidateAudience = false,
                IssuerSigningKey = new SymmetricSecurityKey
                                   (Encoding.UTF8.GetBytes(options.Secret))
            };
        });
}
IJwtBuilder 负责创建 JWT 令牌并验证它们。
public interface IJwtBuilder
{
    string GetToken(string userId);
    string ValidateToken(string token);
}
以下是 IJwtBuilder 的实现
public class JwtBuilder(IOptions<JwtOptions> options) : IJwtBuilder
{
    private readonly JwtOptions _options = options.Value;

    public string GetToken(string userId)
    {
        var signingKey = new SymmetricSecurityKey
                         (Encoding.UTF8.GetBytes(_options.Secret));
        var signingCredentials = new SigningCredentials
                                 (signingKey, SecurityAlgorithms.HmacSha256);
        var claims = new[]
        {
            new Claim("userId", userId)
        };
        var expirationDate = DateTime.Now.AddMinutes(_options.ExpiryMinutes);
        var jwt = new JwtSecurityToken(claims: claims,
                  signingCredentials: signingCredentials, expires: expirationDate);
        var encodedJwt = new JwtSecurityTokenHandler().WriteToken(jwt);

        return encodedJwt;
    }

    public string ValidateToken(string token)
    {
        var principal = GetPrincipal(token);
        if (principal == null)
        {
            return string.Empty;
        }

        ClaimsIdentity identity;
        try
        {
            identity = (ClaimsIdentity)principal.Identity;
        }
        catch (NullReferenceException)
        {
            return string.Empty;
        }
        var userIdClaim = identity?.FindFirst("userId");
        if (userIdClaim == null)
        {
            return string.Empty;
        }
        var userId = userIdClaim.Value;
        return userId;
    }

    private ClaimsPrincipal GetPrincipal(string token)
    {
        try
        {
            var tokenHandler = new JwtSecurityTokenHandler();
            var jwtToken = (JwtSecurityToken)tokenHandler.ReadToken(token);
            if (jwtToken == null)
            {
                return null;
            }
            var key = Encoding.UTF8.GetBytes(_options.Secret);
            var parameters = new TokenValidationParameters()
            {
                RequireExpirationTime = true,
                ValidateIssuer = false,
                ValidateAudience = false,
                IssuerSigningKey = new SymmetricSecurityKey(key)
            };
            IdentityModelEventSource.ShowPII = true;
            ClaimsPrincipal principal =
                  tokenHandler.ValidateToken(token, parameters, out _);
            return principal;
        }
        catch (Exception)
        {
            return null;
        }
    }
}
IEncryptor 仅负责加密密码。
public interface IEncryptor
{
    string GetSalt();
    string GetHash(string value, string salt);
}
以下是 IEncryptor 的实现
public class Encryptor: IEncryptor
{
    private const int SALT_SIZE = 40;
    private const int ITERATIONS_COUNT = 10000;

    public string GetSalt()
    {
        var saltBytes = new byte[SALT_SIZE];
        var rng = RandomNumberGenerator.Create();
        rng.GetBytes(saltBytes);

        return Convert.ToBase64String(saltBytes);
    }

    public string GetHash(string value, string salt)
    {
        var pbkdf2 = new Rfc2898DeriveBytes
            (value, GetBytes(salt), ITERATIONS_COUNT, HashAlgorithmName.SHA256);

        return Convert.ToBase64String(pbkdf2.GetBytes(SALT_SIZE));
    }

    private static byte[] GetBytes(string value)
    {
        var bytes = new byte[value.Length + sizeof(char)];
        Buffer.BlockCopy(value.ToCharArray(), 0, bytes, 0, bytes.Length);

        return bytes;
    }
}
以下是 Startup.cs 中的 Configure 方法
// This method gets called by the runtime.
// Use this method to configure the HTTP request pipeline.
public void Configure(IApplicationBuilder app, IWebHostEnvironment env)
{
    if (env.IsDevelopment())
    {
        app.UseDeveloperExceptionPage();
    }

    app.UseSwagger();

    app.UseSwaggerUI(c =>
    {
        c.SwaggerEndpoint("/swagger/v1/swagger.json", "Catalog V1");
    });

    var option = new RewriteOptions();
    option.AddRedirect("^$", "swagger");
    app.UseRewriter(option);

    // ...

    app.UseHttpsRedirection();

    app.UseRouting();

    app.UseAuthorization();

    app.UseEndpoints(endpoints =>
    {
        endpoints.MapControllers();
    });
}
以下是 appsettings.json
{
  "Logging": {
    "LogLevel": {
      "Default": "Information",
      "Microsoft": "Warning",
      "Microsoft.Hosting.Lifetime": "Information"
    }
  },
  "AllowedHosts": "*",
  "mongo": {
    "connectionString": "mongodb://127.0.0.1:27017",
    "database": "store-identity"
  },
  "jwt": {
    "secret": "9095a623-a23a-481a-aa0c-e0ad96edc103",
    "expiryMinutes": 60
  }
}
现在,让我们测试 IdentityMicroservice。
打开 Postman 并执行以下 POST 请求 https://:44397/api/identity/register,并带有以下负载来注册用户
{
  "email": "user@store.com",
  "password": "pass"
}
现在,执行以下 POST 请求 https://:44397/api/identity/login,并带有以下负载来创建 JWT 令牌
{
  "email": "user@store.com",
  "password": "pass"
}

您可以在 jwt.io 上查看生成的令牌。

就是这样。您可以以同样的方式执行以下 GET 请求 https://:44397/api/identity/validate?email={email}&token={token} 来验证 JWT 令牌。如果令牌有效,响应将是用户 ID,即 ObjectId。
如果使用 IISExpress 或 Docker 运行 IdentityMicroservice 项目,您将在访问 https://:44397/ 时看到 Swagger UI。

将 JWT 添加到目录微服务
现在,让我们将 JWT 身份验证添加到目录微服务。
首先,我们必须在 appsettings.json 中添加 jwt 部分。
{
  "Logging": {
    "LogLevel": {
      "Default": "Information",
      "Microsoft": "Warning",
      "Microsoft.Hosting.Lifetime": "Information"
    }
  },
  "AllowedHosts": "*",
  "jwt": {
    "secret": "9095a623-a23a-481a-aa0c-e0ad96edc103"
  },
  "mongo": {
    "connectionString": "mongodb://127.0.0.1:27017",
    "database": "store-catalog"
  }
}
然后,我们必须在 Startup.cs 的 ConfigureServices 方法中添加 JWT 配置。
public void ConfigureServices(IServiceCollection services)
{
    services.AddControllers();

    services.AddJwtAuthentication(Configuration); // JWT Configuration

    // ...
}
其中 AddJwtAuthentication 扩展方法实现如下:
public static void AddJwtAuthentication
    (this IServiceCollection services, IConfiguration configuration)
{
    var section = configuration.GetSection("jwt");
    var options = section.Get<JwtOptions>();
    var key = Encoding.UTF8.GetBytes(options.Secret);
    section.Bind(options);
    services.Configure<JwtOptions>(section);

    services.AddSingleton<IJwtBuilder, JwtBuilder>();
    services.AddTransient<JwtMiddleware>();

    services.AddAuthentication(x =>
        {
            x.DefaultAuthenticateScheme = JwtBearerDefaults.AuthenticationScheme;
            x.DefaultChallengeScheme = JwtBearerDefaults.AuthenticationScheme;
        })
        .AddJwtBearer(x =>
        {
            x.RequireHttpsMetadata = false;
            x.SaveToken = true;
            x.TokenValidationParameters = new TokenValidationParameters
            {
                ValidateIssuerSigningKey = true,
                IssuerSigningKey = new SymmetricSecurityKey(key),
                ValidateIssuer = false,
                ValidateAudience = false
            };
        });

    services.AddAuthorization(x =>
    {
        x.DefaultPolicy = new AuthorizationPolicyBuilder()
            .AddAuthenticationSchemes(JwtBearerDefaults.AuthenticationScheme)
            .RequireAuthenticatedUser()
            .Build();
    });
}
JwtMiddleware 负责验证 JWT 令牌。
public class JwtMiddleware(IJwtBuilder jwtBuilder) : IMiddleware
{
    public async Task InvokeAsync(HttpContext context, RequestDelegate next)
    {
        // Get the token from the Authorization header
        var bearer = context.Request.Headers["Authorization"].ToString();
        var token = bearer.Replace("Bearer ", string.Empty);

        if (!string.IsNullOrEmpty(token))
        {
            // Verify the token using the IJwtBuilder
            var userId = jwtBuilder.ValidateToken(token);

            if (ObjectId.TryParse(userId, out _))
            {
                // Store the userId in the HttpContext items for later use
                context.Items["userId"] = userId;
            }
            else
            {
                // If token or userId are invalid, send 401 Unauthorized status
                context.Response.StatusCode = 401;
            }
        }

        // Continue processing the request
        await next(context);
    }
}
如果 JWT 令牌或用户 ID 无效,我们将发送 **401 Unauthorized 状态**。
然后,我们在 Startup.cs 的 Configure 方法中注册 JwtMiddleware。
public void Configure(IApplicationBuilder app, IWebHostEnvironment env)
{
    // ...

    app.UseMiddleware<JwtMiddleware>(); // JWT Middleware

    app.UseAuthentication();

    app.UseAuthorization();

    // ...
}
然后,我们在 CatalogController.cs 中通过 [Authorize] 属性指定我们需要为我们的端点进行 JWT 身份验证。
// GET: api/<CatalogController>
[HttpGet]
[Authorize]
public IActionResult Get()
{
    var catalogItems = _catalogRepository.GetCatalogItems();
    return Ok(catalogItems);
}

// ...
现在,目录微服务通过 JWT 身份验证得到保护。购物车微服务以同样的方式受到保护。
最后,我们需要将 JWT 身份验证添加到 Swagger。为此,我们需要在 Startup.cs 的 ConfigureServices 中更新 AddSwaggerGen。
public void ConfigureServices(IServiceCollection services)
{
    //...

    services.AddSwaggerGen(c =>
    {
        c.SwaggerDoc("v1", new OpenApiInfo { Title = "Catalog", Version = "v1" });
        c.AddSecurityDefinition("Bearer", new OpenApiSecurityScheme
        {
            In = ParameterLocation.Header,
            Description = "Please insert JWT token with the prefix Bearer into field",
            Name = "Authorization",
            Type = SecuritySchemeType.ApiKey,
            Scheme = "bearer",
            BearerFormat = "JWT"
        });
        c.AddSecurityRequirement(new OpenApiSecurityRequirement {
            {
                new OpenApiSecurityScheme
                {
                    Reference = new OpenApiReference
                    {
                        Type = ReferenceType.SecurityScheme,
                        Id = "Bearer"
                    }
                },
                new string[] { }
            }
        });
    });

    //...
}
现在,如果您想在目录或购物车微服务上运行 Postman,您需要在 **Authorization** 选项卡中指定 **Bearer Token**。
如果您想使用 Swagger 测试目录或购物车微服务,您需要点击 **Authorize** 按钮,然后在授权字段中输入带有 `Bearer` 前缀的 JWT 令牌。
购物车微服务
CartMicroservice 负责管理购物车。
以下是 CartMicroservice 使用的模型
public class Cart
{
    public static readonly string DocumentName = nameof(Cart);

    [BsonId]
    [BsonRepresentation(BsonType.ObjectId)]
    public string? Id { get; init; }
    [BsonRepresentation(BsonType.ObjectId)]
    public string? UserId { get; init; }
    public List<CartItem> CartItems { get; init; } = new();
}

public class CartItem
{
    [BsonRepresentation(BsonType.ObjectId)]
    public string? CatalogItemId { get; init; }
    public required string Name { get; set; }
    public decimal Price { get; set; }
    public int Quantity { get; set; }
}
以下是存储库接口
public interface ICartRepository
{
    IList<CartItem> GetCartItems(string userId);
    void InsertCartItem(string userId, CartItem cartItem);
    void UpdateCartItem(string userId, CartItem cartItem);
    void DeleteCartItem(string userId, string cartItemId);
    void UpdateCatalogItem(string catalogItemId, string name, decimal price);
    void DeleteCatalogItem(string catalogItemId);
}
以下是存储库
public class CartRepository(IMongoDatabase db) : ICartRepository
{
    private readonly IMongoCollection<Cart> _col =
                           db.GetCollection<Cart>(Cart.DocumentName);

    public IList<CartItem> GetCartItems(string userId) =>
        _col
        .Find(c => c.UserId == userId)
        .FirstOrDefault()?.CartItems ?? new List<CartItem>();

    public void InsertCartItem(string userId, CartItem cartItem)
    {
        var cart = _col.Find(c => c.UserId == userId).FirstOrDefault();
        if (cart == null)
        {
            cart = new Cart
            {
                UserId = userId,
                CartItems = new List<CartItem> { cartItem }
            };
            _col.InsertOne(cart);
        }
        else
        {
            var ci = cart
                .CartItems
                .FirstOrDefault(ci => ci.CatalogItemId == cartItem.CatalogItemId);

            if (ci == null)
            {
                cart.CartItems.Add(cartItem);
            }
            else
            {
                ci.Quantity++;
            }

            var update = Builders<Cart>.Update
                .Set(c => c.CartItems, cart.CartItems);
            _col.UpdateOne(c => c.UserId == userId, update);
        }
    }

    public void UpdateCartItem(string userId, CartItem cartItem)
    {
        var cart = _col.Find(c => c.UserId == userId).FirstOrDefault();
        if (cart != null)
        {
            cart.CartItems.RemoveAll(ci => ci.CatalogItemId == cartItem.CatalogItemId);
            cart.CartItems.Add(cartItem);
            var update = Builders<Cart>.Update
                .Set(c => c.CartItems, cart.CartItems);
            _col.UpdateOne(c => c.UserId == userId, update);
        }
    }

    public void DeleteCartItem(string userId, string catalogItemId)
    {
        var cart = _col.Find(c => c.UserId == userId).FirstOrDefault();
        if (cart != null)
        {
            cart.CartItems.RemoveAll(ci => ci.CatalogItemId == catalogItemId);
            var update = Builders<Cart>.Update
                .Set(c => c.CartItems, cart.CartItems);
            _col.UpdateOne(c => c.UserId == userId, update);
        }
    }

    public void UpdateCatalogItem(string catalogItemId, string name, decimal price)
    {
        // Update catalog item in carts
        var carts = GetCarts(catalogItemId);
        foreach (var cart in carts)
        {
            var cartItem = cart.CartItems.FirstOrDefault
                           (i => i.CatalogItemId == catalogItemId);
            if (cartItem != null)
            {
                cartItem.Name = name;
                cartItem.Price = price;
                var update = Builders<Cart>.Update
                    .Set(c => c.CartItems, cart.CartItems);
                _col.UpdateOne(c => c.Id == cart.Id, update);
            }
        }
    }

    public void DeleteCatalogItem(string catalogItemId)
    {
        // Delete catalog item from carts
        var carts = GetCarts(catalogItemId);
        foreach (var cart in carts)
        {
            cart.CartItems.RemoveAll(i => i.CatalogItemId == catalogItemId);
            var update = Builders<Cart>.Update
                .Set(c => c.CartItems, cart.CartItems);
            _col.UpdateOne(c => c.Id == cart.Id, update);
        }
    }

    private IList<Cart> GetCarts(string catalogItemId) =>
        _col.Find(c => c.CartItems.Any(i => i.CatalogItemId == catalogItemId)).ToList();
}
以下是控制器
[Route("api/[controller]")]
[ApiController]
public class CartController(ICartRepository cartRepository) : ControllerBase
{
    // GET: api/<CartController>
    [HttpGet]
    [Authorize]
    public IActionResult Get([FromQuery(Name = "u")] string userId)
    {
        var cartItems = cartRepository.GetCartItems(userId);
        return Ok(cartItems);
    }

    // POST api/<CartController>
    [HttpPost]
    [Authorize]
    public IActionResult Post([FromQuery(Name = "u")] string userId,
                              [FromBody] CartItem cartItem)
    {
        cartRepository.InsertCartItem(userId, cartItem);
        return Ok();
    }

    // PUT api/<CartController>
    [HttpPut]
    [Authorize]
    public IActionResult Put([FromQuery(Name = "u")] string userId,
                             [FromBody] CartItem cartItem)
    {
        cartRepository.UpdateCartItem(userId, cartItem);
        return Ok();
    }

    // DELETE api/<CartController>
    [HttpDelete]
    [Authorize]
    public IActionResult Delete([FromQuery(Name = "u")] string userId,
                                [FromQuery(Name = "ci")] string cartItemId)
    {
        cartRepository.DeleteCartItem(userId, cartItemId);
        return Ok();
    }

    // PUT api/<CartController>/update-catalog-item
    [HttpPut("update-catalog-item")]
    [Authorize]
    public IActionResult Put([FromQuery(Name = "ci")] string catalogItemId,
    [FromQuery(Name = "n")] string name, [FromQuery(Name = "p")] decimal price)
    {
        cartRepository.UpdateCatalogItem(catalogItemId, name, price);
        return Ok();
    }

    // DELETE api/<CartController>/delete-catalog-item
    [HttpDelete("delete-catalog-item")]
    [Authorize]
    public IActionResult Delete([FromQuery(Name = "ci")] string catalogItemId)
    {
        cartRepository.DeleteCatalogItem(catalogItemId);
        return Ok();
    }
}
ICartRepository 通过在 Startup.cs 中使用依赖注入来添加,以使微服务可测试。
public void ConfigureServices(IServiceCollection services)
{
    services.AddControllers();

    services.AddJwtAuthentication(Configuration); // JWT Configuration

    services.AddMongoDb(Configuration);

    services.AddSingleton<ICartRepository>(sp =>
        new CartRepository(sp.GetService<IMongoDatabase>() ??
            throw new Exception("IMongoDatabase not found"))
    );

    // ...
}
Startup.cs 中的 Configure 方法与 CatalogMicroservice 中的相同。
以下是 appsettings.json
{
  "Logging": {
    "LogLevel": {
      "Default": "Information",
      "Microsoft": "Warning",
      "Microsoft.Hosting.Lifetime": "Information"
    }
  },
  "AllowedHosts": "*",
  "jwt": {
    "secret": "9095a623-a23a-481a-aa0c-e0ad96edc103"
  },
  "mongo": {
    "connectionString": "mongodb://127.0.0.1:27017",
    "database": "store-cart"
  }
}
API 文档使用 Swashbuckle 生成。Swagger 中间件在 Startup.cs 的 ConfigureServices 和 Configure 方法中配置。
如果使用 IISExpress 或 Docker 运行 CartMicroservice 项目,您将在访问 https://:44388/ 时看到 Swagger UI。
API 网关
有两个 API 网关,一个用于前端,一个用于后端。
让我们从前端开始。
Program.cs 中添加了 ocelot.json 配置文件,如下所示:
var builder = Host.CreateDefaultBuilder(args)
        .ConfigureAppConfiguration((hostingContext, config) =>
        {
            config
                .SetBasePath(hostingContext.HostingEnvironment.ContentRootPath)
                .AddJsonFile("appsettings.json", true, true)
                .AddJsonFile("ocelot.json", false, true)
                .AddJsonFile($"appsettings.
                {hostingContext.HostingEnvironment.EnvironmentName}.json", true, true)
                .AddJsonFile($"ocelot.
                {hostingContext.HostingEnvironment.EnvironmentName}.json",
                 optional: false, reloadOnChange: true)
                .AddEnvironmentVariables();

            if (hostingContext.HostingEnvironment.EnvironmentName == "Development")
            {
                config.AddJsonFile("appsettings.Local.json", true, true);
            }
        })
        .UseSerilog((_, config) =>
        {
            config
                .MinimumLevel.Information()
                .MinimumLevel.Override("Microsoft", LogEventLevel.Warning)
                .Enrich.FromLogContext()
                .WriteTo.Console();
        })
        .ConfigureWebHostDefaults(webBuilder =>
        {
            webBuilder.UseStartup<Startup>();
        });

builder.Build().Run();
Serilog 被配置为将日志写入控制台。当然,您可以使用 WriteTo.File(@"Logs\store.log") 和 Serilog.Sinks.File nuget 包将日志写入文本文件。
然后,这是 Startup.cs
public class Startup(IConfiguration configuration)
{
    private IConfiguration Configuration { get; } = configuration;

    // This method gets called by the runtime.
    // Use this method to add services to the container.
    public void ConfigureServices(IServiceCollection services)
    {
        services.AddControllers();

        services.AddOcelot(Configuration);

        services.AddJwtAuthentication(Configuration); // JWT Configuration

        services.AddCors(options =>
        {
            options.AddPolicy("CorsPolicy",
                builder => builder.AllowAnyOrigin()
                    .AllowAnyMethod()
                    .AllowAnyHeader());
        });

        services.AddHealthChecks()
            .AddMongoDb(
                mongodbConnectionString: (
                    Configuration.GetSection("mongo").Get<MongoOptions>()
                    ?? throw new Exception("mongo configuration section not found")
                ).ConnectionString,
                name: "mongo",
                failureStatus: HealthStatus.Unhealthy
            );

        services.AddHealthChecksUI().AddInMemoryStorage();
    }

    // This method gets called by the runtime. Use this method
    // to configure the HTTP request pipeline.
    public async void Configure(IApplicationBuilder app, IWebHostEnvironment env)
    {
        if (env.IsDevelopment())
        {
            app.UseDeveloperExceptionPage();
        }

        app.UseMiddleware<RequestResponseLogging>();

        app.UseCors("CorsPolicy");

        app.UseAuthentication();

        app.UseHealthChecks("/healthz", new HealthCheckOptions
        {
            Predicate = _ => true,
            ResponseWriter = UIResponseWriter.WriteHealthCheckUIResponse
        });

        app.UseHealthChecksUI();

        var option = new RewriteOptions();
        option.AddRedirect("^$", "healthchecks-ui");
        app.UseRewriter(option);

        await app.UseOcelot();
    }
}
RequestResponseLogging 中间件负责记录请求和响应。
public class RequestResponseLogging(RequestDelegate next, ILogger<RequestResponseLogging> logger)
{
    public async Task InvokeAsync(HttpContext context)
    {
        context.Request.EnableBuffering();
        var builder = new StringBuilder();
        var request = await FormatRequest(context.Request);
        builder.Append("Request: ").AppendLine(request);
        builder.AppendLine("Request headers:");

        foreach (var header in context.Request.Headers)
        {
            builder.Append(header.Key).Append(": ").AppendLine(header.Value);
        }

        var originalBodyStream = context.Response.Body;
        using var responseBody = new MemoryStream();
        context.Response.Body = responseBody;
        await next(context);

        var response = await FormatResponse(context.Response);
        builder.Append("Response: ").AppendLine(response);
        builder.AppendLine("Response headers: ");

        foreach (var header in context.Response.Headers)
        {
            builder.Append(header.Key).Append(": ").AppendLine(header.Value);
        }

        logger.LogInformation(builder.ToString());

        await responseBody.CopyToAsync(originalBodyStream);
    }

    private static async Task<string> FormatRequest(HttpRequest request)
    {
        using var reader = new StreamReader(
            request.Body,
            encoding: Encoding.UTF8,
            detectEncodingFromByteOrderMarks: false,
            leaveOpen: true);
        var body = await reader.ReadToEndAsync();
        var formattedRequest = $"{request.Method}
        {request.Scheme}://{request.Host}{request.Path}{request.QueryString} {body}";
        request.Body.Position = 0;
        return formattedRequest;
    }

    private static async Task<string> FormatResponse(HttpResponse response)
    {
        response.Body.Seek(0, SeekOrigin.Begin);
        string text = await new StreamReader(response.Body).ReadToEndAsync();
        response.Body.Seek(0, SeekOrigin.Begin);
        return $"{response.StatusCode}: {text}";
    }
}
我们在网关中使用了日志记录,这样就无需检查每个微服务的日志了。
这是 ocelot.Development.json
{
  "Routes": [
    {
      "DownstreamPathTemplate": "/api/catalog",
      "DownstreamScheme": "http",
      "DownstreamHostAndPorts": [
        {
          "Host": "localhost",
          "Port": 44326
        }
      ],
      "UpstreamPathTemplate": "/catalog",
      "UpstreamHttpMethod": [ "GET" ],
      "AuthenticationOptions": {
        "AuthenticationProviderKey": "Bearer",
        "AllowedScopes": []
      }
    },
    {
      "DownstreamPathTemplate": "/api/catalog/{id}",
      "DownstreamScheme": "http",
      "DownstreamHostAndPorts": [
        {
          "Host": "localhost",
          "Port": 44326
        }
      ],
      "UpstreamPathTemplate": "/catalog/{id}",
      "UpstreamHttpMethod": [ "GET" ],
      "AuthenticationOptions": {
        "AuthenticationProviderKey": "Bearer",
        "AllowedScopes": []
      }
    },
    {
      "DownstreamPathTemplate": "/api/cart",
      "DownstreamScheme": "http",
      "DownstreamHostAndPorts": [
        {
          "Host": "localhost",
          "Port": 44388
        }
      ],
      "UpstreamPathTemplate": "/cart",
      "UpstreamHttpMethod": [ "POST" ],
      "AuthenticationOptions": {
        "AuthenticationProviderKey": "Bearer",
        "AllowedScopes": []
      }
    },
    {
      "DownstreamPathTemplate": "/api/cart",
      "DownstreamScheme": "http",
      "DownstreamHostAndPorts": [
        {
          "Host": "localhost",
          "Port": 44388
        }
      ],
      "UpstreamPathTemplate": "/cart",
      "UpstreamHttpMethod": [ "PUT" ],
      "AuthenticationOptions": {
        "AuthenticationProviderKey": "Bearer",
        "AllowedScopes": []
      }
    },
    {
      "DownstreamPathTemplate": "/api/cart",
      "DownstreamScheme": "http",
      "DownstreamHostAndPorts": [
        {
          "Host": "localhost",
          "Port": 44388
        }
      ],
      "UpstreamPathTemplate": "/cart",
      "UpstreamHttpMethod": [ "DELETE" ],
      "AuthenticationOptions": {
        "AuthenticationProviderKey": "Bearer",
        "AllowedScopes": []
      }
    },
    {
      "DownstreamPathTemplate": "/api/identity/login",
      "DownstreamScheme": "http",
      "DownstreamHostAndPorts": [
        {
          "Host": "localhost",
          "Port": 44397
        }
      ],
      "UpstreamPathTemplate": "/identity/login",
      "UpstreamHttpMethod": [ "POST" ]
    },
    {
      "DownstreamPathTemplate": "/api/identity/register",
      "DownstreamScheme": "http",
      "DownstreamHostAndPorts": [
        {
          "Host": "localhost",
          "Port": 44397
        }
      ],
      "UpstreamPathTemplate": "/identity/register",
      "UpstreamHttpMethod": [ "POST" ]
    },
    {
      "DownstreamPathTemplate": "/api/identity/validate",
      "DownstreamScheme": "http",
      "DownstreamHostAndPorts": [
        {
          "Host": "localhost",
          "Port": 44397
        }
      ],
      "UpstreamPathTemplate": "/identity/validate",
      "UpstreamHttpMethod": [ "GET" ]
    }
  ],
  "GlobalConfiguration": {
    "BaseUrl": "https://:44300/"
  }
}
最后,这是 appsettings.json
{
  "Logging": {
    "LogLevel": {
      "Default": "Information",
      "Microsoft": "Warning",
      "Microsoft.Hosting.Lifetime": "Information"
    }
  },
  "AllowedHosts": "*",
  "jwt": {
    "secret": "9095a623-a23a-481a-aa0c-e0ad96edc103"
  },
  "mongo": {
    "connectionString": "mongodb://127.0.0.1:27017"
  }
}
现在,让我们测试前端网关。
首先,执行以下 POST 请求 http//:44300/identity/login,并带有以下负载来创建 JWT 令牌。
{
  "email": "user@store.com",
  "password": "pass"
}
我们已经在测试 IdentityMicroservice 时创建了该用户。如果您还没有创建该用户,可以通过执行以下 POST 请求 https://:44300/identity/register 并使用与上面相同的负载来创建一个。

然后,在 Postman 的 Authorization 选项卡中,选择 **Bearer Token** 类型,并将 JWT 令牌粘贴到 **Token** 字段中。然后,执行以下 GET 请求以检索目录 https://:44300/catalog。
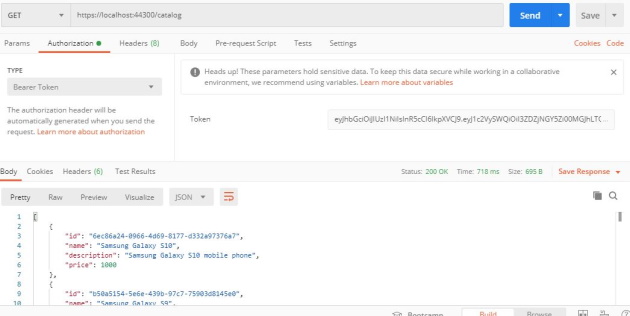
如果 JWT 令牌无效,响应将是 **401 Unauthorized**。
您可以在 jwt.io 上查看令牌。
如果我们打开 Visual Studio 中的控制台,我们可以看到所有日志。

就是这样!您可以以同样的方式测试其他 API 方法。
后端网关的实现方式基本相同。唯一的区别在于 ocelot.json 文件。
客户端应用
有两个客户端应用程序。一个用于前端,一个用于后端。
客户端应用程序使用 HTML 和 Vanilla JavaScript 制作,以保持简单。
以前端的登录页面为例。这是 HTML
<!DOCTYPE html>
<html>
<head>
    <meta charset="utf-8" />
    <title>Login</title>
    <link rel="icon" href="data:,">
    <link href="css/bootstrap.min.css" rel="stylesheet" />
    <link href="css/login.css" rel="stylesheet" />
</head>
<body>
    <div class="header"></div>
    <div class="login">
        <table>
            <tr>
                <td>Email</td>
                <td><input id="email" type="text" autocomplete="off"
                                      class="form-control" /></td>
            </tr>
            <tr>
                <td>Password</td>
                <td><input id="password" type="password" class="form-control" /></td>
            </tr>
            <tr>
                <td></td>
                <td>
                    <input id="login" type="button" value="Login"
                                         class="btn btn-primary" />
                    <input id="register" type="button" value="Register"
                                         class="btn btn-secondary" />
                </td>
            </tr>
        </table>
    </div>
    <script src="js/login.js" type="module"></script>
</body>
</html>
这是 settings.js
export default {
    uri: "https://:44300/"
};
这是 login.js
import settings from "./settings.js";
import common from "./common.js";

window.onload = () => {
    "use strict";

    localStorage.removeItem("auth");

    function login() {
        const user = {
            "email": document.getElementById("email").value,
            "password": document.getElementById("password").value
        };

        common.post(settings.uri + "identity/login?d=frontend", (token) => {
            const auth = {
                "email": user.email,
                "token": token
            };
            localStorage.setItem("auth", JSON.stringify(auth));
            location.href = "/store.html";
        }, () => {
            alert("Wrong credentials.");
        }, user);
    };

    document.getElementById("login").onclick = () => {
        login();
    };

    document.getElementById("password").onkeyup = (e) => {
        if (e.key === 'Enter') {
            login();
        }
    };

    document.getElementById("register").onclick = () => {
        location.href = "/register.html";
    };
};
common.js 包含用于执行 GET、POST 和 DELETE 请求的函数。
export default {
    post: async (url, callback, errorCallback, content, token) => {
        try {
            const headers = {
                "Content-Type": "application/json;charset=UTF-8"
            };
            if (token) {
                headers["Authorization"] = `Bearer ${token}`;
            }
            const response = await fetch(url, {
                method: "POST",
                headers,
                body: JSON.stringify(content)
            });
            if (response.ok) {
                const data = await response.text();
                if (callback) {
                    callback(data);
                }
            } else {
                if (errorCallback) {
                    errorCallback(response.status);
                }
            }
        } catch (err) {
            if (errorCallback) {
                errorCallback(err);
            }
        }
    },
    get: async (url, callback, errorCallback, token) => {
        try {
            const headers = {
                "Content-Type": "application/json;charset=UTF-8"
            };
            if (token) {
                headers["Authorization"] = `Bearer ${token}`;
            }
            const response = await fetch(url, {
                method: "GET",
                headers
            });
            if (response.ok) {
                const data = await response.text();

                if (callback) {
                    callback(data);
                }
            } else {
                if (errorCallback) {
                    errorCallback(response.status);
                }
            }
        } catch (err) {
            if (errorCallback) {
                errorCallback(err);
            }
        }
    },
    delete: async (url, callback, errorCallback, token) => {
        try {
            const headers = {
                "Content-Type": "application/json;charset=UTF-8"
            };
            if (token) {
                headers["Authorization"] = `Bearer ${token}`;
            }
            const response = await fetch(url, {
                method: "DELETE",
                headers
            });

            if (response.ok) {
                if (callback) {
                    callback();
                }
            } else {
                if (errorCallback) {
                    errorCallback(response.status);
                }
            }
        } catch (err) {
            if (errorCallback) {
                errorCallback(err);
            }
        }
    }
};
前端和后端的其他页面也以同样的方式完成。
前端有四个页面。一个登录页面,一个注册用户页面,一个访问商店的页面,以及一个访问购物车的页面。
前端允许注册用户查看可用的目录项,添加目录项到购物车,并从购物车中删除目录项。
这是前端商店页面的截图
后端有两个页面。一个登录页面和一个管理商店的页面。
后端允许管理员用户查看可用的目录项,创建新的目录项,更新目录项,并删除目录项。
这是后端商店页面的截图
单元测试
在本节中,我们将使用 xUnit 和 Moq 对所有微服务进行单元测试。
在对控制器逻辑进行单元测试时,仅测试单个操作的内容,而不测试其依赖项或框架本身的行为。
xUnit 简化了测试过程,让我们能够将更多时间花在编写测试上。
Moq 是 .NET 中一个流行且友好的模拟框架。我们将使用它来模拟存储库和中间件服务。
为了对目录微服务进行单元测试,首先创建了一个 xUnit 测试项目 CatalogMicroservice.UnitTests。然后,创建了一个单元测试类 CatalogControllerTest。该类包含目录控制器的单元测试方法。
已将 CatalogMicroservice 项目的引用添加到 CatalogMicroservice.UnitTests 项目。
然后,通过 Nuget 包管理器添加了 Moq。此时,我们可以开始专注于编写我们的测试了。
已将 CatalogController 的引用添加到 CatalogControllerTest。
private readonly CatalogController _controller;
然后在我们的单元测试类的构造函数中,添加了一个模拟存储库,如下所示:
public CatalogControllerTest()
{
    var mockRepo = new Mock<ICatalogRepository>();
    mockRepo.Setup(repo => repo.GetCatalogItems()).Returns(_items);
    mockRepo.Setup(repo => repo.GetCatalogItem(It.IsAny<string>()))
        .Returns<string>(id => _items.FirstOrDefault(i => i.Id == id));
    mockRepo.Setup(repo => repo.InsertCatalogItem(It.IsAny<CatalogItem>()))
        .Callback<CatalogItem>(_items.Add);
    mockRepo.Setup(repo => repo.UpdateCatalogItem(It.IsAny<CatalogItem>()))
        .Callback<CatalogItem>(i =>
        {
            var item = _items.FirstOrDefault(catalogItem => catalogItem.Id == i.Id);
            if (item != null)
            {
                item.Name = i.Name;
                item.Description = i.Description;
                item.Price = i.Price;
            }
        });
    mockRepo.Setup(repo => repo.DeleteCatalogItem(It.IsAny<string>()))
        .Callback<string>(id => _items.RemoveAll(i => i.Id == id));
    _controller = new CatalogController(mockRepo.Object);
}
其中 _items 是 CatalogItem 的列表。
private static readonly string A54Id = "653e4410614d711b7fc953a7";
private static readonly string A14Id = "253e4410614d711b7fc953a7";
private readonly List<CatalogItem> _items = new()
{
    new()
    {
        Id = A54Id,
        Name = "Samsung Galaxy A54 5G",
        Description = "Samsung Galaxy A54 5G mobile phone",
        Price = 500
    },
    new()
    {
        Id = A14Id,
        Name = "Samsung Galaxy A14 5G",
        Description = "Samsung Galaxy A14 5G mobile phone",
        Price = 200
    }
};
然后,这是 **GET api/catalog** 的测试。
[Fact]
public void GetCatalogItemsTest()
{
    var okObjectResult = _controller.Get();
    var okResult = Assert.IsType<OkObjectResult>(okObjectResult);
    var items = Assert.IsType<List<CatalogItem>>(okResult.Value);
    Assert.Equal(2, items.Count);
}
这是 **GET api/catalog/{id}** 的测试。
[Fact]
public void GetCatalogItemTest()
{
    var id = A54Id;
    var okObjectResult = _controller.Get(id);
    var okResult = Assert.IsType<OkObjectResult>(okObjectResult);
    var item = Assert.IsType<CatalogItem>(okResult.Value);
    Assert.Equal(id, item.Id);
}
这是 **POST api/calatlog** 的测试。
[Fact]
public void InsertCatalogItemTest()
{
    var createdResponse = _controller.Post(
        new CatalogItem
        {
            Id = "353e4410614d711b7fc953a7",
            Name = "iPhone 15",
            Description = "iPhone 15 mobile phone",
            Price = 1500
        }
    );
    var response = Assert.IsType<CreatedAtActionResult>(createdResponse);
    var item = Assert.IsType<CatalogItem>(response.Value);
    Assert.Equal("iPhone 15", item.Name);
}
这是 **PUT api/catalog** 的测试。
[Fact]
public void UpdateCatalogItemTest()
{
    var id = A54Id;
    var okObjectResult = _controller.Put(
        new CatalogItem
        {
            Id = id,
            Name = "Samsung Galaxy S23 Ultra",
            Description = "Samsung Galaxy S23 Ultra mobile phone",
            Price = 1500
        });
    Assert.IsType<OkResult>(okObjectResult);
    var item = _items.FirstOrDefault(i => i.Id == id);
    Assert.NotNull(item);
    Assert.Equal("Samsung Galaxy S23 Ultra", item.Name);
    okObjectResult = _controller.Put(null);
    Assert.IsType<NoContentResult>(okObjectResult);
}
这是 **DELETE api/catalog/{id}** 的测试。
[Fact]
public void DeleteCatalogItemTest()
{
    var id = A54Id;
    var item = _items.FirstOrDefault(i => i.Id == id);
    Assert.NotNull(item);
    var okObjectResult = _controller.Delete(id);
    Assert.IsType<OkResult>(okObjectResult);
    item = _items.FirstOrDefault(i => i.Id == id);
    Assert.Null(item);
}
购物车微服务和身份微服务的单元测试以同样的方式编写。
这是购物车微服务的单元测试。
public class CartControllerTest
{
    private readonly CartController _controller;
    private static readonly string UserId = "653e43b8c76b6b56a720803e";
    private static readonly string A54Id = "653e4410614d711b7fc953a7";
    private static readonly string A14Id = "253e4410614d711b7fc953a7";
    private readonly Dictionary<string, List<CartItem>> _carts = new()
    {
        {
            UserId,
            new()
            {
                new()
                {
                    CatalogItemId = A54Id,
                    Name = "Samsung Galaxy A54 5G",
                    Price = 500,
                    Quantity = 1
                },
                new()
                {
                    CatalogItemId = A14Id,
                    Name = "Samsung Galaxy A14 5G",
                    Price = 200,
                    Quantity = 2
                }
            }
        }
    };

    public CartControllerTest()
    {
        var mockRepo = new Mock<ICartRepository>();
        mockRepo.Setup(repo => repo.GetCartItems(It.IsAny<string>()))
            .Returns<string>(id => _carts[id]);
        mockRepo.Setup(repo => repo.InsertCartItem(It.IsAny<string>(),
                               It.IsAny<CartItem>()))
            .Callback<string, CartItem>((userId, item) =>
            {
                if (_carts.TryGetValue(userId, out var items))
                {
                    items.Add(item);
                }
                else
                {
                    _carts.Add(userId, new List<CartItem> { item });
                }
            });
        mockRepo.Setup(repo => repo.UpdateCartItem(It.IsAny<string>(),
                               It.IsAny<CartItem>()))
            .Callback<string, CartItem>((userId, item) =>
            {
                if (_carts.TryGetValue(userId, out var items))
                {
                    var currentItem = items.FirstOrDefault
                        (i => i.CatalogItemId == item.CatalogItemId);
                    if (currentItem != null)
                    {
                        currentItem.Name = item.Name;
                        currentItem.Price = item.Price;
                        currentItem.Quantity = item.Quantity;
                    }
                }
            });
        mockRepo.Setup(repo => repo.UpdateCatalogItem
                 (It.IsAny<string>(), It.IsAny<string>(), It.IsAny<decimal>()))
            .Callback<string, string, decimal>((catalogItemId, name, price) =>
            {
                var cartItems = _carts
                .Values
                .Where(items => items.Any(i => i.CatalogItemId == catalogItemId))
                .SelectMany(items => items)
                .ToList();

                foreach (var cartItem in cartItems)
                {
                    cartItem.Name = name;
                    cartItem.Price = price;
                }
            });
        mockRepo.Setup(repo => repo.DeleteCartItem
                      (It.IsAny<string>(), It.IsAny<string>()))
            .Callback<string, string>((userId, catalogItemId) =>
            {
                if (_carts.TryGetValue(userId, out var items))
                {
                    items.RemoveAll(i => i.CatalogItemId == catalogItemId);
                }
            });
        mockRepo.Setup(repo => repo.DeleteCatalogItem(It.IsAny<string>()))
            .Callback<string>((catalogItemId) =>
            {
                foreach (var cart in _carts)
                {
                    cart.Value.RemoveAll(i => i.CatalogItemId == catalogItemId);
                }
            });
        _controller = new CartController(mockRepo.Object);
    }

    [Fact]
    public void GetCartItemsTest()
    {
        var okObjectResult = _controller.Get(UserId);
        var okResult = Assert.IsType<OkObjectResult>(okObjectResult);
        var items = Assert.IsType<List<CartItem>>(okResult.Value);
        Assert.Equal(2, items.Count);
    }

    [Fact]
    public void InsertCartItemTest()
    {
        var okObjectResult = _controller.Post(
            UserId,
            new CartItem
            {
                CatalogItemId = A54Id,
                Name = "Samsung Galaxy A54 5G",
                Price = 500,
                Quantity = 1
            }
        );
        Assert.IsType<OkResult>(okObjectResult);
        Assert.NotNull(_carts[UserId].FirstOrDefault(i => i.CatalogItemId == A54Id));
    }

    [Fact]
    public void UpdateCartItemTest()
    {
        var catalogItemId = A54Id;
        var okObjectResult = _controller.Put(
            UserId,
            new CartItem
            {
                CatalogItemId = A54Id,
                Name = "Samsung Galaxy A54",
                Price = 550,
                Quantity = 2
            }
        );
        Assert.IsType<OkResult>(okObjectResult);
        var catalogItem = _carts[UserId].FirstOrDefault
                          (i => i.CatalogItemId == catalogItemId);
        Assert.NotNull(catalogItem);
        Assert.Equal("Samsung Galaxy A54", catalogItem.Name);
        Assert.Equal(550, catalogItem.Price);
        Assert.Equal(2, catalogItem.Quantity);
    }

    [Fact]
    public void DeleteCartItemTest()
    {
        var id = A14Id;
        var items = _carts[UserId];
        var item = items.FirstOrDefault(i => i.CatalogItemId == id);
        Assert.NotNull(item);
        var okObjectResult = _controller.Delete(UserId, id);
        Assert.IsType<OkResult>(okObjectResult);
        item = items.FirstOrDefault(i => i.CatalogItemId == id);
        Assert.Null(item);
    }

    [Fact]
    public void UpdateCatalogItemTest()
    {
        var catalogItemId = A54Id;
        var okObjectResult = _controller.Put(
            A54Id,
            "Samsung Galaxy A54",
            550
        );
        Assert.IsType<OkResult>(okObjectResult);
        var catalogItem = _carts[UserId].FirstOrDefault
                         (i => i.CatalogItemId == catalogItemId);
        Assert.NotNull(catalogItem);
        Assert.Equal("Samsung Galaxy A54", catalogItem.Name);
        Assert.Equal(550, catalogItem.Price);
        Assert.Equal(1, catalogItem.Quantity);
    }

    [Fact]
    public void DeleteCatalogItemTest()
    {
        var id = A14Id;
        var items = _carts[UserId];
        var item = items.FirstOrDefault(i => i.CatalogItemId == id);
        Assert.NotNull(item);
        var okObjectResult = _controller.Delete(id);
        Assert.IsType<OkResult>(okObjectResult);
        item = items.FirstOrDefault(i => i.CatalogItemId == id);
        Assert.Null(item);
    }
}
这是身份微服务的单元测试。
public class IdentityControllerTest
{
    private readonly IdentityController _controller;
    private static readonly string AdminUserId = "653e4410614d711b7fc951a7";
    private static readonly string FrontendUserId = "653e4410614d711b7fc952a7";
    private static readonly User UnknownUser = new()
    {
        Id = "653e4410614d711b7fc957a7",
        Email = "unknown@store.com",
        Password = "4kg245EBBE+1IF20pKSBafiNhE/+WydWZo41cfThUqh7tz7+n7Yn9w==",
        Salt = "2lApH7EgXLHjYAvlmPIDAaQ5ypyXlH8PBVmOI+0zhMBu5HxZqIH7+w==",
        IsAdmin = false
    };
    private readonly List<User> _users = new()
    {
        new()
        {
            Id = AdminUserId,
            Email = "admin@store.com",
            Password = "Ukg255EBBE+1IF20pKSBafiNhE/+WydWZo41cfThUqh7tz7+n7Yn9w==",
            Salt = "4lApH7EgXLHjYAvlmPIDAaQ5ypyXlH8PBVmOI+0zhMBu5HxZqIH7+w==",
            IsAdmin = true
        },
        new()
        {
            Id = FrontendUserId,
            Email = "jdoe@store.com",
            Password = "Vhq8Klm83fCVILYhCzp2vKUJ/qSB+tmP/a9bD3leUnp1acBjS2I5jg==",
            Salt = "7+UwBowz/iv/sW7q+eYhJSfa6HiMQtJXyHuAShU+c1bUo6QUL4LIPA==",
            IsAdmin = false
        }
    };

    private static IConfiguration InitConfiguration()
    {
        var config = new ConfigurationBuilder()
            .AddJsonFile("appsettings.json")
            .AddEnvironmentVariables()
            .Build();
        return config;
    }

    public IdentityControllerTest()
    {
        var mockRepo = new Mock<IUserRepository>();
        mockRepo.Setup(repo => repo.GetUser(It.IsAny<string>()))
            .Returns<string>(email => _users.FirstOrDefault(u => u.Email == email));
        mockRepo.Setup(repo => repo.InsertUser(It.IsAny<User>()))
            .Callback<User>(_users.Add);
        var configuration = InitConfiguration();
        var jwtSection = configuration.GetSection("jwt");
        var jwtOptions = Options.Create(new JwtOptions
        {
            Secret = jwtSection["secret"],
            ExpiryMinutes = int.Parse(jwtSection["expiryMinutes"] ?? "60")
        });
        _controller = new IdentityController
                      (mockRepo.Object, new JwtBuilder(jwtOptions), new Encryptor());
    }

    [Fact]
    public void LoginTest()
    {
        // User not found
        var notFoundObjectResult = _controller.Login(UnknownUser);
        Assert.IsType<NotFoundObjectResult>(notFoundObjectResult);

        // Backend failure
        var user = new User
        {
            Id = FrontendUserId,
            Email = "jdoe@store.com",
            Password = "aaaaaa",
            IsAdmin = false
        };
        var badRequestObjectResult = _controller.Login(user, "backend");
        Assert.IsType<BadRequestObjectResult>(badRequestObjectResult);

        // Wrong password
        user.Password = "bbbbbb";
        badRequestObjectResult = _controller.Login(user);
        Assert.IsType<BadRequestObjectResult>(badRequestObjectResult);

        // Frontend success
        user.Password = "aaaaaa";
        var okObjectResult = _controller.Login(user);
        var okResult = Assert.IsType<OkObjectResult>(okObjectResult);
        var token = Assert.IsType<string>(okResult.Value);
        Assert.NotEmpty(token);

        // Backend success
        var adminUser = new User
        {
            Id = AdminUserId,
            Email = "admin@store.com",
            Password = "aaaaaa",
            IsAdmin = true
        };
        okObjectResult = _controller.Login(adminUser, "backend");
        okResult = Assert.IsType<OkObjectResult>(okObjectResult);
        token = Assert.IsType<string>(okResult.Value);
        Assert.NotEmpty(token);
    }

    [Fact]
    public void RegisterTest()
    {
        // Failure (user already exists)
        var user = new User
        {
            Id = FrontendUserId,
            Email = "jdoe@store.com",
            Password = "aaaaaa",
            IsAdmin = false
        };
        var badRequestObjectResult = _controller.Register(user);
        Assert.IsType<BadRequestObjectResult>(badRequestObjectResult);

        // Success (new user)
        user = new User
        {
            Id ="145e4410614d711b7fc952a7",
            Email = "ctaylor@store.com",
            Password = "cccccc",
            IsAdmin = false
        };
        var okResult = _controller.Register(user);
        Assert.IsType<OkResult>(okResult);
        Assert.NotNull(_users.FirstOrDefault(u => u.Id == user.Id));
    }

    [Fact]
    public void ValidateTest()
    {
        // User not found
        var notFoundObjectResult = _controller.Validate(UnknownUser.Email, string.Empty);
        Assert.IsType<NotFoundObjectResult>(notFoundObjectResult);

        // Invalid token
        var badRequestObjectResult = _controller.Validate("jdoe@store.com", "zzz");
        Assert.IsType<BadRequestObjectResult>(badRequestObjectResult);

        // Success
        var user = new User
        {
            Id = FrontendUserId,
            Email = "jdoe@store.com",
            Password = "aaaaaa",
            IsAdmin = false
        };
        var okObjectResult = _controller.Login(user);
        var okResult = Assert.IsType<OkObjectResult>(okObjectResult);
        var token = Assert.IsType<string>(okResult.Value);
        Assert.NotEmpty(token);
        okObjectResult = _controller.Validate(user.Email, token);
        okResult = Assert.IsType<OkObjectResult>(okObjectResult);
        var userId = Assert.IsType<string>(okResult.Value);
        Assert.Equal(user.Id, userId);
    }
}
如果我们运行单元测试,我们会注意到它们都通过了。

您可以在 GitHub Actions 上找到单元测试结果。
使用健康检查进行监控
在本节中,我们将了解如何向目录微服务添加健康检查以进行监控。
健康检查是服务提供的用于检查服务是否正常运行的端点。
健康检查用于监控服务,例如:
- 数据库 (SQL Server, Oracle, MySql, MongoDB, etc.)
- 外部 API 连接性
- 磁盘连接性 (读/写)
- 缓存服务 (Redis, Memcached, etc.)
如果您找不到适合您的实现,可以创建自己的自定义实现。
为了向目录微服务添加健康检查,添加了以下 nuget 包:
AspNetCore.HealthChecks.MongoDbAspNetCore.HealthChecks.UIAspNetCore.HealthChecks.UI.ClientAspNetCore.HealthChecks.UI.InMemory.Storage
AspNetCore.HealthChecks.MongoDb 包用于检查 MongoDB 的健康状况。
AspNetCore.HealthChecks.UI 包用于使用健康检查 UI,该 UI 存储并显示来自配置的 HealthChecks URI 的健康检查结果。
然后,Startup.cs 中的 ConfigureServices 方法更新如下:
services.AddHealthChecks()
    .AddMongoDb(
        mongodbConnectionString: (
            Configuration.GetSection("mongo").Get<MongoOptions>()
            ?? throw new Exception("mongo configuration section not found")
        ).ConnectionString,
        name: "mongo",
        failureStatus: HealthStatus.Unhealthy
    );
services.AddHealthChecksUI().AddInMemoryStorage();
然后,Startup.cs 中的 Configure 方法更新如下:
app.UseHealthChecks("/healthz", new HealthCheckOptions
{
    Predicate = _ => true,
    ResponseWriter = UIResponseWriter.WriteHealthCheckUIResponse
});

app.UseHealthChecksUI();
最后,appsettings.json 更新如下:
{
  "Logging": {
    "LogLevel": {
      "Default": "Information",
      "Microsoft": "Warning",
      "Microsoft.Hosting.Lifetime": "Information"
    }
  },
  "AllowedHosts": "*",
  "mongo": {
    "connectionString": "mongodb://127.0.0.1:27017",
    "database": "store-catalog"
  },
  "jwt": {
    "secret": "9095a623-a23a-481a-aa0c-e0ad96edc103",
    "expiryMinutes": 60
  },
  "HealthChecksUI": {
    "HealthChecks": [
      {
        "Name": "HTTP-Api-Basic",
        "Uri": "https://:44397/healthz"
      }
    ],
    "EvaluationTimeOnSeconds": 10,
    "MinimumSecondsBetweenFailureNotifications": 60
  }
}
如果我们运行目录微服务,访问 https://:44326/healthchecks-ui 时将获得以下 UI。

就是这样。其他微服务和网关的健康检查以同样的方式实现。
如何运行应用程序
要运行应用程序,请以管理员身份在 Visual Studio 2022 中打开解决方案 store.sln。
如果尚未安装 MongoDB,则需要安装它。
首先,右键单击解决方案,单击属性,然后选择多个启动项目。选择所有项目作为启动项目,除了 Middleware 和 unit tests 项目。
然后,按 **F5** 运行应用程序。
您可以通过 https://:44317/ 访问前端。
您可以通过 https://:44301/ 访问后端。
要首次登录前端,只需点击 **Register** 创建新用户并登录。
要首次登录后端,您需要创建一个管理员用户。为此,请通过 https://:44397/ 打开 Swagger 并注册,或打开 Postman 并执行以下 POST 请求 https://:44397/api/identity/register,并带有以下负载:
{
  "email": "admin@store.com",
  "password": "pass",
  "isAdmin": true
}
最后,您可以使用您创建的管理员用户登录后端。
如果要修改 MongoDB 连接字符串,则需要更新微服务和网关的 appsettings.json。
以下是所有端点:
- 前端: https://:44317/
- 后端: https://:44301/
- 前端网关: https://:44300/
- 后端网关: https://:44359/
- 身份微服务: https://:44397/
- 目录微服务: https://:44326/
- 购物车微服务: https://:44388/
如何部署应用程序
您可以使用 Docker 部署应用程序。
如果尚未安装 Docker,则需要安装它。
首先,将源代码复制到您计算机上的一个文件夹中。
然后打开终端,进入该文件夹(store.sln 文件所在的位置),然后运行以下命令:
docker-compose up
就是这样,应用程序将被部署并运行。
然后,您可以从 http://<hostname>:44317/ 访问前端,从 http://<hostname>:44301/ 访问后端。
这是应用程序在 Ubuntu 上运行的截图

对于那些想了解部署过程的人,这里是 docker-compose.yml
version: "3.8"
services:
  mongo:
    image: mongo
    ports:
       - 27017:27017

  catalog:
    build:
      context: .
      dockerfile: src/microservices/CatalogMicroservice/Dockerfile
    depends_on:
      - mongo
    ports:
      - 44326:80

  cart:
    build:
      context: .
      dockerfile: src/microservices/CartMicroservice/Dockerfile
    depends_on:
      - mongo
    ports:
      - 44388:80

  identity:
    build:
      context: .
      dockerfile: src/microservices/IdentityMicroservice/Dockerfile
    depends_on:
      - mongo
    ports:
      - 44397:80

  frontendgw:
    build:
      context: .
      dockerfile: src/gateways/FrontendGateway/Dockerfile
    depends_on:
      - mongo
      - catalog
      - cart
      - identity
    ports:
      - 44300:80

  backendgw:
    build:
      context: .
      dockerfile: src/gateways/BackendGateway/Dockerfile
    depends_on:
      - mongo
      - catalog
      - identity
    ports:
      - 44359:80

  frontend:
    build:
      context: .
      dockerfile: src/uis/Frontend/Dockerfile
    ports:
      - 44317:80

  backend:
    build:
      context: .
      dockerfile: src/uis/Backend/Dockerfile
    ports:
      - 44301:80
然后,微服务和网关使用了 appsettings.Production.json,网关使用了 ocelot.Production.json。
例如,这是目录微服务的 appsettings.Production.json
{
  "Logging": {
    "LogLevel": {
      "Default": "Information",
      "Microsoft": "Warning",
      "Microsoft.Hosting.Lifetime": "Information"
    }
  },
  "AllowedHosts": "*",
  "mongo": {
    "connectionString": "mongodb://mongo",
    "database": "store-catalog"
  },
  "HealthChecksUI": {
    "HealthChecks": [
      {
        "Name": "HTTP-Api-Basic",
        "Uri": "http://catalog/healthz"
      }
    ],
    "EvaluationTimeOnSeconds": 10,
    "MinimumSecondsBetweenFailureNotifications": 60
  }
}
这是目录微服务的 Dockerfile
# syntax=docker/dockerfile:1

FROM mcr.microsoft.com/dotnet/aspnet:8.0 AS base
WORKDIR /app

FROM mcr.microsoft.com/dotnet/sdk:8.0 AS build
WORKDIR /src
COPY ["src/microservices/CatalogMicroservice/CatalogMicroservice.csproj",
      "microservices/CatalogMicroservice/"]
COPY src/middlewares middlewares/
RUN dotnet restore "microservices/CatalogMicroservice/CatalogMicroservice.csproj"

WORKDIR "/src/microservices/CatalogMicroservice"
COPY src/microservices/CatalogMicroservice .
RUN dotnet build "CatalogMicroservice.csproj" -c Release -o /app/build

FROM build AS publish
RUN dotnet publish "CatalogMicroservice.csproj" -c Release -o /app/publish

FROM base AS final
WORKDIR /app
ENV ASPNETCORE_URLS=http://+:80
EXPOSE 80
EXPOSE 443
COPY --from=publish /app/publish .
ENTRYPOINT ["dotnet", "CatalogMicroservice.dll"]
多阶段构建的解释 在此处。它有助于提高构建容器的效率,并通过仅允许容器包含应用程序运行时所需的组件来减小容器的尺寸。
这是前端网关的 ocelot.Production.json
{
  "Routes": [
    {
      "DownstreamPathTemplate": "/api/catalog",
      "DownstreamScheme": "http",
      "DownstreamHostAndPorts": [
        {
          "Host": "catalog",
          "Port": 80
        }
      ],
      "UpstreamPathTemplate": "/catalog",
      "UpstreamHttpMethod": [ "GET" ],
      "AuthenticationOptions": {
        "AuthenticationProviderKey": "Bearer",
        "AllowedScopes": []
      }
    },
    {
      "DownstreamPathTemplate": "/api/catalog/{id}",
      "DownstreamScheme": "http",
      "DownstreamHostAndPorts": [
        {
          "Host": "catalog",
          "Port": 80
        }
      ],
      "UpstreamPathTemplate": "/catalog/{id}",
      "UpstreamHttpMethod": [ "GET" ],
      "AuthenticationOptions": {
        "AuthenticationProviderKey": "Bearer",
        "AllowedScopes": []
      }
    },
    {
      "DownstreamPathTemplate": "/api/cart",
      "DownstreamScheme": "http",
      "DownstreamHostAndPorts": [
        {
          "Host": "cart",
          "Port": 80
        }
      ],
      "UpstreamPathTemplate": "/cart",
      "UpstreamHttpMethod": [ "POST" ],
      "AuthenticationOptions": {
        "AuthenticationProviderKey": "Bearer",
        "AllowedScopes": []
      }
    },
    {
      "DownstreamPathTemplate": "/api/cart",
      "DownstreamScheme": "http",
      "DownstreamHostAndPorts": [
        {
          "Host": "cart",
          "Port": 80
        }
      ],
      "UpstreamPathTemplate": "/cart",
      "UpstreamHttpMethod": [ "PUT" ],
      "AuthenticationOptions": {
        "AuthenticationProviderKey": "Bearer",
        "AllowedScopes": []
      }
    },
    {
      "DownstreamPathTemplate": "/api/cart",
      "DownstreamScheme": "http",
      "DownstreamHostAndPorts": [
        {
          "Host": "cart",
          "Port": 80
        }
      ],
      "UpstreamPathTemplate": "/cart",
      "UpstreamHttpMethod": [ "DELETE" ],
      "AuthenticationOptions": {
        "AuthenticationProviderKey": "Bearer",
        "AllowedScopes": []
      }
    },
    {
      "DownstreamPathTemplate": "/api/identity/login",
      "DownstreamScheme": "http",
      "DownstreamHostAndPorts": [
        {
          "Host": "identity",
          "Port": 80
        }
      ],
      "UpstreamPathTemplate": "/identity/login",
      "UpstreamHttpMethod": [ "POST" ]
    },
    {
      "DownstreamPathTemplate": "/api/identity/register",
      "DownstreamScheme": "http",
      "DownstreamHostAndPorts": [
        {
          "Host": "identity",
          "Port": 80
        }
      ],
      "UpstreamPathTemplate": "/identity/register",
      "UpstreamHttpMethod": [ "POST" ]
    },
    {
      "DownstreamPathTemplate": "/api/identity/validate",
      "DownstreamScheme": "http",
      "DownstreamHostAndPorts": [
        {
          "Host": "identity",
          "Port": 80
        }
      ],
      "UpstreamPathTemplate": "/identity/validate",
      "UpstreamHttpMethod": [ "GET" ]
    }
  ],
  "GlobalConfiguration": {
    "BaseUrl": "https://:44300/"
  }
}
这是前端网关的 appsettings.Production.json
{
  "Logging": {
    "LogLevel": {
      "Default": "Information",
      "Microsoft": "Warning",
      "Microsoft.Hosting.Lifetime": "Information"
    }
  },
  "AllowedHosts": "*",
  "jwt": {
    "secret": "9095a623-a23a-481a-aa0c-e0ad96edc103"
  },
  "mongo": {
    "connectionString": "mongodb://mongo"
  },
  "HealthChecksUI": {
    "HealthChecks": [
      {
        "Name": "HTTP-Api-Basic",
        "Uri": "http://frontendgw/healthz"
      }
    ],
    "EvaluationTimeOnSeconds": 10,
    "MinimumSecondsBetweenFailureNotifications": 60
  }
}
最后,这是前端网关的 Dockerfile
# syntax=docker/dockerfile:1

FROM mcr.microsoft.com/dotnet/aspnet:8.0 AS base
WORKDIR /app

FROM mcr.microsoft.com/dotnet/sdk:8.0 AS build
WORKDIR /src
COPY ["src/gateways/FrontendGateway/FrontendGateway.csproj", "gateways/FrontendGateway/"]
COPY src/middlewares middlewares/
RUN dotnet restore "gateways/FrontendGateway/FrontendGateway.csproj"

WORKDIR "/src/gateways/FrontendGateway"
COPY src/gateways/FrontendGateway .
RUN dotnet build "FrontendGateway.csproj" -c Release -o /app/build

FROM build AS publish
RUN dotnet publish "FrontendGateway.csproj" -c Release -o /app/publish

FROM base AS final
WORKDIR /app
ENV ASPNETCORE_URLS=http://+:80
EXPOSE 80
EXPOSE 443
COPY --from=publish /app/publish .
ENTRYPOINT ["dotnet", "FrontendGateway.dll"]
其他微服务和后端网关的配置也以几乎相同的方式完成。
就是这样!希望您喜欢阅读这篇文章。
参考文献
历史
- 2023 年 11 月 15 日
- 首次发布
- 2023 年 11 月 23 日
- 将
Ocelot从 20.0.0 升级到 21.0.0 - 将
Serilog.AspNetCore从 7.0.0 升级到 8.0.0 - 将
xunit从 2.6.1 升级到 2.6.2 - 将
xunit.runner.visualstudio从 2.5.3 升级到 2.5.4
- 将
- 2023 年 11 月 29 日
- 将
Ocelot从 21.0.0 升级到 22.0.0 - 将
Moq从 4.20.69 升级到 4.20.70
- 将
- 2023 年 12 月 26 日
- 将
Ocelot从 22.0.0 升级到 22.0.1 - 将
MongoDB.Driver从 2.22.0 升级到 2.23.1 - 将
AspNetCore.HealthChecks.UI从 7.0.2 升级到 8.0.0 - 将
AspNetCore.HealthChecks.UI.Client从 7.1.0 升级到 8.0.0 - 将
AspNetCore.HealthChecks.UI.InMemory.Storage从 7.0.0 升级到 8.0.0 - 将
AspNetCore.HealthChecks.MongoDb从 7.0.0 升级到 8.0.0 - 将
xunit从 2.6.2 升级到 2.6.4 - 将
xunit.runner.visualstudio从 2.5.4 升级到 2.5.6
- 将
- 2024 年 1 月 14 日
- 更新了后端和前端
- 将
Microsoft.VisualStudio.Azure.Containers.Tools从 1.19.5 升级到 1.19.6 - 将
Microsoft.AspNetCore.Authentication.JwtBearer从 8.0.0 升级到 8.0.1 - 将
xunit从 2.6.4 升级到 2.6.5
- 2024 年 2 月 13 日
- 将
Ocelot从 22.0.1 升级到 23.0.0 - 将
Microsoft.AspNetCore.Authentication.JwtBearer从 8.0.1 升级到 8.0.2 - 将
Serilog.AspNetCore从 8.0.0 升级到 8.0.1 - 将
xunit从 2.6.5 升级到 2.6.6 - 将
Microsoft.NET.Test.Sdk从 17.8.0 升级到 17.9.0
- 将
- 2024 年 3 月 3 日
- 将
Ocelot从 23.0.0 升级到 23.1.0 - 将
coverlet.collector从 6.0.0 升级到 6.0.1 - 将
MongoDB.Driver从 2.23.1 升级到 2.24.0 - 将
xunit从 2.6.6 升级到 2.7.0 - 将
xunit.runner.visualstudio从 2.5.6 升级到 2.5.7
- 将
- 2024 年 3 月 23 日
- 将
coverlet.collector从 6.0.1 升级到 6.0.2 - 将
Microsoft.AspNetCore.Authentication.JwtBearer从 8.0.2 升级到 8.0.3 - 将
Microsoft.Extensions.DependencyInjection.Abstractions从 8.0.0 升级到 8.0.1
- 将