
增强 WPF DatePicker: 通过 SmartDate CustomControl 解决问题
5.00/5 (4投票s)
一份全面的指南,介绍了识别标准 WPF DatePicker 的问题,探讨其设计和交互的复杂性,并引入一个名为 SmartDate 的 CustomControl 的新实现。
认识到 WPF DatePicker 的问题
WPF DatePicker 是 WPF 的核心控件之一,拥有近20年的历史。与 Button、TextBox 或 CheckBox 等简单控件相比,DatePicker 的结构和阶段更为复杂,由多个控件组成。这种复杂性需要高超的专业知识才能进行自定义,使得使用或修改提供的过时控件变得困难。
理解 WPF DatePicker
分析和理解 DatePicker 的结构及其内部元素在 Template 中的交互,对于提高 WPF 的基本设计和分析能力非常有益。这适用于所有 WPF 控件,而不仅仅是 DatePicker。然而,由于 DatePicker 是根据过时的趋势设计的,因此基于基本 Control 实现一个新的 CustomControl 可能更有效。
源代码下载和设置
本文识别了使用基本 DatePicker 的问题,并演示了如何使用 CustomControl 方法重新设计它。通过 GitHub 下载源代码以亲身体验结果并阅读本文也是有益的。
首先,使用以下 git 命令下载源代码
git clone https://github.com/vickyqu115/smartdate
接下来,要运行源代码中的解决方案文件,您需要一个运行 Windows 10 或更高版本、Visual Studio 2022 或 Rider 以及 .NET 8.0 的环境。
SmartDate.sln
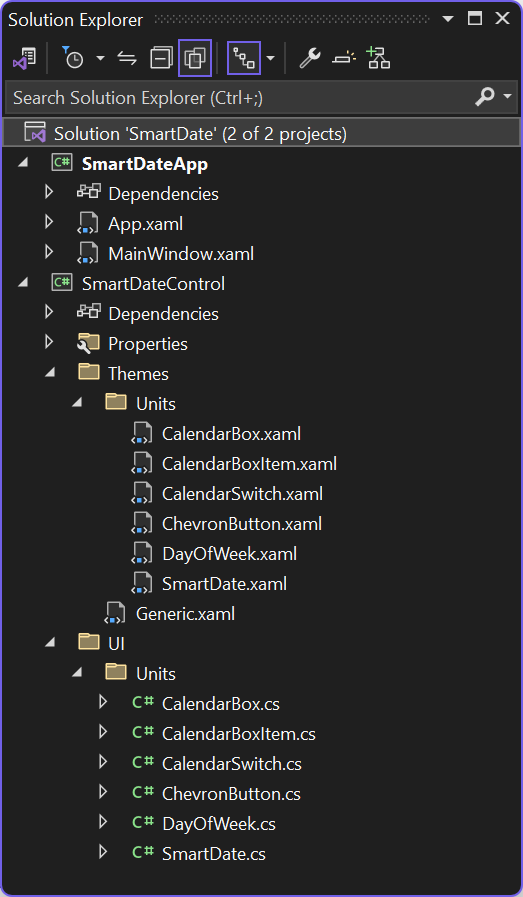
项目结构
SmartDate 包含两个项目
- SmartDateControl
- SmartDateApp
SmartDateControl 是一个 CustomControl 库,其中包含 SmartDate 类以及所有其他从属 CustomControl 类。SmartDateApp 是一个简单的应用程序项目,用于指导用户如何使用此控件。
声明和使用 SmartDate
用法很简单。使用 xmlns 声明命名空间,然后像使用标准 DatePicker 一样使用 SmartDate。
<Window x:Class="SmartDateApp.MainWindow"
        xmlns="http://schemas.microsoft.com/winfx/2006/xaml/presentation"
        xmlns:x="http://schemas.microsoft.com/winfx/2006/xaml"
        xmlns:d="http://schemas.microsoft.com/expression/blend/2008"
        xmlns:mc="http://schemas.openxmlformats.org/markup-compatibility/2006"
        xmlns:smart="clr-namespace:SmartDateControl.UI.Units;assembly=SmartDateControl"
        xmlns:theme="https://jamesnet.dev/xaml/presentation/themeswitch"
        mc:Ignorable="d"
        x:Name="Window"
        Title="SmartDate" Height="450" Width="800" Background="#FFFFFF">
    <Viewbox Width="500">
        <UniformGrid Margin="20" Columns="1" VerticalAlignment="Top">
            <smart:SmartDate SelectedDate="{Binding Created}"/>
            <DatePicker SelectedDate="{Binding Created}"/>
        </UniformGrid>
    </Viewbox>
</Window>
SelectedDate 是一个 DependencyProperty,使用与 DatePicker 的 SelectedDate 相同的 DateTime? 类型。
执行结果

CustomControl 的定义和使用
我之前在 CodeProject 的四篇文章中详细讨论了 CustomControl 背后的技术。如果您需要理解和掌握 CustomControl,请参考这些文章。特别是关于 RiotSlider 的文章深入探讨了 WPF CustomControl 的架构,如果您还没有阅读过,我强烈推荐您阅读。
回到主要讨论,让我们来定义 CustomControl。通常,CustomControl 的目标是派生自 Control 的类,但实际上,它包括所有派生自 DependencyObject 的类,而不仅仅是继承 Control 的类,例如 Panels,直到 Visuals,如 Animations。然而,如前所述,只有在能够利用 Templates 或至少 DataContext 的层中实现 CustomControl 才有意义。因此,以 CustomControl 的风格实现派生自 FrameworkElement 的类被认为是明智的。
设计新的 DatePicker:SmartDate
本文将详细介绍如何在不使用现有 DatePicker 的情况下,实现一个名为 SmartDate 的新 CustomControl,它派生自最基本的类 Control。
选择 Control 而不是 ContentControl
首先,让我们来研究一下 ContentControl 和 Control 之间的区别。ContentControl 不仅提供基本的 Template,还提供 Content 和 ContentTemplate 属性。这些属性通过 ContentPresenter 自动链接,自动建立 ContentPresenter、Content 和 ContentTemplate 之间的关系。因此,建议根据 DataTemplate 的基本用法选择派生控件。
DatePicker 本质上是一个利用 DataTemplate 的控件吗?虽然观点可能不同,但像 DatePicker 这样的复杂控件通常需要多个 DataTemplates,并且与标准的 ContentControl 不同。事实上,DatePicker 派生自 Control,类似的控件通常也继承自 Control。例如,ComboBox 看起来可能与 DatePicker 相似,但它是一个具有 ItemsSource 属性的 ItemsControl。
因此,将 SmartDate 的实现基于 Control 是合适的,特别是 since SmartDate 不提供自己的 DataTemplate。
使用 DataTemplate
尽管 SmartDate 默认不提供 DataTemplate,但在控件的各个区域都有许多可以通过 DataTemplate 扩展来受益的点。
例如,您可以扩展 DayOfWeek 控件的 ContentPresenter 以添加特定的日期处理,这是客户的常见要求。这允许进行各种扩展,例如为特殊日期添加触发器或转换器。
通过将 SelectedDate 绑定区域扩展到 ContentPresenter,您可以灵活地使用它来选择日期,包括从简单的 TextBlock 到可编辑的 TextBox,甚至包括时间。
对 DataTemplate 的负面看法
DataTemplate 在复杂情况下仍然保持通用性,并且是自定义的重要模板区域。然而,是否应该将这种通用性应用于日期选择器等特定控件应仔细考虑。使用 DataTemplate 意味着所有相关逻辑必须被分离成可交互实现的组件。虽然这看起来很实用,但做出明智的判断至关重要。
SmartDate 的关键绑定属性 (DependencyProperty)
此控件包含一个名为 SelectedDate 的绑定属性,类型为 DateTime?。由于默认值可能为 null,因此它被声明为可空类型,用于设置通过日历选择的日期值。
SmartDate 模板设计
ControlTemplate 设计中必须包含的基本组件如下:
- 弹出窗口
- ListBox
- ToggleButton
Popup 作为容纳 ListBox(即日历)的面板,ListBox 使用内部的 ItemsPanel 通过 UniformGrid 实现日历。ToggleButton 用作日历图标,切换按钮会更改 Popup 的 IsOpen 属性来控制日历窗口。这种设置与基本 DatePicker 控件中的设置相似,因此与实际的 DatePicker 开源代码进行比较非常有益。
现在让我们看看 SmartDate 控件在 Template 中的结构。
SmartDate: ControlTemplate
<ControlTemplate TargetType="{x:Type units:SmartDate}">
    <Border Background="{TemplateBinding Background}"
            BorderBrush="{TemplateBinding BorderBrush}"
            BorderThickness="{TemplateBinding BorderThickness}" CornerRadius="4">
        <Grid>
            <units:CalendarSwitch x:Name="PART_Switch"/>
            <Popup x:Name="PART_Popup" StaysOpen="False" ...>
                <Border Background="{TemplateBinding Background}" ...>
                    <james:JamesGrid Rows="Auto,Auto,Auto" Columns="*">
                        <james:JamesGrid Rows="*" Columns="Auto,*,Auto">
                            <units:ChevronButton x:Name="PART_Left" Tag="Left"/>
                            <TextBlock Style="{StaticResource MonthStyle}"/>
                            <units:ChevronButton x:Name="PART_Right" Tag="Right"/>
                        </james:JamesGrid>
                        <UniformGrid Columns="7">
                            <units:DayOfWeek Grid.Column="0" Content="Su"/>
                            <units:DayOfWeek Grid.Column="1" Content="Mo"/>
                            <units:DayOfWeek Grid.Column="2" Content="Tu"/>
                            <units:DayOfWeek Grid.Column="3" Content="We"/>
                            <units:DayOfWeek Grid.Column="4" Content="Th"/>
                            <units:DayOfWeek Grid.Column="5" Content="Fr"/>
                            <units:DayOfWeek Grid.Column="6" Content="Sa"/>
                        </UniformGrid>
                        <units:CalendarBox x:Name="PART_ListBox"/>
                    </james:JamesGrid>
                </Border>
            </Popup>
        </Grid>
    </Border>
</ControlTemplate>
正如您在 ControlTemplate 中看到的,所有先前提到的组件都包含在内。Popup 用作基本控件,CalendarSwitch 是一个继承自 ToggleButton 的日历切换按钮。最后,CalendarBox 继承自 ListBox,用作日历上选择日期的列表控件。
此外,还包含用于导航到上一个月和下一个月的按钮,用于显示当前月份的 TextBlock,以及用于显示星期几的设计元素。
CustomControl 仅用于内部使用,不用于重用
SmartDate 控件不仅独立使用,还在其 Template 中使用了 CustomControls。并非所有 CustomControls 都旨在实现通用控件。在 SmartDate 等情况下,它们是为特定目的实现的,这是从 WPF 架构角度来看的常见做法。
这类控件通常归类在“Primitives”命名空间下。此类别包括 ToggleButton、Thumb 和 ScrollBar 等控件,它们通常不直接使用,而是用在其他控件的内部。
基于 WPF 的这些架构事实,可以看出 SmartDate 控件的 Template 结构与 WPF 的基本模式没有显著差异。
理解 PART_ 控件项及其作用
CustomControl 结构不像 UserControls 那样自动连接代码和 XAML。因此,两者之间的所有交互完全由 _PART 控件管理。
预定义的 _PART 控件包括:
- PART_Switch
- PART_ListBox
- PART_Left
- PART_Right
这些在 SmartDate 类重写 OnApplyTemplate 方法时被分配,所有必要的进程,如按钮事件和日期生成,都在此处实现。在传递 OnApplyTemplate 时,将控件命名为 PART_ 前缀是一个好习惯。此外,在 XAML 中命名这些元素,使其允许开发人员根据 PART_ 名称预测类中的进程,将是典范。
SmartDate.cs 源代码
接下来,我们将检查 SmartDate.cs 类文件中包含的核心实现。需要重点关注的区域包括:
- 声明的 DependencyProperty
- 通过 OnApplyTemplate 定义 PART_ 元素
- 通过 SelectedDate 属性进行日期选择控件逻辑
- 在 CalendarBox 中使用 SelectedItem/SelectedValue
SmartDate: CustomControl
using System;
using System.Collections.Generic;
using System.Linq;
using System.Text;
using System.Threading.Tasks;
using System.Windows;
using System.Windows.Controls;
using System.Windows.Controls.Primitives;
using System.Windows.Data;
using System.Windows.Documents;
using System.Windows.Input;
using System.Windows.Media;
using System.Windows.Media.Imaging;
using System.Windows.Navigation;
using System.Windows.Shapes;

namespace SmartDateControl.UI.Units
{
    public class SmartDate : Control
    {
        private Popup _popup;
        private CalendarSwitch _switch;
        private CalendarBox _listbox;

        public bool KeepPopupOpen
        {
            get { return (bool)GetValue(KeepPopupOpenProperty); }
            set { SetValue(KeepPopupOpenProperty, value); }
        }

        public static readonly DependencyProperty KeepPopupOpenProperty =
            DependencyProperty.Register("KeepPopupOpen", typeof(bool), typeof(SmartDate), new PropertyMetadata(true));


        public DateTime CurrentMonth
        {
            get { return (DateTime)GetValue(CurrentMonthProperty); }
            set { SetValue(CurrentMonthProperty, value); }
        }

        public static readonly DependencyProperty CurrentMonthProperty =
            DependencyProperty.Register("CurrentMonth", typeof(DateTime), typeof(SmartDate), new PropertyMetadata(null));


        public DateTime? SelectedDate
        {
            get { return (DateTime?)GetValue(SelectedDateProperty); }
            set { SetValue(SelectedDateProperty, value); }
        }

        public static readonly DependencyProperty SelectedDateProperty =
            DependencyProperty.Register("SelectedDate", typeof(DateTime?), typeof(SmartDate), new PropertyMetadata(null));


        static SmartDate()
        {
            DefaultStyleKeyProperty.OverrideMetadata(typeof(SmartDate), new FrameworkPropertyMetadata(typeof(SmartDate)));
        }
        public override void OnApplyTemplate()
        {
            base.OnApplyTemplate();

            _popup = (Popup)GetTemplateChild("PART_Popup");
            _switch = (CalendarSwitch)GetTemplateChild("PART_Switch");
            _listbox = (CalendarBox)GetTemplateChild("PART_ListBox");
            ChevronButton leftButton = (ChevronButton)GetTemplateChild("PART_Left");
            ChevronButton rightButton = (ChevronButton)GetTemplateChild("PART_Right");

            _popup.Closed += _popup_Closed;
            _switch.Click += _switch_Click;
            _listbox.MouseLeftButtonUp += _listbox_MouseLeftButtonUp;

            leftButton.Click += (s, e) => MoveMonthClick(-1);
            rightButton.Click += (s, e) => MoveMonthClick(1);

        }

        private void MoveMonthClick(int month)
        {
            GenerateCalendar(CurrentMonth.AddMonths(month));
        }

        private void _popup_Closed(object sender, EventArgs e)
        {
            _switch.IsChecked = IsMouseOver;
        }

        private void _switch_Click(object sender, RoutedEventArgs e)
        {
            if (_switch.IsChecked == true)
            {
                _popup.IsOpen = true;

                GenerateCalendar(SelectedDate ?? DateTime.Now);
            }
        }

        private void _listbox_MouseLeftButtonUp(object sender, MouseButtonEventArgs e)
        {
            if (_listbox.SelectedItem is CalendarBoxItem selected)
            {
                SelectedDate = selected.Date;
                GenerateCalendar(selected.Date);

                _popup.IsOpen = KeepPopupOpen;
            }
        }
        private void GenerateCalendar(DateTime current)
        {
            if (current.ToString("yyyyMM") == CurrentMonth.ToString("yyyyMM")) return;

            CurrentMonth = current;
            _listbox.Items.Clear();
            DateTime fDayOfMonth = new(current.Year,current.Month,1);
            DateTime lDayOfMonth = fDayOfMonth.AddMonths(1).AddDays(-1);

            int fOffset = (int)fDayOfMonth.DayOfWeek;
            int lOffset = 6 - (int)lDayOfMonth.DayOfWeek;

            DateTime fDay = fDayOfMonth.AddDays(-fOffset);
            DateTime lDay = lDayOfMonth.AddDays(lOffset);

            for (DateTime day = fDay; day <= lDay; day = day.AddDays(1))
            {
                CalendarBoxItem boxItem = new();
                boxItem.Date = day;
                boxItem.DateFormat = day.ToString("yyyyMMdd");
                boxItem.Content = day.Day;
                boxItem.IsCurrentMonth = day.Month == current.Month;

                _listbox.Items.Add(boxItem);
            }
            if (SelectedDate != null)
            {
                _listbox.SelectedValue = SelectedDate.Value.ToString("yyyyMMdd");
            }
        }
    }
}
首先,仔细检查 DependencyProperty,包括 SelectedDate 等重要属性,它保留了所选的日期。KeepPopupOpen 属性确定在选择日期后是否保持窗口打开,而 CurrentMonth 属性(一个在标准 DatePicker 控件中未见的 DateTime 属性)保留当前月份的位置,以方便在日历月份之间导航。
GenerateCalendar 方法包含基于所选日期重新创建日历的逻辑。Offset 计算部分在此值得注意。当前日期设置日历显示,为了包含上一个月和下一个月的预览日期,需要一个简单但至关重要的计算。
DateTime fDayOfMonth = new(current.Year,current.Month,1);
DateTime lDayOfMonth = fDayOfMonth.AddMonths(1).AddDays(-1);

int fOffset = (int)fDayOfMonth.DayOfWeek;
int lOffset = 6 - (int)lDayOfMonth.DayOfWeek;

DateTime fDay = fDayOfMonth.AddDays(-fOffset);
DateTime lDay = lDayOfMonth.AddDays(lOffset);
在事件处理方面,日历选择事件利用 MouseLeftButtonUp 来与典型的按钮点击行为保持一致。这是合适的,因为如果再次选择相同的值,SelectionChanged 事件不会触发,因此在这种情况下不适用。
ToggleButton 的 IsChecked 状态、Popup 的 IsOpen 和 Close 功能之间的交互都通过事件实现,提供了一个全面的交互机制,通过直接实现来学习它是有益的。
附加实现
这个为教程目的而设计的应用程序允许进一步的功能扩展,例如时间选择或手动值调整。在此框架内,还可以实现根据特定客户要求量身定制的日历显示。
SmartDate 实现教程和源代码简介
SmartDate 控件的整个实现过程可在 YouTube 和 Bilibili 的教程视频中找到,并可在 GitHub 上查看。这些视频时长略超 50 分钟,在平衡其他专业职责的同时花费了两个月时间开发,使其成为免费提供的高质量教育资源。建议您留出充足的时间和耐心来学习这些教程,以确保充分的学习。
如果您对 WPF 或相关研究有任何疑问,请随时进行讨论。我们的社区非常乐意协助您的探索。