端到端的 LightSwitch HTML 示例
4.95/5 (34投票s)
创建 HTML5 LightSwitch 应用程序的分步教程
从此处下载 63MB 的项目: http://code.msdn.microsoft.com/vstudio/Online-Ordering-System-An-5a6d9134
端到端的 LightSwitch HTML 示例
注意: 在此处查看更新后的 Visual Studio 2013 版本: 一个端到端的 Visual Studio LightSwitch 2013 HTML5 应用程序
实时演示: https://endtoendexample.lightswitchhelpwebsite.com/Client/default.htm (请使用您在 http://LightSwitchHelpWebsite.com 上的用户名和密码)
在本文中,我们将创建一个端到端的HTML应用程序,该应用程序使用Visual Studio LightSwitch。目的是演示LightSwitch如何让您创建专业业务应用程序,而这些应用程序可能需要开发人员花费数天时间才能创建。使用LightSwitch,您可以在不到一个小时的时间内创建此类应用程序。
您可以在以下位置下载LightSwitch: http://www.microsoft.com/visualstudio/en-us/lightswitch。
场景
在此示例中,我们将负责创建一个满足订单跟踪系统以下要求的应用程序:
- 产品
- 添加产品
- 编辑产品
- 删除产品
- 订单
- 添加订单
- 编辑订单
- 添加订单明细
- 编辑订单明细
- 删除订单明细
- 删除订单
- Business Rules
- 允许当前用户只能查看自己的订单
- 显示当前用户的订单数量
- 允许管理员查看所有订单
- 特点
- 显示用户订单数量
创建应用程序

打开 Visual Studio 并选择 文件,然后选择 新建项目。

创建一个新的LightSwitch HTML 应用程序(请注意,您必须安装LightSwitch HTML Client)。

应用程序将被创建。

在解决方案资源管理器中,用鼠标右键单击Server节点,然后选择Add Table。

单击表名进行编辑。
将表名更改为Product。

另外,为该表添加ProductName和ProductPrice字段。

单击Save按钮保存表。

创建一个Order表(包含上图中所示的字段)。

创建一个OrderDetail表(包含上图中所示的字段)。
创建关系
在表之间存在关联时,您应该始终创建关系。这有助于优化LightSwitch应用程序的构建。创建查询时,定义关系允许您只需键入一个句点(“.”)即可从一个实体遍历到另一个实体。这可以节省大量编码工作并减少编码错误。
创建用户界面时,定义关系可以节省大量编码工作,因为LightSwitch可以自动关联,例如,将Order Details与其关联的Order进行关联。

单击Relationship按钮,在OrderDetail和Product表之间创建一个关系。

将出现一个框。选择Product作为To表,然后单击OK(确保其他字段与上图匹配)。

您将看到已创建关系。您可以双击该线来编辑关系。

再次单击Relationship按钮,并与Order表建立新关系。
创建过滤器
我们需要实现的一个功能是仅显示用户的订单(并允许管理员查看所有订单)。我们必须牢记,所有LightSwitch应用程序都通过 OData 公开所有数据,因此我们必须始终在服务器端代码中设置安全,而不仅仅是在客户端代码(如HTML或Silverlight LightSwitch客户端)中。

我们需要做的第一件事是启用安全性。

接下来,我们打开Orders表,选择Write Code,然后选择Orders_Filter。
为该方法使用以下代码
        partial void Orders_Filter(ref Expression<Func<Order, bool>> filter)
        {
            // Only show the Orders for the current user
            filter = (x => x.UserName == this.Application.User.Identity.Name);
        }
所有访问此表的数据都将通过此过滤器。
设置默认值
考虑到我们必须在服务器端代码中设置所有与安全相关的项,我们意识到使用当前用户的UserName标记订单必须通过服务器端代码进行设置。

打开Orders表,选择Write Code,然后选择Orders_Inserting。为该方法使用以下代码:
        partial void Orders_Inserting(Order entity)
        {
            // Set the Username
            entity.UserName = this.Application.User.Name;
        }
对Orders_Updating事件执行相同操作。
稍后,我们还将使用客户端代码设置UserName,但是,服务器端代码将始终运行并覆盖客户端设置的任何值。
创建查询
我们需要实现的另一个功能是显示当前用户的订单数量。我们将创建一个查询,以便稍后可以从客户端使用。

用鼠标右键单击Orders表,然后选择Add Query。

通过单击标题并进行编辑,将查询命名为OrdersForUser。先保存它,然后选择OrdersForUser PreprocessQuery。
为该方法使用以下代码:
        partial void OrdersForUser_PreprocessQuery(ref IQueryable<Order> query)
        {
            // Only show the Orders for the current user
            query = query.Where(x => x.UserName == this.Application.User.Identity.Name);
        }
创建产品用户界面

我们将首先创建一个屏幕,以便我们可以查看Products。
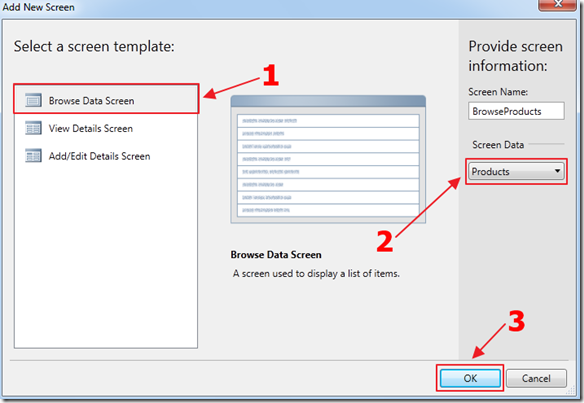
在解决方案资源管理器中,用鼠标右键单击Client节点,然后选择Add Screen。

使用Products表创建一个Browse Data Screen。

屏幕将被创建。

现在,我们将创建一个屏幕,以便我们可以编辑所选的Product。
单击Products List,在其Properties中选择Item Tap操作。

选择Choose an existing method,然后选择editSelected。

现在,我们将把Browse Data Screen连接到一个新的Edit Screen。
对于Navigate To,选择(New Screen…),然后单击OK。

将显示Add New Screen框。仅选择Product Details,然后单击OK。

屏幕将被创建。

现在,我们将添加一个按钮来创建新的Product。
返回到Browse Products屏幕。

选择Command Bar,然后选择Add,然后选择Choose an existing method,然后选择AddAndEditNew。

对于Navigate To,选择Add Edit Product(在上一步中创建的屏幕),然后单击OK。

按F5运行应用程序。
单击ADD PRODUCT按钮添加一个Product。

添加产品,然后单击Save按钮进行保存。

产品将显示在列表中。
创建主页

现在,我们将创建Main屏幕。
创建一个名为Main的新屏幕,使用Orders表作为Screen Data。

为List控件选择Item Tap操作。

现在,我们将屏幕连接到一个新的Edit屏幕。
对于Navigate To,选择(New Screen…),然后单击OK。

将显示Add New Screen框。选择Order Details和Order OrderDetails,然后单击OK。

屏幕将被创建。
格式化添加编辑订单屏幕

将User Name Text Box更改为Text标签。

现在,我们将允许用户选择一个Order Detail并在新屏幕中进行编辑。
单击Order Details List控件,然后在其Properties中单击Tap操作。
选择OrderDetails.editSelected,然后选择Navigate To: (New Screen…)。

将显示Add New Screen框。
选择OrderDetail Details,然后单击OK。

屏幕将被创建。
格式化添加订单明细编辑屏幕

用鼠标右键单击Order下拉列表的Rows Layout,然后Delete它。
我们不需要显示Order(并允许其更改),因为它将在用户到达此屏幕时设置。
稍后我们将返回此屏幕以添加一个delete按钮。该delete按钮需要自定义JavaScript,我们将在后面进行演示。
因此,我们暂时完成此屏幕。
创建添加订单明细按钮

我们将创建一个按钮,允许用户添加新的Order Detail。
返回到AddEditOrder屏幕。
打开Order Details选项卡的Command Bar。
选择Add以添加新按钮。
在Add Button弹出窗口中,选择OrderDetails.addAndEditNew和Navigate To: Add Edit Order Detail(您在上一步中创建的屏幕)。
创建添加订单按钮

我们将创建一个按钮,允许用户添加新的Order。
返回到Main屏幕。
打开Command Bar。
选择Add以添加新按钮。
在Add Button弹出窗口中,选择Orders.addAndEditNew和Navigate To: Add Edit Order(您在上一步中创建的屏幕)。

在解决方案资源管理器中,用鼠标右键单击Main页面,然后选择Set as Home Screen。
设置默认值

如果我们运行应用程序,然后单击Add Order按钮……
……并尝试创建Order,它将无法保存。
我们缺少User Name。我们已经添加了代码来用当前用户覆盖User Name,但由于我们将其设为必填字段,因此仍必须提供。我们可以简单地将User Name字段设置为文本框并允许用户输入,但我们可以使用ServerApplicationContext在客户端自动插入它。
有关分步教程,请参阅以下文章: 在 LightSwitch HTML 客户端中检索当前用户。
使用 Server Application Context
现在,我们将创建一个文件处理程序,该处理程序将使用Server Application Context API来检索当前登录用户的User Name。然后,我们将从客户端的JavaScript代码调用该处理程序,以在屏幕上填充该值。

在解决方案资源管理器中,单击项目并切换到File View。

用鼠标右键单击Server/Web文件夹,然后选择Add,然后选择New Item。

创建一个新的Generic Handler。
(注意:您必须从头创建文件,以便将正确的引用添加到项目中。如果您只是将文件复制粘贴或拖放到项目中,它将无法正常工作。)
为文件使用以下代码:
using System;
using System.Collections.Generic;
using System.Linq;
using System.Web;
namespace LightSwitchApplication.Web
{
    public class GetUserName : IHttpHandler
    {
        public void ProcessRequest(HttpContext context)
        {
            using (var serverContext = ServerApplicationContext.CreateContext())
            {
                context.Response.ContentType = "text/plain";
                context.Response.Write(serverContext.Application.User.Name);
            }
        }
        public bool IsReusable
        {
            get
            {
                return false;
            }
        }
    }
}

切换回Logical View,打开Order表,选择Client(选项卡),然后选择Write Code,接着选择created方法。
为该方法使用以下代码
myapp.Order.created = function (entity) {
    // Set the default date for the Order
    entity.OrderDate = new Date();
    // Using a Promise object we can call the CallGetUserName function
    msls.promiseOperation(CallGetUserName).then(function PromiseSuccess(PromiseResult) {
        // Set the result of the CallGetUserName function to the
        // UserName of the entity
        entity.UserName = PromiseResult;
    });
};

// This function will be wrapped in a Promise object
function CallGetUserName(operation) {
    $.ajax({
        type: 'post',
        data: {},
        url: '../web/GetUserName.ashx',
        success: operation.code(function AjaxSuccess(AjaxResult) {
            operation.complete(AjaxResult);
        })
    });
}
(注意:有关使用msls.promiseOperation的更多信息,请参阅 在 Visual Studio LightSwitch 中使用 Promises)。

当我们运行应用程序时,创建新记录时,User Name和Date现在已设置为其默认值。
您现在可以创建和保存记录。
格式化输出

当我们查看Order Details时,我们发现它不是我们想要的格式。

我们返回到Add Edit Order屏幕,并将Order Detail Summary控件更改为Custom Control。

在控件的Properties中,选择Edit Render Code。
我们使用以下代码:
myapp.AddEditOrder.RowTemplate_render = function (element, contentItem) {
    // We need to wait until the Products for the Order Detail are loaded
    // so we create a binding to "value.Product.ProductName"
    // When the data is loaded the binding will be raised
    // We will then have all the data required for our display
    contentItem.dataBind("value.Product.ProductName", function (newValue) {
        // clear the element
        element.innerHTML = "";
        // Create a template
        var itemTemplate = $("<div></div>");
        // Get the Product name and quantity
        var ProductName = contentItem.value.Product.ProductName;
        var ProductQuantity = "";
        if (contentItem.value.Quantity !== undefined) {
            ProductQuantity = ' [' + contentItem.value.Quantity + ']';
        }
        // Create the final display
        var FinalName = $("<h2>").text(ProductName + ProductQuantity);
        // Complete the template
        FinalName.appendTo($(itemTemplate));
        itemTemplate.appendTo($(element));
    });
};
(注意:有关Promises的更多信息,请参阅: 在 Visual Studio LightSwitch 中使用 Promises。
另请参阅: 在 Visual Studio LightSwitch 中编写实现绑定模式的 JavaScript)

当我们运行应用程序时,输出将按照我们期望的方式格式化。
调用自定义查询
接下来,我们将调用之前创建的查询。

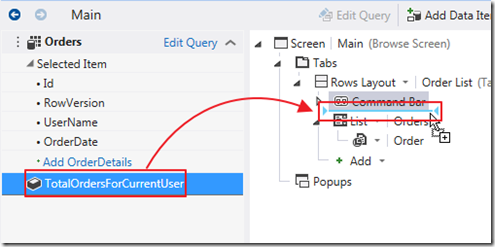
打开Main屏幕,选择Add Data Item,然后创建一个Integer属性。

将该属性从View Model拖放到屏幕布局中。

在Properties中,将标签设置为Left-aligned。

要设置属性的值,请选择Write Code,然后选择created方法。
使用以下代码
myapp.Main.created = function (screen) {
    myapp.activeDataWorkspace.ApplicationData.OrdersForUser().execute().then(function (results) {
        var TotalCountOfOrders = CountOrders(results);
        screen.TotalOrdersForCurrentUser = TotalCountOfOrders.toString();
    });
};
function CountOrders(Orders) {
    var TotalOrders = 0;
    var orders = Orders.results;
    orders.forEach(function (order) {
        TotalOrders = TotalOrders + 1;
    });
    return TotalOrders;
}

当我们运行应用程序时,我们将看到Orders的计数。
轻松格式化

当我们查看Main屏幕时,我们看到它显示了User Name,而我们希望显示Order Date。

在Visual Studio中,打开Main屏幕。
将Order Summary控件更改为Rows Layout。

用鼠标右键单击User Name标签,然后删除它。

当我们运行应用程序时,我们将看到Order Date。
删除记录

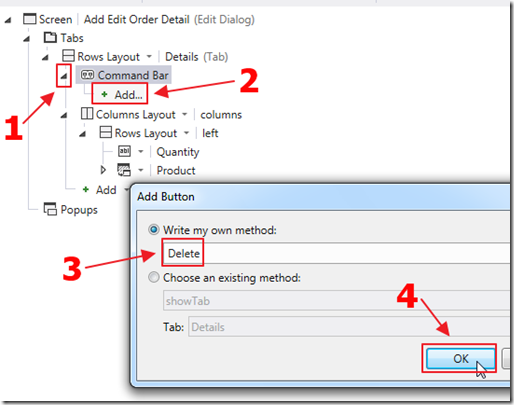
打开Add Edit Order Detail屏幕,并在Command Bar中添加一个按钮。
为该按钮创建一个Delete方法。

用鼠标右键单击View Model中的Delete方法,然后选择Edit Execute Code。
为该方法使用以下代码:
myapp.AddEditOrderDetail.Delete_execute = function (screen) {
    screen.OrderDetail.deleteEntity();
    return myapp.commitChanges().then(null, function fail(e) {
        myapp.cancelChanges();
        throw e;
    });
};

当您运行应用程序时,您将能够删除所选的Order Detail。

您需要Save更改才能实际删除记录。
我们还可以使用以下代码向Add Edit Order屏幕添加一个Delete按钮:
myapp.AddEditOrder.Delete_execute = function (screen) {
    screen.Order.deleteEntity();
    myapp.commitChanges().then(null, function fail(e) {
        alert(e.message);
        myapp.cancelChanges();
        throw e;
    });
};

您会注意到,如果我们尝试删除仍具有Order Detail记录的Order……

……它将引发错误,因为我们之前在表之间创建的关系设置为不允许删除具有关联记录的Order。
先删除所有Order Details,然后才能删除Order。
导航到屏幕

打开Main屏幕,创建一个按钮以导航到Browse Products屏幕。

将显示Show Browse Products按钮。
LightSwitch 帮助网站文章
完全控制 LightSwitch(ServerApplicationContext 和通用文件处理程序及 Ajax 调用)
在 Visual Studio LightSwitch HTML 客户端中保存数据(包括自动保存)
在 LightSwitch HTML 客户端中使用 Wijmo Grid 创建桌面体验
使用 ServerApplicationContext 创建 ASP.NET Web Forms CRUD 页面
在 Visual Studio LightSwitch 中使用 Promises
编写实现 Visual Studio LightSwitch 中绑定模式的 JavaScript
在 LightSwitch HTML 客户端中实现 Wijmo 径向仪表
在 LightSwitch HTML Client Preview 中编写 JavaScript
使用 TypeScript 在 Visual Studio LightSwitch 中创建 JavaScript
使用 JQuery ThemeRoller 为您的 LightSwitch 网站设置主题
在 Visual Studio LightSwitch HTML Client (Preview) 中使用 Toastr
LightSwitch 团队 HTML 和 JavaScript 文章
使用 jQuery Mobile 增强 LightSwitch 控件
LightSwitch HTML 客户端中的自定义控件和数据绑定(Joe Binder)
使用 LightSwitch HTML 客户端创建屏幕(Joe Binder)
LightSwitch HTML 客户端:架构概述(Stephen Provine)
在 LightSwitch 中编写 JavaScript 代码(Joe Binder)
新的 LightSwitch HTML Client API(Stephen Provine)

