
圆形不确定进度指示器控件
5.00/5 (23投票s)
本文向读者介绍了创建显示圆形不确定进度控件的用户控件的步骤。

引言
这篇短文向读者介绍了创建显示圆形不确定进度控件的用户控件的步骤。
目录
符号 [^] 返回目录。
背景
在准备一个工具来帮助我组织计算机和无数 USB 驱动器上的 Visual Studio 解决方案 (.sln)、项目 (.csproj, .vbproj 等) 和源文件时,我发现我需要一个简单的圆形不确定进度指示器。我曾经编写过一个带有环形和旋转指示器的进度指示器,但我正在构建的工具需要更简单的东西。
我们都见过那圈彩色圆圈,围绕中心点旋转,表示一个看不见的、通常长时间运行的进程正在后台执行。它很简单,满足了我的需求。本文讨论了我对该控件的实现。
控件组件 [^]

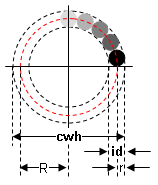
彩色圆圈环(以下称为“指示器圆圈”)可以看作是一组沿着以控件边界为中心的虚构圆圈移动的圆圈。
在图中,控件边界以黑色绘制,指示器圆圈所沿的虚构圆圈以红色虚线绘制。
在绘制控件之前需要三个值
- 控件的宽度。请注意,控件的宽度和高度相等。
- 指示器圆圈的直径。
- 指示器圆圈从控件中心所对的角。
可能不那么明显的是,除了其外观属性(例如,颜色、指示器圆圈数量、旋转速度等)之外,控件完全由控件宽度/高度和指示器直径定义。后面的章节将讨论如何使用这两个属性。
两个半径 [^]

值R是从控件中心到指示器圆圈中心的距离。值r是指示器圆圈的半径。这些值对所有指示器圆圈都相同。
细心的读者可能会注意到,给定R和r,我们可以使用简单的三角学来求解剩余的值。
线性组件 [^]
使用两个线性组件来定义控件。
r = id / 2.0
R = cwh / 2.0 - r
r是指示器圆圈的半径(简单地是指示器直径(图中显示为id)除以二)。一旦我们有了r,我们就可以计算R,方法是从控件宽度/高度(图中显示为cwh)除以二中减去r。
这是因为指示器圆圈的外边缘可能不会超出控件宽度/高度。另请注意,在计算R之前计算r更容易。
角度组件 [^]

一个角度组件将初始指示器圆圈定位在控件内;第二个角度组件用于定位其余的指示器圆圈。
theta(图中显示为 θ)是指示器圆圈从控件中心所对的角。phi(图中显示为 φ)是theta的一半,是从指示器圆圈中心到指示器圆圈底部的角。在计算theta之前计算phi更容易。
phi = arctan ( r / R )
theta = 2.0 * phi
phi 定位第一个指示器圆圈;theta 定位其余的指示器圆圈。
实现 [^]
属性 [^]
许多属性使该控件在实际编程中更有用。控件的属性在下表中列出。
| 属性 | 描述 | 属性类型 | 默认值 | 最小值/最大值 |
|---|---|---|---|---|
| 动画 | 启动/停止指示器动画 | 布尔值 | true | |
| BackgroundColor | 控件背景颜色 | 系统颜色 | Control | |
| 圆圈数量 | 指示器圆圈的数量 | 整数 | 5 | 5/10 |
| 控件宽度高度 | 控件的宽度和高度 | 像素 | 30 | 20/400 |
| 指示器颜色 | 第一个旋转指示器的颜色 | Color | 黑色 | |
| 指示器直径 | 指示器圆圈的直径 | 像素 | 8 | 4/100 |
| 指示器类型 | 指定控件是动画还是脉冲 | 枚举 | 动画 | |
| 刷新率 | 指示器移动之间的间隔 | 毫秒 | 100 | 50/300 |
方法 [^]
控件中只有一个方法,Pulse,可以被调用。当 IndicatorType 属性设置为 PULSED 时,此方法用于使指示器圆圈顺时针移动一个位置。一旦该属性被设置,指示器圆圈的旋转就会停止,直到调用 Pulse 方法或将 IndicatorType 属性设置为 ANIMATED。
修订控件几何 [^]
修改控件的某些属性需要重新绘制控件。当控件的 CirclesCount、ControlWidthHeight 或 IndicatorDiameter 属性更改时,必须重新绘制控件。在重新绘制控件之前,必须重新计算影响控件外观的四个值。此重新计算在update_indicator_geometry方法中执行。
        // ********************************* update_indicator_geometry

        /// <summary>
        /// phi is one-half the angle subtended by one indicator
        /// circle as measured from the center of the control; phi is
        /// dependent upon the control and indicator diameters; theta
        /// is two times phi and is the angular shift from center to
        /// center of two adjacent indicator circles
        ///
        /// the centers of the indicator circle are at
        ///     ( R, phi + i * theta ) | i = 0, n;
        ///                              n = number of circles
        ///
        /// invoke this method whenever the circles count, control
        //  width/height, or the indicator diameter are changed
        /// </summary>
        /// <remarks>
        /// note that phi is negative because when drawing the
        /// indicator circles, we are move counterclockwise; likewise
        /// because the indicator moves clockwise, we must flip the
        /// sign of theta
        /// </remarks>
        void update_indicator_geometry ( )
            {

            r = ( float ) IndicatorDiameter / 2.0F;
            R = ( ( float ) ControlWidthHeight / 2.0F ) - r;
            phi = -( float ) Math.Atan2 ( ( double ) r,
                                          ( double ) R );
            theta = 2.0F * phi;
            indicator_angular_advance = -theta;
            }
调用update_indicator_geometry后,可以重新绘制控件。
重绘控件 [^]
与所有 Windows Forms 一样,我们重写 OnPaint 事件以控制重绘过程。
        // ****************************************** OnPaint override

        /// <summary>
        /// take over the event handling for the control's OnPaint
        /// event
        /// </summary>
        /// <param name="e">
        /// The PaintEventArgs class contains data for the Paint
        /// event; of particular interest here is e.Graphics that has
        /// methods to draw points, strings, lines, arcs, ellipses,
        /// and other shapes
        /// </param>
        protected override void OnPaint ( PaintEventArgs e )
            {

            base.OnPaint ( e );

            if ( control_graphic == null )
                {
                create_control_graphic ( );
                }
            control_graphic.RenderGraphicsBuffer ( e.Graphics );

            create_indicator_graphic ( );
            indicator_graphic.RenderGraphicsBuffer ( e.Graphics );
                                        // revise rotation angle and
                                        // avoid overflow
            indicator_angle += indicator_angular_advance;
            if ( indicator_angle > ( float ) ( 2.0 * Math.PI ) )
                {
                indicator_angle -= ( float ) ( 2.0 * Math.PI );
                }
            }
从这段源代码可以看出,该控件由两个图形对象组成:一个控件图形和一个指示器图形。控件图形只是控件背景;指示器图形是指示器圆圈。
        // ************************************ create_control_graphic

        /// <summary>
        /// deletes any existing control graphic and then creates a
        /// new one
        /// </summary>
        void create_control_graphic ( )
            {
            Rectangle   bounding_rectangle;

            if ( control_graphic != null )
                {
                control_graphic =
                    control_graphic.DeleteGraphicsBuffer ( );
                }

            control_graphic = new GraphicsBuffer ( );

            if ( control_graphic.CreateGraphicsBuffer (
                            this.CreateGraphics ( ),
                            ControlWidthHeight,
                            ControlWidthHeight ) )
                {
                control_graphic.g.SmoothingMode =
                                  SmoothingMode.HighQuality;
                bounding_rectangle = this.ClientRectangle;
                bounding_rectangle.Inflate ( 1, 1 );
                control_graphic.g.FillRectangle (
                    new SolidBrush ( BackgroundColor ),
                    bounding_rectangle );
                bounding_rectangle.Inflate ( -1, -1 );
                }
            }
指示器图形有点复杂。它绘制由 CirclesCount 指定的指示器圆圈数量。它用 IndicatorColor 指定的颜色着色第一个指示器圆圈,然后“淡化”每个后续的指示器圆圈。
        // ********************************** create_indicator_graphic

        /// <summary>
        /// this method creates a new indicator graphic that is the
        /// size of the control graphic; it rotates clockwise around
        /// the center of the control graphic; the indicator graphic
        /// initially has its leading edge at the x-axis; any existing
        /// indicator graphic will be deleted
        /// </summary>
        void create_indicator_graphic ( )
            {
                                        // effectively erases the
                                        // background
            if ( control_graphic == null )
                {
                create_control_graphic ( );
                }

            if ( indicator_graphic != null )
                {
                indicator_graphic =
                    indicator_graphic.DeleteGraphicsBuffer ( );
                }

            indicator_graphic = new GraphicsBuffer ( );

            update_indicator_geometry ( );

            if ( indicator_graphic.CreateGraphicsBuffer (
                            this.CreateGraphics ( ),
                            ControlWidthHeight,
                            ControlWidthHeight ) )
                {
                Color       color = IndicatorColor;
                Graphics    graphics = indicator_graphic.g;
                Rectangle   indicator_bounding_rectangle;
                Size        size = new Size ( ( int ) ( 2.0F * r ),
                                              ( int ) ( 2.0F * r ) );

                indicator_graphic.g.SmoothingMode =
                                  SmoothingMode.HighQuality;
                indicator_bounding_rectangle = this.ClientRectangle;
                indicator_graphic.g.FillRectangle (
                    new SolidBrush ( Color.Transparent ),
                    indicator_bounding_rectangle );
                for ( int i = 0; ( i  < CirclesCount ); i++ )
                    {
                    float       angle;
                    Rectangle   bounding_rectangle;
                    Brush       brush = new SolidBrush ( color );
                    Point       top_left = new Point ( );
                    int         x;
                    int         y;

                    angle = ( phi + ( float ) i * theta ) +
                            indicator_angle;
                    polar_to_cartesian (     R,
                                             angle,
                                         out x,
                                         out y );
                    top_left.X = ( int ) ( ( float ) x - r ) +
                                 this.Width / 2;
                    top_left.Y = ( int ) ( ( float ) y - r ) +
                                 this.Height / 2;

                    bounding_rectangle = new Rectangle ( top_left,
                                                         size );
                    graphics.FillEllipse ( brush,
                                           bounding_rectangle );

                    brush.Dispose ( );

                    color = lighter_color ( color, 0.25F );
                    }
                }
            }
两个辅助函数polar_to_cartesian和lighter_color是
        // **************************************** polar_to_cartesian

        // http://en.wikipedia.org/wiki/Polar_coordinate_system

        public void polar_to_cartesian (     float  radius,
                                             float  theta,  // radians
                                         out int    x,
                                         out int    y )
            {
            double  r = ( double ) radius;
            double  t = ( double ) theta;

            x = ( int ) ( r * Math.Cos ( t ) );
            y = ( int ) ( r * Math.Sin ( t ) );
            }

        // ********************************************* lighter_color

        // http://stackoverflow.com/questions/801406/
        //     c-create-a-lighter-darker-color-based-on-a-system-color

        Color lighter_color ( Color  color,
                              float  factor )
            {
            Color  new_color = Color.Black;

            try
                {
                float red = ( 255 - color.R ) * factor + color.R;
                float green = ( 255 - color.G ) * factor + color.G;
                float blue = ( 255 - color.B ) * factor + color.B;

                new_color = Color.FromArgb ( color.A,
                                             ( int ) red,
                                             ( int ) green,
                                             ( int ) blue );
                }
            catch ( Exception ex )
                {
                new_color = Color.Black;
                }

            return ( new_color );
            }
动画或脉冲 [^]
我正在构建的工具在顶层目录下搜索所有 .sln 文件。该工具无法知道搜索需要多长时间。所以我计划将控件的 IndicatorType 属性设置为 PULSED,并在找到 .sln 文件后调用控件的 Pulse 方法。
结论 [^]
这篇简短的文章展示了如何实现一个简单的控件。
参考资料 [^]
历史 [^]
| 04/10/2013 | 原始文章 |