
轻松实现您自己的在线商店
4.88/5 (23投票s)
使用 Scavix PHP Web 开发框架轻松构建在线商店。
介绍
本文介绍如何使用 PHP 中的 Scavix Web 开发框架创建一个在线商店系统。所有代码都托管在 GitHub 存储库中,因此您可以在那里轻松浏览它们。您应该先阅读这篇基础文章,以了解 Scavix Web 开发框架的基础知识。
目标读者
具有扎实的 PHP、JavaScript 和 SQL 知识的经验丰富的软件开发人员。
任务
“我们需要一个商店,不需要太复杂”
我们经常从客户那里听到这句话,而且我们确信您也知道。幸运的是,我们可以向您展示如何快速使用 Scavix WebFramework 设置一个基本的商店系统。此示例向您展示了基础知识,以便您可以稍后添加商店所需的所有附加功能。这让您可以自由地从非常基本的精简商店代码开始,然后根据您的需求扩展它,添加所有额外的逻辑。
在线商店的要求大多数时候都差不多
- 产品列表
- 产品详情页
- 每个产品都有一个标题、副标题、描述、价格和图片。
- 购物车
- 简单的后台管理
- 不同的支付提供商
所有这些都可以非常快速轻松地完成。当然,还有更多功能,但这几乎是每个商店系统的核心。如果实现了这些基础,那么所有调整都相对容易。
优秀的商店系统(市面上有大量非常好的商店系统)可以做到这一切,但需要为每个客户进行调整。这些调整可能需要花费很多天的时间,而实现一个轻量级、小型的专用商店可能花费的时间相同甚至更少。 此外,市面上功能齐全的在线商店系统具有大量通常不需要的功能,特别是当您商店的产品很少时。
好吧,我们在这里不讨论其他商店系统的优缺点,而是直接开始...
数据库模式
这是很常见的,所以我们将使用一个ERM来说明:

如您所见,我们将从不包含用户注册开始,只让客户输入他们的地址详细信息。我们还将跳过管理表(用于管理员用户等),暂时只依赖硬编码的管理员凭据。
当然,对于在线商店来说,这是不可行的,但如前所述,我们想专注于商店的基础知识。
GitHub 上的示例代码包含一个函数,该函数将确保数据库结构存在,并在SQLite数据库中填充一些示例数据。请注意,上面的图片仅显示了数据库的基本概念,而不是实际结构,所以如果您在代码中发现图片中没有的字段,请不要责怪我们:)。
基本设置
与使用 Scavix Web 开发框架工作一样,您将需要三个文件:index.php、config.php 和(实际上是可选的).htaccess 文件。
- index.php 包含上述数据库设置代码,但除此之外没有其他您不知道的内容。
- config.php 设置 Scavix Web 开发框架,
- .htaccess 文件用于美观的 URL。
所有这些都在这里详细描述:超快速 PHP 应用程序开发。
结构
我们将需要三个控制器:Products、Basket 和 Admin。
当然,如果您想拆分成其他逻辑单元,也可以这样做!
无论如何:会有产品列表、产品详情页、购物车页面和后台管理。从购物车页面,客户可以开始支付流程,这将需要更多页面来收集客户数据。

布局
我们不会花太多时间来为我们的示例商店创建一个漂亮的布局。只需要一个基础控制器类和几行 CSS 代码就足够了:
//controller/shopbase.class.php
<?php
use ScavixWDF\Base\HtmlPage;

class ShopBase extends HtmlPage { /* no code needed here */ }
?>
// controller/shopbase.tpl.php
<div id="page">
    <div id="navigation">
        <a href="<?=buildQuery('Products')?>">Products</a>
        <a href="<?=buildQuery('Basket')?>">Basket</a>
        <a href="<?=buildQuery('Admin')?>">Administration (normally hidden)</a>
    </div>
    <div id="content">
        <? foreach( $content as $c ) echo $c; ?>
    </div>
</div>
// res/shopbase.css
#page { font: 14px normal Verdana,Arial,serif; }
#page > div { width: 960px; margin: auto; }
#navigation { padding-bottom: 10px; border-bottom: 1px solid gray; }
#navigation a
{
	font-size: 18px;
	font-weight: bold;
	margin-right: 15px;
}

.product_overview
{
	clear: both;
	margin-top: 25px;
	border-bottom: 1px solid gray;
	height: 75px;
}

.product_overview img
{
	width: 50px;
	float: left;
	margin-right: 10px;
}

.product_overview div
{
	white-space: nowrap;
	overflow: hidden;
}

.product_overview .title { font-weight: bold; }
.product_overview a { float: right; }

.product_basket
{
	clear: both;
}

.product_basket img
{
	width: 30px;
	float: left;
	margin-right: 10px;
}

.basket_total
{
	clear: both;
	text-align: right;
	font-size: 14px;
	font-weight: bold;
}
所以现在 ShopBase 只是一个中心基类,所有派生类都将继承相同的布局。当然,通过继承共享通用的 CSS 和程序逻辑总是一个好主意,所以这并不是白费力气。
看到了那些丑陋的硬编码导航链接了吗?那将是以后要处理的另一项任务。
可能只会显示给已验证用户链接,或者在购物车为空时隐藏购物车链接。但如前所述:我们不想失去焦点。
产品
我们将在此实现两个页面:产品列表和产品详情页。
// controller/products.class.php
<?php
use ScavixWDF\Base\Template;
use ScavixWDF\JQueryUI\uiMessage;

class Products extends ShopBase
{
    /**
     * Lists all products.
     * @attribute[RequestParam('error','string',false)]
     */
    function Index($error)
    {
        // display error message if given
        if( $error )
            $this->content(uiMessage::Error($error));

        // loop thru the products...
        $ds = model_datasource('system');
        foreach( $ds->Query('products')->orderBy('title') as $prod )
        {
            //... and use a template to represent each
            $this->content( Template::Make('product_overview') )
                ->set('title',$prod->title)
                ->set('tagline',$prod->tagline)
                // see config.php where we set up products images folder as resource folder
                ->set('image',resFile($prod->image))
                ->set('link',buildQuery('Products','Details',array('id'=>$prod->id)))
                ;
        }
    }

    /**
     * Shows product details
     * @attribute[RequestParam('id','int')]
     */
    function Details($id)
    {
        // check if product really exists
        $ds = model_datasource('system');
        $prod = $ds->Query('products')->eq('id',$id)->current();
        if( !$prod )
            redirect('Products','Index',array('error'=>'Product not found'));

        // create a template with product details
        $this->content( Template::Make('product_details') )
            ->set('title',$prod->title)
            ->set('description',$prod->body)
            // see config.php where we set up products images folder as resource folder
            ->set('image',resFile($prod->image))
            ->set('link',buildQuery('Basket','Add',array('id'=>$prod->id)))
            ;
    }
}
里面没有什么魔法,代码非常直接:'Index' 方法循环遍历数据库中的所有产品,并使用 'product_overview' 模板显示每个产品。如果您不熟悉这一点,请再次查看WDF 基础知识。
// templates/product_overview.tpl.php
<div class="product_overview">
    <img src="<?=$image?>" alt=""/>
    <div class="title"><?=$title?></div>
    <div class="tagline"><?=$tagline?></div>
    <a href="<?=$link?>">Details...</a>
</div>
'Details' 方法使用类似的方法,但不循环,而是加载单个产品。它还使用另一个模板文件。
// templates/product_details.tpl.php
<div class="product_details">
    <img src="<?=$image?>" alt=""/>
    <div class="title"><?=$title?></div>
    <div class="description"><?=$description?></div>
    <a href="<?=$link?>">Add to basket</a>
    <a href="javascript:history.back()">back to listing</a>
</div>
好吧……就是这样:我们已经实现了完整的产品部分。
产品列表页:

以及产品的详情页:

购物车
与市面上几乎所有其他商店一样,我们想要一个购物车。基本原理:客户将产品添加到购物车,然后可以更改购物车中每个产品的数量。将数量减少到零将从购物车中删除该产品。当然,这可以做得更好,但……您已经知道“保持焦点”这句话了:)。
所以直接回到代码:
// controller/basket.class.php
<?php
use ScavixWDF\Base\Template;
use ScavixWDF\JQueryUI\uiButton;
use ScavixWDF\JQueryUI\uiMessage;

class Basket extends ShopBase
{
    /**
     * Lists all items in the basket.
     * @attribute[RequestParam('error','string',false)]
     */
    function Index($error)
    {
        // display any given error message
        if( $error )
            $this->content(uiMessage::Error($error));

        // prepare basket variable
        if( !isset($_SESSION['basket']) )
            $_SESSION['basket'] = array();

        if( count($_SESSION['basket']) == 0 )
            $this->content(uiMessage::Hint('Basket is empty'));
        else
        {
            // list all items in the basket ...
            $ds = model_datasource('system');
            $price_total = 0;
            foreach( $_SESSION['basket'] as $id=>$amount )
            {
                $prod = $ds->Query('products')->eq('id',$id)->current();

                //... each using a template
                $this->content( Template::Make('product_basket') )
                    ->set('title',$prod->title)
                    ->set('amount',$amount)
                    ->set('price',$prod->price)
                    // see config.php where we set up
                    // products images folder as resource folder
                    ->set('image',resFile($prod->image))
                    ->set('add',buildQuery('Basket','Add',array('id'=>$prod->id)))
                    ->set('remove',buildQuery('Basket','Remove',array('id'=>$prod->id)))
                    ;
                $price_total += $amount * $prod->price;
            }
            // display total price and the button to go on
            $this->content("<div
              class='basket_total'>Total price: $price_total</div>");
            $this->content( uiButton::Make("Buy now") )->onclick =
              "location.href = '".buildQuery('Basket','BuyNow')."'";
        }
    }

    /**
     * Adds a product to the basket.
     * @attribute[RequestParam('id','int')]
     */
    function Add($id)
    {
        // check if the product exists
        $ds = model_datasource('system');
        $prod = $ds->Query('products')->eq('id',$id)->current();
        if( !$prod )
            redirect('Basket','Index',array('error'=>'Product not found'));

        // increase the counter for this product
        if( !isset($_SESSION['basket'][$id]) )
            $_SESSION['basket'][$id] = 0;
        $_SESSION['basket'][$id]++;
        redirect('Basket','Index');
    }

    /**
     * Removes an item from the basket.
     * @attribute[RequestParam('id','int')]
     */
    function Remove($id)
    {
        // check if the product exists
        $ds = model_datasource('system');
        $prod = $ds->Query('products')->eq('id',$id)->current();
        if( !$prod )
            redirect('Basket','Index',array('error'=>'Product not found'));

        // decrease the counter for this product
        if( isset($_SESSION['basket'][$id]) )
            $_SESSION['basket'][$id]--;
        // and unset if no more items left
        if( $_SESSION['basket'][$id] == 0 )
            unset($_SESSION['basket'][$id]);
        redirect('Basket','Index');
    }

    /* full code: https://github.com/ScavixSoftware/WebFramework/blob/master/web/sample_shop/controller/basket.class.php */
}
同样,'Index' 方法提供了一个列表,这次的来源是一个 SESSION 变量,其中包含产品 ID 及其数量的键值对。
'Add' 和 'Remove' 方法会增加和减少购物车中产品的数量。
上面代码的其余部分是在检查产品是否存在以及变量是否存在。
最后要提一下:我们再次使用一个特殊的模板来显示订单项列表:
// templates/product_basket.tpl.php
<div class="product_basket">
    <img src="<?=$image?>" alt=""/>
    <span class="title"><?=$title?></span>
    <span class="amount">Amount: <?=$amount?></span>
    <span class="amount">Price: <?=$price?></span>
    <span class="amount">Total: <?=$amount * $price?></span>
    <a href="<?=$add?>">add one more</a>
    <a href="<?=$remove?>">remove one</a>
</div>
购物车列表/编辑部分就到此为止。结果如下:

结账
好吧,这实际上是实现商店系统中最有趣的部分:如何获得客户的钱。该示例提供了与PayPal和Gate2Shop(因为我们过去与他们合作过)的接口,并且可以轻松扩展以支持其他提供商。在开发阶段,还有一个测试支付提供商。
订单支付的基本流程是:
- 获取客户的地址数据
- 将其与购物车数据一起存储到数据库中
- 为选定的支付提供商启动结账流程
- 响应来自提供商的支付消息
复杂吗?不。
// controller/basket.class.php
<?php
use ScavixWDF\Base\Template;
use ScavixWDF\JQueryUI\uiButton;
use ScavixWDF\JQueryUI\uiMessage;

class Basket extends ShopBase
{
    /* full code: https://github.com/ScavixSoftware/WebFramework/blob/master/web/sample_shop/controller/basket.class.php*/

    /**
     * Entrypoint for the checkout process.
     *
     * Requests customers address details and asks for payment processor.
     */
    function BuyNow()
    {
        // displays the chechout form, which has all inputs for address on it
        $this->content( Template::Make('checkout_form') );
    }

    /**
     * Persists current basket to the database and starts checkout process.
     * @attribute[RequestParam('fname','string')]
     * @attribute[RequestParam('lname','string')]
     * @attribute[RequestParam('street','string')]
     * @attribute[RequestParam('zip','string')]
     * @attribute[RequestParam('city','string')]
     * @attribute[RequestParam('email','string')]
     * @attribute[RequestParam('provider','string')]
     */
    function StartCheckout($fname,$lname,$street,$zip,$city,$email,$provider)
    {
        if( !$fname || !$lname || !$street || !$zip || !$city || !$email )
            redirect('Basket','Index',array('error'=>'Missing some data'));

        // create a new customer. note that we do not check for existance or stuff.
        // this should be part of a real shop system!
        $cust = new SampleCustomer();
        $cust->fname = $fname;
        $cust->lname = $lname;
        $cust->street = $street;
        $cust->zip = $zip;
        $cust->city = $city;
        $cust->email = $email;
        $cust->price_total = 0;
        $cust->Save();

        // create a new order and assign the customer (from above)
        $order = new SampleShopOrder();
        $order->customer_id = $cust->id;
        $order->created = 'now()';
        $order->Save();

        // now loop thru the basket-items and add them to the order...
        $ds = model_datasource('system');
        foreach( $_SESSION['basket'] as $id=>$amount )
        {
            //... by creating a dataset for each item
            $prod = $ds->Query('products')->eq('id',$id)->current();
            $item = new SampleShopOrderItem();
            $item->order_id = $order->id;
            $item->price = $prod->price;
            $item->amount = $amount;
            $item->title = $prod->title;
            $item->tagline = $prod->tagline;
            $item->body = $prod->body;
            $item->Save();

            $order->price_total += $amount * $prod->price;
        }
        // save the order again to persist the total amount
        $order->Save();
        $_SESSION['basket'] = array();

        // finally start the checkout process using the given payment provider
        log_debug("Handing control over to payment provider '$provider'");
        $p = new $provider();
        $p->StartCheckout($order,buildQuery('Basket','PostPayment'));
    }

    /**
     * This is the return URL for the payment provider.
     * Will be called when payment raches a final state, so control is handed over to our
     * app again from the payment processor.
     */
    function PostPayment()
    {
        // we just display the $_REQUEST data for now.
        // in fact this is the point where some processing
        // should take place: send email to the team,
        // that prepares the items for shipping, send email(s) to customer,...
        log_debug("PostPayment",$_REQUEST);
        $this->content("<h1>Payment processed</h1>");
        $this->content("Provider returned this data:<br/>" +
            "<pre>".render_var($_REQUEST)."</pre>");
    }

    /**
     * This is a special handler method for PayPal.
     * It will be called asynchronously from PayPal
     * backend so user will never see results of it.
     * Just here to update the database when payments
     * are ready or refunded or whatever.
     * See https://www.paypal.com/ipn for details
     * but in fact WebFramework will handle this for you.
     * Just needs this entry point for the callback.
     * @attribute[RequestParam('provider','string')]
     */
    function Notification($provider)
    {
        log_debug("Notification",$_REQUEST);
        $provider = new $provider();
        if( $provider->HandleIPN($_REQUEST) )
            die("OK");
        die("ERR");
    }
}
这段代码创建了一个表单,要求提供客户的地址数据以及他们想使用的支付提供商:
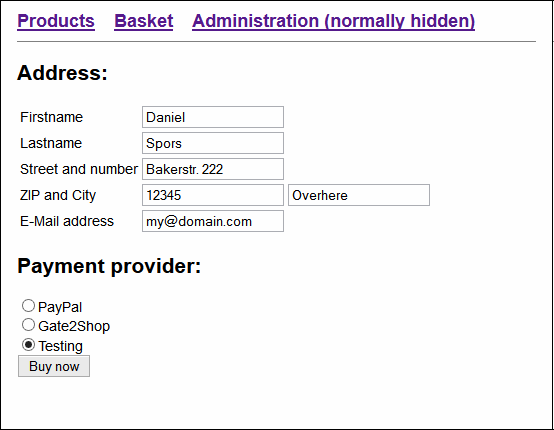
到目前为止,一切顺利。如果您点击“立即购买”(使用测试提供商,因为其他提供商缺少一些配置),您将看不到什么特别的,但订单将被创建。

为了使其以这种简单的方式工作,SampleShopOrder 类必须实现 IShopOrder 接口。它提供了一些简单的方法,允许对支付流程进行通用处理:
// model/sampleshoporder.class.php
<?php
use ScavixWDF\Model\Model;
use ScavixWDF\Payment\IShopOrder;
use ScavixWDF\Payment\ShopOrderAddress;

/**
 * Represents an order in the database.
 *
 * In fact nothing more than implementations for the inherited Model
 * and the implemented IShopOrder interface.
 * See https://github.com/ScavixSoftware/WebFramework/wiki/classes_modules_payment#wiki-1c67f96d00c3c22f1ab9002cd0e3acbb
 * More logic would go into the Set* methods to handle different order states.
 * For our sample we just set the states in the DB.
 */
class SampleShopOrder extends Model implements IShopOrder
{
	const UNKNOWN  = 0;
	const PENDING  = 10;
	const PAID     = 20;
	const FAILED   = 30;
	const REFUNDED = 40;

	/**
	 * Returns the table name.
	 * See https://github.com/ScavixSoftware/WebFramework/wiki/classes_essentials_model_model.class#gettablename
	 */
	public function GetTableName() { return 'orders'; }

	/**
	 * Gets the orders address.
	 * @return ShopOrderAddress The order address
	 */
	public function GetAddress()
	{
		$res = new ShopOrderAddress();
		$res->Firstname = $this->fname;
		$res->Lastname = $this->lname;
		$res->Address1 = $this->street;
		$res->Zip = $this->zip;
		$res->City = $this->city;
		$res->Email = $this->email;
		return $res;
	}

	/**
	 * Gets the currency code.
	 * @return string A valid currency code
	 */
	public function GetCurrency() { return 'EUR'; }

	/**
	 * Gets the invoice ID.
	 * @return mixed Invoice identifier
	 */
	public function GetInvoiceId() { return "I".$this->id; }

	/**
	 * Gets the order culture code.
	 *
	 * See <CultureInfo>
	 * @return string Valid culture code
	 */
	public function GetLocale() { return 'en-US'; }

        /**
	 * Return the total price incl. VAT (if VAT applies for the given country).
	 * @param float $price The price without VAT.
	 * @return float Price including VAT (if VAT applies for the country).
	 */
	public function GetTotalPrice($price = false)
	{
		if( $price !== false )
			return $price * ( (1+$this->GetVatPercent()) / 100 );
		return $this->price_total * ( (1+$this->GetVatPercent()) / 100 );
	}

        /**
	 * Return the total VAT (if VAT applies for the given country).
	 * @return float VAT in order currency
	 */
	public function GetTotalVat() { return $this->price_total * ($this->GetVatPercent()/100); }

        /**
	 * Return the total VAT percent (if VAT applies for the given country).
	 * @return float VAT percent
	 */
	public function GetVatPercent() { return 19; }

	/**
	 * Returns all items.
	 *
	 * @return array A list of <IShopOrderItem> objects
	 */
	public function ListItems() { return SampleShopOrderItem::Make()->eq('order_id',$this->id)->orderBy('id'); }

	/**
	 * Sets the currency
	 * @param string $currency_code A valid currency code
	 * @return void
	 */
	public function SetCurrency($currency_code) { /* we stay with EUR */ }

	/**
	 * Creates an instance from an order id.
	 * @return IShopOrder The new/loaded order <Model>
	 */
	public static function FromOrderId($order_id)
	{
		return SampleShopOrder::Make()->eq('id',$order_id)->current();
	}

	/**
	 * Called when the order has failed.
	 *
	 * This is a callback from the payment processor. Will be called when there was an error in the payment process.
	 * This can be synchronous (when cutsomer aborts in then initial payment ui) or asynchronous when something goes wrong
	 * later in the payment processors processes.
	 * @param int $payment_provider_type Provider type identifier (<PaymentProvider>::PROCESSOR_PAYPAL, <PaymentProvider>::PROCESSOR_GATE2SHOP, ...)
	 * @param mixed $transaction_id Transaction identifier (from the payment provider)
	 * @param string $statusmsg An optional status message
	 * @return void
	 */
	public function SetFailed($payment_provider_type, $transaction_id, $statusmsg = false)
	{
		$this->status = self::FAILED;
		$this->updated = $this->deleted = 'now()';
		$this->Save();
	}

	/**
	 * Called when the order has been paid.
	 *
	 * This is a callback from the payment processor. Will be called when the customer has paid the order.
	 * @param int $payment_provider_type Provider type identifier (<PaymentProvider>::PROCESSOR_PAYPAL, <PaymentProvider>::PROCESSOR_GATE2SHOP, ...)
	 * @param mixed $transaction_id Transaction identifier (from the payment provider)
	 * @param string $statusmsg An optional status message
	 * @return void
	 */
	public function SetPaid($payment_provider_type, $transaction_id, $statusmsg = false)
	{
		$this->status = self::PAID;
		$this->updated = $this->completed = 'now()';
		$this->Save();
	}

	/**
	 * Called when the order has reached pending state.
	 *
	 * This is a callback from the payment processor. Will be called when the customer has paid the order but the
	 * payment has not yet been finished/approved by the provider.
	 * @param int $payment_provider_type Provider type identifier (<PaymentProvider>::PROCESSOR_PAYPAL, <PaymentProvider>::PROCESSOR_GATE2SHOP, ...)
	 * @param mixed $transaction_id Transaction identifier (from the payment provider)
	 * @param string $statusmsg An optional status message
	 * @return void
	 */
	public function SetPending($payment_provider_type, $transaction_id, $statusmsg = false)
	{
		$this->status = self::PENDING;
		$this->updated = 'now()';
		$this->Save();
	}

	/**
	 * Called when the order has been refunded.
	 *
	 * This is a callback from the payment processor. Will be called when the payment was refunded for any reason.
	 * This can be reasons from the provider and/or from the customer (when he cancels the payment later).
	 * @param int $payment_provider_type Provider type identifier (<PaymentProvider>::PROCESSOR_PAYPAL, <PaymentProvider>::PROCESSOR_GATE2SHOP, ...)
	 * @param mixed $transaction_id Transaction identifier (from the payment provider)
	 * @param string $statusmsg An optional status message
	 * @return void
	 */
	public function SetRefunded($payment_provider_type, $transaction_id, $statusmsg = false)
	{
		$this->status = self::REFUNDED;
		$this->updated = $this->deleted = 'now()';
		$this->Save();
	}

	/**
	 * Checks if VAT needs to be paid.
	 * @return boolean true or false
	 */
	public function DoAddVat() { return true; /* Let's assume normal VAT customers for now */ }
}
您还需要创建一个订单项类,我们的类称为 SampleShopOrderItem,并实现 IShopOrderItem 接口。
// model/sampleshoporderitem.class.php
<?php
use ScavixWDF\Model\Model;
use ScavixWDF\Payment\IShopOrderItem;

/**
 * Represents an order item in the database.
 *
 * In fact nothing more than implementations for the inherited Model
 * and the implemented IShopOrderItem interface.
 * See https://github.com/ScavixSoftware/WebFramework/wiki/classes_modules_payment#wiki-97745ff2e14aebb2225c7647a8a059bc
 */
class SampleShopOrderItem extends Model implements IShopOrderItem
{
	/**
	 * Returns the table name.
	 * See https://github.com/ScavixSoftware/WebFramework/wiki/classes_essentials_model_model.class#gettablename
	 */
	public function GetTableName() { return 'items'; }

	/**
	 * Gets the price per item converted into the requested currency.
	 * @param string $currency Currency code
	 * @return float The price per item converted into $currency
	 */
	public function GetAmount($currency) { return $this->price; }

	/**
	 * Gets the discount.
	 * @return float The discount
	 */
	public function GetDiscount() { return 0; }

	/**
	 * Gets the handling cost.
	 * @return float Cost for handling
	 */
	public function GetHandling() { return 0; }

	/**
	 * Gets the items name.
	 * @return string The item name
	 */
	public function GetName() { return $this->title; }

	/**
	 * Gets the quantity.
	 * @return float The quantity
	 */
	public function GetQuantity() { return $this->amount; }

	/**
	 * Gets the shipping cost.
	 * @return float Cost for shipping
	 */
	public function GetShipping() { return 0; }
}
最后,必须配置支付模块
// config.php
<?php
// full code: https://github.com/ScavixSoftware/WebFramework/blob/master/web/sample_shop/config.php

// configure payment module with your IShopOrder class
$CONFIG["payment"]["order_model"] = 'SampleShopOrder';
// set up Gate2Shop if you want to use it
$CONFIG["payment"]["gate2shop"]["merchant_id"]      = '<your_merchant_id>';
$CONFIG["payment"]["gate2shop"]["merchant_site_id"] = '<your_merchant_site_id>';
$CONFIG["payment"]["gate2shop"]["secret_key"]       = '<your_secret_key>';
// set up PayPal if you want to use it
$CONFIG["payment"]["paypal"]["paypal_id"]      = '<your_paypal_id>';
$CONFIG["payment"]["paypal"]["notify_handler"] = array('Basket','Notification');
后台管理
对于商店系统,您需要能够创建产品,并某种程度上能够访问您的客户数据和订单。
一旦您进入后台管理页面,它会要求您输入凭据(如上所述,凭据是硬编码的):用户名使用“admin”,密码使用“admin”。
// controller/admin.class.php
<?php
use ScavixWDF\Base\AjaxAction;
use ScavixWDF\Base\AjaxResponse;
use ScavixWDF\Base\Template;
use ScavixWDF\Controls\Form\Form;
use ScavixWDF\JQueryUI\Dialog\uiDialog;
use ScavixWDF\JQueryUI\uiButton;
use ScavixWDF\JQueryUI\uiDatabaseTable;
use ScavixWDF\JQueryUI\uiMessage;

class Admin extends ShopBase
{
        /**
	 * Checks if aa admin has logged in and redirects to login if not.
	 */
	private function _login()
	{
		// check only the fact that somebody logged in
		if( $_SESSION['logged_in'] )
			return true;

		// redirect to login. this terminates the script execution.
		redirect('Admin','Login');
	}

	/**
	 * @attribute[RequestParam('username','string',false)]
	 * @attribute[RequestParam('password','string',false)]
	 */
	function Login($username,$password)
	{
		// if credentials are given, try to log in
		if( $username && $password )
		{
			// see config.php for credentials
			if( $username==cfg_get('admin','username') && $password==cfg_get('admin','password') )
			{
				$_SESSION['logged_in'] = true; // check only the fact that somebody logged in
				redirect('Admin');
			}
			$this->content(uiMessage::Error("Unknown username/passsword"));
		}
		// putting it together as control here. other ways would be to create a new class
		// derived from Control or a Template (anonymous or with an own class)
		$form = $this->content(new Form());
		$form->content("Username:");
		$form->AddText('username', '');
		$form->content("<br/>Password:");
		$form->AddPassword('password', '');
		$form->AddSubmit("Login");
	}

        /* full code: https://github.com/ScavixSoftware/WebFramework/blob/master/web/sample_shop/controller/admin.class.php*/
}
Admin 类中的每个方法都会调用 `_login` 方法,如果没有管理员用户登录,则会重定向到“Admin/Login”。该方法使用纯 Control 语法构建登录表单,没有模板。
在如此粗糙的开发状态下非常丑陋,但有效。
现在我们从上面提到的第一个部分开始:产品管理。
// controller/admin.class.php
<?php
use ScavixWDF\Base\AjaxAction;
use ScavixWDF\Base\AjaxResponse;
use ScavixWDF\Base\Template;
use ScavixWDF\Controls\Form\Form;
use ScavixWDF\JQueryUI\Dialog\uiDialog;
use ScavixWDF\JQueryUI\uiButton;
use ScavixWDF\JQueryUI\uiDatabaseTable;
use ScavixWDF\JQueryUI\uiMessage;

class Admin extends ShopBase
{
        /* full code: https://github.com/ScavixSoftware/WebFramework/blob/master/web/sample_shop/controller/admin.class.php */

        function Index()
	{
		$this->_login(); // require admin to be logged in

		// add products table and a button to create a new product
		$this->content("<h1>Products</h1>");
		$this->content(new uiDatabaseTable(model_datasource('system'),false,'products'))
			->AddPager(10)
			->AddRowAction('trash', 'Delete', $this, 'DelProduct');
		$this->content(uiButton::Make('Add product'))->onclick = AjaxAction::Post('Admin', 'AddProduct');

		// add orders table
		$this->content("<h1>Orders</h1>");
		$this->content(new uiDatabaseTable(model_datasource('system'),false,'orders'))
			->AddPager(10)
			->OrderBy = 'id DESC';

		// add customers table
		$this->content("<h1>Customers</h1>");
		$this->content(new uiDatabaseTable(model_datasource('system'),false,'customers'))
			->AddPager(10)
			->OrderBy = 'id DESC';
	}

	/**
	 * @attribute[RequestParam('title','string',false)]
	 * @attribute[RequestParam('tagline','string',false)]
	 * @attribute[RequestParam('body','text',false)]
	 * @attribute[RequestParam('price','double',false)]
	 */
	function AddProduct($title,$tagline,$body,$price)
	{
		$this->_login(); // require admin to be logged in

		// This is a quite simple condition: You MUST provide each of the variables
		if( $title && $tagline && $body && $price )
		{
			// store the uploaded image if present
			if( isset($_FILES['image']) && $_FILES['image']['name'] )
			{
				$i = 1; $image = __DIR__.'/../images/'.$_FILES['image']['name'];
				while( file_exists($image) )
					$image = __DIR__.'/../images/'.($i++).'_'.$_FILES['image']['name'];
				move_uploaded_file($_FILES['image']['tmp_name'], $image);
				$image = basename($image);
			}
			else
				$image = '';

			// store the new product into the database
			$ds = model_datasource('system');
			$ds->ExecuteSql("INSERT INTO products(title,tagline,body,image,price)VALUES(?,?,?,?,?)",
				array($title,$tagline,$body,$image,$price));

			redirect('Admin');
		}
		// create a dialog and put a template on it.
		$dlg = new uiDialog('Add product',array('width'=>600,'height'=>450));
		$dlg->content( Template::Make('admin_product_add') );
		$dlg->AddButton('Add product', "$('#frm_add_product').submit()"); // frm_add_product is defined in the template
		$dlg->AddCloseButton("Cancel");
		return $dlg;
	}

	/**
	 * @attribute[RequestParam('table','string',false)]
	 * @attribute[RequestParam('action','string',false)]
	 * @attribute[RequestParam('model','array',false)]
	 * @attribute[RequestParam('row','string',false)]
	 */
	function DelProduct($table,$action,$model,$row)
	{
		$this->_login(); // require admin to be logged in

		// we use the ajax confirm features of the framework which require some translated string, so we set them up here
		// normally we would start the sysadmin and create some, but for this sample we ignore that.
		default_string('TITLE_DELPRODUCT','Delete Product');
		default_string('TXT_DELPRODUCT','Do you really want to remove this product? This cannot be undone!');
		if( !AjaxAction::IsConfirmed('DELPRODUCT') )
			return AjaxAction::Confirm('DELPRODUCT', 'Admin', 'DelProduct', array('model'=>$model));

		// load and delete the product dataset
		$ds = model_datasource('system');
		$prod = $ds->Query('products')->eq('id',$model['id'])->current();
		$prod->Delete();

		// delete the image too if present
		if( $prod->image )
		{
			$image = __DIR__.'/../images/'.$prod->image;
			if( file_exists($image) )
				unlink($image);
		}
		return AjaxResponse::Redirect('Admin');
	}
}
'Index' 方法创建一个数据库表和一个添加新产品的按钮。简单但有效。数据库表控件允许我们添加行操作,因此我们将其用于“删除”触发器,该触发器将在单击时调用“DelProduct”。
点击“添加产品”按钮将显示一个对话框,其中包含一个用于输入所有产品数据的表单。然后(在对话框接受后),新产品将被添加到数据库,并且浏览器会被重定向以刷新产品列表。

您猜怎么着:这就是产品后台管理基础部分的内容。当然,我们缺少“编辑”功能以及更多功能,但这展示了我们为实现完整的后台管理界面需要遵循的方向。
顺着这个思路,我们只在这里再显示两个表:订单和客户。好吧……只是为了展示基本概念:

接下来呢?
这对于一个示例来说已经足够了,但接下来该怎么做呢?好吧,有一些“标准”的事情要做:
- 在 PayPal 和/或 Gate2Shop 注册,并更新商店配置,以便它们可以使用。
- 实现更多代码以使支付流程可用(发送电子邮件等)
- 扩展后台管理界面以管理产品和订单。
- ....
更改日志
- 2013/05/8:初始发布
- 2013/05/23:修复了损坏的链接,更新了代码片段以匹配最新版本。
- 2014/10/31:添加了命名空间代码。