
通过 LDAP 对 Active Directory 和 Edirectory 进行身份验证
4.67/5 (35投票s)
2004年1月28日
5分钟阅读
366905
5828
一篇关于对 Active Directory 和 Edirectory 进行用户身份验证的文章
目录

图 1.0 - 这是用户登录的主窗口。
引言
本文介绍了如何通过LDAP对Microsoft Active Directory和Novell Edirectory进行身份验证。
转到目录背景
要找到一篇关于如何通过LDAP对MS Active Directory和Novell Edirectory进行用户身份验证的文章并不容易。简而言之,LDAP代表轻量级目录访问协议。它是目录访问协议(DAP)的一个子集。由密歇根大学开发,因为DAP占用了大量资源。总之,本文将介绍开始通过这两种目录服务进行用户身份验证所需的所有必要步骤。
转到目录支持的功能
- 对MS Active Directory进行身份验证
- 对Novell E-Directory进行身份验证
要求
- 运行Active Directory的服务器
- 运行Edirectory的服务器
- 熟悉LDAP及其实体寻址方式
可选工具
- Adsvw.exe(Microsoft出品)- 此实用工具允许用户浏览LDAP目录。它作为ADSI SDK的一部分或作为高级服务器支持工具的一部分提供。当用户尝试查找实体的引用方式时,它非常有帮助。这里有一个小技巧。如果用户使用它来浏览Active Directory,请确保选中安全连接。当涉及到Edirectory时,应选中使用加密选项。
使用代码
首先,通过转到项目->添加引用来添加对System.DirectoryServices的引用。完成此操作后,将显示图 2.0所示的对话框。在.NET选项卡下,单击System.DirectoryServices.dll,然后单击选择。然后单击确定返回到项目。

图 2.0 - 这是用户选择引用的对话框。
在此解决方案中,有一个名为Authenticate的类。它包含在名为Authenticate.cs的文件中。您应该将其添加到项目中,或从代码部分复制粘贴此类。创建一个Authenticate的新实例并将其分配给aAuthent。在执行实际登录之前,需要初始化几个值。
Authenticate aAuthent = new Authenticate();
从现在开始,我将引用各种小部件。您需要关注3个文本编辑小部件和2个单选按钮小部件。请在您的工作区中相应地映射方向。通过调用SetDomain将域名设置为txtDomain小部件所持有的值。这是用户输入的IP地址(例如10.x.x.x)或目标服务器的主机名(例如mydomain.com)。请注意,此类中除了一个Set/Modifier方法外,其他方法都返回布尔值。它只是指示变量是否成功修改。这可能不符合约定,但在我看来,在函数内部检查参数比在其他地方重复工作要有利得多。
if (!(aAuthent.SetDomain(this.txtDomain.Text)))
{
    // error message here
}
然后,调用SetUser函数来获取文本小部件txtUser的值。这里输入用户名。
if (!(aAuthent.SetUser(this.txtUser.Text)))
{
    // error message here
}
之后,调用SetPass函数来传递txtPassword的值。这里输入用户密码。
if (!(aAuthent.SetPass(this.txtPassword.Text)))
{
    // error message here
}
接下来,检查用户希望 against 哪个目录进行身份验证。在此解决方案中,有两个单选按钮,分别名为rbtnED和rbtnAD。如果选中前者,则调用SetAuthenticationType并将参数设置为true。这将告诉Authenticate类使用安全套接字层或SSL。Edirectory使用ssl协议执行身份验证任务。在后一种情况下,布尔值false将指示该类使用安全。Active Directory利用安全方法。这些通信协议或方法的内部细节超出了本文的范围。因此,我将跳过它们。
if (this.rbtnED.Checked)
  aAuthent.SetAuthenticationType(true);r>
else if (this.rbtnAD.Checked)
  aAuthent.SetAuthenticationType(false);
最后,应该调用此类中的Login函数。它将处理此后的所有内容。成功则会欢迎用户;否则显示失败消息。
aAuthent.Login(); 转到目录
代码
  /// <summary>
  /// This class performs user authentication against Active Directory and
  /// Novell Edirectory.
  /// </summary>
  public class Authenticate
  {
    /// <summary>
    /// string specifying user name
    /// </summary>
    private string strUser;

    /// <summary>
    /// string specifying user password
    /// </summary>
    private string strPass;

    /// <summary>
    /// string specifying user domain
    /// </summary>
    private string strDomain;

    /// <summary>
    /// AuthenticationTypes specifying the security
    /// protocol to use, i.e. Secure, SSL
    /// </summary>
    private AuthenticationTypes atAuthentType;

    /// <summary>
    /// default constructor
    /// </summary>
    public Authenticate()
    {
    }

    /// <summary>
    /// function that sets the domain name
    /// </summary>
    /// <param name="strValue"></param>
    /// <returns>It returns true, if user passed
    ///            something; otherwise, false </returns>
    public bool SetDomain(string strValue)
    {
      if (strValue.Length <= 0)
        return false;

      this.strDomain = "LDAP://" + strValue;
      return true;
    }

    /// <summary>
    /// function that sets user name
    /// </summary>
    /// <param name="strValue"></param>
    /// <returns>It returns true, if user passed
    ///          something; otherwise, false </returns>
    public bool SetUser(string strValue)
    {
      if (strValue.Length <= 0)
        return false;

      this.strUser = strValue;
      return true;
    }

    /// <summary>
    /// function that sets user password
    /// </summary>
    /// <param name="strValue"></param>
    /// <returns>It returns true, if user passed
    ///          something; otherwise, false </returns>
    public bool SetPass(string strValue)
    {
      if (strValue.Length <= 0)
        return false;

      this.strPass = strValue;
      return true;
    }

    /// <summary>
    /// function that sets user authentication type
    /// </summary>
    /// <param name="bValue"></param>
    public void SetAuthenticationType(bool bValue)
    {
      // set ssl to true if true is found
      if (bValue)
        atAuthentType = AuthenticationTypes.SecureSocketsLayer;
      // otherwise set it to secure
      else
        atAuthentType = AuthenticationTypes.Secure;
    }

    /// <summary>
    /// function that performs login task
    /// and welcomes user if they are verified
    /// </summary>
    public void Login()
    {
      // now create the directory entry to establish connection
      using(DirectoryEntry deDirEntry = new DirectoryEntry(this.strDomain,
                                                           this.strUser,
                                                           this.strPass,
                                                           this.atAuthentType))

      {
        // if user is verified then it will welcome them
        try
        {
          MessageBox.Show("Welcome to '" + deDirEntry.Name + "'");

          // TODO: add your specific tasks here
        }
        catch (Exception exp)
        {
          MessageBox.Show("Sorry, unable to verify your information");
        }
      }

    }
  }
关注点
一个问题是寻址方式。在Active Directory中,用户可以输入他们的名字而无需使用区分名称格式。如果他们尝试 against Edirectory执行相同的操作,则会立即失败。
转到目录如何使用此演示
对Edirectory进行身份验证
首先,输入用户名。这是用户在进行下一步之前需要了解的内容。使用前面推荐的ADSVW实用工具来了解当前用户的寻址方式。在此示例中,cn=userA,ou=rajibOU,o=rajibContext 表示用户userA属于组织单元rajibOU,并尝试登录rajibContext下的资源。
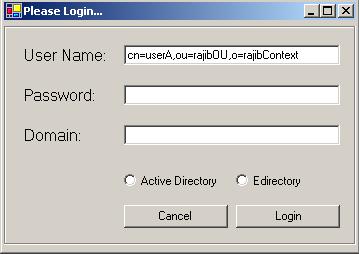
图 3.0 - 用户输入区分名称。
其次,输入该特定用户的密码。
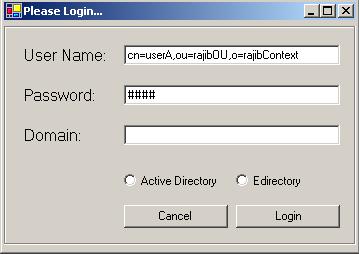
图 3.1 - 用户输入密码。
第三,输入适用的域名或IP地址。

图 3.2 - 用户输入目标服务器的IP地址。
第四,选择Active Directory或Edirectory。

图 3.2 - 用户选择目录服务。
最后,单击Login,它应该会产生如图 3.4所示的输出。

图 3.4 - 显示用户登录尝试的结果。
对Active Directory进行身份验证
首先,输入用户名。

图 3.5 - 用户输入区分名称。
其次,输入该特定用户的密码。

图 3.6 - 用户输入密码。
第三,输入适用的域名或IP地址。

图 3.7 - 用户输入目标服务器的IP地址。
第四,选择Active Directory。

图 3.8 - 用户选择目录服务。
最后,单击Login,它应该会产生如图 3.9所示的输出。

图 3.9 - 显示用户登录尝试的结果。
转到目录结论
好了,这是我的第二篇文章。希望您觉得它有用且直观。
转到目录