
使用 Silverlight 3 的 WriteableBitmap 实现波纹反射效果
5.00/5 (2投票s)
使用 Silverlight 3 的 WriteableBitmap 实现波纹反射效果
这篇博文演示了如何使用 Silverlight 3 的 WriteableBitmap 创建一个 UserControl,该控件将任何其他 Framework Element 的内容渲染为带有动画波纹效果的反射。
[在我的博客上查看上述动画演示。]
今年年初听到雅虎关闭 GeoCities 的消息我很伤心。在 GeoCities 的某个地方深处,埋藏着我创建的第一个网页,里面有“建设中”的横幅、动画 GIF、留言簿和糟糕的背景音乐。不幸的是,我不知道该页面的 URL 是什么,而且这还是在 Google 管理我生活之前很久!
这篇博文是对 90 年代流行的许多动态效果之一的致敬,即动画反射。这些 Java Applet 曾经很流行,但最终和 GeoCities 一样消失了。也许现在是复兴的时候了?
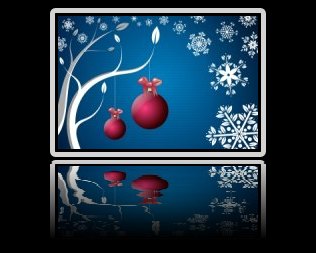
上面显示的 Silverlight 应用程序包含一个 UserControl,它渲染一个引用 FrameworkElement 的动画反射。
产生波纹的代码非常简单,一个 DispatcherTimer 递增 _time 并重新绘制反射。反射本身是通过从引用的元素构造一个 WriteableBitmap 来实现的,从而使我们能够获取其像素值。另一个 WriteableBitmap 被构造用于反射图像,并以合适的 Y 偏移量复制像素行,以产生波纹效果。
private double _time = 0.0;

private void Timer_Tick(object sender, EventArgs e)
{
    // increment phi and update the reflection
    _time += 0.4;
    UpdateReflection();
}

/// <summary>
/// Copies an inverted image of the referenced FrameworkElement
/// with a 'ripple' effect
/// </summary>
private void UpdateReflection()
{
    FrameworkElement reflectedFE = ReflectedElement as FrameworkElement;

    if (reflectedFE == null)
        return;

    // synchronize the element width
    Width = reflectedFE.ActualWidth;

    // copy the source into a writeable bitmap
    WriteableBitmap sourceBitmap = new WriteableBitmap(reflectedFE, null);

    // create a target which is the same width / height as the reflection element
    WriteableBitmap targetBitmap =
	new WriteableBitmap((int)ActualWidth, (int)ActualHeight);

    // copy the reflection
    for (int y = 0; y < targetBitmap.PixelHeight; y++)
    {
        double amplitude = ComputeAmplitude(y, targetBitmap.PixelHeight);
        double sinusoid = ComputeRipple(y, targetBitmap.PixelHeight, _time);

        // the offset to the y value index caused by the ripple
        int yOffset = (int)(sinusoid * amplitude);

        // compute the Y position of the line to copy from the source image
        int sourceYLocation = sourceBitmap.PixelHeight - 1 -
            ((y + yOffset) * sourceBitmap.PixelHeight) / targetBitmap.PixelHeight;

        // check that this value is in range
        sourceYLocation = Math.Min
	(sourceBitmap.PixelHeight - 1, Math.Max(0, sourceYLocation));

        // copy the required row
        int sourceIndex = sourceYLocation * sourceBitmap.PixelWidth;
        int targetIndex = y * targetBitmap.PixelWidth;
        for (int i = 0; i < targetBitmap.PixelWidth; i++)
        {
            targetBitmap.Pixels[targetIndex++] = sourceBitmap.Pixels[sourceIndex++];
        }
    }

    targetBitmap.Invalidate();

    LayoutRoot.Source = targetBitmap;
}

/// <summary>
/// Compute the amplitude of the oscillations at a given Y position
/// </summary>
private double ComputeAmplitude(int y, int height)
{
    // our amplitude range is 1 to 3
    return ((double)y * 2) / (double)height + 1.0;
}

/// <summary>
/// Compute the sinusoid applied to the image at the given location
/// </summary>
private double ComputeRipple(int y, int height, double time)
{
    // provide a ripple that is the combination of two out of phase sine waves
    double phaseFactor = (double)y / (double)height;
    return Math.Sin(time + phaseFactor * 16) + Math.Sin(time + phaseFactor * 30)
        + Math.Sin(time + phaseFactor * 62);
}
此用户控件的 XAML 只是一个带有不透明度渐变的图像
<UserControl x:Class="SilverlightShimmer.ReflectionControl"
    xmlns="http://schemas.microsoft.com/winfx/2006/xaml/presentation"
    xmlns:x="http://schemas.microsoft.com/winfx/2006/xaml"
    Width="300" Height="300">
    <Image x:Name="LayoutRoot">
        <Image.OpacityMask>
            <LinearGradientBrush EndPoint="0.5,1" StartPoint="0.5,0">
                <GradientStop Color="#FF000000" Offset="0"/>
                <GradientStop Color="#00000000" Offset="1"/>
            </LinearGradientBrush>
        </Image.OpacityMask>
    </Image>
</UserControl>
此控件与我们的圣诞主题图像关联如下
<UserControl x:Class="SilverlightShimmer.MainPage"
    xmlns="http://schemas.microsoft.com/winfx/2006/xaml/presentation"
    xmlns:x="http://schemas.microsoft.com/winfx/2006/xaml"
    xmlns:local="clr-namespace:SilverlightShimmer" Width="320" Height="260">

    <Grid Background="Black">

        <StackPanel Orientation="Vertical" Margin="10">
            <Border  x:Name="controlToReflect"
		BorderThickness="5" BorderBrush="LightGray"
                     CornerRadius="3" HorizontalAlignment="Center">
                <Image  Source="christmas.jpg" Margin="3"
                        Stretch="None"/>
            </Border>
            <local:ReflectionControl x:Name="shimmer" Height="80" Margin="3"
                       ReflectedElement="{Binding ElementName=controlToReflect}"/>
        </StackPanel>
    </Grid>
</UserControl>
一个有趣的点在于 Border 和 Image 与 ReflectionControl 关联的方式。ReflectedElement 属性通过 ElementName 绑定到 Border,但是此绑定没有 Path。因此,与其绑定到引用元素的属性,不如将 ReflectedElement 绑定到元素本身。因此,无需任何代码来将 ReflectionControl 与要渲染的元素关联。
此控件可用于渲染任何内容的反射(甚至可以渲染反射的反射,如果您愿意)。这是一个更复杂的例子
[在我的博客上查看上述动画演示。]
您可以在这里下载完整的源代码:SilverlightShimmer.zip。
此致,
Colin E.