使用 WCF 进行 Metro 风格的 CRUD 操作
4.24/5 (7投票s)
使用 WCF 的 Metro 风格 CRUD。
引言
CRUD 指的是创建 (Create)、检索(读取 Read)、更新 (Update) 和删除 (Delete)。这些是持久存储的四个基本功能。有时 CRUD 也被称为 CRMD(创建、检索、修改和销毁)。通常,这些功能是 LOB(业务线应用程序)的重要组成部分。 如果你要创建一个学生成绩 MIS,UI 可能包含:学生姓名、科目、他们的最高分数、获得的分数,以及可能的百分比。为此,你必须使用 CRUD 来检索记录、输入新记录、删除记录或修改记录。
背景
此应用程序将使初学者程序员或其他已开始制作 Windows Metro 风格应用程序的人员能够创建应用程序,因为此应用程序不具有 system.data 引用。我们将使用 WCF 服务与 SQL Server 通信,尤其是在 LOB 类型中。
所需工具
- 启用了 Metro 风格的 Visual Studio 2012 或 2010。
- Microsoft SQL Server Management Studio 或使用 Visual Studio 服务器资源管理器进行数据库部分的操作。
- C# 和 XAML 知识。
- 一杯茶、咖啡或任何你喜欢的饮料。

- 最重要的是,一个头脑。

附注:我们在这个项目中使用 Microsoft SQL Server。
我们通过创建数据库部分来启动项目。
数据库设计
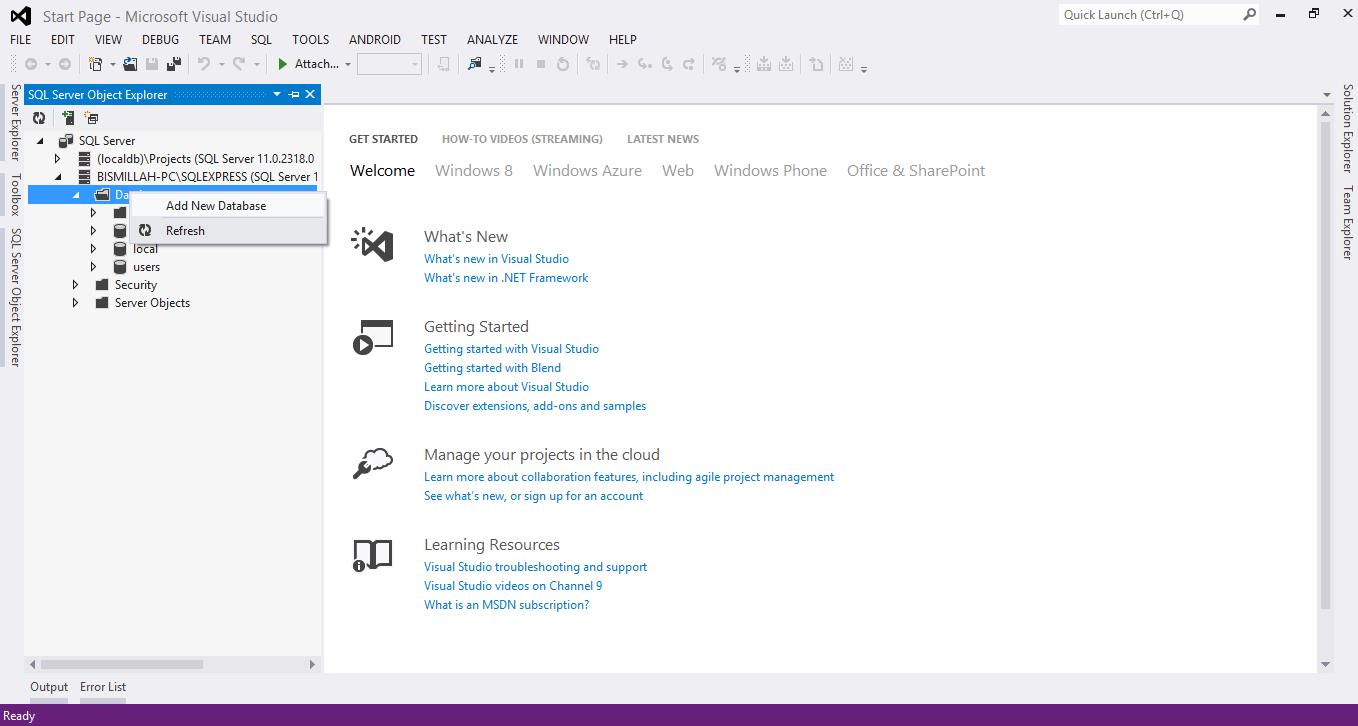
启动 Visual Studio,单击“视图”选项卡,然后单击“SQL Server 对象资源管理器”。将打开“Server 对象资源管理器”。之后,单击“添加新数据库”并给它命名,然后将创建数据库。
创建数据库后,下一步是创建表。按照以下项目中的步骤创建表。
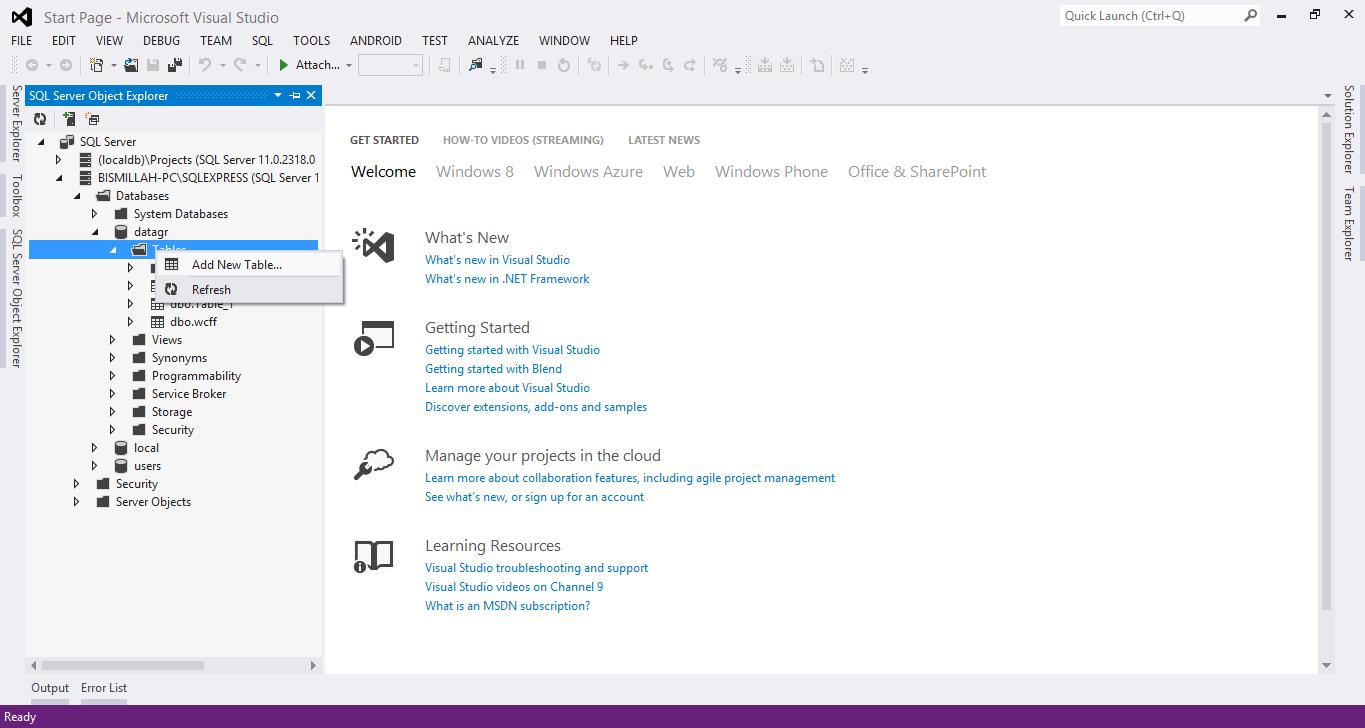
单击“添加新表”,然后给它命名。将创建该表。然后单击该表,然后单击“查看设计器”,我们将在其中设计数据库。下面是设计器的示例。
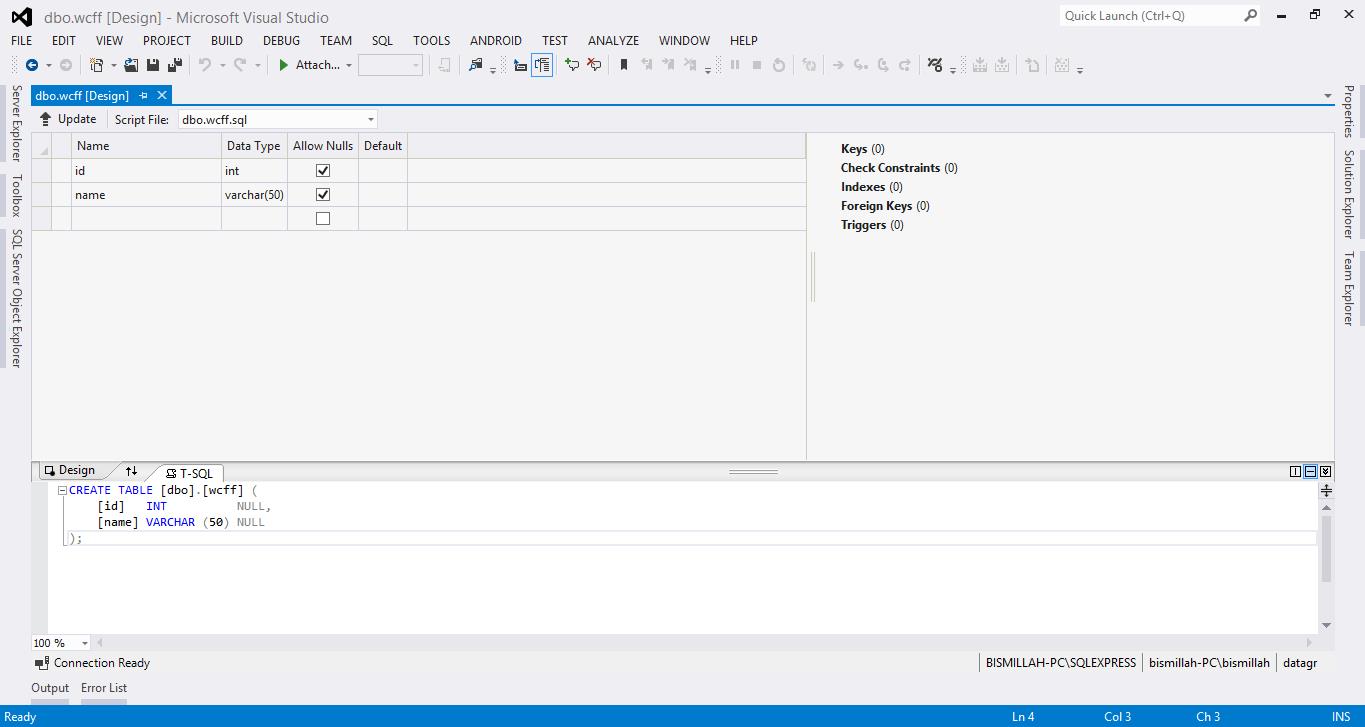
像上面一样设计数据库,然后单击“更新”,然后按照下一步操作。创建数据库后,请按照以下步骤创建 Metro 风格的 UI。
创建用户界面
要创建 Metro UI,请单击“新建项目”,给它命名,然后单击“确定”,如下图所示

创建项目后,你将得到一个空白的黑色屏幕。你可以在此处设计 UI。
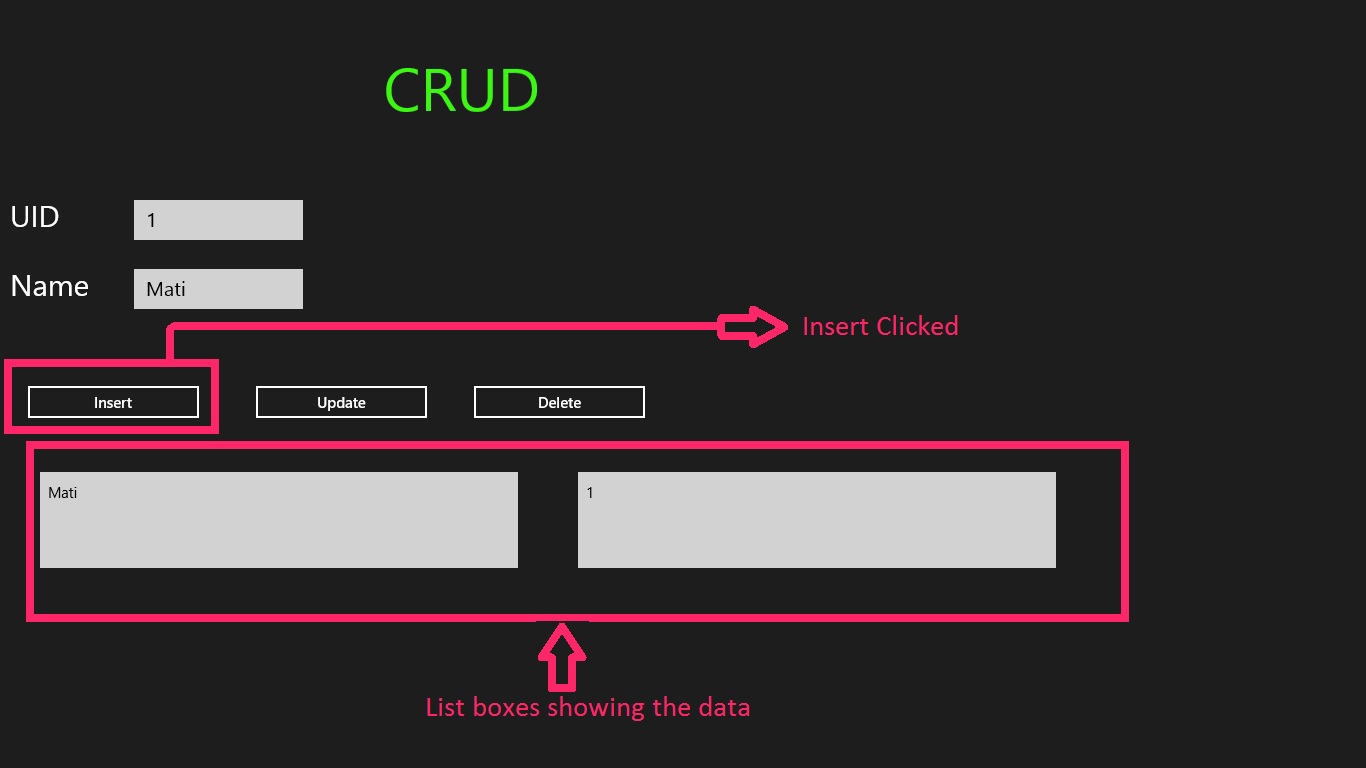
下图显示了我创建的 UI。
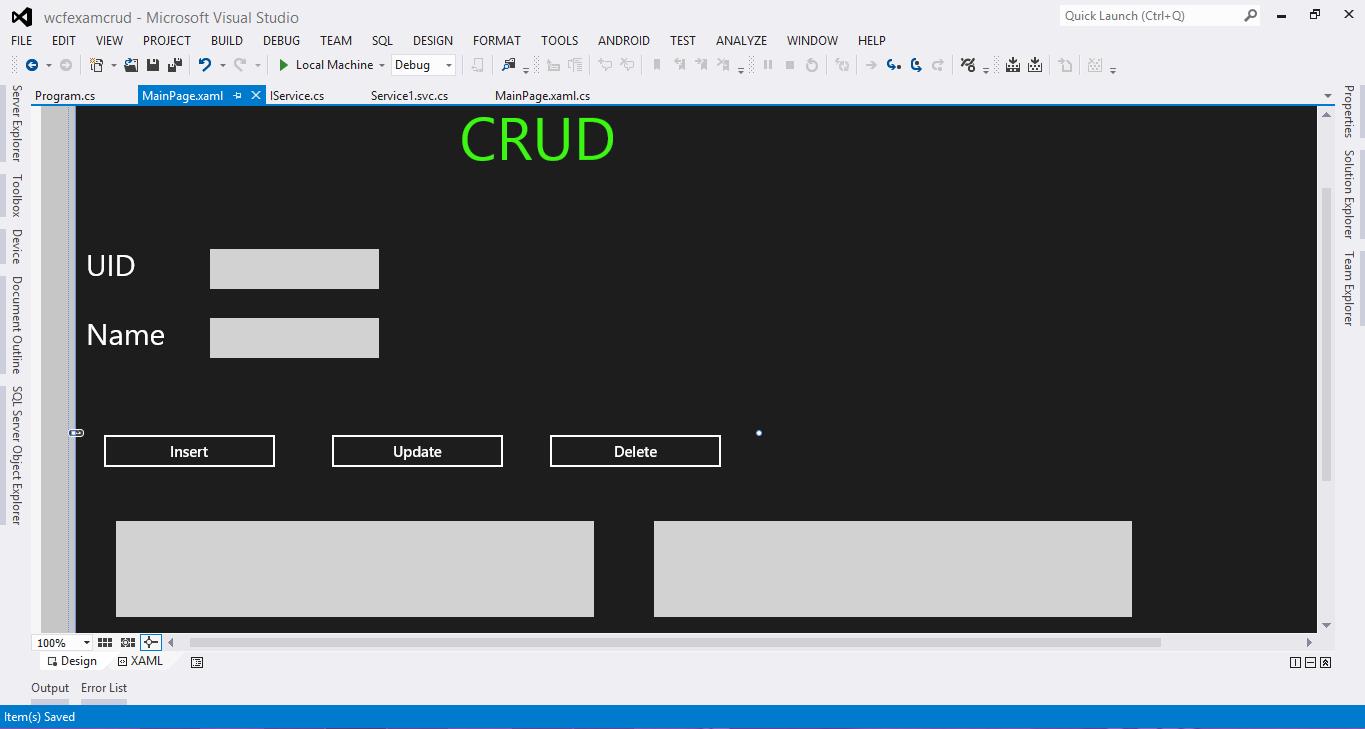
这是我的 UI。我确定你是一个比我更好的设计师。:)
你的 UI 必须包含
- 3 个标签(主标签、ID、名称)
- 2 个文本框
- 3 个按钮
- 2 个列表框
设计完成后,给它们命名。
我的 XAML 如下所示
 <Page
    x:Class="wcfexamcrud.MainPage"
    xmlns="http://schemas.microsoft.com/winfx/2006/xaml/presentation"
    xmlns:x="http://schemas.microsoft.com/winfx/2006/xaml"
    xmlns:local="using:wcfexamcrud"
    xmlns:d="http://schemas.microsoft.com/expression/blend/2008"
    xmlns:mc="http://schemas.openxmlformats.org/markup-compatibility/2006"
    mc:Ignorable="d">
    <Page.Resources>
        <DataTemplate x:Key="uid">
            <Grid/>
        </DataTemplate>
    </Page.Resources>

    <Grid Background="{StaticResource ApplicationPageBackgroundThemeBrush}">
        <TextBox x:Name="uidtb" HorizontalAlignment="Left"
        Margin="134,200,0,0" TextWrapping="Wrap" VerticalAlignment="
        Top" Width="169" Height="40" FontSize="20"/>
        <TextBox x:Name="nametb" HorizontalAlignment="Left"
        Margin="134,269,0,0" TextWrapping="Wrap" VerticalAlignment="
        Top" Width="169" Height="40" FontSize="20"/>
        <TextBlock HorizontalAlignment="Left" Height="40"
        Margin="10,200,0,0" TextWrapping="Wrap"
        Text="UID" VerticalAlignment="Top" Width="55"
        FontSize="30"/>
        <TextBlock HorizontalAlignment="Left" Height="40"
        Margin="10,269,0,0" TextWrapping="Wrap" Text="Name"
        VerticalAlignment="Top" Width="119" FontSize="30"
        RenderTransformOrigin="0.442,2.612"/>
        <Button Content="Insert" HorizontalAlignment="Left"
        Margin="25,383,0,0" VerticalAlignment="Top"
        Width="177" Click="Button_Click_1"/>
        <Button Content="Update" HorizontalAlignment="Left"
        Margin="253,383,0,0" VerticalAlignment="Top"
        Width="177" Click="Button_Click_2"/>
        <Button Content="Delete" HorizontalAlignment="Left"
        Margin="471,383,0,0" VerticalAlignment="Top"
        Width="177" Click="Button_Click_3"/>
        <TextBlock HorizontalAlignment="Left" Margin="383.426,56.423,0,0"
        TextWrapping="Wrap" Text="CRUD " VerticalAlignment="Top"
        Width="510.708" RenderTransformOrigin="0.5,0.5"
        UseLayoutRounding="False" d:LayoutRounding="Auto"
        Height="60.461" FontSize="60" Foreground="#FF3CF712">
            <TextBlock.RenderTransform>
                <CompositeTransform Rotation="-0.045"/>
            </TextBlock.RenderTransform>
        </TextBlock>
        <ListBox x:Name="gv1" HorizontalAlignment="Left"
        Height="100" Margin="38,470,0,0" VerticalAlignment="
        Top" Width="482"/>
        <ListBox x:Name="gv2" HorizontalAlignment="Left"
        Height="100" Margin="576,470,0,0"
        VerticalAlignment="Top" Width="482"/>

    </Grid>
</Page>
设计完成后,单击解决方案,然后在“添加新解决方案”上单击“添加”,然后添加 WCF 服务应用程序的新项目。参见下图
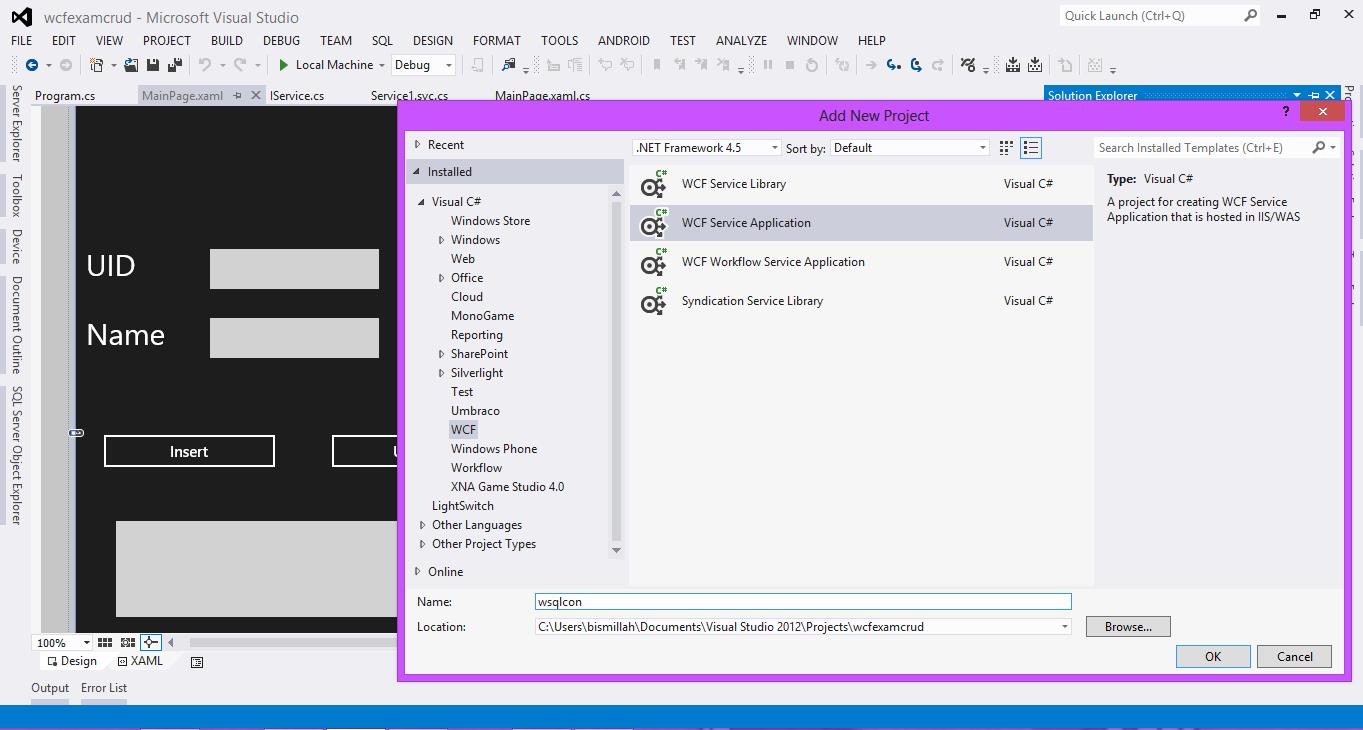
单击“确定”。它将添加一个新的 WCF 项目并打开两个 CS 文件,一个是接口,第二个是继承服务的服务,将 Iservice1 重命名为 Iservice。Iservice 和 service 的 C# 代码如下
Iservice.cs
using System;
using System.Collections.Generic;
using System.Linq;
using System.Runtime.Serialization;
using System.ServiceModel;
using System.ServiceModel.Web;
using System.Text;
using System.Data;
namespace wsqlcon
{
    [ServiceContract]
    public interface IService
    {
        // TODO: Add your service operations here

        [OperationContract]
        List<string> getusers();
        [OperationContract]
        List<string> getids();
        [OperationContract]
        int opi(usersinfo insert);
        [OperationContract]
        int opu(usersinfo update);
        [OperationContract]
        int opd(usersinfo id);
    }

    // Use a data contract as illustrated in the sample below to
    // add composite types to service operations.
    [DataContract]
    public class usersinfo
    {
        [DataMember]
        public int id { get; set; }

        [DataMember]
        public string name { get; set; }
    }
}
在接口中,我们有 5 个操作协定,操作协定必须具有将要执行的操作。在 usersinfo 类中,我们有 ID 和名称的数据成员,以及 getter 和 setter。基本上,getter 和 setter 只是帮助封装的方法。
service1.svc.cs
service1.svc.cs 包含要执行的主要代码,sqlcommands,从数据库中获取所有数据的 List。我们的 service1.svc.cs 包含以下代码
using System;
using System.Collections.Generic;
using System.Linq;
using System.Runtime.Serialization;
using System.ServiceModel;
using System.ServiceModel.Web;
using System.Text;
using System.Data;
using System.Data.SqlClient;

namespace wsqlcon
{
    public class Service1 : IService
    {
        //Your connection string here.
        SqlConnection con = new SqlConnection
        (@"Data Source=BISMILLAH-PC\SQLEXPRESS;
        Initial Catalog=datagr;Integrated Security=True");


        public List<string> getids()
        {
            List<string> idslisr = new List<string>();
            con.Open();
            using (SqlCommand cmd = new SqlCommand("SELECT * FROM wcff", con))
            {
                using (SqlDataReader idsreader = cmd.ExecuteReader())
                {
                    while (idsreader.Read())
                    {
                        idslisr.Add(idsreader[0].ToString());
                    }
                }
            }

            return idslisr;
        }

        public List<string> getusers()
        {
            List<string> userslist = new List<string>();
            con.Open();
            using (SqlCommand cmd = new SqlCommand("SELECT * FROM wcff", con))
            {
                using (SqlDataReader reader = cmd.ExecuteReader())

                {
                    while (reader.Read())
                    {
                        userslist.Add(reader[1].ToString());
                    }
                }
            }

            return userslist;

        }
        public int opi (usersinfo insert)
        {
            con.Open();
            SqlCommand cmd = new SqlCommand
            ("INSERT INTO wcff (id,name) VALUES (@id,@name)", con);
            cmd.Parameters.AddWithValue("@id", insert.id);
            cmd.Parameters.AddWithValue("@name", insert.name);
           int a= cmd.ExecuteNonQuery();
            con.Close();
            return a;
        }

        public int opu(usersinfo update)
        {
            con.Open();
            SqlCommand cmd = new SqlCommand
            ("UPDATE wcff SET name = @name  WHERE id = @id", con);
            cmd.Parameters.AddWithValue("@id", update.id);
            cmd.Parameters.AddWithValue("@name", update.name);
            int a =cmd.ExecuteNonQuery();
            con.Close();
            return a;
        }

        public int opd(usersinfo id)
        {
            con.Open();
            SqlCommand cmd = new SqlCommand("DELETE FROM wcff WHERE id = @id", con);
            cmd.Parameters.AddWithValue("@id", id.id);

           int a = cmd.ExecuteNonQuery();
            con.Close();
            return a;
        }
    }
}连接字符串可在此处获得:here。
- 列表
getids将获取所有 ID,列表getusers将获取所有用户名。 int opi方法具有insertSQL 命令。int opu方法具有updateSQL 命令。int opd具有DeleteSQL 命令。
完成 WCF 项目中的编码部分后,单击该项目,然后单击“生成”,等待一段时间,然后你将看到 Visual Studio 显示“生成成功”。然后单击“在浏览器中查看”。之后,将在浏览器中打开一个页面。单击 service1.svc。单击它时,将提示你进入一个页面,提示你已创建服务。复制该链接。现在,在你的 Metro 风格项目中,单击“引用”,然后单击“添加服务引用”。将链接粘贴到地址栏中,然后单击“转到”。它将看起来如下图所示。

MainPage.xaml.cs
以下是你的 XAML C# 代码将如何执行 UI 中的操作。
using System;
using System.Collections.Generic;
using System.IO;
using System.Linq;
using Windows.Foundation;
using Windows.Foundation.Collections;
using Windows.UI.Xaml;
using Windows.UI.Xaml.Controls;
using Windows.UI.Xaml.Controls.Primitives;
using Windows.UI.Xaml.Data;
using Windows.UI.Xaml.Input;
using Windows.UI.Xaml.Media;
using Windows.UI.Xaml.Navigation;
using wcfexamcrud.ServiceReference1;

namespace wcfexamcrud
{
    public sealed partial class MainPage : Page
    {
        //object of service ref
        ServiceReference1.ServiceClient objserv = new ServiceReference1.ServiceClient();
        public MainPage()
        {
            this.InitializeComponent();
            this.get();
        }

        protected  override void OnNavigatedTo(NavigationEventArgs e)
        {
           //get() <-- Can be here
        }
        // To get ids and users
        public async void get()
        {
            gv1.ItemsSource = await objserv.getusersAsync();
            gv2.ItemsSource = await objserv.getidsAsync();
        }

        // To insert ids and users
        private async void Button_Click_1(object sender, RoutedEventArgs e)
        {
            usersinfo insert = new usersinfo();
            insert.id = int.Parse(uidtb.Text);
            insert.name = nametb.Text;
            await objserv.opiAsync(insert);
            get();
        }
        // To update ids and users
        private async void Button_Click_2(object sender, RoutedEventArgs e)
        {
            usersinfo update = new usersinfo();
            update.id = int.Parse(uidtb.Text);
            update.name = nametb.Text;
            await objserv.opuAsync(update);
            get();
        }

        // To del the users
        private async void Button_Click_3(object sender, RoutedEventArgs e)
        {
            usersinfo delete = new usersinfo();
            delete.id = int.Parse(uidtb.Text);
            await objserv.opdAsync(delete);
            get();
        }
    }
}
在 MainPage C# 文件中进行编码后,单击 Metro 项目并将其设置为启动项目。
然后调试应用程序并检查应用程序是否正常工作。
工作方式如下图所示