
SSIS:通过编码 第 2 部分
使用 C# 和条件拆分分步创建 SSIS 包。
介绍
在上篇文章中,我讨论了如何使用 C# 和 SSIS 库创建源连接和目标连接,并将所有数据从源表传递到目标表。您可以在此处找到更多相关信息。
在这篇文章中,我将演示如何基于某些条件在同一服务器上的两个表之间传输数据(将演示使用 C# 进行条件拆分),并逐步完全通过编码创建包。
虽然通过 GUI 创建 SSIS 包非常容易(只需设置几个属性,包即可执行),但在这里我将演示通过编码方式创建SSIS 包。
您将学到什么(目录)
在上篇文章中,您已经学习了如何创建源和目标连接以及数据流任务。因此,我在这里只作简要概述。- 在数据库中创建两个表(源和目标)
- 初始任务
- 创建条件拆分转换,分配源输出
- 分配过滤条件
- 创建目标数据源并分配目标连接管理器
- 在过滤后的输出和目标之间创建路径
- 将过滤后的输出列映射到目标输入列
- 保存包并执行实际代码
- 屏幕截图
- 奖励:获取剩余数据并将其插入到另一个表中!
- 屏幕截图
分步操作 ;
1. 在数据库中创建两个表(源和目标)
创建两个名为SourceTable 和 DestinationTable1 的虚拟表,具有相同的字段,如下所示:CREATE TABLE [dbo].[SourceTable](
[ID] [int] NOT NULL,
[Name] [varchar](20) NULL,
[Age] [int] NULL
) ON [PRIMARY]
GO
SET ANSI_PADDING OFF
GO
CREATE TABLE [dbo].[DestinationTable1](
[ID] [int] NOT NULL,
[Name] [varchar](20) NULL,
[Age] [int] NULL
) ON [PRIMARY]
我还向源表中填入了一些虚拟数据。| ID | 名称 | 年龄 |
| 1 | Alok | 30 |
| 2 | Ashish | 30 |
| 3 | Jasdeep | 30 |
| 4 | Ritesh | 35 |
| 5 | Kamlesh | 32 |
| 6 | Hariharan | 36 |
2. 初始任务
- 创建一个
C# Windows 窗体应用程序项目。没什么花哨的。 - 在窗体上添加一个按钮,并包含
OnClick事件处理程序,我们将在此事件处理程序中进行所有编程。 - 现在,将支持性的 SSIS DotNet 程序集添加到项目中。为此,右键单击“解决方案资源管理器”中的“引用”,然后浏览到 %Program Files%\Microsoft SQL Server\100\SDK\Assemblies,包含以下文件:
- Microsoft.SQLServer.DTSPipelineWrap
- Microsoft.SqlServer.DTSRuntimeWrap
- Microsoft.SqlServer.ManagedDTS
- 关闭“添加程序集”对话框并保存解决方案。
Package objPackage = new Package();
            objPackage.Name = "SSISExample";
            objPackage.PackageType = DTSPackageType.DTSDesigner100;
            objPackage.VersionBuild = 1;
在上面,我们创建了 SSIS 包对象,并将其命名为“SSISExample”,并将包类型定义为 DTSPackageType.DTSDesigner100。还有许多其他选项。请在此处查看(这里我们指的是创建面向设计器的包) 在我们继续之前,最好让连接管理器正常运行。我在这里创建了两个到同一数据库的 Oledb 连接,这些连接将由 OleDB 源和 OleDB 目标使用。var connectingString =
@"Data Source=localhost;Integrated Security=SSPI;Initial Catalog=TestDB;Provider=SQLNCLI10.1;Persist Security Info=True;";
ConnectionManager oleDBConnSrc = objPackage.Connections.Add("OLEDB");
oleDBConnSrc.ConnectionString = connectingString;
oleDBConnSrc.Name = "SourceConnection";
ConnectionManager oleDBDestination = objPackage.Connections.Add("OLEDB");
oleDBDestination.ConnectionString = connectingString;
oleDBDestination.Name = "DestinationConnection";我在此提供了包含 SQL 数据库连接字符串的 connectingString。有一点需要注意,您登录数据库的用户应具有写入访问权限。oleDBConnSrc 和 oleDBDestination 是两个 ConnectionManager 对象。现在,我们来到包中最重要的一部分,即所有导入/导出的实际战场。尽管它的后台名称是 Pipeline,但在设计器屏幕上它被称为“数据流任务”。我们所有关于源和目标的所有编码都将在该数据流任务中完成,它的创建非常简单。//Create DataFlowTask in the package
TaskHost dataFlowTaskHost = (TaskHost)objPackage.Executables.Add("SSIS.Pipeline.2");
dataFlowTaskHost.Name = @"SSISPipeline";
dataFlowTaskHost.FailPackageOnFailure = true;
dataFlowTaskHost.FailParentOnFailure = true;
dataFlowTaskHost.DelayValidation = false;
dataFlowTaskHost.Description = @"Data Flow Task";
//-----------Data Flow Inner component starts----------------
MainPipe dataFlowTask = dataFlowTaskHost.InnerObject as MainPipe;
从我们的包对象开始,我们将使用 objPackage.Executables.Add() 方法添加 Pipeline 对象,并将 "SSIS.Pipeline.2" 作为对象名传递以进行创建,并为任务对象提供默认属性。现在,我们获取已创建的数据流任务主管道 MainPipe ,其余组件将附加到此 MainPipe (数据流任务)。// Create and configure an OLE DB source component.
IDTSComponentMetaData100 sourceOleDB = dataFlowTask.ComponentMetaDataCollection.New();
sourceOleDB.ComponentClassID = "DTSAdapter.OLEDBSource.2";
CManagedComponentWrapper srcDesignTime = sourceOleDB.Instantiate();
// The ProvideComponentProperties method creates a default output.
srcDesignTime.ProvideComponentProperties();
sourceOleDB.Name = "TestDB DATA Source";
在这里,我们在数据流任务对象中创建一个对象,并分配 ComponentClassID = "DTSAdapter.OLEDBSource.2",以告知包我们正在添加 OLEDBSource 适配器。之后,我们实例化其设计时组件,并获取其属性,稍后我们将对其进行分配。// Assign the connection manager.
sourceOleDB.RuntimeConnectionCollection[0].ConnectionManagerID = oleDBConnSrc.ID;
sourceOleDB.RuntimeConnectionCollection[0].ConnectionManager =
DtsConvert.GetExtendedInterface(oleDBConnSrc);
现在,将源数据库适配器与源连接管理器关联。上面的代码完成了这一部分,现在我们将设置表以读取模式打开的属性: // Set the custom properties of the source.
srcDesignTime.SetComponentProperty("AccessMode", 0); // Mode 0 : OpenRowset / Table - View
srcDesignTime.SetComponentProperty("OpenRowset", "[dbo].[SourceTable]");
// Connect to the data source, and then update the metadata for the source.
srcDesignTime.AcquireConnections(null);
srcDesignTime.ReinitializeMetaData();
srcDesignTime.ReleaseConnections();
在这里,AccessMode=0 表示我们以视图模式打开数据库,OpenRowSet 属性表示我们要打开的表。到目前为止,所有指令都直接从上一篇文章复制。从第 3 步开始是本文的实际内容。3. 创建条件拆分转换,分配源输出
现在我们已经有了源输出列,现在是时候创建ConditionalSplit 转换了。// Add an ConditionalSplit to the data flow. IDTSComponentMetaData100 conditionalSplit = dataFlowTask.ComponentMetaDataCollection.New(); conditionalSplit.Name = "conditionalSplit1"; conditionalSplit.ComponentClassID = "DTSTransform.ConditionalSplit.2"; CManagedComponentWrapper conditionalSplitDesignTime = conditionalSplit.Instantiate(); conditionalSplitDesignTime.ProvideComponentProperties(); conditionalSplit.InputCollection[0].ExternalMetadataColumnCollection.IsUsed = false; conditionalSplit.InputCollection[0].HasSideEffects = false; conditionalSplitDesignTime.AcquireConnections(null); conditionalSplitDesignTime.ReinitializeMetaData(); conditionalSplitDesignTime.ReleaseConnections();在上面的代码中,我们正在创建一个类型为
“DTSTransform.ConditionalSplit.2” 的转换,这将指示SSIS 创建 ConditionalSplit 转换,并使用 CManagedComponentWrapper 类来实例化其设计属性。现在,我们将源输出列的路径连接到 ConditionalSplit 输入列,并设置每个列的用法。 // Create the path from Source to Split Column Transformation.
IDTSPath100 pathSourceconditionalSplit = dataFlowTask.PathCollection.New();
pathSourceconditionalSplit.AttachPathAndPropagateNotifications(sourceOleDB.OutputCollection[0],conditionalSplit.InputCollection[0]);
// Set Usagetype for Input column, so that they are available for coding
var vInput1 = conditionalSplit.InputCollection[0].GetVirtualInput();
foreach (IDTSVirtualInputColumn100 vColumn in vInput1.VirtualInputColumnCollection)
{
conditionalSplitDesignTime.SetUsageType(conditionalSplit.InputCollection[0].ID,
vInput1, vColumn.LineageID, DTSUsageType.UT_READONLY);
}
4. 分配过滤条件
现在我们已经有了第 3 步中的ConditionSplit 对象,现在我们将创建一个新的输出集合,以便我们可以分配我们的过滤条件。我们将创建一个名为“ConditionalSplitFilerCondtion”的输出集合,并将其输入集合 ID 分配给它,以便它可以对传入数据执行过滤。var newOutputCollection = conditionalSplit.OutputCollection.New();
newOutputCollection.Name = "ConditionalSplitFilerCondtion";
newOutputCollection.HasSideEffects = false;
newOutputCollection.ExclusionGroup = 1;
newOutputCollection.ExternalMetadataColumnCollection.IsUsed = false;
newOutputCollection.ErrorRowDisposition = DTSRowDisposition.RD_FailComponent;
newOutputCollection.TruncationRowDisposition = DTSRowDisposition.RD_FailComponent;
newOutputCollection.ErrorOrTruncationOperation = "Computation";
newOutputCollection.SynchronousInputID = conditionalSplit.InputCollection[0].ID;
一旦我们有了输出集合对象,我们将为“
Expression”、“FriendlyExpression”和“EvalutionOrder”创建自定义属性,并在那里分配我们的过滤条件 ([Age] <31)。- 这里
Expression和FriendlyExpression几乎相同,但是我们为两者都分配了值。此外,它还包含 ID(列),我们将ContainID=true。 - 对于
EvalutionOrder,我们可以有多个条件,每个条件都会产生不同的输出。所以这就像分配优先级。
 IDTSCustomProperty100 myPropCS = newOutputCollection.CustomPropertyCollection.New();
 myPropCS.ContainsID = true;
 myPropCS.Name = "Expression";
 myPropCS.Value = "[Age] < 31";
 myPropCS.ExpressionType = DTSCustomPropertyExpressionType.CPET_NOTIFY;


 myPropCS = newOutputCollection.CustomPropertyCollection.New();
 myPropCS.ContainsID = true;
 myPropCS.Name = "FriendlyExpression";
 myPropCS.Value = "[Age] < 31";
 myPropCS.ExpressionType = DTSCustomPropertyExpressionType.CPET_NOTIFY;

 myPropCS = newOutputCollection.CustomPropertyCollection.New();

 myPropCS.Name = "EvaluationOrder";
 myPropCS.Value = "0";
 myPropCS.ExpressionType = DTSCustomPropertyExpressionType.CPET_NOTIFY;
5. 创建目标数据源并分配目标连接管理器
代码与源适配器类似,只不过我们将ComponentClassID 传递为 "DTSAdapter.OleDbDestination",AccessMode = 3,并且 OpenRowSet 属性包含目标表。IDTSComponentMetaData100 destinationOleDb =
dataFlowTask.ComponentMetaDataCollection.New();
destinationOleDb.ComponentClassID = "DTSAdapter.OleDbDestination";
CManagedComponentWrapper destDesignTime = destinationOleDb.Instantiate();
destDesignTime.ProvideComponentProperties();
// Assign the connection manager.
destinationOleDb.RuntimeConnectionCollection[0].ConnectionManagerID = oleDBDestination.ID;
destinationOleDb.RuntimeConnectionCollection[0].ConnectionManager =
DtsConvert.GetExtendedInterface(oleDBDestination);
// Set the custom properties of the source.
destDesignTime.SetComponentProperty("AccessMode", 3);
destDesignTime.SetComponentProperty("OpenRowset",
"[dbo].[DestinationTable1]");
// Connect to the data source, and then update the metadata for the source.
destDesignTime.AcquireConnections(null);
destDesignTime.ReinitializeMetaData();
destDesignTime.ReleaseConnections();
6. 在过滤后的输出和目标之间创建路径
现在,我们的源适配器和目标适配器都已准备就绪。过滤后的输出列也已准备就绪。现在,我们将过滤后的输出列与目标输入列连接起来,以便目标能够感知其接收的内容。为此,我们将在它们之间添加路径。 // Create the path from source to destination
IDTSPath100 pathDestination = dataFlowTask.PathCollection.New();
pathDestination.AttachPathAndPropagateNotifications(conditionalSplit.OutputCollection["ConditionalSplitFilerCondtion"],
destinationOleDb.InputCollection[0]);
这里,AttachPathAndPropagateNotifications 方法从 ConditionSplit 过滤后的输出来初始化目标输入。由于我们知道传入集合的名称,因此我们可以使用命名的输出集合。7. 将源输出列映射到目标输入列
// Get the destination's default input and virtual input.
IDTSInput100 destinationinput = destinationOleDb.InputCollection[0];
IDTSVirtualInput100 vdestinationinput = destinationinput.GetVirtualInput();

// Iterate through the virtual input column collection.
foreach (IDTSVirtualInputColumn100 vColumn in
vdestinationinput.VirtualInputColumnCollection)
{
  IDTSInputColumn100 vCol = destDesignTime.SetUsageType(destinationinput.ID, vdestinationinput, vColumn.LineageID, DTSUsageType.UT_READWRITE);

 // check if the column exist in the destination table
  string cinputColumnName = vColumn.Name;
  var columnExist = (from item in destinationinput.ExternalMetadataColumnCollection.Cast<IDTSExternalMetadataColumn100>()
                     where item.Name == cinputColumnName
                     select item).Count();
 // if yes map it
 if (columnExist > 0)
 destDesignTime.MapInputColumn(destinationinput.ID, vCol.ID,
                               destinationinput.ExternalMetadataColumnCollection[vColumn.Name].ID);
 }
在这里,我们获取目标输入列,在设计视图中将其标记为可用,然后搜索目标表中匹配的列名。如果找到匹配项,则使用 MapInputColumn 方法映射列。8. 保存包并执行包
SSIS 文件实际上是 XML 文件。如果您将 dtsx 文件重命名为 xml,您可以看到我们设置的所有属性。我们将保存它,并在 Business Intelligence Studio 中查看它。Microsoft.SqlServer.Dts.Runtime.Application app = new Microsoft.SqlServer.Dts.Runtime.Application();
app.SaveToXml(string.Format(@"c:\workSamplePackage\SamplePackage{0}.dtsx",
DateTime.Now.ToString("hhmmss")),
objPackage, null);
objPackage.Execute();
objPackage.Dispose();
app = null;
9. 屏幕截图
如果我们打开上面创建的包文件并将其保存在 Business Intelligence Studio 中,它将显示如下:

您可以看到我们添加的两个连接管理器和条件拆分。还有我们创建的源和目标连接。如果打开条件拆分,它将显示如下:

现在,如果您运行它,它会显示如下:

它显示 6 行数据已从源数据库传输到条件拆分,并且在过滤时,有 3 行数据从条件拆分传输到目标表。这里,看一下目标表。

10. 奖励:获取剩余数据并将其插入到另一个表中!
由于我们已经有了来自条件拆分的剩余数据输出连接,现在我们将创建另一个表 DestinationTable2,并将所有剩余数据放入其中。CREATE TABLE [dbo].[DestinationTable2](
[ID] [int] NOT NULL,
[Name] [varchar](20) NULL,
[Age] [int] NULL
) ON [PRIMARY]
简而言之,我们将创建另一个 OleDBDestination,并将来自条件拆分的输出连接附加到其输入集合。我们将使用相同的代码进行输入列映射和保存包。//-------------Create leftout Destination Package
IDTSComponentMetaData100 destinationOleDbLO =
dataFlowTask.ComponentMetaDataCollection.New();
destinationOleDbLO.ComponentClassID = "DTSAdapter.OleDbDestination";
CManagedComponentWrapper destDesignTimeLO = destinationOleDbLO.Instantiate();
destDesignTimeLO.ProvideComponentProperties();
destinationOleDbLO.Name = "LeftOutData Destination";
destinationOleDbLO.Description = "For Left out data";
// Assign the connection manager.
destinationOleDbLO.RuntimeConnectionCollection[0].ConnectionManagerID = oleDBDestination.ID;
destinationOleDbLO.RuntimeConnectionCollection[0].ConnectionManager =
DtsConvert.GetExtendedInterface(oleDBDestination);
// Set the custom properties of the source.
destDesignTimeLO.SetComponentProperty("AccessMode", 3);
destDesignTimeLO.SetComponentProperty("OpenRowset", "[dbo].[DestinationTable2]");
// Connect to the data source, and then update the metadata for the source.
destDesignTimeLO.AcquireConnections(null);
destDesignTimeLO.ReinitializeMetaData();
destDesignTimeLO.ReleaseConnections();
唯一不同之处在于,我们为目标 Oledb 提供了名称,因为我们已经有一个目标 Oledb 连接处于活动状态。需要注意的第二件重要事情是,名称和描述应该在实例化 ManagedComponentWrapper 并且 ProvideComponentProperties 方法已被调用后填写;否则,这些更改将不会反映出来。
在这里,我们在默认的条件拆分和目标之间创建了路径。由于默认占位符位于第一个位置,因此我们可以使用索引 0 来标识它。
// Create the path from source to destination
IDTSPath100 pathDestinationLO = dataFlowTask.PathCollection.New();
pathDestinationLO.AttachPathAndPropagateNotifications(conditionalSplit.OutputCollection[0],
            destinationOleDbLO.InputCollection[0]);

// Get the destinations default input and virtual input.
IDTSInput100 destinationinputLO = destinationOleDbLO.InputCollection[0];

IDTSVirtualInput100 vdestinationinputLO = destinationinputLO.GetVirtualInput();

// Iterate through the virtual input column collection.
foreach (IDTSVirtualInputColumn100 vColumn in
         vdestinationinputLO.VirtualInputColumnCollection)
{
  IDTSInputColumn100 vCol = destDesignTimeLO.SetUsageType(destinationinputLO.ID,
           vdestinationinputLO, vColumn.LineageID,
           DTSUsageType.UT_READWRITE);

string cinputColumnName = vColumn.Name;
   var columnExist =
  (from item in
  destinationinputLO.ExternalMetadataColumnCollection.Cast<IDTSExternalMetadataColumn100>()
                     where item.Name == cinputColumnName
                     select item).Count();

if (columnExist > 0)
     destDesignTimeLO.MapInputColumn(destinationinputLO.ID, vCol.ID,
     destinationinputLO.ExternalMetadataColumnCollection[vColumn.Name].ID);
 }
您可以使用第 8 步中提到的代码来保存包。11. 屏幕截图
现在,上面创建的包文件将显示如下:

您可以看到我们添加的两个连接管理器和条件拆分。还有我们创建的源和两个目标连接。 现在,如果您运行它,它会显示如下:
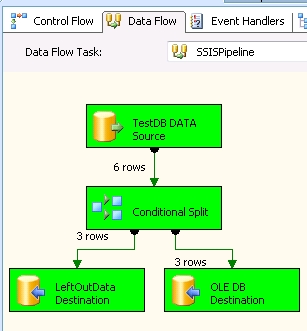
它显示 6 行数据已从源数据库传输到条件拆分,并且在过滤时,有 3 行数据从条件拆分传输到目标表,有 3 行数据传输到剩余表。这里,看一下目标表。在我执行包之前,我已截断了 DestinationTable1 和 DestinationTable2。
