
使用 Web 服务 API(Mashups)获取内容
5.00/5 (3投票s)
使用 Web 服务 API(Mashups)获取内容
引言
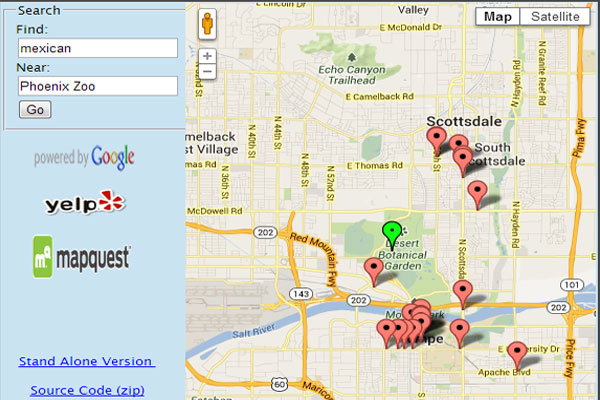
在本文中,我将演示内容聚合(也称为 mashups)的基本概念。我将提供代码来利用三个不同的基于 Web 的 API 的服务。具体来说是 Yelp、Map Quest 和 Google Maps。最终产品将是可显示/嵌入的请求位置的地图。地图上将设置图钉,显示基于用户输入的条件的兴趣点。当用户将鼠标悬停在图钉上时,每个图钉都会在其弹出窗口中显示信息。完成项目的演示可以在此处找到。
第一步 – Google Maps API
我们首先声明 CSS 标识符并在主 PHP 文档(如下)中包含 Google API JavaScript。
<style type="text/css">
  html { height: 100% }
  body { height: 100%; margin: 0; padding: 0 }
  #map-canvas { height: 100% }
< /style>
<script src="https://maps.googleapis.com/maps/api/js?sensor=false">
</script>
接下来,我们将添加初始化地图的代码。首先,将一个 `div` 标签(其 id 为“map-canvas”)添加到文档的 body 中,该标签已在上面的 CSS 样式部分中声明。将一个事件处理程序添加到页面的“load”事件。地图的“initialize” JavaScript 函数在处理程序的实现中被调用。调用时,“initialize”函数会创建一个地图对象,其缩放级别为 12,纬度和经度分别为 33.452945、-111.949678。请注意,在打开 body 标签之前的 PHP 代码。在这里,我已将 PHP 中的经度和纬度打印到文档中,作为文件级别的 JavaScript 变量。您会看到地图上已在指定中心位置放置了一个标记。该位置是凤凰城动物园。当您将鼠标悬停在标记上时,文本“Phoenix Zoo”会出现。
<?php
	print("var Latitude = " . $Latitude . ";\n");
	print("var Longitude = " . $Longitude . ";\n");
	print("</script>\n");
?>
<body>
	<div id="map-canvas"/>
</body>
<script type="text/javascript">
google.maps.event.addDomListener(window, 'load', initialize);
function initialize()
{
	var ZoomLevel = 12;
	var LatLng = new google.maps.LatLng(Latitude, Longitude);
	var mapOptions = {
		center: LatLng,
		zoom: ZoomLevel,
		mapTypeId: google.maps.MapTypeId.ROADMAP
	};
	var map = new google.maps.Map(document.getElementById
			("map-canvas"),mapOptions);
	var marker = new google.maps.Marker(
	{
		position: LatLng,
		map: map,
		title: "Phoenix Zoo"
	});
}
</script>
这段代码足以显示一个以给定位置为中心的标准地图。您可以在此处看到它的运行效果。API 的详细信息可以在此处找到。
第二步 - Yelp API
与大多数 Web API 一样,需要注册。这是一个简单的过程,所以我不会在这里浪费篇幅进行详细介绍。只需按照此链接进行操作。我们将使用 PHP 访问此服务。首先,我们将以下 PHP 添加到打开的 body 标签之后。
<?php
	include("ylp-data.php");
	$BizLocations = GetEnhancedYelpData($Latitude, $Longitude, "mexican");
	for($i=0;$i<count($BizLocations);++$i)
		print($BizLocations[$i]["name"] . "<br/>\n");
?>
新代码包含一个具有调用 Yelp Web 服务功能的文件的文件。该文件提供了一个函数,该函数返回一个对象数组,其中包含 Yelp 返回给我们的每个条目。我们遍历这些对象并打印企业的名称。此内容的演示可以在此处找到。看起来还不算美观,但我们正朝着目标前进。现在让我们看看“yld-data.php”的内容。
<?php
require_once ('OAuth.php'); //include OAuth PHP library
function GetYelpData($Lat, $Long, $Term)
{
	$URL = "http://api.yelp.com/v2/search?ll=" .
	$Lat . "," . $Long . "&term=" . $Term;
	$ConsumerKey = "Your Consumer Key";
	$ConsumerSecret = "Your Consumer Secret";
	$Token = "Your Token";
	$TokenSecret = "Your Token Secret";

	$AuthToken = new OAuthToken($Token, $TokenSecret);
	$Consumer = new OAuthConsumer($ConsumerKey, $ConsumerSecret);
	// Build OAuth Request
	$AuthRequest = OAuthRequest::
	from_consumer_and_token($Consumer, $AuthToken, 'GET', $URL);
	// Sign the request
	$AuthRequest->sign_request(new OAuthSignatureMethod_HMAC_SHA1(),
		$Consumer, $AuthToken);
	// Send Yelp API Call via Curl
	$Handle = curl_init($AuthRequest->to_url());
	curl_setopt($Handle, CURLOPT_RETURNTRANSFER, true);
	curl_setopt($Handle, CURLOPT_HEADER, 0);
	$YelpResponse = curl_exec($Handle); // Yelp response
	curl_close($Handle);
	//Decode the response and return
	return json_decode($YelpResponse,true);
}
?>
代码利用OAuth库对请求进行签名,并利用 curl 功能发送和获取响应。首先,使用基础 Yelp 搜索 URL 和函数输入参数的连接来构造一个 URL。接下来,使用 Yelp 提供的令牌和令牌密钥字符串生成一个 `OAuth` 令牌。同样,从我们的消费者和消费者密钥字符串生成一个 `OAuth` 消费者对象。然后将这三者组合起来创建一个 `OAuthRequest`。然后通过 curl 对请求进行签名并传输。最后,解码接收到的 json 并由函数返回。
此时,我们已经有了我们所在区域的地图以及一些兴趣点的名称。现在我们需要做的是获取我们兴趣点的地理坐标并将它们放置在地图上。
第三步 - 使用 Map Quest 绘制我们的点
与 Yelp 一样,您需要注册才能访问 Map Quest API。在此步骤中,我们将通过添加第二个函数“GetEnhancedYelpData”来开始扩展“ylp-data.php”。
include('mq-data.php');
function GetEnhancedYelpData($Lat, $Long, $Term)
{
	$Data = GetYelpData($Lat,$Long,$Term);
	return GetGeoData($Data["businesses"]);
}
新代码包含对“mq-data.php”文件的包含。其源代码如下
<?php
function GetGeoData($DataIn)
{
	//Generate a URL using the data passed in
	$Format = "json";
	$Key = "Your Map Quest Key";
	$URL = "http://www.mapquestapi.com/geocoding/v1/batch?outFormat=" .
			$Format . "&key=" . $Key;
	for($i=0;$i<count($DataIn);++$i)
	{
		$LocationData = "";
		if(array_key_exists("street-address",$DataIn[$i]))
		{
			$LocationData = $LocationData .
				"&location=" .
				urlencode($DataIn[$i]["street-address"]);
		}
		else
		{
			$Address = "";
			if(count($DataIn[$i]["location"]["address"]))
				$Address = $DataIn[$i]["location"]["address"][0];
			$LocationData = $LocationData .
			"&location=" . urlencode($Address . " "
				. $DataIn[$i]["location"]["city"] . ", "
				. $DataIn[$i]["location"]["state_code"]);
		}
		$URL = $URL . $LocationData;
	}
	//Submit the request via curl
	$Handle = curl_init($URL);
	curl_setopt($Handle, CURLOPT_RETURNTRANSFER, true);
	$RawData = curl_exec($Handle);
	curl_close($Handle);
	$Result = json_decode($RawData, true);
	//Used the decoded results to enrich our data
	if(count($Result["results"]) == count($DataIn))
	{
		for($i=0;$i<count($Result["results"]);++$i)
		{
			$LatLong = array($Result
			["results"][$i]["locations"]
			[0]["latLng"]["lat"],
				$Result["results"][$i]["locations"]
				[0]["latLng"]["lng"]);
			$DataIn[$i]["lat-long"] = $LatLong;
		}
	}
	return $DataIn;
}
?>
该文件的唯一函数“GetGeoData”的职责是遍历传入的地址,并使用它们来构造一个 URL。然后将该 URL 与 API 密钥一起提交给 Map Quest。Map Quest 返回的数据随后用于丰富相应的地址,并添加纬度和经度。为了显示此附加数据,我们需要修改主文档 body 中的 PHP,如下所示
<?php
	include("ylp-data.php");
	$YelpData = GetEnhancedYelpData($Latitude, $Longitude, "mexican");
	$BizLocations = $YelpData;
	for($i=0;$i<count($BizLocations);++$i)
		print($BizLocations[$i]["name"] .
		" (" . $BizLocations[$i]["lat-long"][0]
			. ", " . $BizLocations[$i]
			["lat-long"][1] . ")<br/>\n");
?>
此时,页面现在看起来像这样。
第四步 - 创建最终产品
现在我们有了区域地图、Yelp 数据以及该数据的相应地理坐标。是时候创建最终产品了。我们将在地图上放置标记并清理页面,使其看起来更精致。现在我们将只在主 PHP 文件中工作,我会很快进行,因为所有这些代码都可以在压缩的演示文件中找到。我们要做的第一个更改是“initialize” JavaScript 函数。这是新代码
function initialize()
{
	var ZoomLevel = 12;
	var LatLng = new google.maps.LatLng(Latitude, Longitude);
	var mapOptions = {
		center: LatLng,
		zoom: ZoomLevel,
		mapTypeId: google.maps.MapTypeId.ROADMAP
	};
	var map = new google.maps.Map(document.getElementById("map-canvas"),mapOptions);
	var pinColor = "11FF11";
    var pinImage = new google.maps.MarkerImage(
		"http://chart.apis.google.com/chart?chst=d_map_pin_letter&chld=%E2%80%A2|"
		+ pinColor,
        new google.maps.Size(21, 34),
        new google.maps.Point(0,0),
        new google.maps.Point(10, 34));
	var marker = new google.maps.Marker(
	{
		position: LatLng,
		icon: pinImage,
		map: map,
		title: <?php print("\"" . $SearchAreaText . "\""); ?>
	});
	<?php
		$Data = GetEnhancedYelpData($Latitude, $Longitude, $SearchTerm);
		for($i=0;$i<count($Data);++$i)
		{
			$Address = "";
			if(count($Data[$i]["location"]["address"])>0)
				$Address = $Data[$i]["location"]["address"][0];
			print("\t\tnew google.maps.Marker( {
				position: new google.maps.LatLng(" .
				$Data[$i]["lat-long"][0]
				."," . $Data[$i]["lat-long"][1] ."),
				map: map,
				title: \"" . $Data[$i]["name"] . "\\n"
				. $Address . "\\n"
				. $Data[$i]["location"]["city"] . ", "
				. $Data[$i]["location"]["state_code"] . "\"
			});\n");
		}
	?>
}
</script>
最显著的变化是 PHP 代码混入了这里的 JavaScript 函数的末尾……
<?php print("\"" . $SearchAreaText . "\""); ?>
以及这里……
<?php
	$Data = GetEnhancedYelpData($Latitude, $Longitude, $SearchTerm);
	for($i=0;$i<count($Data);++$i)
	{
		$Address = "";
		if(count($Data[$i]["location"]["address"])>0)
			$Address = $Data[$i]["location"]["address"][0];
		print("\t\tnew google.maps.Marker( {
			position: new google.maps.LatLng(" . $Data[$i]["lat-long"][0]
			."," . $Data[$i]["lat-long"][1] ."),
			map: map,
			title: \"" . $Data[$i]["name"] . "\\n"
			. $Address . "\\n"
			. $Data[$i]["location"]["city"] . ", "
			. $Data[$i]["location"]["state_code"] . "\"
		});\n");
	}
?>
它的作用是遍历 Map Quest 增强的 Yelp 数据,并生成 JavaScript,将标记插入到嵌入的 Google 地图中。此外,我们还更新了地图的中心点,使其标记现在以绿色显示。我们进行的下一个重大更改是出现在 body 标签之前的 PHP 代码。我们对其进行了增强,以处理用户输入。
<?php
	include("ylp-data.php");
	$Latitude = 33.452945;
	$Longitude =  -111.949678;
	$SearchTerm = "mexican";
	if(isset($_POST) && isset($_POST["search-term"])
	&& strlen($_POST["search-term"]))
		$SearchTerm = $_POST["search-term"];
	$SearchAreaText = "";
	if(isset($_POST) && isset($_POST["search-area"])
	&& strlen($_POST["search-area"]))
		$SearchAreaText = $_POST["search-area"];
	if($SearchAreaText != null && strlen($SearchAreaText)>0)
	{
		print("\t//Geo Data Lookup For: " . $SearchAreaText . "\n");
		$SearchArea = array(array("street-address" => $SearchAreaText));
		$SearchArea = GetGeoData($SearchArea);
		$Latitude = $SearchArea[0]["lat-long"][0];
		$Longitude =  $SearchArea[0]["lat-long"][1];
	}
	else
	{
		$SearchAreaText = "Phoenix Zoo";
	}
	print("\t//Search Area Text: " . $SearchAreaText . "\n");
	print("\tvar Latitude = " . $Latitude . ";\n");
	print("\tvar Longitude = " . $Longitude . ";\n");
	print("\tvar SearchTerm = \"" . $SearchTerm . "\";\n");
?>
虽然代码仍默认为凤凰城动物园周围的墨西哥菜,但现在它允许使用其他位置和搜索条件。为了支持这一点,HTML 的 body 需要更新如下
<body>
	<div id="main-content">
    	<div id="map-sidebar">
            <form action="content-aggregation-standalone-final.php"
            method="post">
                <fieldset>
                    <legend>Search</legend>
                    Find:
                    <input type="text" name="search-term"
                    value="<?php print($SearchTerm); ?>"/>
                    Near:
                    <input type="text" name="search-area"
                    value="<?php print($SearchAreaText); ?>"/>
                    <input type="submit" name="search"
                    value="Go" />
                </fieldset>
            </form>
            <br/>
            <div id="powered-by">
                <a href="http://www.mapquest.com">
                <img src="../images/powered-by-google-on-white.png"
                alt="Google Maps Logo"  width="100"
                height="30"></a>
                <br/>
                <a href="http://www.yelp.com">
                <img src="http://s3-media4.ak.yelpcdn.com/assets/2/www/
                img/7e704c57a423/developers/yelp_logo_75x38.png"
                alt="Yelp Logo" width="80" height="30"></a>
                <br/>
                <a href="http://www.mapquest.com">
                <img src="http://content.mqcdn.com/winston-312/cdn/
                dotcom3/images/logos/logo.png" alt="Map Quest Logo"
                width="100" height="50"></a>
			</div>
        </div>
		<div id="map-canvas"/>
	</div>
</body>
摘要
随着我们创建了这样一个有些简化的聚合示例,我想简要说明几点需要注意的地方。首先,这个例子几乎没有错误处理。您可以随意使用此代码,但我强烈建议添加一些健壮的错误处理。其次,这只是一个非常基本的示例。实际上,我并没有比 Yelp 提供的功能增加任何价值。所有这些服务的提供者都假定您将创造超越其网站所提供价值的内容。最后,功劳归功于应得者。请务必在您的页面上包含相应的链接,链接回这些服务的提供者。