
高斯模糊和 Alpha 模糊
4.43/5 (19投票s)
2004 年 2 月 23 日
5分钟阅读
123200
3556
分步说明和理论

引言
我创建这个是为了我图标生成器项目的一部分。让我先退一步解释一下。在我的图标项目中,我大量处理图标。当用户将低分辨率图标放大时,会遇到一个问题。结果是图标的边缘会变得模糊。我的目标是编写一些东西来消除这种边缘模糊。好吧,快进一点 :-)
我当时正在思考如何实现我的目标,突然想到“我这里需要一个高斯模糊函数”。不幸的是,标准的 GDI+ 函数中没有这样的东西。所以(又一次)我决定自己编写一个高斯模糊(类似)的函数。之所以它不完全等同于真正的 McCoy,是因为它没有考虑变换矩阵,因此所有颜色的加权值都相同(但你实际上看不出区别)。
揭开“图像”的神秘面纱
![]()
图像处理总是让我退缩并说“哎哟”。直到你真正思考它,它似乎是一个非常复杂的问题,而实际上它并不比你在学校里写过的地址簿程序(很久很久以前,用 Pascal)难。我将尝试为你分解这个概念,并将其还原到最基本的形式。
如果别的记不住,请记住这一点
图像只是一个二维颜色数组,我们可以像这样在数组中表示图像:
        For PixelX = 0 To Image.Width - 1
            For PixelY = 0 To Image.Height - 1
                ImagePixel(PixelX, PixelY) = Image.getpixel(PixelX, PixelY)
            Next
Next这将遍历图片并为整个图像创建一个颜色数组(幸运的是我们不必这样做,我只是想说明这一点)。图像不过是一个我们可以修改的颜色数组。模糊界限

当我们用红色加上绿色时会发生什么?(我们得到黄色)当我们把这个概念应用到二维数组上时会发生什么?(我们得到模糊效果)。在最后一个代码片段中,我们了解到 `GetPixel` 返回图像中一个点的颜色。所以考虑一下:
        For PixelX = 0 To Image.Width - 2
            For PixelY = 0 To Image.Height - 2
                Dim Color1 As Color = Image.getpixel(PixelX, PixelY)
                Dim Color2 As Color = Image.getpixel(PixelX + 1, PixelY)
                Dim Merge As Color = Color.FromArgb( _
                          (Color1.A + Color2.A) / 2, _
                          (Color1.R + Color2.R) / 2, _
                          (Color1.G + Color2.G) / 2, _
                          (Color1.B + Color2.B) / 2)
                SetPixel(PixelX, PixelY, Merge)

            Next
        Next
出于我们的目的,每种颜色由四个值组成:A = Alpha(透明度),R = Red(红色),G = Green(绿色),B = Blue(蓝色)。所以本质上,我们正在做的是将这些“颜色通道”与下一个像素进行平均。所以,假设像素 (1, 1) 是红色,像素 (2, 1) 是绿色,我们混合它们并将像素 (1, 1) 设置为结果颜色,黄色。恭喜,你刚刚实现了模糊!实际上,它更像是一种条纹。
构建更好的模糊
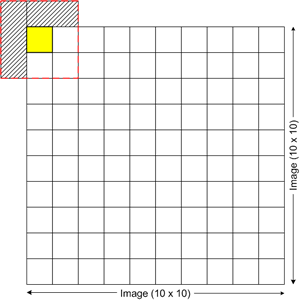
与其模糊两个像素,不如进行更大的采样并平均一个 3x3 像素组,这将给你一个更好的模糊效果。我们需要做的第一件事是有一个函数来过滤掉那些不存在的讨厌的像素。正如我在上面演示的那样,(1,1) 的 3x3 像素采样将渲染五个不存在的点。
        dim pixels as new arraylist
        dim x as integer, y as integer
        dim size as new size(3, 3)
        dim imageSize as new size(10, 10)


        For x = PixelX - CInt(Size.Width / 2) To PixelX + _
              CInt(Size.Width / 2)
            For y = Pixely - CInt(Size.Height / 2) To Pixely + _
                CInt(Size.Height / 2)
                If (x > 0 And x < imageSize.Width) And _
                   (y > 0 And y < imageSize.Height) Then
                    pixels.Add(bmp.GetPixel(x, y))
                End If
            Next
        Next
这个小宝石的作用是获取 PixelX 和 PixelY(这里是 1, 1)并创建一个像素颜色数组。这个像素颜色数组将包含四个像素 (1,1) (2,1) (1,2) 和 (2,2) 的颜色信息。这里还有两个例子:
示例一 (2,1) 将产生 6 个点。示例 2 将产生 9 个点。
正如你所见,这是一个多用途函数,根据像素的位置,它可以返回多达九个像素的颜色。
现在我们有了用于模糊的像素数组,让我们看看如何平均它们。
        Dim thisColor As Color


        Dim alpha As Integer = 0
        Dim red As Integer = 0
        Dim green As Integer = 0
        Dim blue As Integer = 0


        For Each thisColor In pixels
            alpha += thisColor.A
            red += thisColor.R
            green += thisColor.G
            blue += thisColor.B
        Next


        Return Color.FromArgb(alpha / pixels.Count, _
                              red / pixels.Count, _
                              green / pixels.Count, _
                              blue / pixels.Count)
这将遍历像素集合,在过程中累加颜色通道。然后,当它完成后,它将返回一个包含所有颜色平均值的颜色,这个结果颜色就是你设置像素 (1, 1) 的值。
什么是 Alpha 通道

Alpha 通道是一个颜色通道,它表示该颜色的透明度。在上面的例子中,所有三个正方形都是红色的,但 Alpha 通道不同。第一个正方形是实心的,Alpha 通道设置为 255。第二个正方形是 50% 实心的(127.5),最后一个是完全透明的,Alpha 为 0%(0)。
Alpha 通道最常用于 GIF、PNG 和 ICO 文件。出于这个原因,你可以加载一个透明的 GIF 并检查每个像素的 Alpha 通道,从而获得图像实心部分的轮廓。
Alpha 模糊
使用与之前相同的技术,我们可以测试像素是否不实心,然后将其发送到我们的模糊函数,从而模糊对象的 Alpha 通道或边缘。**注意** 对象必须是透明的才能使此功能生效!
整合所有内容
这是一个我构建的执行这种高斯式模糊的程序的完整示例。
    Private Function Average(ByVal Size As Size, ByVal imageSize As SizeF, _
               ByVal PixelX As Integer, ByVal Pixely As Integer) As Color


        Dim pixels As New ArrayList
        Dim x As Integer, y As Integer
        Dim bmp As Bitmap = PictureBox1.Image.Clone


        ' Find the color for each pixel and add it to a new array.
        '
        ' Remember a 5X5 area on or near the edge will ask
        ' for pixels that don't
        ' exist in our image, this will filter those out.
        '
        For x = PixelX - CInt(Size.Width / 2) To PixelX + _
               CInt(Size.Width / 2)
            For y = Pixely - CInt(Size.Height / 2) To Pixely + _
                   CInt(Size.Height / 2)
                If (x > 0 And x < imageSize.Width) And _
                   (y > 0 And y < imageSize.Height) Then
                    pixels.Add(bmp.GetPixel(x, y))
                End If
            Next
        Next

        ' Adverage the A, R, G, B channels
        ' reflected in the array

        Dim thisColor As Color
        Dim alpha As Integer = 0
        Dim red As Integer = 0
        Dim green As Integer = 0
        Dim blue As Integer = 0

        For Each thisColor In pixels
            alpha += thisColor.A
            red += thisColor.R
            green += thisColor.G
            blue += thisColor.B
        Next

        ' Return the sum of the colors / the number of colors (The average)
        '
        Return Color.FromArgb(alpha / pixels.Count, _
                              red / pixels.Count, _
                              green / pixels.Count, _
                              blue / pixels.Count)
    End Function


    Private Sub gausianBlur(ByVal alphaEdgesOnly As Boolean, _
                            ByVal blurSize As Size)

        Dim PixelY As Integer
        Dim PixelX As Integer
        Dim bmp As Bitmap = PictureBox1.Image.Clone

        ' UI Stuff
        Label1.Text = "Applying Gausian Blur of " & blurSize.ToString

        Progress.Maximum = bmp.Height * bmp.Width
        Progress.Minimum = 0
        Progress.Value = 0

        ' Loop the rows of the image
        For PixelY = 0 To bmp.Width - 1

            ' Loop the cols of the image
            For PixelX = 0 To bmp.Height - 1
                If Not alphaEdgesOnly Then     ' Blur everything
                    bmp.SetPixel(PixelX, PixelY, Average(blurSize, _
                                 bmp.PhysicalDimension, PixelX, PixelY))
                ElseIf bmp.GetPixel(PixelX, PixelY).A _
                       <> 255 Then  ' Alpha blur channel check
                    bmp.SetPixel(PixelX, PixelY, Average(blurSize, _
                                 bmp.PhysicalDimension, PixelX, PixelY))
                End If
                Progress.Value += 1
                Application.DoEvents()
            Next
        Next

        PictureBox1.Image = bmp.Clone
        bmp.Dispose()
    End Sub

    Private Sub Button1_Click(ByVal sender As System.Object, _
              ByVal e As System.EventArgs) Handles Button1.Click
        gausianBlur(False, New Size(6, 6))
    End Sub
起初它看起来有些令人费解,直到你像我刚刚为你做的那样分解它。基本上,当你单击 `button1` 时,它会将信息发送到 `gausianBlur` 子例程来构建模糊。`gausianBlur` 子例程会检查图像的该部分是否需要模糊,如果需要,则将该像素设置为 `adverage` 函数的输出颜色。