
MEF 和 AppDomain - 动态删除程序集
4.96/5 (20投票s)
演示了在 AppDomain 中使用 MEF,并允许在应用程序运行时交换 MEF 部件。
引言
本文将介绍与运行中的 MEF 应用程序交互的涉及内容,以及如何在不关闭应用程序进行部件升级的情况下移除或替换 MEF 部件。这在替换或移除基于 MEF 且具有管理组件以与服务交互的 Windows 服务中的组件时尤其有用。
背景
上周有人问到如何动态地替换启用了 MEF 的 DLL。由于 .NET 即使在启用了 MEF 的应用程序中也会锁定程序集,因此您无法在代码中释放 MEF 部件时替换 DLL。在进行一些努力之前,替换 DLL 的唯一方法是关闭应用程序,替换 DLL,然后重新启动应用程序。因此,在研究并找到几个不错的示例并进行一些努力后,我得出了这个解决方案。它并不漂亮,而且功能不多,只是证明了如何做到这一点。这是我同名博客文章的副本。
Using the Code
此示例仅适用于 .NET 4.5 及更高版本,并假设您已了解 MEF 的工作原理,并且可以熟练使用它,而无需进行相关教程。
我们将使用AppDomain 类来创建 MEF 组件运行的应用程序域。这将允许我们在运行时访问组件。随着我们进展,我将进一步解释其工作原理。
首先,创建一个名为AppDomainTest的控制台应用程序项目。在您的Program类中,插入以下代码。我在这里设置了几个指向 MEF DLL 所在位置以及AppDomainSetup将在运行时缓存 DLL 的位置的路径。稍后我会进一步解释。
using System;
using System.IO;

namespace AppDomainTest {

    internal class Program {
        private static AppDomain domain;

        [STAThread]
        private static void Main() {
            var cachePath = Path.Combine
            (AppDomain.CurrentDomain.SetupInformation.ApplicationBase, "ShadowCopyCache");
            var pluginPath = Path.Combine
            (AppDomain.CurrentDomain.SetupInformation.ApplicationBase, "Plugins");
            if (!Directory.Exists(cachePath)) {
                Directory.CreateDirectory(cachePath);
            }

            if (!Directory.Exists(pluginPath)) {
                Directory.CreateDirectory(pluginPath);
            }

            // This creates a ShadowCopy of the MEF DLL's
            // (and any other DLL's in the ShadowCopyDirectories)
            var setup = new AppDomainSetup {
                CachePath = cachePath,
                ShadowCopyFiles = "true",
                ShadowCopyDirectories = pluginPath
            };
        }
    }
}
现在,创建一个名为AppDomainTestInterfaces的类库项目。此库将包含 MEF 库和主应用程序的合同接口。在主应用程序中添加对此库的引用。删除其中的类文件,并创建一个名为IExport的接口。
namespace AppDomainTestInterfaces {

    public interface IExport {

        void InHere();
    }
}
接下来,创建几个 MEF 类库项目。在每个库中添加对AppDomainTestInterfaces和System.ComponentModel.Composition的引用。删除Class1文件,并在每个项目中创建一个Import类。
您需要为主应用程序的生成输出设置到bin\Debug文件夹,如图所示。我将编译后的 DLL 放入主应用程序bin\Debug文件夹下的一个名为Plugins的文件夹中,以便于查找,并且可以为本示例设置简单的代码。根据需要使用您自己的文件夹。

最后,创建一个名为AppDomainTestRunner的类库项目,并在主应用程序中设置对其的引用。添加对System.ComponentModel.Composition、System.ComponentModel.Composition.Registration和System.Reflection.Context的引用,以访问其余示例中使用的必要 MEF 组件。最后,添加对AppDomainTestInterfaces的引用。
现在我们可以进入项目的核心了。
在 AppDomainTestRunner 库项目中,删除Class1文件并添加一个Runner类。将以下代码添加到Runner中。此类将处理 MEF 的导入和导出,我们将看到整个类都在一个单独的AppDomain中运行。
using System;
using System.Collections.Generic;
using System.ComponentModel.Composition;
using System.ComponentModel.Composition.Hosting;
using System.ComponentModel.Composition.Registration;
using System.IO;
using System.Linq;
using AppDomainTestInterfaces;

namespace AppDomainTestRunner {

    public class Runner : MarshalByRefObject {
        private CompositionContainer container;
        private DirectoryCatalog directoryCatalog;
        private IEnumerable<iexport> exports;
        private static readonly string pluginPath = Path.Combine
        (AppDomain.CurrentDomain.SetupInformation.ApplicationBase,
        "Plugins");

        public void DoWorkInShadowCopiedDomain() {
            // Use RegistrationBuilder to set up our MEF parts.
            var regBuilder = new RegistrationBuilder();
            regBuilder.ForTypesDerivedFrom
            <IExport>().Export<IExport>();

            var catalog = new AggregateCatalog();
            catalog.Catalogs.Add(new AssemblyCatalog
            (typeof(Runner).Assembly, regBuilder));
            directoryCatalog = new DirectoryCatalog(pluginPath, regBuilder);
            catalog.Catalogs.Add(directoryCatalog);

            container = new CompositionContainer(catalog);
            container.ComposeExportedValue(container);

            // Get our exports available to the rest of Program.
            exports = container.GetExportedValues<iexport>();
            Console.WriteLine("{0} exports in AppDomain {1}",
            exports.Count(), AppDomain.CurrentDomain.FriendlyName);
        }

        public void Recompose() {
            // Gimme 3 steps...
            directoryCatalog.Refresh();
            container.ComposeParts(directoryCatalog.Parts);
            exports = container.GetExportedValues<IExport>();
        }

        public void DoSomething() {
            // Tell our MEF parts to do something.
            exports.ToList().ForEach(e => e.InHere(););
        }
    }
}
接下来,按如下方式设置 MEF 库代码。这只是表明我们实际上正在 DLL 中运行。我创建了两个完全相同的库,只是将第二个命名为AppDomainTestLib2。
using System;
using AppDomainTestInterfaces;

namespace AppDomainTestLib {

    public class Import : MarshalByRefObject, IExport {

        public void InHere() {
            Console.WriteLine("In MEF Library1: AppDomain: {0}",
            AppDomain.CurrentDomain.FriendlyName);
        }
     }
}
请注意MarshalByRefObject的使用,它本质上会将此类标记为可序列化,并允许跨AppDomain边界访问对象,从而获得对托管AppDomain中类的成员和属性的必要访问权限。
最后,按以下方式设置Main()方法。在这里,我们看到使用AppDomainSetup对象来定义我们的AppDomain配置。这建立了 DLL 的影子复制以及在哪里进行影子复制。CachePath参数是可选的,在此仅作为证明。参数ShadowCopyFiles是一个string参数,接受true或false。ShadowCopyDirectories参数确定从哪个目录进行影子复制。
using System;
using System.IO;
using AppDomainTestRunner;

namespace AppDomainTest {

internal class Program {
    private static AppDomain domain;

        [STAThread]
        private static void Main() {
            var cachePath = Path.Combine
            (AppDomain.CurrentDomain.SetupInformation.ApplicationBase,
            "ShadowCopyCache");
            var pluginPath = Path.Combine
            (AppDomain.CurrentDomain.SetupInformation.ApplicationBase,
            "Plugins");
            if (!Directory.Exists(cachePath)) {
                Directory.CreateDirectory(cachePath);
            }

            if (!Directory.Exists(pluginPath)) {
                Directory.CreateDirectory(pluginPath);
            }

            // This creates a ShadowCopy of the MEF DLL's
            // (and any other DLL's in the ShadowCopyDirectories)
            var setup = new AppDomainSetup {
                CachePath = cachePath,
                ShadowCopyFiles = "true",
                ShadowCopyDirectories = pluginPath
            };

            // Create a new AppDomain then create a new instance
            // of this application in the new AppDomain.
            domain = AppDomain.CreateDomain("Host_AppDomain",
            AppDomain.CurrentDomain.Evidence, setup);
            var runner = (Runner)domain.CreateInstanceAndUnwrap
            (typeof(Runner).Assembly.FullName, typeof(Runner).FullName);

            Console.WriteLine("The main AppDomain is:
            {0}", AppDomain.CurrentDomain.FriendlyName);

            // We now have access to all the methods and properties of Program.
            runner.DoWorkInShadowCopiedDomain();
            runner.DoSomething();

            Console.WriteLine("\nHere you can remove a
            DLL from the Plugins folder.");
            Console.WriteLine("Press any key when ready...");
            Console.ReadKey();

            // After removing a DLL, we can now recompose the
            // MEF parts and see that the removed DLL is no longer accessed.
            runner.Recompose();
            runner.DoSomething();
            Console.WriteLine("Press any key when ready...");
            Console.ReadKey();

            // Clean up.
            AppDomain.Unload(domain);
        }
    }
}
关于影子复制:ShadowCopyFiles会复制在AppDomain中实际使用的 DLL,并将它们放在一个特殊文件夹中,然后从那里引用它们。这允许在运行时删除或替换Plugins(或其他配置的文件夹)中的 DLL。原始 DLL 将保留在缓存文件夹中,直到应用程序下次启动,或者,在我们看到的示例中,直到DirectoryCatalog刷新,并且CompositionContainer被重新组合并重新导出。
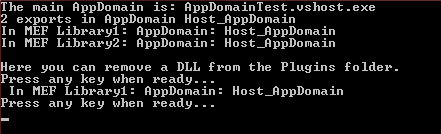
现在,当您运行应用程序时,您会在Host_AppDomain中看到 MEF DLL 运行。

此时,您可以转到Plugins文件夹并删除一个 DLL,然后在控制台窗口中按任意键,看看当调用runner.Recompose()时会发生什么。这证明了 recompose 释放了我们的 DLL,但这仅仅是因为ShadowCopyFiles参数。
现在,打开另一个 Visual Studio 实例,创建一个名为AppDomainTestLib3的类库。添加与之前相同的引用,并且不要设置输出目录,我们将手动复制它。将其Import类代码设置与之前的AppDomainTestLib类相同。继续编译它。
接下来,在之前的 Visual Studio 实例中运行应用程序,并在第一个Console.ReadKey()处停止。从Plugins文件夹中删除一个 DLL,然后将新 DLL 复制到原位置。按任意键继续...

最后,要实际替换 DLL,您必须先删除以前的 DLL,然后再实现新的 DLL。我们可以通过将以下代码插入Program来演示手动方式。正如注释和本文中所述,程序集现在需要签名,并且AssemblyInfo.cs中的AssemblyVersionAttribute需要设置为新版本。(程序集版本控制通常是好的做法...)这将要求接口程序集和其他插件程序集也必须签名。
<a href="http://stackoverflow.com/a/14842417">
// After removing a DLL, we can now recompose the MEF parts
// and see that the removed DLL is no longer accessed
runner.Recompose();
runner.DoSomething();

Console.WriteLine("\nHere we will begin to replace Lib3 with an updated version.
\nDelete the old one first DLL from the Plugins folder.");
Console.WriteLine("Press any key when ready...");
Console.ReadKey();

Console.WriteLine("Now showing that Lib3 is deleted.");
runner.Recompose();
runner.DoSomething();

Console.WriteLine("\nNext drop the new Lib3 in the Plugins folder.");
Console.WriteLine("Press any key when ready...");
Console.ReadKey();

runner.Recompose();
runner.DoSomething();

Console.WriteLine("Press any key when ready...");
Console.ReadKey();

// Clean up.
AppDomain.Unload(domain);</a>
将当前的AppDomainTestLib3留在Plugins文件夹中并运行应用程序。现在,按照提示操作,当您到达“在这里我们将开始用更新的版本替换Lib3”时,对AppDomainTestLib3进行可观察的更改,然后进行编译。完成删除旧 DLL 后,按任意键重新组合 DLL。现在,当您看到下一个提示时,将新 DLL 放入Plugins文件夹。像往常一样按任意键。您现在应该会看到来自您更改的 DLL 的响应。
进行两次runner.Recompose()调用是的原因是 DLL 的Exports签名与前一个版本匹配,MEF 由于不检查FileInfo的差异,因此未检测到更改。这会告诉AppDomain DLL 也没有改变,并且ShadowCopyFiles不会启动以进行更改。简单的解决方法是删除原始文件,重新组合,然后将新文件放到原位,并再次重新组合。我在此看到的唯一缺点是,在重新组合过程中,应用程序的性能会暂时下降。
我已将源代码添加到GitHub存储库。我还包含在源代码中,可以实现跨 AppDomain 传递数据。源代码可在此处下载:here。