
Visual Studio 插件 - 深入探讨
4.96/5 (17投票s)
对 Visual Studio 插件进行更深入的探讨,并附带一个完整的实现示例。
引言
Visual Studio 插件是扩展 Visual Studio 功能的一种非常快速便捷的方式。它们不如 Visual Studio 包(Visual Studio packages)强大,使用包可以获得更多控制权,但它们确实提供了一种快速便捷的方式来发布你的功能。使用向导创建插件非常简单,只需进行一些选择,Visual Studio 就会设置好解决方案并在“工具”菜单中添加一个示例按钮,你只需填补空白即可执行你的代码。
但我认为,在创建插件并希望提供流畅无问题的用户体验时,有一些重要的细节和概念并没有讲清楚,你应该了解。例如,UI 未被创建、UI 未更新或在同一菜单中被创建多次。我在创建 Team Foundation Server 的 Compare to Branch 扩展 时遇到了这些问题,并希望在这里分享我的经验,以便其他人不必经历我所经历的头疼过程。代码中有一个完整的实现示例,使用了这里讨论的所有元素,希望这能提供一个模板,让其他人可以专注于实现功能。
目录
- TFS 的 Compare to Branch 扩展
- 关于示例代码的说明
- 向导创建的插件结构
- 临时 UI 和永久 UI
- 控件和命令
- 图标
- 记录插件中的错误
- 为插件编写安装程序
- 完整示例 - 查找解决方案资源管理器插件
- 总结
- 历史
TFS 的 Compare to Branch 扩展
Compare to Branch 是我为 Visual Studio 2010/2012 和 TFS 2010/2012 编写的一个插件,它可以让你在 Visual Studio 中轻松地比较不同分支之间的文件和文件夹。只需在源代码管理资源管理器中右键单击一个项目,就会在弹出菜单中显示一个与分支相关的项目列表,让你轻松地比较分支之间的项目。我写它是为了帮助我更好地可视化我目前正在处理的一个项目不断增长的已发布和支持版本之间的差异。TFS 用户一直可以通过使用比较对话框跨分支进行比较,但我认为进行比较所需的点击次数太多了。《Compare to Branch》将该过程减少到只需 2 次鼠标单击。
在此 从 Visual Studio Gallery 获取。

关于示例代码的说明
示例代码是用 VS 2010 编写的,但在 VS2012 中也能正常工作。我包含了项目用户文件,因为它们包含你需要调试设置(例如,调试时运行哪个版本的 devenv.exe)。如果这些设置不匹配你的系统或你需要更改它们,则可以在项目设置的“调试”选项卡中进行修改。
每个插件项目还包含一个名为 - ForTesting.addin 的文件。这些 XML 文件需要被复制到你想调试的 Visual Studio 版本的插件目录中。例如:%MYDOCUMENTS%\Visual Studio 2010\Addins。你还需要更新 addin 文件中的 <Assembly> 节点以指向你的项目正在构建的 addin DLL,并更新 <Version> 节点以引用你正在定位的正确 Visual Studio 版本。
在启动 Visual Studio 的新实例以调试你的插件时,我发现最好在启动 Visual Studio 之前重命名这些文件的扩展名。然后撤销重命名并打开解决方案。这可以防止 Visual Studio 锁定你的调试 DLL,使你无法重新构建它们。
我没有在 Visual Studio 2008 及更早版本上测试过此代码。
向导创建的插件结构
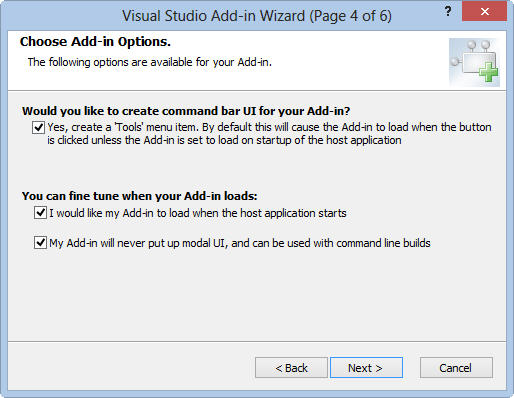
启动 Visual Studio 并创建一个类型为“Visual Studio Add-in”(在“其他项目类型”->“可扩展性”下)的新项目。点击通过向导,但务必将其设置为在“工具”菜单下创建示例按钮,并在启动时加载你的插件。
当 Visual Studio 启动时,它会检查一个文件夹集合中的 .AddIn 文件。此文件的内容告诉 Visual Studio 有一个插件要加载以及如何处理该插件。VS 使用的文件夹层次结构可以在选项对话框中看到。

向导创建的项目会将一个名为“MyAddin- For Testing.AddIn”的 .AddIn 文件放在 %VSMYDOCUMENTS%\Addins (在我的 PC 上是 %MYDOCUMENTS%\Visual Studio 2010\Addins)中,这就是 Visual Studio 在我们尝试调试我们的插件时会解析的插件文件。
按 F5,请注意项目设置为在调试时启动另一个 Visual Studio 实例。该实例启动,读取 For Testing.AddIn 文件,加载我们的调试程序集,并在“工具”菜单中看到我们新创建的按钮。

调试代码时,我们可以看到 UI 是在 Connect 类的 OnConnection 方法中创建的。我们可以修改该代码来随意调整 UI,并且有一些函数需要我们自己实现。一个在插件被调用时执行的 Exec 函数,以及一个设置我们按钮 UI 状态的 QueryStatus 函数。似乎剩下的就是这些了,但首先有一些重要的事情需要理解。
临时 UI 和永久 UI
让我们更详细地看一下 .AddIn XML 文件。
<Extensibility xmlns="http://schemas.microsoft.com/AutomationExtensibility">
    <HostApplication>
        <Name>Microsoft Visual Studio</Name>
        <Version>10.0</Version>
    </HostApplication>
    <Addin>
        <FriendlyName>FindInSolutionExplorer</FriendlyName>
        <Description>Easily find files in the solution explorer</Description>
        <Assembly>C:\Users\Ham\Documents\Visual Studio 2010\Projects\FindInSolutionExplorer\FindInSolutionExplorer\bin\FindInSolutionExplorer.dll</Assembly>
        <FullClassName>FindInSolutionExplorer.Connect</FullClassName>
        <LoadBehavior>5</LoadBehavior>
        <CommandPreload>1</CommandPreload>
        <CommandLineSafe>1</CommandLineSafe>
    </Addin>
</Extensibility>
大多数设置应该是自解释的。有关更多信息,请参阅这篇 msdn 文章。该文件告诉 Visual Studio 从哪里加载我们的插件程序集,以及我们的连接类的类名和命名空间。在我看来,重要的设置是 LoadBehaviour 和 CommandPreLoad。
LoadBehaviour 指定我们是否希望插件在 Visual Studio 启动时加载。如果设置为 0,用户必须先从“插件管理器”对话框(可在“工具”菜单中找到)手动加载插件,然后才能使用它。
CommandPreLoad 极大地影响了我们 UI 的创建方式。如果设置为 0,则 UI 在每次插件加载时创建,并在每次插件卸载或 Visual Studio 关闭时删除。从这个意义上说,UI 是临时的。
如果设置为 1,Visual Studio 会在第一次遇到 .addin 文件时创建并持久化 UI,并运行 OnConnection 方法。之后所有 Visual Studio 的启动都不会运行插件的 OnConnection 方法,也不会重新创建或更新 UI。从这个意义上说,UI 被认为是永久性的。这样做的目的是优化 Visual Studio 的启动时间。如果 CommandPreLoad 为 true,LoadBehaviour 在很大程度上变得无关紧要,它可以用来控制是否加载/创建其他依赖于插件的资源,但不能控制 UI 何时创建。
永久 UI 和临时 UI 之间的区别非常重要,它极大地影响你如何编写和管理你的插件。让我们通过几个例子来更详细地了解这两个方法。
临时 UI
示例解决方案包含一个演示临时 UI 的项目。请注意,.addin 文件中的 CommandPreLoad = 0。代码中最重要的部分是
public void OnConnection(object application, ext_ConnectMode connectMode, object addInInst, ref Array custom)
{
    applicationObject = (DTE2)application;
    addInInstance = (AddIn)addInInst;

    switch (connectMode)
    {
        case ext_ConnectMode.ext_cm_UISetup:
            // We should never get here, this is temporary UI
            break;

        case ext_ConnectMode.ext_cm_Startup:
            // The add-in was marked to load on startup
            AddTemporaryUI();
            break;

        case ext_ConnectMode.ext_cm_AfterStartup:
            // The add-in was loaded by hand after startup using the Add-In Manager
            // Initialize it in the same way that when is loaded on startup
            AddTemporaryUI();
            break;
    }
}

/// <summary>
/// Setup the temporary UI for this addin
/// </summary>
private void AddTemporaryUI()
{
    object[] contextUIGuids = new object[] { };
    Commands2 commands = (Commands2)applicationObject.Commands;
    try
    {
        tempCommand = commands.Item(
            string.Format("{0}.{1}", addInInstance.ProgID, MY_COMMAND_NAME), -1);
    }
    catch
    {
        // command doesn't exist
    }

    if (tempCommand == null)
    {
        tempCommand = commands.AddNamedCommand2(
            addInInstance,
            MY_COMMAND_NAME,
            MY_COMMAND_NAME,
            MY_COMMAND_NAME,
            true,
            59,
            ref contextUIGuids,
            (int)(vsCommandStatus.vsCommandStatusSupported | vsCommandStatus.vsCommandStatusEnabled));
    }

    CommandBars cmdBars = (CommandBars)applicationObject.CommandBars;

    if (tempCommand != null)
    {
        // Add a button to the code window context window
        CommandBar codeWindowCommandBar = cmdBars["Code Window"];
        if (codeWindowCommandBar != null)
        {
            tempCodeWindowCommandBarButton = (CommandBarButton)tempCommand.AddControl(
                codeWindowCommandBar, codeWindowCommandBar.Controls.Count + 1);
            tempCodeWindowCommandBarButton.Caption = "Example button in the code window menu";
        }

        // Add a popup and some buttons to the solution explorer
        CommandBar solutionExplorerItemCommandBar = cmdBars["Item"];
        if (solutionExplorerItemCommandBar != null)
        {
            tempCommandBarPopup = (CommandBarPopup)solutionExplorerItemCommandBar.Controls.Add(
                MsoControlType.msoControlPopup, System.Type.Missing, System.Type.Missing,
                solutionExplorerItemCommandBar.Controls.Count + 1, true);
            tempCommandBarPopup.Caption = "Example Popup";

            tempSECommandBarButton1 = (CommandBarButton)tempCommand.AddControl(
                tempCommandBarPopup.CommandBar, tempCommandBarPopup.Controls.Count + 1);
            tempSECommandBarButton1.Caption = "Example button 1 in the solution explorer item menu";

            tempSECommandBarButton2 = (CommandBarButton)tempCommand.AddControl(
                tempCommandBarPopup.CommandBar, tempCommandBarPopup.Controls.Count + 1);
            tempSECommandBarButton2.Caption = "Example button 2 in the solution explorer item menu";
        }
    }
}

public void OnDisconnection(ext_DisconnectMode disconnectMode, ref Array custom)
{
    switch (disconnectMode)
    {
        case ext_DisconnectMode.ext_dm_HostShutdown:
        case ext_DisconnectMode.ext_dm_UserClosed:
            if ((tempSECommandBarButton1 != null))
            {
                tempSECommandBarButton1.Delete(true);
            }
            if ((tempSECommandBarButton2 != null))
            {
                tempSECommandBarButton2.Delete(true);
            }
            if ((tempCodeWindowCommandBarButton != null))
            {
                tempCodeWindowCommandBarButton.Delete(true);
            }
            if (tempCommandBarPopup != null)
            {
                tempCommandBarPopup.Delete();
            }
            if (tempCommand != null)
            {
                tempCommand.Delete();
            }
            break;
    }
}
这里最重要的事情要注意的是
OnConnection方法只会收到ext_cm_Startup或ext_cm_AfterStartup的值,这取决于插件是用户通过插件管理器对话框手动加载的,还是在启动时自动加载的。ext_cm_UISetup的情况永远不会发生,它只与永久 UI(CommandPreLoad = 1)相关。- 请参阅 AddTemporaryUI,了解如何将 UI 元素添加到 Visual Studio 的不同部分。
- OnDisconnection 方法显式删除我们创建的所有控件和命令。
可以观察到 UI 的临时性。如果你按 F5 并运行项目,插件将加载并创建 UI。如果你通过插件管理器对话框手动卸载插件,将调用 OnDisconnection ,UI 将被删除并从 Visual Studio 中消失。重新加载插件,将调用 AddTemporaryUI 并重新创建 UI。如果你未能正确地在 OnDisconnection 中处理控件和命令,那么下次通过插件管理器加载插件时,你会看到多个 UI 实例被创建,这是非常令人不快的。

永久 UI
如果你走永久 UI 的路线,那么你的 .addin 文件看起来会像这样
<LoadBehavior>1</LoadBehavior>
<CommandPreload>1</CommandPreload>
如果你调试 PermanentUI 示例项目,你会看到 OnConnection 被调用,connectMode 等于 ext_cm_UISetup。在这里,我们设置了永久 UI,一个工具菜单上的按钮和一个标准的 Visual Studio 工具栏上的新按钮。请注意,我们在 OnDisconnection 中没有处理任何内容。这里的想法是命令和 UI 只创建一次,然后就结束了。下次 Visual Studio 加载时,它会从存储中读取命令和相关的 UI,并节省创建它们的初始化成本。代码比临时情况简单得多。
public void OnConnection(object application, ext_ConnectMode connectMode, object addInInst, ref Array custom)
{
    applicationObject = (DTE2)application;
    addInInstance = (AddIn)addInInst;

    MessageBox.Show(string.Format("OnConnection with connectMode: {0}", connectMode));
    switch (connectMode)
    {
        case ext_ConnectMode.ext_cm_UISetup:
            AddPermanentUI();
            break;

        case ext_ConnectMode.ext_cm_Startup:
            // Do nothing, permanent UI
            break;

        case ext_ConnectMode.ext_cm_AfterStartup:
            // Do nothing, permanent UI
            break;
    }
}

/// <summary>
/// Setup the permanent UI for this addin
/// </summary>
private void AddPermanentUI()
{
    object[] contextUIGuids = new object[] { };
    Commands2 commands = (Commands2)applicationObject.Commands;
    try
    {
        permCommand = commands.Item(
            string.Format("{0}.{1}", addInInstance.ProgID, MY_COMMAND_NAME), -1);
        MessageBox.Show("Permanent UI Example: Command already exists");
    }
    catch
    {
        // command doesn't exist
    }

    if (permCommand == null)
    {
        MessageBox.Show("Permanent UI Example: Creating command");
        permCommand = commands.AddNamedCommand2(
            addInInstance,
            MY_COMMAND_NAME,
            MY_COMMAND_NAME,
            MY_COMMAND_NAME,
            true,
            59,
            ref contextUIGuids,
            (int)(vsCommandStatus.vsCommandStatusSupported | vsCommandStatus.vsCommandStatusEnabled));
    }

    CommandBars cmdBars = (CommandBars)applicationObject.CommandBars;

    if (permCommand != null)
    {
        MessageBox.Show("Permanent UI Example: Creating UI");

        // Add button to the tools menu
        CommandBar menuBarCommandBar = ((CommandBars)applicationObject.CommandBars)["MenuBar"];
        CommandBarControl toolsControl = menuBarCommandBar.Controls["Tools"];
        CommandBarPopup toolsPopup = (CommandBarPopup)toolsControl;
        CommandBarButton toolsMenuCommandBarButton = (CommandBarButton)permCommand.AddControl(
                    toolsPopup.CommandBar, 1);
        toolsMenuCommandBarButton.Caption = "Example button on the tools menu";

        // Add button to the standard tool bar
        CommandBar standardCommandBar = cmdBars["Standard"];
        CommandBarButton standardCommandBarButton = (CommandBarButton)permCommand.AddControl(
                    standardCommandBar, standardCommandBar.Controls.Count + 1);
        standardCommandBarButton.Style = MsoButtonStyle.msoButtonIcon;
    }
}
但我敢肯定你在想,“每次我调试我的项目时,我都能看到 OnConnection 被调用,值为 ext_cm_UISetup ,并且我的 UI 正在创建。这是因为默认的调试器设置是使用命令行 /resetaddin PermanentUI.Connect 启动 devenv。/resetaddin 开关会销毁此插件的所有持久化数据,并强制在 OnConnection 期间重新创建它。尝试正常启动 Visual Studio 或从调试器设置中删除此命令。会有消息框弹出,告知你正在发生的事情,因此你可以看到命令和 UI 何时以及如何被创建。你将看到如果正常启动 Visual Studio,AddPermanentUI 不会被调用。
这引出了一个有趣的点。你如何更新插件中的 UI?如果你发布了一个新版本,如何确保运行它会按照你的意愿更新 UI?解决方案是在安装新版本之前重置你的插件,最简单的方法是调用
devenv.exe /ResetAddIn Namespace.Connect /Command File.Exit从你的安装程序中。我还建议安装过程在安装结束时启动并关闭一个 Visual Studio 实例,以强制创建和持久化 UI。这将减少首次设置插件时出现的错误。
我更倾向于使用临时 UI。从开发的角度来看,它更直观。如果你出于性能原因需要使用永久 UI,我建议你彻底测试升级等所有场景。如果创建命令栏,使用永久 UI 会有一些额外的小陷阱,我会引导你到 mztools,这是一个处理此类问题的绝佳资源。
控件和命令
从到目前为止的示例中,你可以看到插件通过创建命令,然后从这些命令生成一个或多个控件来指导你向 Visual Studio 添加 UI 和功能。然后,控件与命令关联,Visual Studio 会处理后续的所有连接。
如果需要,我们可以绕过这个命令系统,直接创建控件。当基于命令的 Exec 和 QueryStatus 系统不满足你的需求,并且你需要额外的控制级别时,这可能很有用,例如,你可能需要动态生成 UI。代码看起来会像这样
CommandBarButton newControl = (CommandBarButton)codeWindowCommandBar.Controls.Add(
                MsoControlType.msoControlButton, Type.Missing, Type.Missing, 1, Type.Missing);
newControl.Caption = "button created with no command";
newControl.Click += new _CommandBarButtonEvents_ClickEventHandler(newControl_Click);

void newControl_Click(CommandBarButton Ctrl, ref bool CancelDefault)
{
    // Your code here
}
如果使用 TemporaryUI 方法,请确保在 OnDisconnection 方法中清理你创建的所有控件。实际上,这种方法在 Permanent UI 模型下会失败。这是因为只有与命令关联的控件才会被持久化,所以你在下次 Visual Studio 运行时创建的这些控件将会丢失。这是坚持使用 Temporary UI 的另一个原因。
图标
有两种方法可以配置 GUI 中使用的图标。你可以从 Microsoft Office 系统中选择一个图标,并在 AddNamedCommand2 中指定该图标的整数。请注意数字 59,它对应于笑脸图标。有关如何查找标准图标 ID 号的信息,请参阅 MSDN 网站上的 Microsoft Office 系统命令栏中的按钮面孔列表。
commands.AddNamedCommand2(
        addInInstance,
     MY_COMMAND_NAME,
     MY_COMMAND_NAME,
     MY_COMMAND_NAME,
     true,
     59,
     ref contextUIGuids,
     (int)(vsCommandStatus.vsCommandStatusSupported | vsCommandStatus.vsCommandStatusEnabled));
或者,使用相同的方法,你可以传递一个来自程序集资源的 Bitmap 类型对象。下面的完整实现示例中有一个例子。
commands.AddNamedCommand2(
      addInInstance,
      MY_COMMAND_NAME,
      MY_COMMAND_NAME,
      MY_COMMAND_NAME,
      false,
      Resources.MyBitmap,
      ref contextUIGuids,
      (int)(vsCommandStatus.vsCommandStatusSupported | vsCommandStatus.vsCommandStatusEnabled));
记录插件中的错误
如果你要在用户的计算机上诊断插件问题,日志记录将至关重要。为此,我编写了 AddInLogger 类,该类能够将消息和错误记录到事件日志,或者(如果你正在调试,例如)记录到 Visual Studio 的输出窗口。
示例如下。
public void OnConnection(object application, ext_ConnectMode connectMode, object addInInst, ref Array custom)
{
    applicationObject = (DTE)application;
    addInInstance = (AddIn)addInInst;

    bool logtoOutputWindow = System.Diagnostics.Debugger.IsAttached;
    logger = new AddInLogger(applicationObject, "MyAddIn", logtoOutputWindow);

    logger.LogMessage(string.Format("OnConnection() called with connectMode: '{0}'", connectMode));
    try
    {
        // Your initialisation code here
    }
    catch (Exception ex)
    {
        logger.LogError(ex.ToString());
    }
}
在这里,我们创建了日志记录器的实例。如果我们在调试,所有日志都将写入输出窗口中一个名为“MyAddIn”的新窗格。否则,我们的日志将以“MyAddIn”作为事件源写入事件日志。
注意: 如果你正在记录到事件日志,那么你必须确保一个名为“MyAddIn”的事件源存在。你不能依赖你的应用程序代码在它不存在时创建它,因为它很可能没有权限这样做。你可以手动使用 powershell 创建事件源,但最佳实践是在你的安装程序中创建它(我们接下来会看到)。
New-EventLog -LogName Application -Source MyAddin
AddInLogger 代码如下,应该是不言自明的。
// <summary>
/// Helper class to do all the logging
/// Assumes an event source of name 'eventSource' exists
/// Run the following powershell snippet to set it up if debugging 'New-EventLog -LogName Application -Source My_Addin'
/// 'Remove-EventLog -Source MyAddin'
/// On real installations the event source is created by the installer
/// </summary>
internal class AddInLogger
{
    private string eventSource = string.Empty;
    private OutputWindowPane outputWindowPane = null;
    private bool logtoOutputWindow = true;

    /// <summary>
    /// Constructor
    /// </summary>
    /// <param name="_applicationObject"></param>
    /// <param name="_eventSource"></param>
    /// <param name="_logtoOutputWindow"></param>
    internal AddInLogger(DTE _applicationObject, string _eventSource, bool _logtoOutputWindow)
    {
        try
        {
            logtoOutputWindow = _logtoOutputWindow;
            eventSource = _eventSource;
            if (logtoOutputWindow)
            {
                // Create an output pane for this addin
                Window window = _applicationObject.Windows.Item(Constants.vsWindowKindOutput);
                OutputWindow outputWindow = (OutputWindow)window.Object;
                outputWindowPane = null;

                for (int i = 1; i <= outputWindow.OutputWindowPanes.Count; ++i)
                {
                    if (outputWindow.OutputWindowPanes.Item(i).Name.Equals(eventSource,
                        StringComparison.CurrentCultureIgnoreCase))
                    {
                        outputWindowPane = outputWindow.OutputWindowPanes.Item(i);
                        break;
                    }
                }

                if (outputWindowPane == null)
                    outputWindowPane = outputWindow.OutputWindowPanes.Add(eventSource);
            }
        }
        catch
        {
            // Swallow it, never let errors in logging stop the add in
        }
    }

    /// <summary>
    /// Log trace
    /// </summary>
    /// <param name="message"></param>
    internal void LogMessage(string message)
    {
        try
        {
            if (logtoOutputWindow)
            {
                outputWindowPane.OutputString(string.Format("{0}\n", message));
            }
            else
            {
                EventLog.WriteEntry(eventSource, message);
            }
        }
        catch
        {
            // Swallow, never let errors in logging stop the add in
        }
    }

    /// <summary>
    /// Log an error
    /// </summary>
    /// <param name="message"></param>
    internal void LogError(string message)
    {
        try
        {
            if (logtoOutputWindow)
            {
                outputWindowPane.OutputString(string.Format("Error: {0}\n", message));
            }
            else
            {
                EventLog.WriteEntry(eventSource, message, EventLogEntryType.Error);
            }
        }
        catch
        {
            // Swallow, never let errors in logging stop the add in
        }
    }
}
为插件编写安装程序
旧的设置和部署项目已从 Visual Studio 2012 及更高版本中移除,因此现在我们被迫使用 WIX。有时寻找实现所需功能的正确标记感觉像是在玩黑魔法,但过一段时间就会明白(从 主页 下载最新版本的 WIX)。
下面的标记创建了一个非常简单的插件安装程序,如果需要,你可以将其用作插件安装程序的模板。步骤如下:
- 检查你支持的 Visual Studio 版本是否已安装
- 为你的日志记录创建事件日志源
- 将插件 DLL 和 addin 文件部署到特定 Visual Studio 版本的插件目录
- 使用 XmlUtil 更新 addin 文件中的 Visual Studio 版本号
我不会过多介绍 WIX 标记,它应该相当自解释。请确保用你自己的 GUID 替换所有 GUID,否则你可能会遇到一些问题。安装程序还支持自动升级。当你想要发布新版本时,只需更新产品版本号并创建一个新的产品 GUID。
如果你复制粘贴,请务必重新生成所有 GUID,否则你可能会陷入麻烦。
<?xml version="1.0" encoding="UTF-8"?>
<!--
When we release a new version we must
1) Update assemlby version number
2) Update product version number here
3) Create a new Product Id
-->

<Wix xmlns="http://schemas.microsoft.com/wix/2006/wi">
  <Product Id="NEW-GUID-HERE"
           Version="1.0.0.0"
           Name="My Add In"
           Language="1033"
           Manufacturer="Company Name"
           UpgradeCode="NEW-GUID-HERE">
    <Package InstallerVersion="200" Compressed="yes" InstallScope="perMachine" />

    <Media Id="1" Cabinet="media1.cab" EmbedCab="yes" />

    <!-- Specify your licence here -->
    <!--<WixVariable Id="WixUILicenseRtf" Value="$(var.ProjectDir)\licence.rtf" />-->

    <!-- Use a Minimal UI -->
    <UI Id="UserInterface">
    </UI>
    <UIRef Id="WixUI_Minimal" />

    <MajorUpgrade Schedule="afterInstallInitialize" AllowDowngrades="yes"/>

    <!-- Determine what versions of Visual Studio are installed-->
    <Property Id="VS2010INSTALLATIONFOLDER" Secure="yes">
      <RegistrySearch Id="VS2010InstallationFolderRegistrySearchId" Type="raw"
                      Root="HKLM" Key="SOFTWARE\Microsoft\VisualStudio\10.0"
                      Name="InstallDir">
      </RegistrySearch>
    </Property>
    <Property Id="VS2012INSTALLATIONFOLDER" Secure="yes">
      <RegistrySearch Id="VS2012InstallationFolderRegistrySearchId" Type="raw"
                      Root="HKLM" Key="SOFTWARE\Microsoft\VisualStudio\11.0"
                      Name="InstallDir">
      </RegistrySearch>
    </Property>

    <Condition Message="This add-in requires Visual Studio 2010 or 2012 to be already installed">
      VS2012INSTALLATIONFOLDER OR VS2010INSTALLATIONFOLDER
    </Condition>

    <!-- Create the event log source -->
    <Directory Id="TARGETDIR" Name="SourceDir">
      <Component Id="EventLog" Guid="NEW-GUID-HERE">
        <Util:EventSource xmlns:Util="http://schemas.microsoft.com/wix/UtilExtension"
              Log="Application" Name="MyAddIn"
                          EventMessageFile="[NETFRAMEWORK20INSTALLROOTDIR]EventLogMessages.dll"/>
      </Component>

      <Directory Id="CommonAppDataFolder">
        <Directory Id="MicrosoftDirId" Name="Microsoft">
          <Directory Id="VisualStudioDirId" Name="VisualStudio">

            <!-- VS 2010 files -->
            <Directory Id="Dir100Id" Name="10.0">
              <Directory Id="Dir100AddInsId" Name="AddIns">
                <Component Id="MyAddIn2010Resources" Guid="NEW-GUID-HERE">
                  <File Id="MyAddInDll2010" Name="MyAddIn.dll" Vital="yes"
                        Source="..\MyAddIn\bin\MyAddIn.dll"/>
                  <File Id="MyAddInAddIn2010" Name="MyAddIn.Addin" Vital="yes"
                        Source="..\MyAddIn\MyAddIn.Addin"/>
                  <!-- Update the .addin file to specify version 10.0 of Visual Studio -->
                  <Util:XmlFile xmlns:Util="http://schemas.microsoft.com/wix/UtilExtension"
                                Id="VS2010SetVersion" Action="setValue" File="[#MyAddInAddIn2010]"
                                ElementPath="/Extensibility/HostApplication/Version"
                                Value="10.0" Sequence="1" />
                </Component>
              </Directory>
            </Directory>

            <!-- VS 2012 files -->
            <Directory Id="Dir110Id" Name="11.0">
              <Directory Id="Dir110AddInsId" Name="AddIns">
                <Component Id="MyAddIn2012Resources" Guid="NEW-GUID-HERE">
                  <File Id="MyAddInDll2012" Name="MyAddIn.dll" Vital="yes"
                        Source="..\bin\MyAddIn.dll"/>
                  <File Id="MyAddInAddIn2012" Name="MyAddIn.Addin" Vital="yes"
                        Source="..\MyAddIn.Addin"/>
                  <!-- Update the .addin file to specify version 11.0 of Visual Studio -->
                  <Util:XmlFile xmlns:Util="http://schemas.microsoft.com/wix/UtilExtension"
                                Id="VS2012SetVersion" Action="setValue" File="[#MyAddInAddIn2012]"
                                ElementPath="/Extensibility/HostApplication/Version"
                                Value="11.0" Sequence="1" />
                </Component>
              </Directory>
            </Directory>

          </Directory>
        </Directory>
      </Directory>
    </Directory>


    <Feature Id="ProductFeature" Title="My Add In" Level="1" >
      <ComponentRef Id="EventLog"/>

      <!-- If VS2010 present then install add in to 2010-->
      <Feature Id="VS2010" Title="Visual Studio 2010"
               Description="Installs the add-in for Visual Studio 2010" Level="1" AllowAdvertise="no">
        <Condition Level="0">NOT VS2010INSTALLATIONFOLDER</Condition>
        <ComponentRef Id="MyAddIn2010Resources"/>
      </Feature>

      <!-- If VS2012 present then install add in to 2012-->
      <Feature Id="VS2012" Title="Visual Studio 2012"
         Description="Installs the add-in for Visual Studio 2012" Level="1" AllowAdvertise="no">
        <Condition Level="0">NOT VS2012INSTALLATIONFOLDER</Condition>
        <ComponentRef Id="MyAddIn2012Resources"/>
      </Feature>

    </Feature>
  </Product>
</Wix>
完整示例 - 查找解决方案资源管理器插件
示例代码包含一个实现了上述所有想法的完整示例。它在代码窗口的上下文菜单中添加了一个“在解决方案资源管理器中查找”按钮。单击后,将在解决方案资源管理器中找到并选择该文件。这是在解决方案资源管理器中快速查找文件位置的一种便捷方式。我确信我在旧的开发环境中曾从另一个扩展中获得过此功能,但我记不清是哪个扩展提供的,所以我决定自己编写一个。只需在文件中右键单击并单击按钮,然后文件就会在解决方案资源管理器中被选中并显示。

我希望这个例子能作为一个模板,快速创建其他插件。你只需要
- 更新
OnConnection以创建你所需的 UI - 更新
Exec和QueryStatus方法以实现你的功能 - 更新安装程序以满足你的需求
你可以在示例项目中找到用于搜索解决方案资源管理器的代码。实际上这是一个棘手的小问题,比它应该的要困难得多。代码不是 100% 生产就绪,但在此处完成了它的目的,并且 *大部分* 时间都能正常工作。
总结
在你深入开发插件之前,你需要问自己插件是否是开发 Visual Studio 扩展的合适框架。另一个选择是 Visual Studio Packages。Visual Studio Packages 是 Add Ins 的“大哥哥”。它们比插件提供对 Visual Studio 更大的控制,但代价是复杂性。在 Visual Studio Gallery 和通过 nuget 中也对 Packages 提供了更好的支持。
我想,如果让我重新选择,我会将 Compare To Branch 编写成一个 package。因为 UI 是动态的,控制我想要的 UI 变得相当复杂,而 package 可以让我更好地优化它的工作方式。
我仍然认为插件有其存在的价值。如果你需要做一些快速而简单的事情,那么插件是理想的选择。你只需要一个 DLL 文件和一个 XML 文件,然后将其复制到你计算机上的正确位置,就可以开始了。
历史
- 2013/09/01 - 初稿