
用汇编和 C 编写引导加载程序——第二部分
4.97/5 (49投票s)
使用BIOS中断和服务读取软盘内容。
引言
在上一篇文章中,我尝试简要介绍了引导过程,如何在C和汇编中编写可引导代码,以及如何在C程序中嵌入汇编语句。我们还尝试编写了一些程序来检查注入到设备引导扇区中的代码是否有效。在本文中,我将尝试解释分段以及在引导过程中从软盘读取数据并将其显示在屏幕上的方法。我们将尝试编写一些程序并检查我们是否可以读取数据并尝试将其显示在屏幕上。
文章的范围是什么?
我将把文章的范围限制在如何用汇编语言编写程序代码,如何将其复制到3.5英寸软盘镜像的引导扇区,以及如何使用bochs这样的x86模拟器来测试软盘以引导我们编写的代码。我将借助BIOS服务来完成从软盘读取数据的任务。通过这样做,我们可以更多地了解BIOS例程,并轻松地在实模式下进行操作。
话题分解
- 分段简介
- 编程环境
- 从RAM内存中读取数据
- 存储设备简介
- 软盘架构
- 与软盘交互
分段简介
在继续编写读取软盘的示例之前,我想先回顾一下分段的主题及其必要性,如下所示。
什么是分段?
主内存被划分为几个段,这些段由几个特殊的寄存器(如段寄存器CS、DS、SS和ES)索引。
分段的用途是什么?
当我们指定一个16位地址时,CPU会自动计算相应段的起始地址。然而,程序员有责任指定每个段的起始地址,尤其是在编写引导加载程序这样的程序时。
有哪些不同类型的段?
我现在只列出四种类型,因为它们对我们理解很重要。
- 代码段
- 数据段
- 堆栈段
- 扩展段
代码段
它是程序在内存中的一部分,包含可执行指令。如果您参考我之前的文章,您会看到`.text`标签,我们在其中放置要执行的指令。当程序加载到内存中时,`.text`部分下的指令会被放置到代码段。在CPU中,我们使用CS寄存器来引用内存中的代码段。
数据段
它是程序在内存中的一部分,包含程序员定义的静态和全局变量。我们使用DS寄存器来引用内存中的数据段。
堆栈段
程序员可以在程序运行期间使用寄存器来存储、修改和检索数据。由于程序员在程序运行时可用的寄存器数量有限,程序逻辑可能会变得复杂,因为可用于临时使用的寄存器很少。因此,程序员总是需要一个更大、更灵活的空间来存储、处理和检索数据。CPU设计者提出了一个名为堆栈段的特殊段。为了在堆栈段上存储和检索数据,程序员使用push和pop指令。我们也使用push指令将参数传递给函数。我们使用SS寄存器来引用内存中的堆栈段。另外请记住,堆栈是向下增长的。
扩展段
扩展段通常用于加载比数据段中存储的数据更大的数据。您将进一步看到,我将尝试从软盘加载数据到扩展段。我们使用ES寄存器来引用内存中的扩展段。
如何设置段寄存器?
程序员不能直接设置任何段寄存器,而是遵循以下方式。
movw $0x07c0, %ax
movw %ax, %ds
上述步骤是什么意思?
- 将数据复制到一个通用寄存器。
- 然后将其分配给段寄存器。
我们将AX寄存器设置为0x07c0
当我们复制AX的内容到DS时,绝对地址计算如下。
DS = 16 * AX
So DS = 0x7c00
我们进一步使用偏移量来遍历。要访问数据段中的某个位置,我们使用偏移量。
编程环境
- 操作系统 (GNU Linux)
- 汇编器 (GNU Assembler)
- 编译器(GNU GCC)
- 链接器 (GNU 链接器 ld)
- 一个用于我们测试目的的x86模拟器(bochs)。
从RAM读取数据
注意
现在,如果您注意到BIOS将我们的程序加载到0x7c00并开始执行,然后我们的程序开始逐个打印值。我们通过直接指定偏移量并设置数据段为0x7c00来访问RAM上的数据。
示例1
一旦我们的程序被BIOS加载到0x7c00,让我们尝试读取偏移量3和4的数据,然后将它们打印到屏幕上。
程序:test.S
.code16                   #generate 16-bit code
.text                     #executable code location
     .globl _start;
_start:                   #code entry point
     jmp  _boot           #jump to boot code
     data : .byte 'X'     #variable
     data1: .byte 'Z'     #variable
_boot:
     movw $0x07c0, %ax    #set ax = 0x07c0
     movw %ax    , %ds    #set ds = 16 * 0x07c0 = 0x7c00
     #Now we will copy the data at position 3 from 0x7c00:0x0000
     # and then print it onto the screen
     movb 0x02   , %al    #copy the data at 2nd position to %al
     movb $0x0e  , %ah
     int  $0x10
    #Now we will copy the data at position 4 from 0x7c00:0x0000
    # and then print it onto the screen
     movb 0x03   , %al    #copy the data at 3rd position to %al
     movb $0x0e  , %ah
     int  $0x10
#infinite loop
_freeze:
     jmp _freeze
     . = _start + 510     #mov to 510th byte from 0 pos
     .byte 0x55           #append boot signature
     .byte 0xaa           #append boot signature
现在,在命令行上,要生成二进制文件并将代码复制到软盘的引导扇区,请键入如下命令,然后按回车键。
- as test.S –o test.o
- ld –Ttext=0x7c00 –oformat=binary boot.o –o boot.bin
- dd if=/dev/zero of=floppy.img bs=512 count=2880
- dd if=boot.bin of=floppy.img
注意
如果您用十六进制编辑器打开boot.bin文件,您会看到类似下面的内容。

您会看到X和Y位于0x7c00的第0个偏移量起的第三个和第四个位置。
要测试代码,请键入以下命令,如下所示。
- bochs

示例
一旦我们的程序被BIOS加载到0x7c00,让我们读取偏移量2处的以null结尾的字符串并打印它。
程序:test2.S
.code16                                     #generate 16-bit code
.text                                       #executable code location
     .globl _start;
_start:                                     #code entry point
     jmp  _boot                             #jump to boot code
     data : .asciz "This is boot loader"    #variable
     #calls the printString function which
     #starts printing string from the position
     .macro mprintString start_pos          #macro to print string
          pushw %si
          movw  \start_pos, %si
          call  printString
          popw  %si
     .endm
     printString:                           #function to print string
     printStringIn:
          lodsb
          orb %al   , %al
          jz  printStringOut
          movb $0x0e, %ah
          int  $0x10
          jmp  printStringIn
     printStringOut:
     ret
_boot:
     movw $0x07c0, %ax                      #set ax = 0x07c0
     movw %ax    , %ds                      #set ds = 16 * 0x07c0 = 0x7c00
     mprintString $0x02
_freeze:
     jmp _freeze
     . = _start + 510                       #mov to 510th byte from 0 pos
     .byte 0x55                             #append boot signature
     .byte 0xaa                             #append boot signature
如果您编译程序并在十六进制编辑器中打开二进制文件,您可能会在输出中看到字符串“This is boot loader”。

存储设备简介
什么是存储设备?
它是用于信息存储、检索的设备。它也可以用作可引导媒体。
为什么计算机需要存储设备?
我们使用计算机主要是为了存储、检索和处理信息,因此作为存储和检索信息的一部分,制造商提出了各种类型的存储设备。
有哪些可用的存储设备类型?
根据数据的大小,我将尝试如下列出它们。
- 软盘
- 硬盘
- USB磁盘
以及更多……
什么是软盘?
它是用于信息存储、检索的设备。它也用作可引导媒体。
软盘设计用于存储少量数据,其最大尺寸可能限制在几兆字节。
什么是兆字节?
在计算中,数据的大小通过以下方式之一来衡量
- 位:它可以存储0或1的值
- 半字节:4位
- 字节(B):8位
- 千字节(KB):1024字节
- 兆字节(MB):1千字节 * 1千字节 = 1,048,576字节 = 1024千字节 = 1024 * 1024字节
- 千兆字节(GB):1,073,741,824字节 = 2^30字节 = 1024兆字节 = 1,048,576千字节 = 1024 * 1024 * 1024字节
- 太字节(TB):1,099,511,627,776字节 = 2^40字节 = 1024千兆字节 = 1,048,576兆字节 = 1024 * 1024 * 1024 * 1024字节
还有更多…但我们将仅限于以上内容。
软盘看起来是什么样的?

我可以在软盘上存储多少数据?
这取决于制造商提供的各种软盘类型及其各自的尺寸。
我将简单列出我以前使用过的3.5英寸软盘的详细信息。
Name            Description              Size(mm)            Volume(mm2)     Capicity(MB)
3.5 inches   3.5 inch Floppy Disk 	93.7 x 90.0 x 3.3     27,828.9 	       1.44 MB
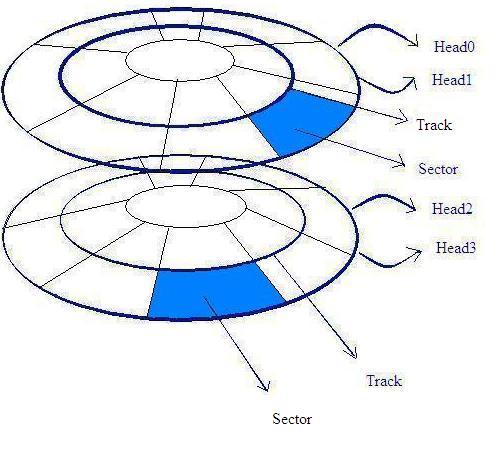
典型软盘的架构
上图显示了典型软盘的架构,我们将重点关注3.5英寸软盘,并在下面对其进行更详细的说明。
如何描述3.5英寸软盘?
- 它有2个面
- 每个面称为一个磁头。
- 每个面包含80个磁道。
- 每个磁道包含18个扇区。
- 每个扇区包含512字节。
如何计算软盘的大小?
- 总大小(字节):总面数 * 总磁道数 * 每磁道扇区数 * 每扇区总字节数。
总大小(字节)= 2 * 80 * 18 * 512 = 1474560字节。
- 总大小(KB):(总面数 * 总磁道数 * 每磁道扇区数 * 总字节数)/1024。
总大小(KB)= (2 * 80 * 18 * 512)/1024 = 1474560/1024 = 1440 KB。
- 总大小(MB):((总面数 * 总磁道数 * 每磁道扇区数 * 总字节数)/1024)/1024
总大小(MB)= ((2 * 80 * 18 * 512)/1024)/1024 = (1474560/1024)/1024 = 1440/1024 = 1.4 MB
引导扇区位于软盘的哪个位置?
它位于磁盘的第一个扇区。
与软盘交互
如何从软盘读取数据?
既然我们本篇文章的目的是从软盘读取数据,那么我们目前唯一剩下的选择是在程序中使用BIOS服务,因为在引导时我们处于实模式以与软盘交互。我们需要使用BIOS中断来完成我们的任务。
我们将使用哪些中断?
Interrupt 0x13
Service code 0x02
如何使用中断0x13访问软盘?
- 要请求BIOS读取软盘上的扇区,我们使用以下方法。
AH = 0x02
- 要请求BIOS从“N”号磁柱读取,我们使用以下方法。
CH = ‘N’
- 要请求BIOS从“N”号磁头读取,我们使用以下方法。
DH = ‘N’
- 要请求BIOS读取“N”号扇区,我们使用以下方法。
CL = ‘N’
- 要请求BIOS读取“N”个扇区,我们使用以下方法。
AL = N
- 要中断CPU执行此活动,我们使用以下方法。
Int 0x13
从软盘读取数据
让我们编写一个程序来显示几个扇区的标签。
程序:test.S
.code16 #generate 16-bit code
.text #executable code location
.globl _start; #code entry point
_start:
jmp _boot #jump to the boot code to start execution
msgFail: .asciz "something has gone wrong..." #message about erroneous operation
#macro to print null terminated string
#this macro calls function PrintString
.macro mPrintString str
leaw \str, %si
call PrintString
.endm
#function to print null terminated string
PrintString:
lodsb
orb %al , %al
jz PrintStringOut
movb $0x0e, %ah
int $0x10
jmp PrintString
PrintStringOut:
ret
#macro to read a sector from a floppy disk
#and load it at extended segment
.macro mReadSectorFromFloppy num
movb $0x02, %ah #read disk function
movb $0x01, %al #total sectors to read
movb $0x00, %ch #select cylinder zero
movb $0x00, %dh #select head zero
movb \num, %cl #start reading from this sector
movb $0x00, %dl #drive number
int $0x13 #interrupt cpu to get this job done now
jc _failure #if fails then throw error
cmpb $0x01, %al #if total sectors read != 1
jne _failure #then throw error
.endm
#display the string that we have inserted as the
#identifier of the sector
DisplayData:
DisplayDataIn:
movb %es:(%bx), %al
orb %al , %al
jz DisplayDataOut
movb $0x0e , %ah
int $0x10
incw %bx
jmp DisplayDataIn
DisplayDataOut:
ret
_boot:
movw $0x07c0, %ax #initialize the data segment
movw %ax , %ds #to 0x7c00 location
movw $0x9000, %ax #set ax = 0x9000
movw %ax , %es #set es = 0x9000 = ax
xorw %bx , %bx #set bx = 0
mReadSectorFromFloppy $2 #read a sector from floppy disk
call DisplayData #display the label of the sector
mReadSectorFromFloppy $3 #read 3rd sector from floppy disk
call DisplayData #display the label of the sector
_freeze: #infinite loop
jmp _freeze #
_failure: #
mPrintString msgFail #write error message and then
jmp _freeze #jump to the freezing point
. = _start + 510 #mov to 510th byte from 0 pos
.byte 0x55 #append first part of the boot signature
.byte 0xAA #append last part of the boot signature
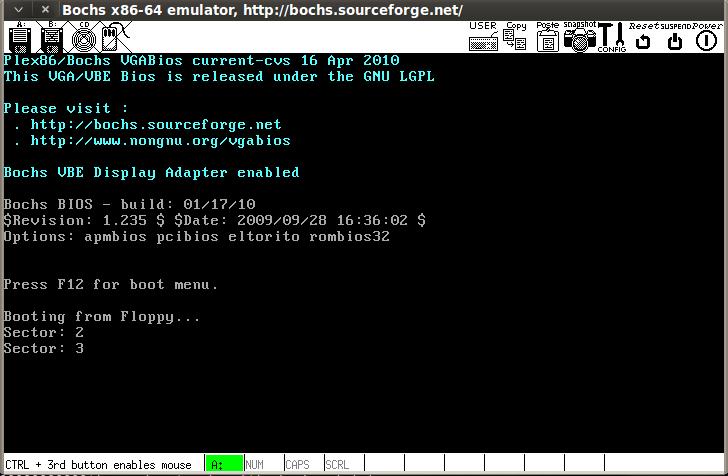
_sector2: #second sector of the floppy disk
.asciz "Sector: 2\n\r" #write data to the begining of the sector
. = _sector2 + 512 #move to the end of the second sector
_sector3: #third sector of the floppy disk
.asciz "Sector: 3\n\r" #write data to the begining of the sector
. = _sector3 + 512 #move to the end of the third sector
现在按如下方式编译代码
- as test.S -o test.o
- ld -Ttext=0x0000 --oformat=binary test.o -o test.bin
- dd if=test.bin of=floppy.img
如果您在十六进制编辑器中打开test.bin,您会发现我已将标签嵌入到扇区2和3中。我在下面的快照中突出显示了它们。

如果您通过在命令提示符下键入bochs来运行程序,您将看到如下内容。
上述程序的功能是什么?
在上述程序中,我们定义了宏和函数来读取和显示嵌入在每个扇区中的字符串的内容。
让我简要介绍每个宏和函数。
#macro to print null terminated string
#this macro calls function PrintString
.macro mPrintString str
  leaw \str, %si
  call PrintString
.endm
此宏定义用于接受字符串作为参数,并在内部调用另一个名为PrintString的函数,该函数逐个字符地将字符显示在屏幕上。
#function to print null terminated string
PrintString:
  lodsb
  orb  %al  , %al
  jz   PrintStringOut
  movb $0x0e, %ah
  int  $0x10
  jmp  PrintString
PrintStringOut:
Ret
这是宏mPrintString调用的函数,用于将以null结尾的字符串的每个字节显示在屏幕上。
#macro to read a sector from a floppy disk
 #and load it at extended segment
 .macro mReadSectorFromFloppy num
      movb $0x02, %ah     #read disk function
      movb $0x01, %al     #total sectors to read
      movb $0x00, %ch     #select cylinder zero
      movb $0x00, %dh     #select head zero
      movb \num, %cl      #start reading from this sector
      movb $0x00, %dl     #drive number
      int  $0x13          #interrupt cpu to get this job done now
      jc   _failure       #if fails then throw error
      cmpb $0x01, %al     #if total sectors read != 1
      jne  _failure       #then throw error
 .endm
此宏mReadSectorFromFloppy将一个扇区读入扩展段,并将其放在那里以便进一步处理。此宏以要读取的扇区号作为参数。
#display the string that we have inserted as the
#identifier of the sector
DisplayData:
DisplayDataIn:
  movb %es:(%bx), %al
  orb  %al      , %al
  jz   DisplayDataOut
  movb $0x0e    , %ah
  int  $0x10
  incw %bx
  jmp  DisplayDataIn
DisplayDataOut:
Ret
此函数显示数据从开始到遇到null终止字符的每个字节。
_boot:
     movw  $0x07c0, %ax       #initialize the data segment
     movw  %ax    , %ds       #to 0x7c00 location
     movw  $0x9000, %ax       #set ax = 0x9000
     movw  %ax    , %es       #set es = 0x9000 = ax
     xorw  %bx    , %bx       #set bx = 0
这是用于执行的主引导代码。在开始打印磁盘内容之前,我们将数据段设置为0x7c00,并将扩展段设置为0x9000。
设置扩展段的目的是什么?
首先,我们将一个扇区读入我们的程序内存,地址为0x9000,然后开始显示该扇区的内容。
这就是为什么我们将扩展段设置为0x9000。
mReadSectorFromFloppy $2 #read a sector from floppy disk
call DisplayData         #display the label of the sector
mReadSectorFromFloppy $3 #read 3rd sector from floppy disk
call DisplayData         #display the label of the sector
我们调用宏来读取扇区2,然后显示其内容,然后再次调用宏来读取扇区3,然后显示其内容。
_freeze:                      #infinite loop
jmp _freeze              #
在显示了扇区的内容之后,我们将进入一个无限循环来挂起我们的程序。
_failure:                     #
mPrintString msgFail     #write error message and then
jmp _freeze              #jump to the freezing point
我们定义了这个部分,以便在出现任何错误情况时跳转到这个标签,然后再次挂起程序。
. = _start + 510         #mov to 510th byte from 0 pos
.byte 0x55               #append first part of the boot signature
.byte 0xAA               #append last part of the boot signature
我们移动到扇区的第510个字节,然后附加引导签名,这对软盘被识别为可引导设备是强制性的,否则系统会抛出无效磁盘的错误。
_sector2:                     #second sector of the floppy disk
     .asciz "Sector: 2\n\r"   #write data to the begining of the sector
     . = _sector2 + 512       #move to the end of the second sector
_sector3:                     #third sector of the floppy disk
     .asciz "Sector: 3\n\r"   #write data to the begining of the sector
     . = _sector3 + 512       #move to the end of the third sector
上述步骤在扇区2和3的开头附加了一个字符串。
本篇文章就到这里了:)
玩得开心,尝试探索在实模式下读取软盘,并将功能嵌入到您的引导加载程序中。
在接下来的文章中,我将尝试简要介绍文件系统及其重要性。我们还将编写一个最小的引导加载程序来解析fat12格式的软盘,如何对其进行读写,以及编写第二个阶段的引导加载程序及其重要性。
再见:)