
使用 Mono 的平台无关代码:客户端-服务器应用程序示例
4.80/5 (22投票s)
本文展示了如何使用 Mono 开发平台无关软件。
引言
在本文中,我想展示如何使用 Mono 开发平台独立软件。我不会考虑什么是 Mono。如果 Mono 对你来说不熟悉,请查阅我的上一篇文章——“我们如何在 Linux 上用 C# 编写:为 Gnome 桌面实现 PanelApplet”。前三部分描述了开发的软件。最后一部分描述了如何在不同的操作系统中部署该软件,我认为这是本文最重要的部分。
1. 要求
需要开发一个客户端-服务器应用程序来监控远程工作站上的进程列表。服务器和客户端软件都需要在 Linux 和 Windows 操作系统上运行。使用的数据库可以是 Microsoft Sql Server 或 MySql。
2. 设计
我在这里描述了一些设计步骤。
2.1 架构

有一个服务器运行在 Windows 或 Linux 操作系统下。该服务器向运行在 Windows 或 Linux 操作系统下的客户端提供 Web 服务。该服务从客户端接收数据并将数据放入数据库中。数据库可以是 Microsoft Sql Server 或 MySql。
服务器提供使用网络浏览器查看接收到的信息的能力。这可以通过使用 IIS 或 Apache 网络服务器来完成。
2.2 数据库模式
我们可以使用 Linux 下的免费工具,如 Visio 来开发模式和图表。其中一个工具是 Dia。数据库模式的开发过程如图所示。

有两张表:Computers 和 Processes。Computers 表将存储表示计算机信息的数据。此信息包括计算机名称、IP 地址(我们将使用 .NET Framework 内置类获取)、用户名和上次活动时间。Processes 表将存储进程列表,包括进程名称和进程标识符 (PID)。
3. 实现
我们的解决方案将由以下项目组成:
- InfoCenter.Agent – 开发应用程序的客户端部分
- InfoCenter.Logic – 从 Web 服务调用的业务逻辑层
- InfoCenter.Logic.Tests – 业务逻辑层的测试
- InfoCenter.Persistence – 持久层。该层与数据库交互
- Infocenter.Persistence.Tests – 持久层的测试
- InfoCenter.WebConsole – 演示层。这是一个 ASP.NET WebForms 网站。
我使用 MonoDevelop 作为 IDE。在开发服务器业务逻辑时,我们将使用测试驱动开发方法。我们可以使用 Synaptic Package Manager 在 Ubuntu OS 下安装它。

3.1 TDD 方法论和 NUnit 工具
测试驱动开发是一种软件开发技术,它依赖于非常短的开发周期的重复:首先开发人员编写一个失败的自动化测试用例,定义所需的改进或新功能,然后生成代码以通过该测试,最后将新代码重构到可接受的标准。此外,TDD 允许我们自信地对旧代码进行新更改:我们可以通过单击一下简单地验证代码。NUnit 等工具帮助我们做到这一点。NUnit 是一个用于 Microsoft .NET 的开源单元测试框架。它与 JUnit 在 Java 世界中的作用相同,是 xUnit 系列中的众多框架之一。
我们需要添加“nunit.framework.dll”程序集才能使用此工具。
3.2 服务器
3.2.1 持久层
服务器必须将数据保存到数据库中。如果我们要支持不同的数据库而不编写不同的 Sql 脚本,我们应该考虑对象关系映射工具,例如 NHibernate。
对象关系映射和 NHibernate
对象关系映射是一种编程技术,用于在关系数据库和面向对象编程语言中不兼容的类型系统之间转换数据。NHibernate 是 ORM 工具,它提供快速构建代码中高级持久层所需的所有功能。它能够加载和保存互连对象的整个图,同时维护它们之间的关系。要使用此工具,我们需要添加 Nhibernate.dll 程序集并提供有关数据库模式的一些附加元信息。
实现
表 Computers 的 NHibernate 映射文件
<?xml version="1.0" encoding="utf-8" ?>
<hibernate-mapping xmlns="urn:nhibernate-mapping-2.2" auto-import="true">
  <class name="InfoCenter.Persistence.Entities.Computer, InfoCenter.Persistence" table="Computers" lazy="false">
    <id name="ID" column="ID">
      <generator class="native" />
    </id>
    property name="Name" column="Name"/>
    <property name="Ip" column="Ip"/>
    <property name="UserName" column="UserName"/>
    <property name="OsVersion" column="OsVersion"/>
    <property name="RecentActivity" column="RecentActivity"/>
  </class>
</hibernate-mapping>
Computer 实体如下
public class Computer
    {
        private int _id;
        public int ID
        {...}

        private string _name;
	public string Name
	{...}

        private string _ip;
	public string Ip
	{...}

        private string _userName ;
	public string UserName
	{...}

        private string _osVersion;
	public string OsVersion
	{...}

        private DateTime _recentActivity;
	public DateTime RecentActivity
	{...}
    }
最简单的创建、读取、更新、删除 (CRUD) 和搜索操作将通过使用 Repository 类执行
public class Repository<T> : IRepository<T>
    {
        private ISessionFactory _sessionFactory;
        private ISession Session
        {
            get
            {
                return _sessionFactory.OpenSession();
            }
        }

        public Repository(ISessionFactory sessionFactory)
        {
            _sessionFactory = sessionFactory;
        }

        public void Add(T entity)
        {
            using (ISession session = _sessionFactory.OpenSession())
            using (session.BeginTransaction())
            {
                session.Save(entity);
                session.Transaction.Commit();
            }
        }

        public void Update(T entity)
        {
            using (ISession session = _sessionFactory.OpenSession())
            using (session.BeginTransaction())
            {
                session.SaveOrUpdate(entity);
                session.Transaction.Commit();
            }
        }

        public void Remove(T entity)
        {
            using (ISession session = _sessionFactory.OpenSession())
            using (session.BeginTransaction())
            {
                session.Delete(entity);
                session.Transaction.Commit();
            }
        }
...
}
在 Repository 类中,我们使用 Nhiberbate 的内部类来获取必要的数据。不幸的是,我们不能在 Mono 中使用 LinqToNhibernate 功能,因为其中一个必要的库没有实现。
Repository 类派生自 IRepository 接口
public interface IRepository<T>
    {
        void Add(T entity);
        void Update(T entity);

        void Remove(T entity);
        void Remove(DetachedCriteria criteria);

        long Count(DetachedCriteria criteria);

        bool Exists(DetachedCriteria criteria);
        //Collection by criteria
        ICollection<T> FindAll(DetachedCriteria criteria);
        ICollection<T> FindAll(DetachedCriteria criteria, params Order[] orders);
        ICollection<T> FindAll(DetachedCriteria criteria, int firstResult, int numberOfResults, params Order[] orders);

        //Single by criteria
        T FindFirst(DetachedCriteria criteria, Order order);
        T FindFirst(DetachedCriteria criteria);
        T FindOne(DetachedCriteria criteria);
    }
测试用例
首先我们应该初始化测试数据
        [TestFixtureSetUp]
        public void Test_Construction()
        {
	    base.TestFixtureSetUp();

            repository = new Repository<Computer>(SessionFactory);
	    Assert.IsNotNull(repository, "Cannot get repository");
            computer1 = new Computer();

            computer1.Name = "Computer1";
            computer1.Ip = "192.168.1.1";
            computer1.OsVersion = "Os1";
            computer1.UserName = "User1";
	    computer1.RecentActivity = DateTime.Now;
        }
测试添加和检索数据
        [Test]
        public void CanAdd()
        {
	    base.TestFixtureSetUp();
            repository.Add(computer1);
        }

        [Test]
        public void CanGet()
        {

	DetachedCriteria criteria = DetachedCriteria.For<Computer>()
                .Add(NHibernate.Criterion.Expression.Like("Name","Computer1"));
	    Computer comp = repository.FindOne(criteria);

            Assert.NotNull(comp, "Query doesn't work");
            Assert.AreEqual(computer1.Name, comp.Name, "Name mismatch");
            Assert.AreEqual(computer1.Ip, comp.Ip, "Ip mismatch");
        }
NUnit 使用 Test 和 TestFixtureSetUp 属性。运行测试的结果如下所示。

这是 Windows 下 NUnit 程序的主窗口。
3.2.2 业务层
该层必须从客户端获取数据,准备数据并调用持久层方法。主要逻辑位于 PacketParser 类中。该类提供两种方法:
- AddInfo()。此方法解压缩 Agent 的输入字符串。然后将结果数据反序列化为 Agent.Entities.Computer 对象。然后将此对象转换为 Computer 对象,并在数据库中更新此计算机的信息。
public void AddInfo(string compressedInfo) { string decompressed = Archiver.Decompress(compressedInfo); Agent.Entities.Computer info = (Agent.Entities.Computer) ObjectSerializer.XmlStrToObj<Agent.Entities.Computer>(decompressed); DetachedCriteria criteria = DetachedCriteria.For<Computer>() .Add(NHibernate.Criterion.Expression.Like("Name",info.Name)); Computer oldEntry = computers.FindOne(criteria); if(oldEntry != null) { oldEntry.Name = info.Name; oldEntry.Ip = info.Ip; oldEntry.UserName = info.UserName; oldEntry.OsVersion = info.OsVersion; oldEntry.RecentActivity = DateTime.Now; computers.Update(oldEntry); } else { Computer computer = new Computer(); computer.Name = info.Name; computer.Ip = info.Ip; computer.UserName = info.UserName; computer.OsVersion = info.OsVersion; computer.RecentActivity = DateTime.Now; computers.Add(computer); } } - AddProcesses()。此方法将计算机中的进程添加到数据库中。
现在来看测试
public void CanAddInfoFromAgent()
        {
			DetachedCriteria criteria = DetachedCriteria.For<Computer>()
                .Add(NHibernate.Criterion.Expression.Like("Name","ILYA"));

            //call expected method
            PacketParser pp = new PacketParser(computers, null);
            pp.AddInfo(GetInfo());


	    Computer computer = computers.FindOne(criteria);

            Assert.IsNotNull(computer, "Can't get computer");
            Assert.AreEqual("ILYA", computer.Name, "Computer name is invalid");
            Assert.AreEqual("aidan", computer.UserName, "User name is invalid");
            Assert.AreEqual("Microsoft Windows NT 5.1.2600 Service Pack 2", computer.OsVersion, "OS name is invalid");
            Assert.AreEqual("192.168.220.1", computer.Ip, "IP is invalid");
        }
此测试检查 AddInfo 方法。GetInfo 方法返回虚假数据。所有运行测试的结果如下所示。

这张图片显示了 Ubuntu 9.10 下 MonoDevelop 2.2 IDE 中的 NUnit 模块。我认为这是一个非常有用的工具。
3.2.3 演示层
我们将使用 ASP.NET WebForms 功能显示数据。我们也可以使用 ASP.NET MVC,但我认为 WebForms 更适合这个例子(也许我只是想简化我的工作?)。我们的 WebService 的实现很简单。
        internal class InfoCenterService
	{
		private PacketParser pp;

		IRepository<Computer> computers;
               IRepository<Process> processes;

		protected ISessionFactory sessionFactory;

		public InfoCenterService()
		{
		    sessionFactory = Initializer.GetSessionFactory(false);
                    computers = new Repository<Computer>(sessionFactory);
                    processes = new Repository<Process>(sessionFactory);
                     pp = new PacketParser(computers, processes);
		}

	 [WebMethod(Description = "This method insert information about computer")]
        public void AddInfo(string compressedXml)
        {
		pp.AddInfo(compressedXml);
        }

        [WebMethod(Description="This method insert processes from a computer")]
        public void AddProcesses(string compName, string compressedXml)
        {
		pp.AddProcesses(compName, compressedXml);
        }
	}
我们只调用业务层对象的方法。标准的 ASP.NET WebForms 控件用于显示来自数据库的信息。
    <form id="form1" runat="server">
		<h2>Select a computer from the list below to view the processes</h2>
		<asp:DataList runat="server" id="computersList"
			OnItemCommand="ComputersList_ItemCommand"
			CellSpacing="4"
			Style="background-color: #d5d5ee;">
			<HeaderTemplate>
				<tr style="background:#AAA; color:White;">
					<td>Name</td>
					<td>Ip</td>
					<td>User</td>
					<td>OS</td>
					<td>Activity</td>
				</tr>
			</HeaderTemplate>
            <ItemTemplate>
            	<tr>
                	<td>
                		<asp:LinkButton runat="server"
                			CommandName="SelectComputer"
                			CommandArgument='<%#Eval("Name")%>' >
                			<%#Eval("Name")%>
                		</asp:LinkButton>
                	</td>
                	<td><%#Eval("Ip")%></td>
                	<td><%#Eval("UserName")%></td>
                	<td><%#Eval("OsVersion")%></td>
                	<td><%#Eval("RecentActivity")%></td>
                </tr>
            </ItemTemplate>
		</asp:DataList>
		<div><asp:Label runat="server" id="lblCurrentComp"></asp:Label></div>
		<asp:GridView runat="server" id="processesGrid" AutoGenerateColumns="false">
			<Columns>
				<asp:BoundField DataField="Name" HeaderText="Name" />
				<asp:BoundField DataField="Pid" HeaderText="Pid" />
			</Columns>
		</asp:GridView>
	</form>
我们使用 DataList 和 GridView 控件显示表格数据。代码隐藏逻辑也很简单。
public partial class Default : System.Web.UI.Page
{
		IRepository<Computer> computers;
		IRepository<Process> processes;

		protected override void OnLoad (EventArgs e)
		{
			ISessionFactory sessionFactory = Initializer.GetSessionFactory(false);
            computers = new Repository<Computer>(sessionFactory);
            processes = new Repository<Process>(sessionFactory);

			DetachedCriteria criteria = DetachedCriteria.For<Computer>()
                .Add(NHibernate.Criterion.Expression.Like("Name","%"));

			IList<Computer> list = new List<Computer>();
			foreach(Computer item in computers.FindAll(criteria))
				list.Add(item);

			computersList.DataSource = list;
			computersList.DataBind();

			base.OnLoad (e);
		}

		protected void ComputersList_ItemCommand(object source, DataListCommandEventArgs e)
		{
			string compName = e.CommandArgument.ToString();
			lblCurrentComp.Text = String.Format(@"<b>Processes on computer '{0}':</b>",compName);

			DetachedCriteria criteria = DetachedCriteria.For<Process>().CreateAlias("Host","c")
                .Add(NHibernate.Criterion.Expression.Eq("c.Name",compName));

			IList<Process> list = new List<Process>();
			foreach(Process item in processes.FindAll(criteria))
				list.Add(item);

			processesGrid.DataSource = list;
			processesGrid.DataBind();
		}
	}
3.3 客户端
3.3.1 服务或守护程序
在 Windows 操作系统中,在后台运行的计算机程序称为服务。在 Linux 中,此类程序称为守护进程。在 .NET Framework 中存在一个特殊类来实现后台程序。
public class AgentService : System.ServiceProcess.ServiceBase
  {
    private Container components;
    private Thread  listenerThread;
	private Listener listener;


    public AgentService()
    {
      Logger.Debug("Service ctor");
      try
	{
		InitializeComponent();
		listener = new Listener();

      } catch (Exception e)
        {
          Logger.Fatal(e.Message);
        }
      Logger.Debug("Service ctor complete");
    }

    // The main entry point for the process of service
    static void Main()
    {
      ServiceBase[] services;

      Logger.Debug("Service entry point");
      services = new ServiceBase[] { new AgentService() };
      ServiceBase.Run(services);
    }

    private void InitializeComponent()
    {
      components = new System.ComponentModel.Container();
      this.ServiceName = "InfoCenter agent";
    }

    protected override void OnStart(string[] args)
    {
      Logger.Debug("Service OnStart");

      //listener.Run = true;
      listenerThread = new Thread(new ThreadStart(listener.Start));
      listenerThread.Start();

    }

    protected override void OnStop()
    {
      Logger.Debug("Service OnStop");

      listenerThread.Abort();
      listener = null;

    }

    protected override void OnContinue()
    {
      Logger.Debug("Service OnContinue");;
    }

    protected override void OnPause()
    {
      Logger.Debug("Service OnPause");
    }

    protected override void OnShutdown()
    {
      Logger.Debug("Service OnShutdown");
    }
  }
这个类提供了处理启动、停止、暂停、继续或关闭等事件的能力。Windows 中的服务和 Linux 中的守护程序之间存在一些差异。我们应该在 Windows 系统中注册服务。为此,我们可以将 Install 类添加到我们的 Agent 中。
    [RunInstaller(true)]
    public partial class AgentInstaller : Installer
    {
        private System.ServiceProcess.ServiceInstaller servInstaller;
        private System.ServiceProcess.ServiceProcessInstaller serviceProcessInstaller;


        public AgentInstaller()
        {
            InitializeComponent();


            this.servInstaller = new System.ServiceProcess.ServiceInstaller();
            this.serviceProcessInstaller = new System.ServiceProcess.ServiceProcessInstaller();
            //
            // serviceInstaller1
            //
            this.servInstaller.DisplayName = "InfoCenter Agent";
            this.servInstaller.ServiceName = "InfoAgent";
            this.servInstaller.StartType = System.ServiceProcess.ServiceStartMode.Automatic;
            this.servInstaller.Description = "Client part of InfoCenter";
            //
            // serviceProcessInstaller1
            //
            this.serviceProcessInstaller.Account = System.ServiceProcess.ServiceAccount.LocalSystem;
            this.serviceProcessInstaller.Password = null;
            this.serviceProcessInstaller.Username = null;

            //
            // ProjectInstaller
            //
            this.Installers.AddRange(new System.Configuration.Install.Installer[] {
            this.servInstaller,this.serviceProcessInstaller});

        }
...

	}
稍后此类别将由 InstallUtil 实用程序使用。
3.3.2 获取系统信息
要获取一些系统信息,我们可以使用标准类。
        public static Computer Create()
        {
            Computer computer = new Computer();

            computer.Name = Environment.MachineName;

            //get ip
            foreach (IPAddress ip in Dns.GetHostAddresses(computer.Name))
            {
                if (((ip != IPAddress.Any) || (ip != IPAddress.Loopback)) &&
                    (ip.AddressFamily == System.Net.Sockets.AddressFamily.InterNetwork))
                {
                    computer.Ip = ip.ToString();
                }
            }

            computer.UserName = Environment.UserName;
            computer.OsVersion = Environment.OSVersion.ToString();

            return computer;
        }
要获取进程列表,我们可以使用 System.Diagnostics.Process.GetProcesses() 方法。
public static IListProcesses() { IList<Process> processes = new List<Process>(); foreach (System.Diagnostics.Process process in System.Diagnostics.Process.GetProcesses()) { Process p = new Process(); p.Pid = process.Id; p.Name = process.ProcessName; processes.Add(p); } return processes; }
3.3.3 压缩数据
进程列表可能很长,最好对其进行压缩。以下方法使用 GZipStream 类压缩表示进程列表数据的字符串。
        public static string Compress(string text)
        {
            byte[] buffer = Encoding.UTF8.GetBytes(text);
            MemoryStream ms = new MemoryStream();
            using (GZipStream zip = new GZipStream(ms, CompressionMode.Compress, true))
            {
                zip.Write(buffer, 0, buffer.Length);
            }

            ms.Position = 0;

            byte[] compressed = new byte[ms.Length];
            ms.Read(compressed, 0, compressed.Length);

            byte[] gzBuffer = new byte[compressed.Length + 4];
            Buffer.BlockCopy(compressed, 0, gzBuffer, 4, compressed.Length);
            Buffer.BlockCopy(BitConverter.GetBytes(buffer.Length), 0, gzBuffer, 0, 4);

            return Convert.ToBase64String(gzBuffer);
        }
3.3.4 调用 Web 服务
Web 服务提供 WSDL 文件,我们可以使用 Mono 的 wsdl 工具生成必要的类。
wsdl InfoCenterService.wsdl
3.3.5 日志记录
此外,我们的服务将使用以下类将一些信息记录到文件中。
         static class Logger
	{
	    private static  string FullPath =System.AppDomain.CurrentDomain.BaseDirectory+"log.txt";

         public static void Debug (string str)
         {
              DebugFormat (str);
         }
         public static void DebugFormat (string str, params object [] args)
         {
               using(StreamWriter writer = File.AppendText(FullPath))
		{
                   writer.WriteLine(DateTime.Now.ToLongTimeString()+": "+ str, args);
                 }
         }
         public static void Fatal (string str)
         {
               DebugFormat (str);
         }
       }
4 部署
首先,我们应该在 Linux 上安装 Mono 运行时,在 Windows 上安装 .NET Framework 2(或更高版本)。开发的软件在 Linux 和 Windows 下工作,无需为不同的操作系统构建不同的版本。这是可能的,因为使用 Mono 编译器构建的程序集与 Microsoft 的 Common Language Runtime 实现兼容。顺便说一句,Mono 的实现在 Windows 上也存在。
要在 Ubuntu 下安装 Mono,我们可以使用“Synaptic Package Manager”,它有助于从存储库快速下载和安装软件。我们还可以使用终端命令:
sudo apt-get install mono
第三种方式也存在——你只需下载源代码,编译并安装即可。我使用了第三种方式。请注意,Ubuntu 预装了 Mono,但到 Ubuntu 版本发布时,其版本通常已过时。
4.1 数据库
使用 NHibernate ORM 工具,我们不必担心不同数据库之间的差异。我们所需要做的就是为使用的数据库提供一个适当的配置文件。此文件是手动编辑的,无需重新构建应用程序。我已在两个数据库上测试了我的代码,下面是 NHibernate 配置文件的示例。
4.1.1 Ms Sql Server 配置
<?xml version="1.0" encoding="utf-8" ?>
<hibernate-configuration xmlns="urn:nhibernate-configuration-2.2">
  <session-factory>
    <property name="connection.provider">
      NHibernate.Connection.DriverConnectionProvider
    </property>
    <property name="connection.driver_class">
      NHibernate.Driver.SqlClientDriver
    </property>
    <property name="connection.connection_string">
      Server=192.168.234.246;database=InfoCenter;user id=sa;password=1;persist security info=False;
    </property>
    <property name="dialect">
      NHibernate.Dialect.MsSql2000Dialect
    </property>
    <property name="show_sql">
      false
    </property>
    <property name="proxyfactory.factory_class">
      NHibernate.ByteCode.Castle.ProxyFactoryFactory,NHibernate.ByteCode.Castle
    </property>
  </session-factory>
</hibernate-configuration>
这是 Microsoft Sql Server Management Studio 工具的屏幕截图。
\
4.1.2 MySql 配置
<?xml version="1.0" encoding="utf-8" ?>
<hibernate-configuration xmlns="urn:nhibernate-configuration-2.2">
  <session-factory>
    <property name="connection.provider">
      NHibernate.Connection.DriverConnectionProvider
    </property>
    <property name="connection.driver_class">
    NHibernate.Driver.MySqlDataDriver
    </property>
	<property name="connection.connection_string">
			Database=InfoCenter;Server=localhost;User Id=root;Password=1234qwer!
	</property>
	<property name="dialect">
	NHibernate.Dialect.MySQLDialect
	</property>
	<property name="hbm2ddl.keywords">
	none
	</property>
    <property name="show_sql">
      false
    </property>
    <property name="proxyfactory.factory_class">
      NHibernate.ByteCode.Castle.ProxyFactoryFactory,NHibernate.ByteCode.Castle
    </property>
  </session-factory>
</hibernate-configuration>
这是 MySql Administrator 工具的屏幕截图。

注意:我需要将 NHibernate 所需的一些附加程序集放入输出目录。
4.2 客户端
4.2.1 Windows
首先,要在 Windows 下运行 Agent,我们需要将其作为 Windows 服务安装到操作系统中。为此,我们运行“InstallUtil”实用程序。该实用程序是 Microsoft .NET Framework 的一部分,您可以在框架目录中找到它。此实用程序的输出如下:

然后我们可以使用服务控制管理器启动我们的服务。

4.2.1 Linux
要在 Linux 下运行 Agent,我们应该使用 mono-service2 工具。
mono-service2 Agent.exe
这个工具还为服务程序提供了一些额外的功能。

4.3 服务器
4.2.1 在 Windows 和 IIS 上运行 ASP.NET 网站
我相信许多开发人员都熟悉在 Windows 和 Internet Information Service 下部署 ASP.NET 应用程序。下图显示了我们的 ASP.NET 网站在 IIS 5.1 上的情况。

这是我们程序工作的结果。


4.2.2 在 Linux 和 Apache 上运行 ASP.NET 网站
首先,我们需要安装网络服务器软件——Apache。为此,运行终端并输入:
sudo apt-get install apache2
安装完成后,我们应该将 ASP.NET 网站部署到已安装的网络服务器。我在这里找到了关于此步骤的有用信息:http://ubuntuexperiment.wordpress.com/2009/01/29/running-aspnet-applications-in-ubuntu-using-modmono/
简要考虑
- 安装支持 ASP.NET 2.0 的 ModMono
sudo apt-get install libapache2-mod-mono mono-apache-server2
- 安装完成后,重新启动 Apache 并执行以下命令激活 ModMono 模块:
sudo /etc/init.d/apache2 restart sudo a2enmod mod_mono - 部署我们的网站。首先,我们需要在“etc/apache2/sites-available/”目录下为我们的网站创建一个配置文件。为此,请执行以下命令:
gksu nautilus /etc/apache2/sites-available/
这将打开 Nautilus 中的目录。
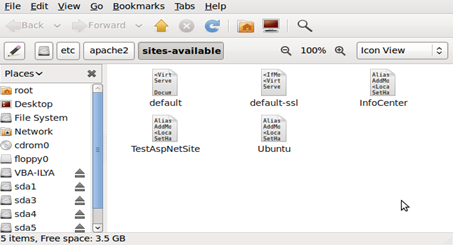
现在,在窗口内右键单击并创建一个新的空文件,并将其命名为“InfoCenter”。然后使用文本编辑器打开该文件,并将以下文本粘贴到其中,保存并关闭。
Alias /InfoCenter "/home/aidan/Projects/InfoCenter//InfoCenter.WebConsole"
AddMonoApplications default "/InfoCenter:/home/aidan/Projects/InfoCenter//InfoCenter.WebConsole"
<Location /InfoCenter>
SetHandler mono
</Location>
然后在终端中运行以下命令:
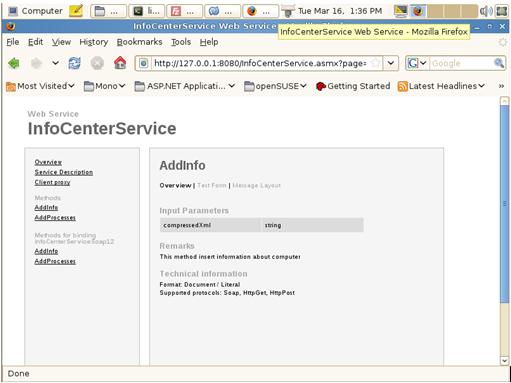
	a2ensite InfoCenter
	sudo /etc/init.d/apache2 restart
现在,InfoCenter 网站可通过此链接访问:https:///InfoCenter/Default.aspx。让我们看看我们的远程 Web 服务页面。
结论
所开发的软件是内网企业应用的一个简单示例。可能存在错误,您在正确安装时可能会遇到一些困难。但是,我已在我的网络中成功运行和测试了此应用程序。
历史
- 2010 年 3 月 24 日 - 第一个版本