
Prism、WPF和Unity基于模块化应用程序的逐步指南
4.56/5 (25投票s)
使用Prism、WPF和Unity容器开始模块化应用程序开发。
引言
本文介绍使用WPF和Prism创建模块化应用程序的一些简单步骤。
背景
本示例UI应用程序使用了第三方DevExpress WPF控件。但是,即使不使用任何第三方UI控件,也可以使用以下步骤,通过Prism和常规WPF控件来开发一个模块化UI应用程序。本示例的目的是展示使用Prism/Unity启动模块化应用程序的基本步骤,而不是第三方控件的使用。
本文最初于2013年2月发布在我的个人博客上
使用代码
在这里,我们将探讨一些基本步骤,说明如何从头开始使用Prism、WPF和Unity容器来启动一个模块化应用程序。模块化应用程序的需求通常很高,尤其是在大型应用程序开发项目中,每个执行特定任务的模块都可以独立开发,然后通过容器无缝地集成到模块化应用程序的shell中。这还提供了无缝切换相似功能的模块的能力,以便应用程序可以按配置显示所需的模块。本文将不深入探讨展示模块化应用程序的各种方面和优点。相反,本文将只展示一些基本步骤,说明如何利用Prism并在UI中定义区域,以便每个模块都可以为应用程序内的独立区域提供服务。
步骤 1
在Visual Studio 2010中,启动一个新的WPF项目。删除自动创建的MainWindow.xaml文件。从App.xaml文件中删除StartupUri="MainWindow.xaml"。
添加以下引用:
Microsoft.Practices.Prism
Microsoft.Practices.Prism.Unity
Microsoft.Practices.Prism.UnityExtensions
Microsoft.Practices.Prism.ServiceLocation
Microsoft.Practices.Prism.Interactivity
创建一个名为Bootstrapper.cs的类,并将其派生自UnityBootstrapper类。通过添加一个名为PrismAppShell.xaml的新WPF窗口来创建主shell窗口。在BootStrapper类中实现抽象方法CreateShell。
在Bootstrapper类中重写这两个方法
InitializeModules
ConfigureModuleCatalog
在App.xaml.cs文件的OnStartup方法中,实例化BootStrapper对象并调用其Run()方法。
<Application x:Class="Prism.ModuleExmaple.App"
   xmlns="http://schemas.microsoft.com/winfx/2006/xaml/presentation"
   xmlns:x="http://schemas.microsoft.com/winfx/2006/xaml"
>
<Application.Resources>
</Application.Resources>
</Application>
public partial class App : Application
{
    protected override void OnStartup(StartupEventArgs e)
    {
        base.OnStartup(e);
        BootStrapper bootstrapper = new BootStrapper();
        bootstrapper.Run();
    }
}
实现一个继承自UnityBootStrapper类的引导程序类,并重写以下三个受保护的方法
public class BootStrapper : UnityBootstrapper
{
    protected override System.Windows.DependencyObject CreateShell()
    {
        return this.Container.Resolve<PrismAppShell>();
    }
    protected override void InitializeModules()
    {
        base.InitializeModules();
        App.Current.MainWindow = (PrismAppShell)this.Shell;
        App.Current.MainWindow.Show();
    }
    protected override void ConfigureModuleCatalog()
    {
        base.ConfigureModuleCatalog();
        this.ModuleCatalog.AddModule(null); // placeholder
    }
}
创建一个如下图所示的shell窗口。
<Window x:Class="Prism.ModuleExmaple.PrismAppShell"
    xmlns="http://schemas.microsoft.com/winfx/2006/xaml/presentation"
    xmlns:x="http://schemas.microsoft.com/winfx/2006/xaml"
    Title="PrismAppShell" Height="300" Width="300">
    <Grid>
    </Grid>
</Window>
到此为止,如果在Visual Studio中运行应用程序,将会出现一个空的shell窗口。
第二步
现在,让我们将UI划分为区域,并通过更新主shellPrismAppShell.xaml文件将其标记为区域名称,如下所示:
<Window x:Class="Prism.ModuleExmaple.PrismAppShell"
      xmlns="http://schemas.microsoft.com/winfx/2006/xaml/presentation"
      xmlns:x="http://schemas.microsoft.com/winfx/2006/xaml"
      xmlns:prism="http://www.codeplex.com/prism"
      Title="PrismAppShell" Height="900" Width="1200">
    <Grid x:Name="LayoutRoot">
        <DockPanel LastChildFill="True" HorizontalAlignment="Stretch"
                 Name="dockPanel1" VerticalAlignment="Stretch">
            <StackPanel Orientation="Horizontal" DockPanel.Dock="Top"
                    Background="#FFCCD4F8" Height="100">
                <ContentControl prism:RegionManager.RegionName="RibbonRegion"></ContentControl>
            </StackPanel>
            <StackPanel Orientation="Horizontal" DockPanel.Dock="Bottom" Background="#FFD9E1EF" Height="100">
                <ContentControl prism:RegionManager.RegionName="StatusRegion"></ContentControl>
            </StackPanel>
            <ScrollViewer>
                <StackPanel Orientation="Vertical" DockPanel.Dock="Left" Background="#FF50576F" Width="200">
                    <ContentControl prism:RegionManager.RegionName="TreeRegion"></ContentControl>
                </StackPanel>
            </ScrollViewer>
            <StackPanel Orientation="Vertical" DockPanel.Dock="Right" Background="#FF677BA7" Width="100">
                <ContentControl prism:RegionManager.RegionName="AlertRegion"></ContentControl>
            </StackPanel>
            <ScrollViewer HorizontalAlignment="Stretch" VerticalAlignment="Stretch">
                <StackPanel HorizontalAlignment="Stretch" VerticalAlignment="Stretch" Background="#FFC0DBF2">
                    <ContentControl prism:RegionManager.RegionName="BlotterRegion"
                        HorizontalAlignment="Stretch" VerticalAlignment="Stretch"></ContentControl>
                </StackPanel>
            </ScrollViewer>
        </DockPanel>
    </Grid>
</Window>
如果此时运行此应用程序,它将显示如下所示的应用程序。请注意,区域已在UI中定义(因此,当我们创建一些模块时,不同的模块可以连接到这里不同的UI区域以提供相应的服务)。

步骤 3
让我们放置一些实际的UI控件来替换占位符堆栈面板(我们为不同的UI区域命名了它们)。
在shell XAML中,我们将使用一个功能区控件并在此定义RibbonRegion。左侧是一个用于TreeRegion的TreeView控件,中间是一个用于BlotterRegion的TabControl。底部和右侧分别是StatusRegion和AlertRegion。我们将继续在这些新添加的UI控件的每个内容控件中定义区域。
<Window x:Class="PrismApp.Shell.PrismAppShell"
    xmlns="http://schemas.microsoft.com/winfx/2006/xaml/presentation"
    xmlns:x="http://schemas.microsoft.com/winfx/2006/xaml"
    xmlns:prism="http://www.codeplex.com/prism"
    Title="PrismAppShell" Height="900" Width="1200"
    xmlns:my="http://schemas.microsoft.com/winfx/2006/xaml/presentation/ribbon"
    >
    <Window.Resources>
        <DataTemplate x:Key="crap">
            <StackPanel Width="100" Height="18"></StackPanel>
        </DataTemplate>
        <Style x:Key="TabItemStyleKey" TargetType="{x:Type TabItem}">
            <Setter Property="Header" Value="{Binding Path=DataContext.ViewTile}"></Setter>
            <Setter Property="HeaderTemplate" Value="{Binding Source=    {StaticResource crap}}"></Setter>
        </Style>
        <Style x:Key="TreeItemStyleKey" TargetType="{x:Type TreeViewItem}">
            <Setter Property="Height" Value="Auto"></Setter>
            <Setter Property="HorizontalAlignment" Value="Left"/>
            <Setter Property="VerticalAlignment" Value="Top" />
            <Setter Property="BorderThickness" Value="0" />
        </Style>
    </Window.Resources>
    <Grid x:Name="LayoutRoot">
        <DockPanel LastChildFill="True" HorizontalAlignment="Stretch"
                Name="dockPanel1" VerticalAlignment="Stretch">
            <my:Ribbon prism:RegionManager.RegionName="RibbonRegion"
                 DockPanel.Dock="Top" HorizontalAlignment="Stretch"
                 VerticalAlignment="Stretch" Name="ribbon1" Height="150"/>
            <StackPanel Orientation="Horizontal" DockPanel.Dock="Bottom"
                     Background="#FFD9E1EF" Height="100">
                <ContentControl prism:RegionManager.RegionName="StatusRegion"></ContentControl>
            </StackPanel>
            <ScrollViewer>
                <StackPanel Orientation="Vertical" DockPanel.Dock="Left"
                          MinWidth="150" MaxWidth="200">
                    <TreeView ItemContainerStyle="{StaticResource TreeItemStyleKey}"
                         prism:RegionManager.RegionName="TreeRegion"
                         Name="treeView1" HorizontalAlignment="Stretch"
                         VerticalAlignment="Stretch" BorderThickness="0"
                    />
                </StackPanel>
            </ScrollViewer>
            <StackPanel Orientation="Vertical" DockPanel.Dock="Right"
                      Background="#FF677BA7" Width="100">
                <ContentControl prism:RegionManager.RegionName="AlertRegion"></ContentControl>
            </StackPanel>
            <ScrollViewer HorizontalAlignment="Stretch" VerticalAlignment="Stretch">
                <StackPanel HorizontalAlignment="Stretch"
                          VerticalAlignment="Stretch" Background="#FFC0DBF2">
                    <TabControl ItemContainerStyle="{StaticResource TabItemStyleKey}"
                        prism:RegionManager.RegionName="BlotterRegion" Name="tabControl1"
                        HorizontalAlignment="Stretch"
                        VerticalAlignment="Stretch" Width="Auto">
                    </TabControl>
                </StackPanel>
            </ScrollViewer>
        </DockPanel>
    </Grid>
</Window>
步骤 4
现在让我们通过实现IModule接口来创建一些模块,并注册到区域。例如,我们创建了一个名为cash blotter module的模块,并按以下方式注册它:
public class CashBlotterModule : IModule
{
    private readonly IRegionViewRegistry regionViewRegistry = null;
    public CashBlotterModule(IRegionViewRegistry regionViewRegistry)
    {
        this.regionViewRegistry = regionViewRegistry;
    }
    public void Initialize()
    {
        this.regionViewRegistry.RegisterViewWithRegion("BlotterRegion", typeof(CashBlotterView));
        this.regionViewRegistry.RegisterViewWithRegion("TreeRegion", typeof (CashItemsTreeView));
    }
}
我们只需为要添加的模块添加新的XAML文件和相应的视图模型文件。下面是添加的骨架模块文件的解决方案资源管理器快照。我们添加了一个cash blotter module、一个deriv blotter module、cash items tree module、deriv items tree module、common module、ticketing module等。模块的名称可能看起来不现实,但为了举例,我们暂且这样称呼它们。

步骤 5
现在,我们将更新BootStrapper类以按如下方式加载模块(下面,为了简化示例,模块仅添加到模块目录中。然而,您可以通过容器进一步加载模块,并将它们与引导程序完全解耦,以便独立按需加载模块)。
public class BootStrapper : UnityBootstrapper
{
    protected override System.Windows.DependencyObject CreateShell()
    {
        return this.Container.Resolve<PrismAppShell>();
    }
    protected override void InitializeModules()
    {
        base.InitializeModules();
        App.Current.MainWindow = (PrismAppShell)this.Shell;
        App.Current.MainWindow.Show();
    }
    protected override void ConfigureModuleCatalog()
    {
        base.ConfigureModuleCatalog();
        ModuleCatalog moduleCatalog = (ModuleCatalog)this.ModuleCatalog;
        // Seems like as soon as you add a new module, internally seletor module
        // adopter (since blotter region is on tab control), automatically adds a tab item)
        moduleCatalog.AddModule(typeof(PrismApp.Module.Cash.Blotter.CashBlotterModule));
        moduleCatalog.AddModule(typeof(PrismApp.Module.Deriv.Blotter.DerivBlotterModule));
        //moduleCatalog.AddModule("CashBlotterModule",
        //   "PrismApp.Module.Cash.Blotter.CashBlotterModule");
    }
}
在上面的代码中,在ConfigureModuleCatalog内部,模块加载将在以下部分进行升级。
现在运行时,骨架应用程序会出现如下所示:
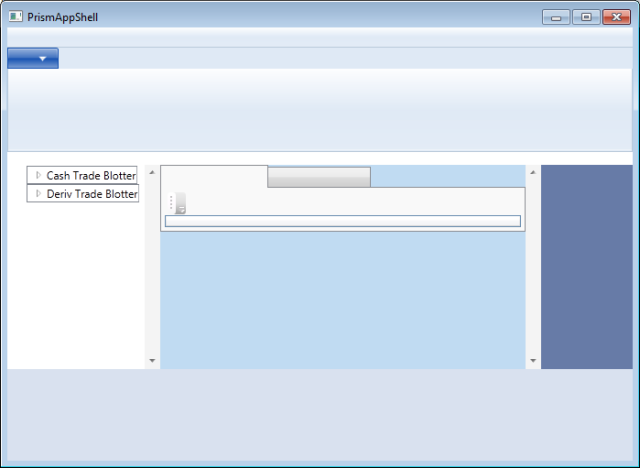
步骤 6
- 用DevExpress网格控件替换了WPF
DataGrid,用DevExpress功能区控件替换了WPF工具箱功能区。(第三方DevExpress控件并非必需,您可以使用任何UI控件,包括常规的.NET提供的WPF控件)。 - 视图注入 - 从cash blotter module和ticket module以及derivatives blotter和ticket module进行了视图注入。
- 将视图注入到shell中所需的Prism区域,即
BlotterRegion、RibbonRegion、TreeRegions。 - 模型 - 连接到数据库以获取模拟交易数据。(此处未显示数据代码示例,您可以设置自己的数据提供程序并检索数据并将其连接到blotter模块进行显示。)
- 视图模型 - 创建了许多视图模型类,以便视图可以绑定到模拟数据。
在步骤6中的所有上述步骤之后,我们的骨架应用程序看起来如下。在下面的UI中,当选择“Cash Trading”选项卡时,cash blotter module将提供必要的数据和服务,Derivative Trading选项卡同理,将由deriv blotter module提供服务。门票(tickets)也是如此。此外,UI上的警报区域(现在为空)将由警报模块填充,同样,状态区域(现在为空)将填充来自状态模块的状态消息。所有这些模块都可以独立于主应用程序开发,可以独立构建、测试和配置。
