
ASP.NET Web API
ASP.NET Web API 是一个用于构建 HTTP 服务的框架,各种客户端(如浏览器和移动设备)都可以访问这些服务。ASP.NET Web API 作为 ASP.NET MVC 4 的一部分推出;然而,它起源于 WCF,当时称为 WCF Web API。这种新的 HTTP 服务模型易于开发和实现。
In this article, we will discuss Web API design, concepts, and features, and compare Web API with WCF.
实现 Web API 项目
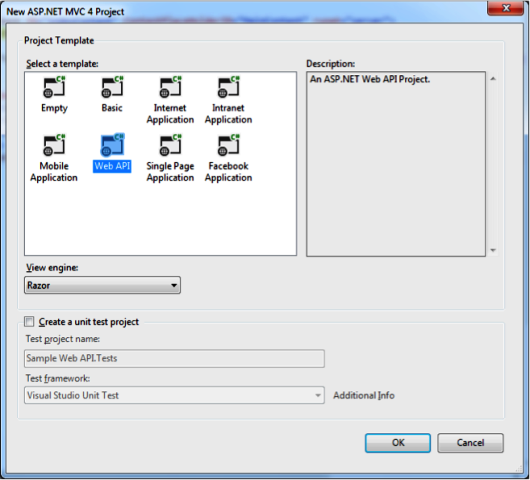
让我们从一个 Web API 项目示例开始讨论。我们将使用 Visual Studio 2012 作为我们的开发环境。我们的第一步是创建一个基于 **Web API** 模板的 ASP.NET MVC 4.0 项目,如图 1 所示。
接下来,我们将在 MVC 解决方案的 Model 文件夹中创建一个示例模型。从解决方案资源管理器中右键单击 Model 文件夹,然后选择 Add -> Class,如图 2 所示。

在本教程中,我将使用清单 1 中定义的 Product 模型。
public class Product
{
public int Id
{ get; set; }
public string Name
{ get; set; }
public string Category
{ get; set; }
public decimal Price
{ get; set; }}
清单 1:定义 Product 模型
创建 **Product** 模型后,我们可以在 controllers 文件夹中创建一个新的 API 控制器来处理 **Product** 模型。默认情况下,基于 Web API 模板的 MVC 项目会添加两个控制器:一个继承自 **Controller** 类,另一个继承自 **ApiController** 类。右键单击 Solution Explorer 中的 controllers 文件夹,然后从模板下的 **Empty API controller** 选项中选择添加新控制器,如图 3 所示。

示例控制器的代码应如清单 2 所示。
 public class ProductsController : ApiController

    {

        List<Product> products = new List<Product>();
        public IEnumerable<Product> GetAllProducts()
        {
           GetProducts();
           return products;
        }

        private void GetProducts()
        {
           products.Add(new Product {Id = 1, Name = "Television", Category="Electronic", Price=82000});
           products.Add(new Product { Id = 2, Name = "Refrigerator", Category = "Electronic", Price = 23000 });
           products.Add(new Product { Id = 3, Name = "Mobiles", Category = "Electronic", Price = 20000 });
           products.Add(new Product { Id = 4, Name = "Laptops", Category = "Electronic", Price = 45000 });
           products.Add(new Product { Id = 5, Name = "iPads", Category = "Electronic", Price = 67000 });
           products.Add(new Product { Id = 6, Name = "Toys", Category = "Gift Items", Price = 15000 });
        }

        public IEnumerable<Product> GetProducts(int selectedId)
        {
            if (products.Count() > 0)
            {
               return products.Where(p => p.Id == selectedId);
            }
            else
            {
                GetProducts();
                return products.Where(p => p.Id == selectedId);
            }
        }
清单 2:向示例项目添加 ApiController 类
运行项目,并通过附加 **api/Products** 到统一资源定位符 (URL) 来访问 API,例如 **https://:8747/api/Products**。您还可以通过将 **SelectedId** 参数作为查询字符串的一部分来访问 **GetProducts** 方法:**https://:8747/api/Products?SelectedId=2**。
将复杂对象传递给 Web API 方法
在 Web API 中传递简单值是一个直接的过程,但在大多数情况下,您需要将复杂对象作为方法参数传递。您可以通过使用 **[FromUrl]** 或 **[FromBody]** 属性来传递这些对象。**[FromBody]** 属性从请求正文中读取数据。但是,该属性只能在方法参数列表中使用一次。
让我们通过清单 3 中的代码片段来理解使用复杂参数的重要性,该代码片段期望一个复杂对象 **Time** 作为其输入。
public class SampleController : ApiController
    {
        /// <summary>
        /// Get time
        /// </summary>
        /// <param name="t"></param>
        /// <returns></returns>
        public string GetTime(Time t)
        {
            return string.Format("Received Time: {0}:{1}.{2}", t.Hour, t.Minute, t.Second);
        }
    }


    public class Time
    {
        public int Hour { get; set; }
        public int Minute { get; set; }
        public int Second { get; set; }
    }
清单 3:将复杂对象作为方法参数传递
现在,让我们尝试使用 **Hour**、**Minute** 和 **Second** 值来传递值给 **GetTime** 方法。如图 4 所示,这将返回 null 引用异常。

即使我们已经提到了与 Time 对象字段相关的值,API 方法也无法正确地将这些值映射到参数。现在,让我们看看如果我们修改代码以包含 **[FromUri]** 属性,以便它可以处理来自查询字符串的复杂对象,会发生什么。正如您在以下代码片段中所看到的,我们在指定 Time 对象之前包含了 **[FromUri]** 属性。
  public string GetTime([FromUri] Time t)
         { -------------------}
现在,如果我们调用该方法,并传入与之前相同的值,我们将观察到截然不同的行为,如图 5 所示。

使用 HttpClient API
HttpClient 是一个可扩展的 API,用于访问通过 HTTP 暴露的任何服务或网站。HttpClient API 作为 WCF Web API 的一部分推出,但现在在.NET Framework 4.5 的 ASP.NET Web API 中可用。您可以使用 HttpClient 从代码隐藏文件以及 WCF 等服务访问 Web API 方法。
清单 4 中显示的代码片段创建了一个 HttpClient 对象,并使用它异步访问示例 API 方法。请参阅代码注释以理解代码片段。
   // asynchronous accessing of web api method
        async Task GetData()
        {
            StringBuilder result = new StringBuilder();
            // Define the httpClient object            using (HttpClient client = new HttpClient())
            {
                // Define the base address of the MVC application hosting the web api
                // accessing the web api from the same solution
                client.BaseAddress = new Uri(HttpContext.Current.Request.Url.AbsoluteUri);
                // Define the serialization used json/xml/ etc
                client.DefaultRequestHeaders.Accept.Add(
                    new MediaTypeWithQualityHeaderValue("application/json"));
                // Call the method
                HttpResponseMessage response = client.GetAsync("api/products").Result;
                if (response.IsSuccessStatusCode)
                {
                    // Convert the result into business object
                    var products = response.Content.ReadAsAsync<IEnumerable<Product>>().Result;
                    foreach (var p in products)
                    {
                        result.Append(string.Format("{0} --- [Price: {1} Category: {2}] ", p.Name, p.Price, p.Category));
                    }
                }
                else
                {
                    result.Append(string.Format("Error Code:-{0}  Error Details: {1}", (int)response.StatusCode, response.ReasonPhrase));
                }
            }
            data.Text = result.ToString();
        }
清单 4:创建 HttpClient 对象以访问示例 API 方法
从 jQuery 访问 Web API
从 HTML5 Web 应用程序,您可以使用 jQuery 直接访问 Web API。您可以使用 **getJSON()** 方法调用 API 来从结果中提取业务对象。jQuery 可以识别与业务对象相关的内部字段,例如 **data[i].Price**。
清单 5 中的代码片段从我们的 **Product** API 方法检索数据,并将数据以表格格式显示。请参阅代码注释以理解代码片段。
<head>
    <title></title>
    <script src="Scripts/jquery-1.8.2.js"></script>
     <script type="text/javascript">
         $.getJSON("api/products",
                       function (data) {
                        //Clear the div displaying the result
                           $("#productView").empty();
                          //Create a table and append the table body
                          var $table = $('<table border="2">');
                          var $tbody = $table.append('<tbody />').children('tbody');
                          //data - return value from the Web API method
                           for (var i = 0; i < data.length; i++) {
                                   //add a new row to the table
                               var $trow=$tbody.append('<tr />').children('tr:last');
                                   //add a new column to display Name
                               var $tcol = $trow.append("<td/>").children('td:last')
                                .append(data[i].Name);
                                   //add a new column to display Category
                              var $tcol = $trow.append("<td/>").children('td:last')
                                .append(data[i].Category);
                                 //add a new column to display Price
                               var $tcol = $trow.append("<td/>").children('td:last')
                                .append(data[i].Price);
                           }
                        //display the table in the div
                           $table.appendTo('#productView');
                       });
         </script>
</head>
<body>
    <div id="productView"></div>
</body>
</html>
清单 5:使用 jQuery 从 Web API 方法检索数据
将参数从 jQuery 传递
除了从 Web API 方法检索数据外,您还可以使用 jQuery 将参数传递回 Web API。jQuery 支持多种传递参数的方法。第一种方法是使用单独的参数集。以下代码片段演示了如何传递单个参数。
  $.getJSON("api/products",
  { selectedId: '4' },
      function (data) {    ….});
您还可以通过参数集传递多个参数,如以下代码片段所示。
   $.getJSON("api/products",
           { selectedId: '4', name: 'TV' },
                       function (data) {    ….});
您可以采取的另一种方法是将参数附加到 URL 查询字符串中进行传递,如以下代码片段所示。
$.getJSON("api/products?selectedId =4",
                       function (data)  {    ….});
第一种方法将查询字符串或参数传递与 URL 分开,适用于复杂或多个数据传递。第二种方法更适合传递一两个参数。
使用 Web API 进行脚手架
ASP.NET Scaffolding 是 ASP.NET Web 应用程序的代码生成框架。Visual Studio 包含用于 MVC 和 Web API 项目的预安装代码生成器。Visual Studio 会自动生成必要的 API 代码,以对指定的模型或数据源执行各种操作。
基于我们的脚手架使用 Entity Framework
为了演示脚手架在 Web API 项目中的工作原理,我们可以使用 Entity Framework 来定义我们的数据库并生成 Web API 方法。首先,我们需要添加一个 ADO.NET 实体数据模型来定义数据。我们的示例数据模型将基于两个表:**Course** 和 **Status**,如图 6 所示。

定义数据模型后,我们可以生成与该模型对应的 Web API 控制器。右键单击 **Controller**,然后单击 **Add Controller**,这将启动 **Add Controller** 对话框。在 **Controller name** 文本框中,键入控制器名称。然后,从 **Template** 下拉列表中,选择 **API controller with read/write actions, using Entity Framework** 模板,如图 7 所示。

接下来,从 **Model class** 下拉列表中选择一个表,然后在 **Data context class** 下拉列表中指定作为 ADO.NET 实体数据模型一部分创建的数据上下文。清单 6 显示为 **CourseController** API 控制器自动生成的代码。请注意,它包含用于支持 get、put、post 和 delete 操作的方法,这些操作对应于所选模型。
public class CourseController : ApiController
{
   private SampleDBEntities db = new SampleDBEntities();
   // GET api/Course
   public IEnumerable<Course> GetCourses()
   {
     return db.Courses.AsEnumerable();
   }
// GET api/Course/5
     public Course GetCourse(int id)
    {
       Course course = db.Courses.Single(c => c.CourseId == id);
       if (course == null)
        {
      throw new HttpResponseException(Request.CreateResponse(HttpStatusCode.NotFound));
        }
    return course;
}
// PUT api/Course/5
 public HttpResponseMessage PutCourse(int id, Course course)
 {
    if (!ModelState.IsValid)
   {
return Request.CreateErrorResponse(HttpStatusCode.BadRequest, ModelState);
}
if (id != course.CourseId)
{
return Request.CreateResponse(HttpStatusCode.BadRequest);
}
db.Courses.Attach(course);
db.ObjectStateManager.ChangeObjectState(course, EntityState.Modified);
try
{
db.SaveChanges();
}
catch (DbUpdateConcurrencyException ex)
{
return Request.CreateErrorResponse(HttpStatusCode.NotFound, ex);
}
return Request.CreateResponse(HttpStatusCode.OK);
}
// POST api/Course
public HttpResponseMessage PostCourse(Course course)
{
if (ModelState.IsValid)
{
db.Courses.AddObject(course);
db.SaveChanges();
HttpResponseMessage response = Request.CreateResponse(HttpStatusCode.Created, course);
response.Headers.Location = new Uri(Url.Link("DefaultApi", new { id = course.CourseId }));
return response;
}
else
{
return Request.CreateErrorResponse(HttpStatusCode.BadRequest, ModelState);
}
}
// DELETE api/Course/5
public HttpResponseMessage DeleteCourse(int id)
{
Course course = db.Courses.Single(c => c.CourseId == id);
if (course == null) {
return Request.CreateResponse(HttpStatusCode.NotFound);
}
db.Courses.DeleteObject(course);
try
{
db.SaveChanges();
}
catch (DbUpdateConcurrencyException ex)
{
return Request.CreateErrorResponse(HttpStatusCode.NotFound, ex);
}
return Request.CreateResponse(HttpStatusCode.OK, course);
}
protected override void Dispose(bool disposing)
{
db.Dispose();
base.Dispose(disposing);
}
}
清单 6:为 CourseController API 控制器生成的代码
Web API 脚手架功能减少了生成执行不同模型中的 CRUD(创建、读取、更新、删除)操作所需的 API 方法所需的工作量。
ASP.NET Web API 中的路由
Web API 使用路由将统一资源标识符 (URI) 匹配到各种操作。位于 Solution Explorer 中 **App_Start** 节点下的 **WebApiConfig** 文件定义了 Web API 使用的默认路由机制。该机制基于 HTTP 方法、操作和属性的组合。但是,我们可以定义自己的路由机制来支持有意义的 URI。
例如,在我们的示例 Web API 项目中,我们使用 **/api/Products** 来检索产品详细信息。但是,通过将 **{action}** 作为 URI 的一部分进行修改,我们可以改用 **api/Products/GetAllProducts**,如以下代码片段所示。
config.Routes.MapHttpRoute(
name: "DefaultApi",
routeTemplate: "api/{controller}/{action}/{id}",
defaults: new { id = RouteParameter.Optional }
);
更新路由后,我们可以在 Web API 方法中使用 **ActionName** 属性来指定操作名称,如下面的代码片段所示。
[ActionName("GetAllProducts")]
public IEnumerable<Product> GetAllProducts()
{……………………………..}
注意:使用 **[NonAction]** 属性来指示 Web API 方法不是 API 操作方法。
我们还可以使用 HTTP 方法或 **Acceptverbs** 属性来指定访问 Web API 方法所需的 HTTP 操作。例如,以下代码片段使用 **HttpGet** 和 **HttpPost** 方法。
[HttpGet]
public IEnumerable<Product> GetProducts(int selectedId)
{………….. }
[HttpPost]
public void AddProduct(Product p)
{………….. }
对于多个方法,使用 **Acceptsverbs** 属性,如以下代码片段所示。
[AcceptVerbs("GET","PUT")]
public IEnumerable<Product> GetProducts(int selectedId)
{………….. }
Web API 2 还允许我们在路由中使用属性。有关详细信息,请参阅 Dino Esposito 的文章“Attribute Routing in Web API v2”。
实现多种序列化方法
Web API 支持多种序列化方法,包括 XML、JSON 和 MessagePack。在接下来的几节中,我们将仔细研究如何实现这三种方法,然后比较它们的行为。但在那之前,让我们修改示例 Web API 项目以返回批量数据,以便我们能够更好地理解和比较序列化方法的性能。清单 7 显示了 GetProducts() 方法是如何更新以返回批量数据的。
        private void GetProducts()
        {
            for (int i = 0; i < 5000; i++)
            {
                products.Add(new Product { Id = i, Name = "Product -  "+i,
                    Category = "The ASP.NET and Visual Web Developer teams have released the ASP.NET and Web Tools 2012.2 update, which extends the existing ASP.NET runtime and adds new web tooling to Visual Studio 2012. Whether you use Web Forms, MVC, Web API, or any other ASP.NET technology, there is something cool in this update for you.",
                    Price = 1 });
            }
        }
清单 7:更新 GetProducts() 方法
使用 JSON 序列化
Web API 使用 JSON 作为其默认序列化方法。因此,当您运行 Web API 项目时,结果会自动以 JSON 格式返回。例如,要检索 **Products** 的详细信息,您只需使用语法 **http://<<server>>:<<port>>/api/Products** 即可以 JSON 格式返回结果。
使用 XML 序列化
要使用 XML 序列化方法在 Web API 项目中,您必须通过在 **Application_Start()** 方法末尾插入以下两行代码来修改 **Global.asax** 文件。
GlobalConfiguration.Configuration.Formatters.RemoveAt(0);
GlobalConfiguration.Configuration.Formatters.XmlFormatter.UseXmlSerializer = true;
实现 XML 序列化方法后,您可以使用语法 **http://<<server>>:<<port>>/api/Products** 来检索 **Products** 的详细信息,这与 JSON 所使用的语法相同。
使用 MessagePack 序列化
要使用 MessagePack 序列化方法,您必须首先安装 MessagePack(http://msgpack.org/)。MessagePack 可作为 NuGet 包提供。您还可以从 GitHub 下载源代码并在 Visual Studio 中构建应用程序。
安装 MessagePack 后,使用 MsgPack.dll 文件添加对 MessagePack 库的引用。接下来,创建一个自定义媒体类型格式化程序,该格式化程序使用 MessagePack 来序列化 Web API 数据。清单 8 显示了一个基于 GitHub 示例(https://gist.github.com/filipw/3693339)的媒体类型格式化程序的代码。
public class MediaTypeFormatterCompatibleMessagePack : MediaTypeFormatter
    {
        private readonly string _mime = "application/x-msgpack";
        Func<Type, bool> IsAllowedType = (t) =>
            {
                if (!t.IsAbstract && !t.IsInterface && t != null && !t.IsNotPublic)
                    return true;
                if (typeof(IEnumerable).IsAssignableFrom(t))
                    return true;
                return false;
            };
        public MediaTypeFormatterCompatibleMessagePack()
        {
            SupportedMediaTypes.Add(new MediaTypeHeaderValue(_mime));
        }
        public override bool CanWriteType(Type type)
        {
            if (type == null)
                throw new ArgumentNullException("Type is null");
            return IsAllowedType(type);
        }
        public override Task WriteToStreamAsync(Type type, object value, System.IO.Stream stream, HttpContent content, TransportContext transportContext)
        {
            if (type == null)
                throw new ArgumentNullException("type is null");
            if (stream == null)
                throw new ArgumentNullException("Write stream is null");
            var tcs = new TaskCompletionSource<object>();
            if (type != typeof(string) && typeof(IEnumerable).IsAssignableFrom(type))
            {
                value = (value as IEnumerable<object>).ToList();
            }
            var serializer = MessagePackSerializer.Create<dynamic>();
            serializer.Pack(stream, value);
            tcs.SetResult(null);
            return tcs.Task;
        }
        public override Task<object> ReadFromStreamAsync(Type type,Stream stream, HttpContent content, IFormatterLogger formatterLogger)
        {
            var tcs = new TaskCompletionSource<object>();
            if (content.Headers != null && content.Headers.ContentLength == 0)
                    return null;
            try
            {
                var serializer = MessagePackSerializer.Create(type);
                object result;
                using (var mpUnpacker = Unpacker.Create(stream))
                {
                    mpUnpacker.Read();
                    result = serializer.UnpackFrom(mpUnpacker);
                }
                tcs.SetResult(result);
            }
            catch (Exception e)
            {
                if (formatterLogger == null) throw;
                formatterLogger.LogError(String.Empty, e.Message);
                tcs.SetResult(GetDefaultValueForType(type));
            }
            return tcs.Task;
        }
        public override bool CanReadType(Type type)
        {
            if (type == null)
                throw new ArgumentNullException("type is null");
            return IsAllowedType(type);
        }
    }
清单 8:构建 MessagePack 媒体类型格式化程序
创建媒体类型格式化程序后,必须更新 Global.asax 文件以使用该格式化程序。在 Application_Start() 方法末尾插入以下代码以使用 MessagePack 序列化。
 GlobalConfiguration.Configuration.Formatters.Clear();
 GlobalConfiguration.Configuration.Formatters.Add(new MediaTypeFormatterCompatibleMessagePack());
比较序列化方法
您可以使用 Fiddler 工具在 Web API 中测试 JSON、XML 和 MessagePack 序列化。打开 Fiddler 并导航到 Request Builder 选项卡。在 Request Builder 中输入 MessagePack Web API URL,并在 **Request Headers** 部分添加 **application/x-msgpack** 作为 Content-Type,如图 8 所示。

现在,单击 **Execute** 按钮调用 Web API 方法。对基于 JSON 和 XML 的 Web API 方法重复此过程,而不指定 **Content-Type** 请求头。比较结果,包括正文大小、接收到的字节和经过的时间,如图 9 所示。

如上图所示,基于 MessagePack 的序列化结果将比其他序列化方法更压缩。JSON 结果的大小将小于基于 XML 的序列化。
从 XML 文档生成帮助页
默认情况下,Web API 提供与项目中定义的 API 方法相关的帮助页。我们可以从作为方法定义一部分提供的 XML 文档生成帮助页。
要创建帮助页,请在 Solution Explorer 中展开 **Areas** 节点(如图 10 所示),然后打开 **HelpPageConfig.cs** 文件。

在 **HelpPageConfig.cs** 文件中,取消注释以下语句。
config.SetDocumentationProvider(new XmlDocumentationProvider(HttpContext.Current.Server.MapPath("~/App_Data/XmlDocument.xml")));
接下来,通过在项目属性的 **Build** 部分选择 **XML documentation file** 选项来启用 XML 文档,如图 11 所示。将配置文件中指定的文件名复制到 XML 文档文件选项。

现在,让我们向示例 API 控制器添加 XML 文档,如清单 9 所示。在每个方法定义之前,指定“///”以获取方法的默认 XML 文档。用更具体的注释进一步修改。
         /// <summary>
        /// Get All products for our Sample
        /// </summary>
        /// <returns></returns>
        public IEnumerable<Product> GetAllProducts()
        {
                 ---------------
        }

        /// <summary>
        /// Return the details of selected product depends on the product id passed.
        /// </summary>
        /// <param name="selectedId"></param>
        /// <param name="name"></param>
        /// <returns></returns>
        public IEnumerable<Product> GetProducts(int selectedId)
        {

                 ------------------
        }
清单 9:向示例 API 控制器添加 XML 文档
更新控制器后,运行应用程序并导航到浏览器屏幕右上角的 **API** 链接,如图 12 所示。

单击 **API** 链接以打开帮助页。注意已添加到控制器中的 XML 文档注释,如图 13 所示。

通过 Web API 使用 WCF
WCF 支持多种协议和消息格式。使用 Web API,我们只能创建基于 HTTP 的服务。显然,我们可以使用 WCF 创建 HTTP 服务,但它们隐藏在不同的抽象层中。此外,与 Web API 相比,WCF 的实现更复杂。WCF 上实现的 HTTP 使用 HTTP post 模型,我们可能无法使用与 HTTP 协议相关的主要功能,例如缓存和状态码。通过使用 Web API,我们可以执行所有活动,如 get、post 和 put,并且可以使用不同的 HTTP 协议功能。
WCF 需要复杂的绑定和地址操作及配置,而 Web API 则简单直接。Web API 也是创建 RESTful 服务的更好选择。您可以在 MSDN 文章“WCF and ASP.NET Web API”中找到 WCF 和 Web API 之间的详细比较。
更新 1
要通过 jQuery 将复杂数据类型传递给 Web API 方法,请使用 JSON.Stringify 来正确地将 JSON 数据传递给方法。
例如,以下代码片段显示了如何将自定义数据“user”传递给 Web API 方法。
   var user = {};
    user.name = 'Mathew';
    user.job = 'ITA';
    user.rating = 'Good';
$.getJSON("api/getEmployeeDetail",
{JSON.stringify(user)},
function (data) { ......}
);