
以思维的速度构建和部署 ASP.NET Web API 2 服务层!
4.95/5 (15投票s)
学习如何使用一个简单的示例开发 WebAPI 服务层
下载源代码
引言
最近我有一个项目需要使用 Web API 2。需求是将一个快速粗糙的 Beta 版本部署到生产环境,然后进行迭代,修复 bug 和数据问题。我一直在寻找一篇能帮助我将项目从开发部署到生产的文章,但一直找不到。本文的目的是尝试在 60 分钟内将一个简单的 Web API 2 服务部署到生产环境。我强烈建议您参考快速参考部分,以深入了解 Web API 和所有细节。
先决条件
- Visual Studio 2013
- 使用 SOAP UI 进行单元测试
- 了解如何使用 NuGet 包来更新您的解决方案
- 愿意解决所有的技术问题
快速参考
(为深入理解必读,但本文不要求)
首先
第一步:启动 Visual Studio 2013。从“文件”菜单中,选择“新建”,然后选择“项目”。
在“模板”窗格中,选择“已安装模板”,展开“Visual C#”节点。在“Visual C#”下,选择“Web”,选择“Visual Studio 2012”。在项目模板列表中,选择“ASP.NET MVC 4 Web Application”。将项目命名为“VehicleStore”。请参见下面的屏幕截图。

在“新建 ASP.NET MVC 4 项目”对话框中,选择“Web API”模板。选中“创建单元测试项目”复选框。单击“确定”。请参见下面的屏幕截图。

第二步:管理 NuGet 包。从“工具”菜单中,选择“NuGet 包管理器”,然后选择“使用解决方案管理 NuGet 包...”。要了解更多关于 NuGet 的信息,请参考此链接:安装 NuGet。安装所有 ASP.NET Web API 2.1 NuGet 包,如下图所示。

配置文件
第三步:Global.asax在 Application_Start() 方法中添加以下行以启用 Web API 2。
            GlobalConfiguration.Configure(WebApiConfig.Register);

            // NOTE: This commented code will NOT work for Web API 2.0.
            //WebApiConfig.Register(GlobalConfiguration.Configuration);
第四步:WebApiConfig.cs在 Register(HttpConfiguration config) 方法中添加以下行以启用 Web API 2。
            // Add this line for Web API 2 - Attribute Routing
            config.MapHttpAttributeRoutes();
构建数据类和领域特定模型
第五步:创建一个 VehicleInfo 数据类。
namespace VehicleStore.Models
{
    ///
    /// A Vehicle Info data class.
    ///
    public class VehicleInfo
    {
        public Guid Id { get; set; }
        public string Trim { get; set; }
        public string Make { get; set; }
        public string Model { get; set; }
        public int Year { get; set; }
        public System.Drawing.Color Color { get; set; }
        public string VIN { get; set; }
        public int SafetyRating { get; set; }
        public int EPAGreenScore { get; set; }
        public int Axles { get; set; }
     }
}
第六步:创建一个 IVehicleRepository 接口
namespace VehicleStore.Models
{
    interface IVehicleRepository
    {
        IEnumerable<VehicleInfo> GetAll();
        IEnumerable<VehicleInfo> GetVehiclesByYear(int year);
        IEnumerable<VehicleInfo> GetVehiclesByMake(string make);
        VehicleInfo Get(Guid Id);
        void Remove(Guid Id);
        bool Update(VehicleInfo item);
        VehicleInfo Add(VehicleInfo item);
    }
}
第七步:创建一个 Vehicle 仓库的具体实现。
注意:有多种实现方式,为清晰起见,已进行了简化。实际生产实现可能会使用 SQL Server 等数据存储或其间的 Entity Framework 层。
namespace VehicleStore.Models
{
    public class VehicleRepository : IVehicleRepository
    {
        /// <summary>
        /// This is not the right approach for production quality code.
        /// This is for demo purposes only.
        /// </summary>
        private List<VehicleInfo> vehicles = new List<VehicleInfo>();

        public VehicleRepository()
        {
            // This is used to populate initial data.
            // NOTE: This is not the right approach for production quality code.
            PopulateInitialData();
        }

        public IEnumerable<VehicleInfo> GetAll()
        {
            return vehicles;
        }

        public IEnumerable<VehicleInfo> GetVehiclesByYear(int year)
        {
            return vehicles.FindAll(p => p.Year == year);
        }

        public IEnumerable<VehicleInfo> GetVehiclesByMake(string make)
        {
            return vehicles.FindAll(p => p.Make == make);
        }

        public VehicleInfo Get(Guid Id)
        {
            return vehicles.Find(p => p.Id == Id);
        }

        public void Remove(Guid Id)
        {
            vehicles.RemoveAll(p => p.Id == Id);
        }

        public bool Update(VehicleInfo item)
        {
            if (item == null)
            {
                throw new ArgumentNullException("item");
            }

            int index = vehicles.FindIndex(p => p.Id == item.Id);
            if (index == -1)
            {
                return false;
            }

            // This form of update is to remove and add again.
            vehicles.RemoveAt(index);
            vehicles.Add(item);

            return true;
        }

        public VehicleInfo Add(VehicleInfo item)
        {
            if (item == null)
            {
                throw new ArgumentNullException("item");
            }
            // A new GUID is assigned every time a new item is added.
            item.Id = System.Guid.NewGuid();
            vehicles.Add(item);
            return item;
        }

        private void PopulateInitialData()
        {
            Add(new VehicleInfo { Make = "Infiniti", Model = "FX 35", Year = 2009, Trim = "Crossover" });
            Add(new VehicleInfo { Make = "Toyota", Model = "RAV44", Year = 2005, Trim = "Sport" });
            Add(new VehicleInfo { Make = "Audi", Model = "A5", Year = 2010, Trim = "Convertible" });
        }
    }
}
第八步:控制器类 - VehiclesController
删除标准的 ValuesController 类,并创建新的 VehiclesController.cs
VehiclesController 继承自 ApiController 类。注意事项
Route属性在 Web API 2.0 中使用。它定义了基于属性的路由。路由是 Web API 将 URI 匹配到操作的方式。通过Route属性可以明确定义复杂的 URI 路由。Route属性定义了实际的入站 URI。后面跟着 HTTP 动词属性(例如:[HttpGet])。-
路由约束 - 例如,此属性
[Route("vehicles/{Id:guid}", Name="VehicleInfoById")]指定了 ID 为Guid的请求将检索具有该值的特定车辆。路由约束可以作为过滤器来正确路由请求。 - 请参阅路由约束列表
namespace VehicleStore.Controllers
{
    public class VehiclesController : ApiController
    {
        // This is NOT a correct implementation. This is for demonstration purposes only.
        // NOTE: NOT for PRODUCTION USE.
        static readonly IVehicleRepository repository = new VehicleRepository();

        [Route("vehicles")]
        [HttpGet]
        public IEnumerable GetAllVehicles()
        {
            return repository.GetAll();
        }

        ///
        /// The route attribute with the data type of GUID
        ///
        ///
        ///
        [Route("vehicles/{Id:guid}", Name="VehicleInfoById")]
        public VehicleInfo GetVehicleInfo(Guid Id)
        {
            VehicleInfo item = repository.Get(Id);

            if (item == null)
            {
                //NOTE: Uncomment the following line of code to use HttpError object.
                //var message = string.Format("Product with id = {0} not found", id);
                //HttpError err = new HttpError(message);
                //return Request.CreateResponse(HttpStatusCode.NotFound, err);

                var resp = new HttpResponseMessage(HttpStatusCode.NotFound)
                {
                    Content = new StringContent(string.Format("No vehicle with ID = {0} exists", Id)),
                    ReasonPhrase = "The given VehicleID was not found."
                };
                throw new HttpResponseException(resp);
            }

            return item;
        }

        [Route("vehicles/{make:alpha}")]
        public IEnumerable GetVehiclesByMake(string make)
        {
            return repository.GetAll().Where(
                p => string.Equals(p.Make, make, StringComparison.OrdinalIgnoreCase));
        }

        [Route("vehicles")]
        [HttpPost]
        public HttpResponseMessage PostVehicle(VehicleInfo item)
        {
            item = repository.Add(item);
            var response = Request.CreateResponse(HttpStatusCode.Created, item);

            string uri = Url.Link("VehicleInfoById", new { id = item.Id });
            response.Headers.Location = new Uri(uri);
            return response;
        }

        [Route("vehicles")]
        [HttpPut]
        public void PutVehicle(Guid Id, VehicleInfo item)
        {
            item.Id = Id;
            if (!repository.Update(item))
            {
                throw new HttpResponseException(HttpStatusCode.NotFound);
            }
        }

        [Route("vehicles")]
        [HttpDelete]
        public void DeleteVehicle(Guid Id)
        {
            VehicleInfo item = repository.Get(Id);
            if (item == null)
            {
                throw new HttpResponseException(HttpStatusCode.NotFound);
            }

            repository.Remove(Id);
        }
    }
}
第九步:构建解决方案。
第十步:将解决方案发布到外部文件夹。
右键单击 VehicleStore 项目,然后选择“发布...”

在以下屏幕中,选择“文件夹”作为发布选项,并指定一个本地文件夹。

第十一步:本地部署:打开 IIS 管理器,为 Web API 2.0 项目创建一个新网站。这里使用端口 8080 而不是 80。请参见以下屏幕截图了解实际配置。

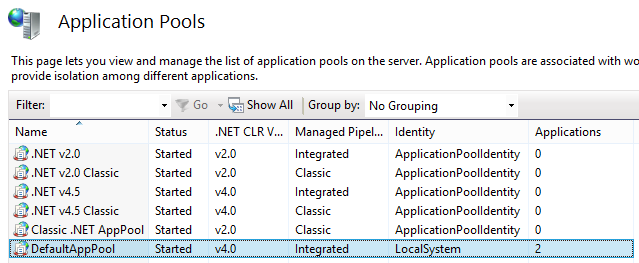
请注意以下屏幕截图中的应用程序池 DefaultAppPool 设置。选择“本地系统”作为标识。
第十二步:使用 SOAP UI 进行单元测试
在 SOAP UI 中创建一个新的 REST 项目。请参见以下屏幕截图中的端点。

结论
在本文中,我们创建了一个模型、一个模型仓库,并将 Web API 2 的配置放入继承自 ApiController 的 VehiclesController 中。其余配置放在 Global.asax 和 webApiConfig.cs 文件中。
整个代码(Visual Studio 2013 解决方案)均可下载。请告诉我您的反馈,我将据此更新文章。
延伸阅读
这是我 ASP.NET 导师 Chander Dhall 的一篇文章。本文分为两部分,我强烈建议您阅读两部分。