
通过 SAML 2.0 资源共享 SSO 集成经验
4.62/5 (5投票s)
通过 SAML 2.0 资源共享 SSO 集成经验
1. 背景
尽管单点登录 (SSO) 已经存在、被讨论和使用很长时间,但实践表明它并非总是易于实现。本文的目的是展示如何为 SAML 2.0 身份提供者 (IdP) 实现自定义的服务提供者 (SP),并利用它将 SAML SSO 集成到您的 Java Web 应用程序中。
在我们最近的一个项目中,我们必须为一所主要大学部署一个集群门户解决方案。其中一项任务是为以下系统实现 SSO:
- Liferay 门户
- 简单的自定义 Java Web 应用程序
- Google Apps
包括附加要求和注意事项
- Shibboleth 已被选定并用作 IdP。Shibboleth 是一个开源系统,完全实现了 SAML 1.0 和 SAML 2.0 协议(http://shibboleth.net/about/index.html)。
- SAML 2.0 被选为 SSO 集成的主要协议。
- Jasig CAS 已配置为 Shibboleth 身份验证提供者。
除了更灵活的身份验证用户体验和流程配置外,这种设置还使 CAS 兼容的系统能够参与 SSO,而无需进行额外实现。
LDAP 已配置为 CAS 的身份验证提供者,并为 Shibboleth 配置为属性提供者。
我们面临的挑战包括
- 制造商提供的 Shibboleth 文档并不总是最新和完整的。
- 很少有关于 Java Web 应用程序的 SAML SP 实现的全面示例。
- 使用与 CAS 集成的 Shibboleth 来启用 SAML 和 CAS SSO 会使 SSO 会话管理复杂化,并需要特别注意。
在解决了这些困难之后,我们忍不住与读者分享我们的经验,以便让其他开发人员更容易理解和使用 SAML 2.0。
2. 目标受众
- 使用 SAML 2.0 将 SSO 功能集成到其项目中的开发人员。
- 正在为他们的应用程序寻找使用 SAML 2.0 集成 SSO 功能的实际示例的 Java 开发人员。
- 希望尝试 Shibboleth 作为 SAML 身份提供者 (IdP) 的 Java 开发人员。
为了更好地理解本文,建议具备 SAML 2.0 规范的基本知识。
3. SSO 主要组件
下图展示了系统中 SSO 的通用操作。

图表显示
- 2 个参与 SSO 的应用程序
- Java Web App – 部署到 Apache Tomcat 的基于 Java Servlet 的 Web 应用程序
- Google Apps – Google 云服务
- SP Filter – 服务提供者实现。它通过 SAML 2.0 协议与 SAML Shibboleth IdP 交互
- Shibboleth IdP 是用于通过 SAML 1.0 和 SAML 2.0 进行身份验证和授权的应用程序。
- Tomcat AS 是 Java 应用程序服务器。
- SP Filter 和 Shibboleth IdP 之间的交互通过安全的 HTTPS 协议进行。
请注意,图表显示 Shibboleth IdP 和 Java Web 应用程序部署在不同的 Tomcat 服务器上。但是,您可以使用单个 Tomcat 实例在一个节点上部署环境。
4. 设置 Shibboleth IdP 环境
安装和配置 Shibboleth IdP
- 从 http://shibboleth.net/downloads/identity-provider/latest/ 下载最新 IdP 版本并解压到任意目录;我们将使用
$shDistr来指代该位置。 - 检查
JAVA_HOME变量是否设置正确。运行 $shDistr/install.sh(我们假设使用的是 Linux 发行版)。
安装程序将询问以下信息:
- 安装路径(例如:/opt/shib)
- IdP 服务器名称(例如:idp.local.com)。
要在本地计算机上测试多域 SSO 配置,您可以使用一个简单的技巧,修改 /etc/hosts 文件 – 只需在 /etc/hosts 文件中将 IdP 服务器域名添加到 localhost 的别名列表中:127.0.0.1 localhost idp.local.com
- 安装过程中生成的 Java 密钥库密码(例如:12345)。
接下来,检查安装过程是否成功完成。
此后我们将使用以下占位符:
$shHome— Shibboleth 安装目录。$shHost— IdP 服务器名称。$shPassword— Java 密钥库 (JKS) 的密码。
- 现在,作为 IdP 配置的一部分,我们需要指定“属性提供者”—— IdP 内部负责检索用户属性的组件。在我们的例子中,我们只需要 IdP 共享用户登录名。
我们在 $shHome/conf/attribute-resolver.xml 文件中的
<AttributeResolver>元素后添加属性的描述。<resolver:AttributeDefinition id="transientId" xsi:type="ad:TransientId">. <resolver:AttributeDefinition xsi:type="PrincipalName" xmlns="urn:mace:shibboleth:2.0:resolver:ad" id="userLogin" > <resolver:AttributeEncoder xsi:type="SAML1String" xmlns="urn:mace:shibboleth:2.0:attribute:encoder" name="userLogin" /> <resolver:AttributeEncoder xsi:type="SAML2String" xmlns="urn:mace:shibboleth:2.0:attribute:encoder" name="userLogin" /> </resolver:AttributeDefinition>注意:您可以使用此文件指定 IdP 可能与服务提供者共享的任何附加属性;可以使用不同的数据源,例如 LDAP 或通过 JDBC 的 DBMS。属性提供者的配置在此 处有更详细的描述。
- 我们还需要修改 $shHome/conf/attribute-filter.xml 文件,以确保 IdP 可以与我们的 SP 共享此属性。
<afp:AttributeFilterPolicy id="releaseUserLoginToAnyone"> <afp:PolicyRequirementRule xsi:type="basic:ANY"/> <afp:AttributeRule attributeID="userLogin"> <afp:PermitValueRule xsi:type="basic:ANY"/> </afp:AttributeRule> </afp:AttributeFilterPolicy>注意:您可以在此处指定更复杂和精确的规则。例如,您可以指定属性仅传输给某个 SAML SP。
- 我们的 Shibboleth IdP 应该了解它可以交互的节点——所谓的信赖方(https://wiki.shibboleth.net/confluence/display/SHIB2/IdPUnderstandingRP)。此信息存储在 $shHome/conf/relying-party.xml 文件中。
让我们打开文件并添加以下元素:
<rp:RelyingParty id="sp.local.ru" provider="https://idp.local.ru/idp/shibboleth"
                                        defaultSigningCredentialRef="IdPCredential">
   <rp:ProfileConfiguration xsi:type="saml:SAML2SSOProfile"
       signResponses="never" signAssertions="never"
       encryptNameIds="never" encryptAssertions="never" />
</rp:RelyingParty>
请注意,SAML 规范要求所有方(如 IdP 和 SP)都由唯一的“实体 ID”标识。通常使用相应组件的域名或 URL 作为实体 ID,尽管这不是必需的。我们为 SP 使用实体 ID `sp.local.com`,为 IdP 使用实体 ID `https://idp.local.com/idp/shibboleth`。
我们将在本地测试整个配置,因此我们还需要将 SP 域名添加到 /etc/hosts 中 localhost 的别名列表中:127.0.0.1 localhost idp.local.com sp.local.com
“
ProfileConfiguration”元素声明信赖方将需要此 IdP 的 SAML 2.0 SSO 服务,并且它不会对消息和响应进行签名或加密。 - 在此步骤中,我们将指定 IdP 如何检索详细的 SP 信息。为此,我们将 SP 元数据提供者添加到 $shHome/conf/relying-party.xml 文件中 IdP 元数据提供者元素旁边。
<metadata:MetadataProvider id="IdPMD" xsi:type="metadata:FilesystemMetadataProvider" .. >

<metadata:MetadataProvider id="spMD" xsi:type="metadata:FilesystemMetadataProvider"
                            metadataFile="/opt/shib/metadata/saml-sp-metadata.xml"/>
因此,我们指示 Shibboleth IdP 在 /opt/shib/metadata/saml-sp-metadata.xml 文件中查找 SP 的定义。让我们创建包含以下内容的此文件:
<md:EntityDescriptor xmlns:md="urn:oasis:names:tc:SAML:2.0:metadata" entityID="sp.local.ru">
  <md:SPSSODescriptor AuthnRequestsSigned="false" ID="sp.local.ru"
     protocolSupportEnumeration="urn:oasis:names:tc:SAML:2.0:protocol">
    <md:AssertionConsumerService Binding="urn:oasis:names:tc:SAML:2.0:bindings:HTTP-POST"
       Location="https://sp.local.ru:8443/sso/acs" index="1" isDefault="true"/>
  </md:SPSSODescriptor>
</md:EntityDescriptor>
这里,我们需要理解以下几点:
- 我们的 SAML 2.0 SP 的标识是 «sp.local.ru»。
<md:AssertionConsumerService>元素中指定了 shibboleth IdP 将返回 SAML 2.0 消息的地址 Location=`https://sp.local.ru:8443/sso/acs`。- 最后,参数
Binding=”urn:oasis:names:tc:SAML:2.0:bindings:HTTP-POST”表明 SP 响应将通过浏览器重定向从 shibboleth IdP 发送。
- 现在剩下的是选择 shibboleth IdP 如何进行实际的用户身份验证——或者用 Shibboleth 的术语来说,定义“身份验证提供者”。在生产环境中,可能有各种配置,包括通过 LDAP、DBMS 甚至 CAS 进行身份验证。我们将使用已包含的远程用户身份验证机制(https://wiki.shibboleth.net/confluence/display/SHIB2/IdPAuthRemoteUser)。
在身份验证请求期间,shibboleth IdP 将查找
REMOTE_USER变量。如果找到该变量,shibboleth IdP 将假定用户已通过外部系统(例如,通过 Web Apache 服务器)进行身份验证。为了不使本文过于复杂,在本例中,我们将通过简单的 Tomcat 配置为每个请求设置
REMOTE_USER变量。恭喜!Shibboleth 设置完成。
下载和配置用于 Shibboleth IdP 的 Tomcat
- 首先,从 https://tomcat.net.cn/download-60.cgi 下载 Tomcat 6,并将其解压到任意文件夹 $tomcatHome(例如,在 opt/shib-tomcat 文件夹中)。
需要注意的是,目前当 SP 和 IdP 通过 SOAP 直接通信时,不能使用 Tomcat 7.*。尽管在本文章的示例中,我们将使用直接浏览器重定向来执行这些通信,但我们仍然建议使用 Tomcat 6 版本。
- 将 $shDistr/endorsed 文件夹复制到 $tomcatHome 文件夹。
- 修改 $tomcatHome/bin/setenv.sh 文件以指定最小 JVM 内存参数。
JAVA_OPTS="$JAVA_OPTS -Xmx512m -XX:MaxPermSize=128m"
- 下载库:(https://build.shibboleth.net/nexus/content/repositories/releases/edu/internet2/middleware/security/tomcat6/tomcat6-dta-ssl/1.0.0/tomcat6-dta-ssl-1.0.0.jar) 到 $tomcatHome/lib 文件夹,用于 SP 和 IdP 之间通信的 SOAP 协议支持。
- 现在让我们打开 $tomcatHome/conf/server.xml 并设置通过 HTTPS 访问 Tomcat。为此,我们定义以下
Connector元素:<Connector port="8443" protocol="org.apache.coyote.http11.Http11Protocol" SSLImplementation="edu.internet2.middleware.security.tomcat6.DelegateToApplicationJSSEmplementation" scheme="https" SSLEnabled="true" clientAuth="want" keystoreFile="$shHome/credentials/idp.jks" keystorePass="$shPassword" />别忘了将变量
$shHome和$shPassword替换为其真实值。 - 现在是将 Shibboleth IdP 应用程序部署到 Tomcat。为此,我们创建一个文件 $tomcatHome/conf/Catalina/localhost/idp.xml,内容如下:
<Context docBase="$shHome/war/idp.war"
privileged="true"
antiResourceLocking="false"
antiJARLocking="false"
unpackWAR="false"
swallowOutput="true" />
别忘了将变量
$shHome替换为正确的值。 - 编译以下类并将其打包到一个 jar 文件 tomcat-valve.jar。
  public class RemoteUserValve extends ValveBase{
    public RemoteUserValve() {
        }

        @Override
        public void invoke(final Request request, final Response response)
         throws IOException, ServletException {
           final String username = "idpuser";
        final String credentials = "idppass";
        final List<String> roles = new ArrayList<String>();
        final Principal principal = new GenericPrincipal(null, username, credentials,
                                                              roles);

        request.setUserPrincipal(principal);
        getNext().invoke(request, response);
      }
    }
将 jar 文件放入 ${tomcatHome}/lib 文件夹。在 server.xml 文件中添加以下代码行:
<Valve ?lassName=”com.eastbanctech.java.web.RemoteUserValve” />
在
<Host name=«localhost» appBase=«webapps» ...>元素内部。此 Valve 仅用于确保 Tomcat 为每个请求设置
REMOTE_USER变量,从而模拟 IdP 的身份验证过程。
5. 实现 SAML 2.0 协议的 SP Filter
现在,我们将实现一个 SAML 2.0 服务提供者 Servlet Filter,它负责以下任务:
- Filter 允许不需身份验证的公共资源请求通过。
- Filter 缓存已验证用户的身份信息,以减少对 Shibboleth IdP 的请求数量。
- Filter 创建 SAML 2.0 身份验证请求消息 (
Authn) 并通过浏览器重定向将其传递给 Shibboleth IdP。 - Filter 处理来自 Shibboleth IdP 的响应消息,如果用户身份验证成功,则显示最初请求的资源。
- 当用户从 Java Web 应用程序注销时,Filter 会删除本地会话。
同时,Shibboleth IdP 会话保持活动状态。
从技术角度来看,Filter 将是标准接口 javax.filter.Filter 的实现。Filter 的范围将在特定的 Web 应用程序上设置。
现在 Filter 的功能已经明确,让我们开始实现吧。
- 创建一个 Maven 项目结构。
可以使用 Maven archetypes 插件来完成此操作。
mvn archetype:generate -DgroupId=ru.eastbanctech.java.web
-DartifactId=saml-sp-filter -DarchetypeArtifactId=maven-archetype-quickstart -DinteractiveMode=false
您可以根据自己的喜好指定 `groupId` 和 `artefactId` 参数。
我们在 Intellij Idea 中的项目结构将如下所示:
- 主 pom.xml:
<project xmlns="http://maven.apache.org/POM/4.0.0" xmlns:xsi="http://www.w3.org/2001/XMLSchema-instance" xsi:schemaLocation="http://maven.apache.org/POM/4.0.0 http://maven.apache.org/xsd/maven-4.0.0.xsd"> <modelVersion>4.0.0</modelVersion> <groupId>ru.eastbanctech.web</groupId> <artifactId>saml-sp-filter</artifactId> <name>${project.artifactId}</name> <version>1.0-SNAPSHOT</version> <packaging>jar</packaging> <properties> <!-- General settings --> <jdk.version>1.6</jdk.version> <encoding>UTF-8</encoding> <project.build.sourceEncoding>${encoding}</project.build.sourceEncoding> <project.reporting.outputEncoding>${encoding}</project.reporting.outputEncoding> </properties> <build> <pluginManagement> <plugins> <plugin> <groupId>org.apache.maven.plugins</groupId> <artifactId>maven-compiler-plugin</artifactId> <version>2.5.1</version> <configuration> <encoding>${encoding}</encoding> <source>${jdk.version}</source> <target>${jdk.version}</target> </configuration> </plugin> </plugins> </pluginManagement> </build> <dependency> <groupId>org.opensaml</groupId> <artifactId>opensaml</artifactId> <version>2.5.1-1</version> </dependency> <dependency> <groupId>javax.servlet</groupId> <artifactId>servlet-api</artifactId> <version>2.5</version> <scope>provided</scope> </dependency> <dependency> <groupId>org.slf4j</groupId> <artifactId>log4j-over-slf4j</artifactId> <version>1.7.1</version> </dependency> <dependency> <groupId>org.slf4j</groupId> <artifactId>slf4j-api</artifactId> <version>1.7.1</version> </dependency> </dependencies> </project> - 类
SAMLSPFilter是我们 Filter 的核心。public class SAMLSPFilter implements Filter { public static final String SAML_AUTHN_RESPONSE_PARAMETER_NAME = "SAMLResponse"; private static Logger log = LoggerFactory.getLogger(SAMLSPFilter.class); private FilterConfig filterConfig; private SAMLResponseVerifier checkSAMLResponse; private SAMLRequestSender samlRequestSender; @Override public void init(javax.servlet.FilterConfig config) throws ServletException { OpenSamlBootstrap.init(); filterConfig = new FilterConfig(config); checkSAMLResponse = new SAMLResponseVerifier(); samlRequestSender = new SAMLRequestSender(); } @Override public void doFilter(ServletRequest servletRequest, ServletResponse servletResponse, FilterChain chain) throws IOException, ServletException { HttpServletRequest request = (HttpServletRequest) servletRequest; HttpServletResponse response = (HttpServletResponse) servletResponse; /* Step 1: Ignore requests that are not addressed to the filter Step 2: If the answer comes from Shibboleth idP, we handle it Step 3: If you receive a request for logout, delete the local session Step 4: If the user has already been authenticated, then we can grant access to a resource Step 5: Create a SAML запрос на аутентификацию and send the user to Shibboleth idP */ } }FilterConfig指定了基本的 Filter 参数(排除的资源、IdP 名称、IdP 元数据路径、SP 名称等)。这些变量的值在 Java Web 应用程序的配置文件 web.xml 中指定。对象
checkSAMLResponse和samlRequestSender用于检查 SAML 2.0 消息的有效性并发送身份验证请求。我们稍后会回来讨论它们。public class FilterConfig { /** * The parameters below should be defined in web.xml file of Java Web Application */ public static final String EXCLUDED_URL_PATTERN_PARAMETER = "excludedUrlPattern"; public static final String SP_ACS_URL_PARAMETER = "acsUrl"; public static final String SP_ID_PARAMETER = "spProviderId"; public static final String SP_LOGOUT_URL_PARAMETER = "logoutUrl"; public static final String IDP_SSO_URL_PARAMETER = "idProviderSSOUrl"; private String excludedUrlPattern; private String acsUrl; private String spProviderId; private String logoutUrl; private String idpSSOUrl; public FilterConfig(javax.servlet.FilterConfig config) { excludedUrlPattern = config.getInitParameter(EXCLUDED_URL_PATTERN_PARAMETER); acsUrl = config.getInitParameter(SP_ACS_URL_PARAMETER); spProviderId = config.getInitParameter(SP_ID_PARAMETER); idpSSOUrl = config.getInitParameter(IDP_SSO_URL_PARAMETER); logoutUrl = config.getInitParameter(SP_LOGOUT_URL_PARAMETER); } // getters and should be defined below } OpenSamlBootstrap class initializes libraries to work with SAML 2.0 messages: public class OpenSamlBootstrap extends DefaultBootstrap { private static Logger log = LoggerFactory.getLogger(OpenSamlBootstrap.class); private static boolean initialized; private static String[] xmlToolingConfigs = { "/default-config.xml", "/encryption-validation-config.xml", "/saml2-assertion-config.xml", "/saml2-assertion-delegation-restriction-config.xml", "/saml2-core-validation-config.xml", "/saml2-metadata-config.xml", "/saml2-metadata-idp-discovery-config.xml", "/saml2-metadata-query-config.xml", "/saml2-metadata-validation-config.xml", "/saml2-protocol-config.xml", "/saml2-protocol-thirdparty-config.xml", "/schema-config.xml", "/signature-config.xml", "/signature-validation-config.xml" }; public static synchronized void init() { if (!initialized) { try { initializeXMLTooling(xmlToolingConfigs); } catch (ConfigurationException e) { log.error("Unable to initialize opensaml DefaultBootstrap", e); } initializeGlobalSecurityConfiguration(); initialized = true; } } }在
xmlToolingConfigs数组中指定的 XML 文件包含关于如何处理 SAML 2.0 消息元素的操作说明。XML 文件本身位于 opensaml-*.jar 库中。
步骤 1:忽略未被 Filter 处理的请求。
excludedUrlPattern 参数是一个正则表达式。如果请求的资源 URL 与 excludedUrlPattern 匹配,Filter 将忽略该请求。
if (!isFilteredRequest(request)) {
  log.debug("According to {} configuration parameter request is ignored + {}",
      new Object[]{FilterConfig.EXCLUDED_URL_PATTERN, request.getRequestURI()});
  chain.doFilter(servletRequest, servletResponse);
  return;
}

// We add method to the filter class that will check if the request needs to be handled
private boolean isFilteredRequest(HttpServletRequest request) {
  return !(filterConfig.getExcludedUrlPattern() != null &&
            getCorrectURL(request).matches(filterConfig.getExcludedUrlPattern()));
   }
   // Also add the auxiliary method for receiving the correct URL
private String getCorrectURL(HttpServletRequest request) {
  String contextPath = request.getContextPath();
  String requestUri = request.getRequestURI();
  int contextBeg = requestUri.indexOf(contextPath);
  int contextEnd = contextBeg + contextPath.length();
  String slash = "/";
  String url = (contextBeg < 0 || contextEnd == (requestUri.length() - 1))
                    ? requestUri : requestUri.substring(contextEnd);
  if (!url.startsWith(slash)) {
      url = slash + url;
  }
  return url;
}
步骤 2:如果收到来自 Shibboleth IdP 的响应,我们进行处理。
我们在 HTTP 请求中查找“SAMLResponse”。如果找到,则表示我们已收到 Shibboleth IdP 对身份验证请求的响应。然后我们开始处理 SAML 2.0 消息。
log.debug("Attempt to secure resource  is intercepted : {}",
((HttpServletRequest) servletRequest).getRequestURL().toString());
/*
  Check if response message is received from identity provider;
  In case of successful response system redirects user to relayState (initial) request
*/
String responseMessage = servletRequest.getParameter(SAML_AUTHN_RESPONSE_PARAMETER_NAME);
if (responseMessage != null) {
  log.debug("Response from Identity Provider is received");
  try {
    log.debug("Decoding of SAML message");
    SAMLMessageContext samlMessageContext =
                    SAMLUtils.decodeSamlMessage((HttpServletRequest) servletRequest,
                                                (HttpServletResponse) servletResponse);
    log.debug("SAML message has been decoded successfully");
    samlMessageContext.setLocalEntityId(filterConfig.getSpProviderId());
    String relayState = getInitialRequestedResource(samlMessageContext);
    checkSAMLResponse.verify(samlMessageContext);
    log.debug("Starting and store SAML session..");
    SAMLSessionManager.getInstance().createSAMLSession(request.getSession(),
                                                                   samlMessageContext);
    log.debug("User has been successfully authenticated in idP. Redirect to initial
                                                   requested resource {}", relayState);
    response.sendRedirect(relayState);
    return;
  } catch (Exception e) {
       throw new ServletException(e);
  }
}
我们需要使用 SAMLUtils.decodeSamlMessage(..) 方法解码 SAML 消息,并验证包含的 SAML 断言——checkSAMLResponse.verify(..)。当一切验证完毕后,我们创建一个本地 SAML 会话 SAMLSessionManager.getInstance().createSAMLSession(..),并将用户重定向到最初请求的资源 response.sendRedirect (..)。
在 SAMLUtils 类中,我们包含用于 SAML 2.0 消息处理的有用辅助方法。其中之一是 decodeSamlMessage ,它解码通过 HTTPS 接收的 SAML 2.0 消息。
public class SAMLUtils {
  public static SAMLMessageContext decodeSamlMessage(HttpServletRequest request,
  HttpServletResponse response) throws Exception {

    SAMLMessageContext<SAMLObject, SAMLObject, NameID> samlMessageContext =
                 new BasicSAMLMessageContext<SAMLObject, SAMLObject, NameID>();

    HttpServletRequestAdapter httpServletRequestAdapter =
                                          new HttpServletRequestAdapter(request);
    samlMessageContext.setInboundMessageTransport(httpServletRequestAdapter);
    samlMessageContext.setInboundSAMLProtocol(SAMLConstants.SAML20P_NS);
    HttpServletResponseAdapter httpServletResponseAdapter =
                     new HttpServletResponseAdapter(response, request.isSecure());
    samlMessageContext.setOutboundMessageTransport(httpServletResponseAdapter);
    samlMessageContext.setPeerEntityRole(IDPSSODescriptor.DEFAULT_ELEMENT_NAME);

    SecurityPolicyResolver securityPolicyResolver =
                                    getSecurityPolicyResolver(request.isSecure());

    samlMessageContext.setSecurityPolicyResolver(securityPolicyResolver);
    HTTPPostDecoder samlMessageDecoder = new HTTPPostDecoder();
    samlMessageDecoder.decode(samlMessageContext);
    return samlMessageContext;
  }

  private static SecurityPolicyResolver getSecurityPolicyResolver(boolean isSecured) {
    SecurityPolicy securityPolicy = new BasicSecurityPolicy();
    HTTPRule httpRule = new HTTPRule(null, null, isSecured);
    MandatoryIssuerRule mandatoryIssuerRule = new MandatoryIssuerRule();
    List<SecurityPolicyRule> securityPolicyRules = securityPolicy.getPolicyRules();
    securityPolicyRules.add(httpRule);
    securityPolicyRules.add(mandatoryIssuerRule);
    return new StaticSecurityPolicyResolver(securityPolicy);
  }
}
让我们在此类中添加一个将 SAML 对象转换为 String 的附加方法。这对于记录 SAML 消息很有用。
public static String SAMLObjectToString(XMLObject samlObject) {
  try {
    Marshaller marshaller =
        org.opensaml.Configuration.getMarshallerFactory().getMarshaller(samlObject);
    org.w3c.dom.Element authDOM = marshaller.marshall(samlObject);
    StringWriter rspWrt = new StringWriter();
    XMLHelper.writeNode(authDOM, rspWrt);
    return rspWrt.toString();
  } catch (Exception e) {
    e.printStackTrace();
  }
  return null;
}
创建一个类 SAMLResponseVerifier,它将包含从 Shibboleth IdP 接收的 SAML 2.0 消息的消息验证功能。在主方法 verify (..) 中,我们实现以下验证:
- IdP SAML 2.0 消息是对我们 Filter 发送的某个 SAML 2.0 请求的响应。
- 消息包含 Shibboleth IdP 对用户的正面身份验证。
- SAML 2.0 响应中的主要断言已满足(消息未过期,消息是为我们的 SP 准备的,等等)。
public class SAMLResponseVerifier {
  private static Logger log = LoggerFactory.getLogger(SAMLResponseVerifier.class);
  private SAMLRequestStore samlRequestStore = SAMLRequestStore.getInstance();

  public void verify(SAMLMessageContext<Response, SAMLObject, NameID> samlMessageContext)
    throws SAMLException {
    Response samlResponse = samlMessageContext.getInboundSAMLMessage();
    log.debug("SAML Response message : {}", SAMLUtils.SAMLObjectToString(samlResponse));
    verifyInResponseTo(samlResponse);
    Status status = samlResponse.getStatus();
    StatusCode statusCode = status.getStatusCode();
    String statusCodeURI = statusCode.getValue();
    if (!statusCodeURI.equals(StatusCode.SUCCESS_URI)) {
      log.warn("Incorrect SAML message code : {} ",
                   statusCode.getStatusCode().getValue());
      throw new SAMLException("Incorrect SAML message code : " + statusCode.getValue());
    }
    if (samlResponse.getAssertions().size() == 0) {
      log.error("Response does not contain any acceptable assertions");
      throw new SAMLException("Response does not contain any acceptable assertions");
    }

    Assertion assertion = samlResponse.getAssertions().get(0);
    NameID nameId = assertion.getSubject().getNameID();
    if (nameId == null) {
      log.error("Name ID not present in subject");
      throw new SAMLException("Name ID not present in subject");
    }
    log.debug("SAML authenticated user " + nameId.getValue());
    verifyConditions(assertion.getConditions(), samlMessageContext);
}

private void verifyInResponseTo(Response samlResponse) {
  String key = samlResponse.getInResponseTo();
  if (!samlRequestStore.exists(key)) { {
    log.error("Response does not match an authentication request");
    throw new RuntimeException("Response does not match an authentication request");
  }
  samlRequestStore.removeRequest(samlResponse.getInResponseTo());
}

private void verifyConditions(Conditions conditions, SAMLMessageContext samlMessageContext) throws SAMLException{
    verifyExpirationConditions(conditions);
    verifyAudienceRestrictions(conditions.getAudienceRestrictions(), samlMessageContext);
}
private void verifyExpirationConditions(Conditions conditions) throws SAMLException {
  log.debug("Verifying conditions");
  DateTime currentTime = new DateTime(DateTimeZone.UTC);
  log.debug("Current time in UTC : " + currentTime);
  DateTime notBefore = conditions.getNotBefore();
  log.debug("Not before condition : " + notBefore);
  if ((notBefore != null) && currentTime.isBefore(notBefore))
    throw new SAMLException("Assertion is not conformed with notBefore condition");

  DateTime notOnOrAfter = conditions.getNotOnOrAfter();
  log.debug("Not on or after condition : " + notOnOrAfter);
  if ((notOnOrAfter != null) && currentTime.isAfter(notOnOrAfter))
    throw new SAMLException("Assertion is not conformed with notOnOrAfter condition");
}

 private void verifyAudienceRestrictions(
 List<AudienceRestriction> audienceRestrictions,
            SAMLMessageContext<?, ?, ?> samlMessageContext)
            throws SAMLException{
// TODO: Audience restrictions should be defined below
}
}
verifyInResponseTo 方法验证 SAML 2.0 响应是否 preceded by our filter's request。实现时,使用了 SAMLRequestStore 类的对象,该对象存储发送到 Shibboleth IdP 的 SAML 2.0 请求。
final public class SAMLRequestStore {
  private Set<String> samlRequestStorage = new HashSet<String>();
  private IdentifierGenerator identifierGenerator = new RandomIdentifierGenerator();
  private static SAMLRequestStore instance = new SAMLRequestStore();

  private SAMLRequestStore() {
  }

  public static SAMLRequestStore getInstance() {
    return instance;
  }

  public synchronized void storeRequest(String key) {
    if (samlRequestStorage.contains(key))
     throw new RuntimeException("SAML request storage has already contains key " + key);

    samlRequestStorage.add(key);
  }
  public synchronized String storeRequest(){
     String key = null;
     while (true) {
       key = identifierGenerator.generateIdentifier(20);
       if (!samlRequestStorage.contains(key)){
         storeRequest(key);
         break;
       }
     }
    return key;
  }
  public synchronized boolean exists(String key) {
    return samlRequestStorage.contains(key);
  }

  public synchronized void removeRequest(String key) {
    samlRequestStorage.remove(key);
  }
}
为了创建本地会话,我们将使用我们自己的类 SAMLSessionManager。其目的是使用 SAMLContext 在 Servlet 会话上下文中创建/销毁由 SAMLSessionInfo 类对象表示的本地会话。
public class SAMLSessionInfo {
  private String nameId;
  private Map<String, String> attributes;
  private Date validTo;
  public SAMLSessionInfo(String nameId, Map<String, String> attributes, Date validTo) {
    this.nameId = nameId;
    this.attributes = attributes;
    this.validTo = validTo;
  }
   // getters should be defined below
}
SAMLSessionManager 类使用 SAMLContext 在 Servlet 会话上下文中创建和销毁本地 SAML 会话。
public class SAMLSessionManager {
  public static String SAML_SESSION_INFO = "SAML_SESSION_INFO";
  private static SAMLSessionManager instance = new SAMLSessionManager();

  private SAMLSessionManager() {
  }

  public static SAMLSessionManager getInstance() {
    return instance;
  }

  public void createSAMLSession(HttpSession session, SAMLMessageContext<Response,
         SAMLObject, NameID> samlMessageContext) {
    List<Assertion> assertions =
                       samlMessageContext.getInboundSAMLMessage().getAssertions();
    NameID nameId = (assertions.size() != 0 && assertions.get(0).getSubject() != null) ?
                     assertions.get(0).getSubject().getNameID() : null;
    String nameValue = nameId == null ? null : nameId.getValue();
    SAMLSessionInfo samlSessionInfo = new SAMLSessionInfo(nameValue,
                                      getAttributesMap(getSAMLAttributes(assertions)),
                                      getSAMLSessionValidTo(assertions));
    session.setAttribute(SAML_SESSION_INFO, samlSessionInfo);
  }

  public boolean isSAMLSessionValid(HttpSession session) {
        SAMLSessionInfo samlSessionInfo = (SAMLSessionInfo)
                              session.getAttribute(SAML_SESSION_INFO);
        if (samlSessionInfo == null)
            return false;
        return samlSessionInfo.getValidTo() == null || new
                 Date().before(samlSessionInfo.getValidTo());
  }

  public void destroySAMLSession(HttpSession session) {
    session.removeAttribute(SAML_SESSION_INFO);
  }

  public List<Attribute> getSAMLAttributes(List<Assertion> assertions) {
    List<Attribute> attributes = new ArrayList<Attribute>();
    if (assertions != null) {
      for (Assertion assertion : assertions) {
        for (AttributeStatement attributeStatement :
                                 assertion.getAttributeStatements()) {
          for (Attribute attribute : attributeStatement.getAttributes()) {
             attributes.add(attribute);
          }
        }
     }
   }
   return attributes;
 }

 public Date getSAMLSessionValidTo(List<Assertion> assertions) {
   org.joda.time.DateTime sessionNotOnOrAfter = null;
   if (assertions != null) {
     for (Assertion assertion : assertions) {
       for (AuthnStatement statement : assertion.getAuthnStatements()) {
         sessionNotOnOrAfter = statement.getSessionNotOnOrAfter();
       }
     }
   }

   return sessionNotOnOrAfter != null ?
           sessionNotOnOrAfter.toCalendar(Locale.getDefault()).getTime() : null;
 }
 public Map<String, String> getAttributesMap(List<Attribute> attributes) {
   Map<String, String> result = new HashMap<String, String>();
   for (Attribute attribute : attributes) {
     result.put(attribute.getName(), attribute.getDOM().getTextContent());
   }
   return result;
 }
}
步骤 3:如果收到注销请求,则删除本地会话。
if (getCorrectURL(request).equals(filterConfig.getLogoutUrl())) {
  log.debug("Logout action: destroying SAML session.");
  SAMLSessionManager.getInstance().destroySAMLSession(request.getSession());
  chain.doFilter(request, response);
  return;
}
注意:会话在 Shibboleth IdP 上保持活动状态,并在提示身份验证时,Shibboleth IdP 会简单地将我们重定向到一个活动会话。全局注销的实现需要额外的配置,而 Shibboleth IdP 在 2.4.0 版本之前不支持这些配置。您可以在 此处了解更多信息。
步骤 4:如果用户已通过身份验证,则我们可以授予对资源的访问权限。
如果用户在我们的 Filter 中具有活动的 SAML 会话,我们将向用户提供该资源。
if (SAMLSessionManager.getInstance().isSAMLSessionValid(request.getSession())) {
     log.debug("SAML session exists and valid: grant access to secure resource");
     chain.doFilter(request, response);
     return;
}
步骤 5:创建 SAML 身份验证请求并将用户发送到 Shibboleth IdP。
log.debug("Sending authentication request to idP");
try {
  samlRequestSender .sendSAMLAuthRequest(request, response,
    filterConfig.getSpProviderId(), filterConfig.getAcsUrl(),
    filterConfig.getIdpSSOUrl());
} catch (Exception e) {
   throw new ServletException(e);
 }
SAMLRequestSender 类创建、编码(可能加密和/或签名)并作为 SAML 2.0 消息发送请求。
public class SAMLRequestSender {
  private static Logger log = LoggerFactory.getLogger(SAMLRequestSender.class);
  private SAMLAuthnRequestBuilder samlAuthnRequestBuilder =
                                                   new SAMLAuthnRequestBuilder();
  private MessageEncoder messageEncoder = new MessageEncoder();

  public void sendSAMLAuthRequest(HttpServletRequest request, HttpServletResponse
     servletResponse, String spId, String acsUrl, String idpSSOUrl) throws Exception {
    String redirectURL;
    String idpUrl = idpSSOUrl;
    AuthnRequest authnRequest = samlAuthnRequestBuilder.buildRequest(spId, acsUrl,
                                   idpUrl);
    // store SAML 2.0 authentication request
    String key = SAMLRequestStore.getInstance().storeRequest();
    authnRequest.setID(key);
    log.debug("SAML Authentication message : {} ",
                            SAMLUtils.SAMLObjectToString(authnRequest));
    redirectURL = messageEncoder.encode(authnRequest, idpUrl, request.getRequestURI());

    HttpServletResponseAdapter responseAdapter =
                    new HttpServletResponseAdapter(servletResponse, request.isSecure());
    HTTPTransportUtils.addNoCacheHeaders(responseAdapter);
    HTTPTransportUtils.setUTF8Encoding(responseAdapter);
    responseAdapter.sendRedirect(redirectURL);
  }

  private static class SAMLAuthnRequestBuilder {

    public AuthnRequest buildRequest(String spProviderId, String acsUrl, String idpUrl){
      /* Building Issuer object */
      IssuerBuilder issuerBuilder = new IssuerBuilder();
      Issuer issuer =
                     issuerBuilder.buildObject("urn:oasis:names:tc:SAML:2.0:assertion",
                                                "Issuer", "saml2p");
      issuer.setValue(spProviderId);

      /* Creation of AuthRequestObject */
      DateTime issueInstant = new DateTime();
      AuthnRequestBuilder authRequestBuilder = new AuthnRequestBuilder();

      AuthnRequest authRequest =
                    authRequestBuilder.buildObject(SAMLConstants.SAML20P_NS,
                            "AuthnRequest", "saml2p");
      authRequest.setForceAuthn(false);
      authRequest.setIssueInstant(issueInstant);
      authRequest.setProtocolBinding(SAMLConstants.SAML2_POST_BINDING_URI);
      authRequest.setAssertionConsumerServiceURL(acsUrl);
      authRequest.setIssuer(issuer);
      authRequest.setNameIDPolicy(nameIdPolicy);
      authRequest.setVersion(SAMLVersion.VERSION_20);
      authRequest.setDestination(idpUrl);

      return authRequest;
    }
  }

  private static class MessageEncoder extends HTTPRedirectDeflateEncoder {
    public String encode(SAMLObject message, String endpointURL, String relayState)
                                         throws MessageEncodingException {
      String encodedMessage = deflateAndBase64Encode(message);
      return buildRedirectURL(endpointURL, relayState, encodedMessage);
    }
    public String buildRedirectURL(String endpointURL, String relayState, String message)
                                                        throws MessageEncodingException {
      URLBuilder urlBuilder = new URLBuilder(endpointURL);
      List<Pair<String, String>> queryParams = urlBuilder.getQueryParams();
      queryParams.clear();
      queryParams.add(new Pair<String, String>("SAMLRequest", message));
      if (checkRelayState(relayState)) {
         queryParams.add(new Pair<String, String>("RelayState", relayState));
      }
      return urlBuilder.buildURL();
    }
  }

}
包含用户身份验证指令的 SAML 2.0 消息使用 buildRequest 方法构建,实际上是一个 XML 对象。
<saml2p:AuthnRequest xmlns:saml2p="urn:oasis:names:tc:SAML:2.0:protocol"
     AssertionConsumerServiceURL="https://sp.local.ru:8443/sso/acs"
     Destination="https://idp.local.ru:8443/idp/profile/SAML2/Redirect/SSO"
     ForceAuthn="false"
     ID="_0ddb303f9500839762eabd30e7b1e3c28b596c69"
     IssueInstant="2013-09-12T09:46:41.882Z"
     ProtocolBinding="urn:oasis:names:tc:SAML:2.0:bindings:HTTP-POST" Version="2.0">
    <saml2p:Issuer
       xmlns:saml2p="urn:oasis:names:tc:SAML:2.0:assertion">sp.local.ru</saml2p:Issuer>
</saml2p:AuthnRequest>
AssertionConsumerServiceURL 参数指定 Shibboleth IdP 返回响应的 URL,而 parametrProtocolBinding 参数指示如何将响应返回给我们 Filter(在本例中为 HTTP POST)。
ID 参数指定消息标识符。我们在发送消息时保存它 `String key = SAMLRequestStore.getInstance().storeRequest();` 并在分析消息时使用 SAMLResponseVerifier 类的 verifyInResponseTo 方法进行验证。
saml2p:Issuer 元素指定我们 SP 的名称/实体 ID。使用 saml2p:Issuer 的值,Shibboleth IdP 确定身份验证请求是从哪个 SP 发送的,以及它应该如何处理(通过元数据 SP)。
我们将从 IdP 接收 SAML 2.0 消息的 XML 格式作为响应。
<saml2p:Response xmlns:saml2p="urn:oasis:names:tc:SAML:2.0:protocol"
     Destination="https://sp.local.ru:8443/sso/acs"
     ID="_9c5e6028df334510cce22409ddbca6ac"
     InResponseTo="_0ddb303f9500839762eabd30e7b1e3c28b596c69"
     IssueInstant="2013-09-12T10:13:35.177Z" Version="2.0">
   <saml2:Issuer xmlns:saml2="urn:oasis:names:tc:SAML:2.0:assertion"
             Format="urn:oasis:names:tc:SAML:2.0:nameid-format:entity">
                     https://idp.local.ru/idp/shibboleth
   </saml2:Issuer>
<saml2p:Status>
    <saml2p:StatusCode Value="urn:oasis:names:tc:SAML:2.0:status:Success"/>
</saml2p:Status>
<saml2:Assertion xmlns:saml2="urn:oasis:names:tc:SAML:2.0:assertion"
    ID="_0a299e86f4b17b5e047735121a880ccb" IssueInstant="2013-09-12T10:13:35.177Z"
    version="2.0">
    <saml2:Issuer Format="urn:oasis:names:tc:SAML:2.0:nameid-format:entity">
          https://idp.local.ru/idp/shibboleth
    </saml2:Issuer>
    <saml2:Subject>
      <saml2:NameID Format="urn:oasis:names:tc:SAML:2.0:nameid-format:transient"
        NameQualifier="https://idp.local.ru/idp/shibboleth">
        _f1de09ee54294d4b5ddeb3aa5e6d2aab
      </saml2:NameID>
      <saml2:SubjectConfirmation Method="urn:oasis:names:tc:SAML:2.0:cm:bearer">
        <saml2:SubjectConfirmationData Address="127.0.0.1"
          InResponseTo="_0ddb303f9500839762eabd30e7b1e3c28b596c69"
          NotOnOrAfter="2013-09-12T10:18:35.177Z"
          Recipient="https://sp.local.ru:8443/sso/acs"/>
      </saml2:SubjectConfirmation>
    </saml2:Subject>
    <saml2:Conditions
         NotBefore="2013-09-12T10:13:35.177Z"
         NotOnOrAfter="2013-09-12T10:18:35.177Z">
        <saml2:AudienceRestriction>
            <saml2:Audience>sp.local.ru</saml2:Audience>
        </saml2:AudienceRestriction>
    </saml2:Conditions>
    <saml2:AuthnStatement AuthnInstant="2013-09-12T10:13:35.137Z"
              SessionIndex="_91826738984ca8bef18a8450135b1821">
        <saml2:SubjectLocality Address="127.0.0.1"/>
        <saml2:AuthnContext>
          <saml2:AuthnContextClassRef>
            urn:oasis:names:tc:SAML:2.0:ac:classes:PasswordProtectedTransport
          </saml2:AuthnContextClassRef>
        </saml2:AuthnContext>
    </saml2:AuthnStatement>
 <saml2:AttributeStatement>
        <saml2:Attribute Name="userLogin" NameFormat="urn:oasis:names:tc:SAML:2.0:attrname-format:uri">
            <saml2:AttributeValue xmlns:xs="http://www.w3.org/2001/XMLSchema" xmlns:xsi="http://www.w3.org/2001/XMLSchema-instance" xsi:type="xs:string">idpuser</saml2:AttributeValue>
        </saml2:Attribute>
    </saml2:AttributeStatement>
</saml2:Assertion>
</saml2p:Response>
消息将在 SAMLResponseVerifier.verify(..) 方法中处理。
就这样——我们的 Filter 已经实现了!
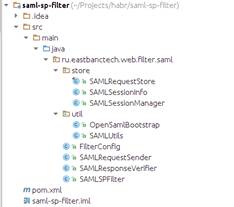
我们的项目结构如下所示:

我们将 Filter 构建为本地存储库中的 jar 库。
为此,我们在 c.pom.xml 所在的目录中运行命令:`mvn clean install`。
6. 创建支持 SSO 的 Java Web 应用程序
创建 Java Web 应用程序
为了说明这一点,我们将创建一个简单的 Java Web 应用程序,其中包含 private 和 public 资源。访问 private 资源需要通过 Shibboleth IdP Web 应用程序进行用户身份验证。其中一个 private 资源将是一个显示系统当前用户信息页面的页面。
我们的应用程序项目结构如下所示:

pom.xml
<project xmlns="http://maven.apache.org/POM/4.0.0"
  xmlns:xsi="http://www.w3.org/2001/XMLSchema-instance"
  xsi:schemaLocation="http://maven.apache.org/POM/4.0.0
  http://maven.apache.org/maven-v4_0_0.xsd">

<modelVersion>4.0.0</modelVersion>
<groupId> ru.eastbanctech.web</groupId>
<artifactId>SimpleSSOApplication</artifactId>
<packaging>war</packaging>
<version>1.0-SNAPSHOT</version>
<name>SimpleSSOApplication</name>
<url>http://maven.apache.org</url>

<!-- Determine the value for our application -->
<properties>
  <sp.id>sp.local.ru</sp.id>
  <acs.url>https://sp.local.ru:8443/sso/acs</acs.url>
  <idp.sso.url>https://idp.local.ru:8443/idp/profile/SAML2/Redirect/SSO</idp.sso.url>
  <logout.url>/logout</logout.url>
</properties>

<dependencies>
  <dependency>
    <groupId>javax.servlet</groupId>
    <artifactId>servlet-api</artifactId>
    <version>2.5</version>
   </dependency>
   <dependency>
     <groupId> ru.eastbanctech.web</groupId>
     <artifactId>saml-sp-filter</artifactId>
     <version>1.0-SNAPSHOT</version>
   </dependency>
   <dependency>
     <groupId>org.slf4j</groupId>
     <artifactId>slf4j-api</artifactId>
     <version>1.7.1</version>
   </dependency>
   <dependency>
     <groupId>org.slf4j</groupId>
     <artifactId>slf4j-log4j12</artifactId>
     <version>1.7.1</version>
   </dependency>
 </dependencies>

 <build>
   <finalName>sso</finalName>
   <plugins>
     <plugin>
       <artifactId>maven-war-plugin</artifactId>
       <configuration>
         <webResources>
           <resource>
             <filtering>true</filtering>
             <directory>src/main/webapp/WEB-INF</directory>
             <targetPath>WEB-INF</targetPath>
             <includes>
               <include>**/*.xml</include>
             </includes>
           </resource>
         </webResources>
       </configuration>
     </plugin>
   </plugins>
 </build>
 </project>
现在,需要注意会话属性,其中设置了我们 Filter 的基本参数。
 <sp.id>sp.local.ru</sp.id> - the name/entityId of SAML 2.0 filter SP
 <acs.url>https://sp.local.ru:8443/sso/acs</acs.url> - URL of the filter to process SAML 2.0 messages from Shibboleth IdP
 <idp.sso.url>https://idp.local.ru:8443/idp/profile/SAML2/Redirect/SSO</idp.sso.url> - URL for our filter to send Shibboleth IdP messages
 <logout.url>/logout</logout.url> - logout URL
web.xml
在 web.xml 文件中,我们定义了 Filter 的参数及其范围。我们通过 excludedUrlPattern 参数排除格式为“*.jpg”的资源。
<!DOCTYPE web-app PUBLIC
 "-//Sun Microsystems, Inc.//DTD Web Application 2.3//EN"
 "http://java.sun.com/dtd/web-app_2_3.dtd" >
<web-app>
  <display-name>Simple SSO Java Web Application</display-name>7.
  <filter>
    <filter-name>SSOFilter</filter-name>
    <filter-class> ru.eastbanctech.java.web.filter.saml.SAMLSPFilter</filter-class>
    <init-param>
      <param-name>excludedUrlPattern</param-name>
      <param-value>.*\.jpg</param-value>
   </init-param>
   <init-param>
     <param-name>idProviderSSOUrl</param-name>
     <param-value> ${idp.sso.url}</param-value>
   </init-param>
   <init-param>
     <param-name>spProviderId</param-name>
     <param-value>${sp.id}</param-value>
   </init-param>
   <init-param>
     <param-name>acsUrl</param-name>
     <param-value>${acs.url}</param-value>
   </init-param>
   <init-param>
     <param-name>logoutUrl</param-name>
     <param-value>${logout.url}</param-value>
   </init-param>
 </filter>
 <filter-mapping>
   <filter-name>SSOFilter</filter-name>
   <url-pattern>/pages/private/*</url-pattern>
 </filter-mapping>

 <filter-mapping>
   <filter-name>SSOFilter</filter-name>
   <url-pattern>${logout.url}</url-pattern>
 </filter-mapping>

 <filter-mapping>
   <filter-name>SSOFilter</filter-name>
   <url-pattern>/acs</url-pattern>
 </filter-mapping>
</web-app>
private/page.jsp
该页面仅显示用户 ID 和已验证用户的属性。
<%@ page import=" ru.eastbanctech.java.web.filter.saml.store.SAMLSessionManager" %>
<%@ page import=" ru.eastbanctech.java.web.filter.saml.store.SAMLSessionInfo" %>
<%@ page import="java.util.Map" %>
<html>
<body>
<h2>Private Resource</h2>
<%
  SAMLSessionInfo info =
       (SAMLSessionInfo)request.getSession().getAttribute(SAMLSessionManager.SAML_SESSION_INFO);
  out.println("User id = " + info.getNameId() + "<BR/>");
  out.println("<TABLE> <TR> <TH> Attribute name </TH> <TH> Attribulte value </TH></TR>");

  for (Map.Entry entry : info.getAttributes().entrySet()) {
    out.println("<TR><TD>" + entry.getKey() + "</TD><TD>" + entry.getValue() + "</TD></TR>");
  }
  out.println("</TABLE>");
%>

<a href="<%=request.getContextPath()%>/logout">Logout</a>
</body>
</html>
让我们使用命令:`mvn clean package` 来构建应用程序。
测试 Java Web 应用程序性能
让我们将应用程序部署到 Tomcat AS 并测试 SSO 性能。
- 我们在 ${tomcatHome}/conf/Catalina/localhost/sso.xml 文件中描述了应用程序上下文。
<Context docBase="$pathToWebApp" privileged="true" antiResourceLocking="false"
        antiJARLocking="false"    unpackWAR="false" swallowOutput="true" />
或者,只需将我们的
sso.war应用程序复制到 ${tomcatHome}/webapps。 - 为了让 Tomcat 应用程序通过 HTTPS 协议连接到 Shibboleth IdP,有必要将 Shibboleth IdP 证书添加到 Java 受信任的密钥库中。
我们使用 Java keytool 工具来实现这一点。
keytool -alias idp.local.ru -importcert -file ${shHome}/idp.crt -keystore ${keystorePath} - 启动 Tomcat AS。
- 打开浏览器窗口并访问受保护的应用程序资源 https://sp.local.ru:8443/sso/pages/private/page.jsp。
- 确保页面已打开,并且我们可以看到用户 ID 和用户名。

- 作为练习,请确保 Filter 允许访问 /pages/private 文件夹中格式为 .jpg 的图片请求。
- 与 Google Apps 集成
现在是时候确认我们的 SSO 确实在工作了。为此,让我们使用 Google Apps 作为另一个服务提供者(http://www.google.com/enterprise/apps/business/)。
- 注册您的域名和超级管理员,使用免费试用版本。完成后,使用这些凭据(完全限定域名)登录 http://admin.google.com/。
- 在管理面板中使用“创建用户”并为 idpuser 分配超级管理员权限。
- 在屏幕底部,从下拉菜单中选择“添加控件”,然后选择“安全”。

- 然后选择“高级设置”->“设置 SSO”。
- 勾选“启用 SSO”并设置以下参数:
Entry Page URL * = https://idp.local.ru:8443/idp/profile/SAML2/Redirect/SSO
Exit Page URL * =  gmail.com
Change Password URL * =  gmail.com
点击“保存更改”按钮。
- 下载证书以通过 HTTPS 与 Shibboleth IdP 配合使用。证书位于 $shHome/credentials/idp.crt。
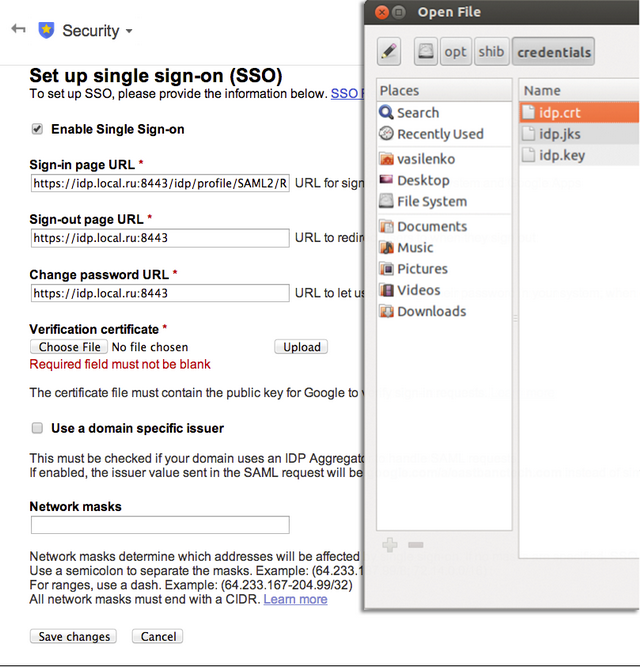
点击“保存更改”按钮。
- 使用 此处的说明,配置 Shibboleth IdP 以与 Google Apps 配合使用。
注意:为添加的元素指定命名空间,否则在 Shibboleth IdP 启动时会出错。例如,而不是
RelyingParty,您需要写rp: RelyingParty。 - 对于名为
edu.internet2.middleware.shibboleth的记录器,设置 DEBUG 级别。<!-- Logs IdP, but not OpenSAML, messages --> <logger name="edu.internet2.middleware.shibboleth" level="DEBUG"/> - 重启 Shibboleth IdP 并在新的浏览器会话中访问页面 https://admin.google.com(您可能需要删除 cookies 或在 Google Chrome 中使用隐身模式)。
- 输入 `idpuser@domain_name`,其中
domain_name是您的注册域名,然后输入密码。按“Enter”。 - 接受未签名的证书,并确保您已作为 idpuser 登录 Google Apps。
在 Shibboleth 日志 ${shHome}/logs/idp-process.log 中,您应该可以看到 Shibboleth IdP 如何处理您的请求。在那里,您将看到身份验证过程是通过
RemoteUserLoginHandler进行的。22:19:49.172 - DEBUG [edu.internet2.middleware.shibboleth.idp.authn.provider.RemoteUserLoginHandler:66] - Redirecting to https://idp.local.ru:8443/idp/Authn/RemoteUser
总的来说,Shibboleth IdP 中的所有日志都非常简单且信息丰富。我们建议花一些时间来理解它们。
- 然后,我们打开我们的应用程序 URL https://sp.local.ru:8443/sso/pages/private/page.jsp,并在日志中查看 Shibboleth IdP 正在为用户 idpuser 查找可用会话。
好了,这就是全部。我们简单的 SSO 系统正在运行。希望您发现本文有用。
有用链接
- https://developers.google.com/google-apps/sso/saml_reference_implementation – Google Apps 的 SSO 服务。它解释了如何使用 SAML 将 SSO 与 Google Docs 集成。
- https://shibboleth.usc.edu/docs/google-apps/ – 关于 Shibboleth 和 Google Docs 集成的说明。
- http://stackoverflow.com/questions/7553967/getting-a-value-from-httpservletrequest-getremoteuser-in-tomcat-without-modify - 如何实现您的 Tomcat Valve。
- https://wiki.shibboleth.net/confluence/display/SHIB2/Home - Shibboleth 文档。
¬或者,您通常可以使用 IdP 提供的通用服务提供者集成模块。在 Shibboleth 的情况下,这意味着需要在应用程序服务器前面安装一个附加的 Apache 服务器,并配置 mod_shib 模块。
- 在撰写本文时,Shibboleth IdP 2.4.0 是最新版本。
- 我们在环境中使用了 Java 7。
- 我们使用 CentOS 6.3 作为我们的操作系统。它也在 Ubuntu 12.04 上进行了测试。编译需要 servlet-api 2.5 和 ${tomcatHome}/lib/catalina.jar。
- 我们建议您作为练习自己实现它。
- 根据您的环境更改红色设置。