
如何:在 WPF 分层 DataTemplate 中使用主-明细模式
4.88/5 (24投票s)
本文展示了一种在分层 DataTemplate 中实现主-明细模式的简单方法
- 下载 Hierarchical_MasterDetail_Simple-noexe.zip - 26.6 KB
- 下载 Hierarchical_MasterDetail_Simple.zip - 61.5 KB
- 下载 Hierarchical_MasterDetail_Advanced-noexe.zip - 1.4 MB
- 下载 Hierarchical_MasterDetail_Advanced.zip - 2.8 MB
引言
本文展示了一种使用分层DataTemplate实现主/从模式的实用且简单的方法。
背景
主/从模式是计算机科学和信息系统中经常使用的模式。几乎每个面向数据的项目都在使用这种模式。其原理非常简单,即通过选定的主项显示详细信息列表

我们可以通过多种方式来实现主/从模式,在我看来,在WPF中最简单的方法是使用DataTemplate。
表示分层数据
每个主/从模式都需要一个数据结构。作为一个分层数据结构的例子,我选择使用以下假设的高科技公司

该公司由三个部门组成
- 管理: 首席执行官 (CEO),首席技术官 (CTO),质量保证副总裁 (VP.QA)
- 开发: CTO 和开发团队的下属。
- 质量保证: 质量保证副总裁和质量保证团队的下属。
在本示例中,我选择采用部门的方面,即视图中的每一行都是不同的部门
让我们看看这些类
public class Employee
{
    public Employee()
    {
        Subordinates = new List<Employee>();
    }

    public List<Employee> Subordinates { get; set; }

    public string Name
    {
        get;
        set;
    }

    public override string ToString()
    {
        return this.Name;
    }
}
每个员工都包含“subordinates”(下属),这是一个员工集合。
public class Department : INotifyPropertyChanged
{
    public Department()
    {
        Employees = new List<Employee>();
    }

    public List<Employee> Employees { get; set; }

    protected int m_EmployeesSelectedIndex = 0;

    public int EmployeesSelectedIndex
    {
        get
        {
            return m_EmployeesSelectedIndex;
        }
        set
        {
            m_EmployeesSelectedIndex = value;
            NotifyPropertyChanged("Subordinates");
        }
    }

    public List<Employee> Subordinates
    {
        get
        {
            List<Employee> res = null;
            if (Employees.Count > 0)
            {
                res = Employees[EmployeesSelectedIndex].Subordinates;
            }

            return res;
        }
    }

    public string Name
    {
        get;
        set;
    }

    public override string ToString()
    {
        return this.Name;
    }

    // This method is called by the Set accessor of each property.
    // The CallerMemberName attribute that is applied to the optional propertyName
    // parameter causes the property name of the caller to be substituted as an argument.
    private void NotifyPropertyChanged(String propertyName = "")
    {
        if (PropertyChanged != null)
        {
            PropertyChanged(this, new PropertyChangedEventArgs(propertyName));
        }
    }

    public event PropertyChangedEventHandler PropertyChanged;
}
每个部门都包含在该部门工作的员工集合。
Department 类还包含以下成员
- EmployeesSelectedIndex
- 下属列表
- NotifyPropertyChanged 机制
所有这些都用于实现主/从逻辑,将在下面的“主/从逻辑”部分中进行解释。
为了简单起见,我们在 ItemsControl 中展示数据
<!-- Data rows -->
<ItemsControl ItemsSource="{Binding Items}">
<ItemsControl.ItemTemplate>
<DataTemplate>
<StackPanel Orientation="Horizontal" MinWidth="320">
<TextBlock Width="130" Text="{Binding Name}"/>
<ComboBox Width="130" ItemsSource="{Binding Employees}" SelectedIndex="{Binding EmployeesSelectedIndex}" />
<ComboBox Width="130" ItemsSource="{Binding Subordinates}" />
</StackPanel>
</DataTemplate>
</ItemsControl.ItemTemplate>
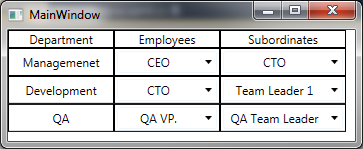
</ItemsControl> 因此,我们在这里处理的只是一个 DataTemplate,其中包含
- TextBlock - 用于部门名称。
- ComboBox - 用于部门员工姓名。
- ComboBox - 用于选定员工的下属。
请注意:在附件的下载代码示例中,每个数据项还包含标题、边框和其他简单的 UI 装饰,但逻辑是相同的。
它应该看起来像这样
主/从逻辑
我们需要将特定员工的选择连接到该员工的下属列表。
这就是 Department 类包含的原因
- EmployeesSelectedIndex
- 下属列表
- NotifyPropertyChanged 机制
让我们看看它是如何工作的

关于下载示例
下载示例有点复杂
Master-Detail Simple 文件还包含
- 每个数据项的标题、边框和其他简单的 UI 装饰。
- 下属的 Selected-Index 用于默认选择下属 ComboBox 中的第一个索引。
- 下属的 Is-Enabled 用于在没有项目时禁用下属 ComboBox。
- 下载 Hierarchical_MasterDetail_Simple-noexe.zip - 26.6 KB
- 下载 Hierarchical_MasterDetail_Simple.zip - 61.5 KB
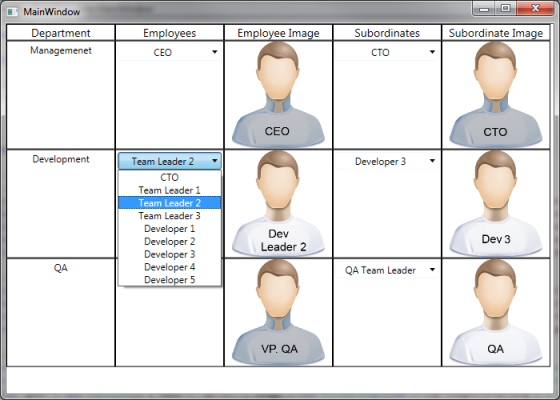
Master-Detail Advanced 文件还包含
- 以上所有 (来自 Simple 示例)
- 员工-图像 & 下属-图像