
Visual Studio.NET 2005 的一些新特性
4.22/5 (20投票s)
2004年8月19日
6分钟阅读
204190
1918
一篇关于 Visual Studio.NET 2005 新特性的文章
引言
自从参与了 Microsoft Visual Studio .NET 2005 Beta 1 志愿者测试计划以来,我发现 Visual Studio.NET 2005 中包含了一些强大新特性和功能。所有这些特性都基于 Microsoft Visual Studio .NET 2005 Beta 1 版本,并且可能会发生变化。
1. 新项目创建类别
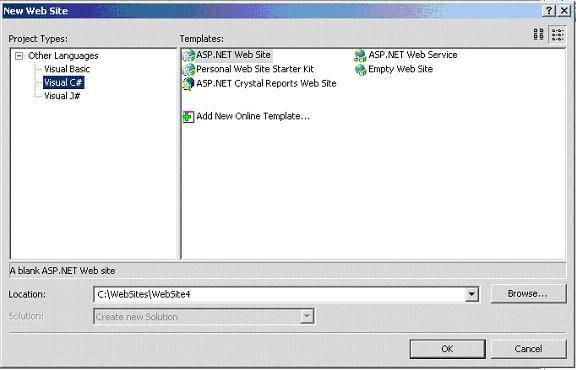
在 VS.NET 2005 Beta 1 中,新项目创建被分离为用于 Web 应用程序的“网站”和用于非 Web 应用程序的“项目”。图 1、2、3 展示了新项目创建向导的截图。与之前的 Visual Studio.NET 2002/2003 中将 Web 应用程序和非 Web 应用程序项目混在一起的项目创建向导相比,此功能为开发人员提供了更清晰的界面,让他们可以更轻松地创建自己特定类型的项目。
图 1 VS.NET 2005 IDE 中创建新项目的屏幕截图

图 2 VS.NET 2005 IDE 中创建新非 Web 项目的屏幕截图

图 3 VS.NET 2005 IDE 中创建新 Web 项目的屏幕截图
2. Visual Studio.NET 2005 IDE 中的新类图视图
在 Visual Studio.NET 2005 IDE 中,提供了一个新的类图视图功能,方便开发人员进行架构、设计和评审工作。开发人员可以通过在类视图选项卡窗口中右键单击类来轻松地将类添加到类图中。图 4 展示了类图的功能。类图信息可以保存在类图文件(.cd 文件)中,该文件是 XML 语法文件,目前只能由 Visual Studio.NET 2005 IDE 正确打开和显示。
以下是一个 .cd 文件的示例内容。
<?xml version="1.0" encoding="utf-8"?>
<Diagram xmlns:xsi="http://www.w3.org/2001/XMLSchema-instance"
xmlns:xsd=http://www.w3.org/2001/XMLSchema
MajorVersion="1" MinorVersion="1"
xmlns="http://www.microsoft.com/VisualStudio/EnterpriseTools/
ClassDesigner/V1.1/DiagramSchema.xsd">
  <View FilterFieldProperty="false" LastOpened="true" Name="Main">
    <AbsoluteBounds X="0" Y="0" Height="8.5" Width="11" />
    <Font Name="Tahoma" Size="0.1145833358168602" />
    <Class Collapsed="true">
      <AbsoluteBounds X="0.75" Y="0.75" Height="0.45" Width="1.5" />
      <TypeIdentifier>
        <FullName>DGDemo.DGDemo</FullName>
        <FileName>DGDemo.cs</FileName>
        <HashCode>AAAAAAAAACAAEAAAAACBAAACAAAgAAAAAAAABAAAAAA=</HashCode>
      </TypeIdentifier>
    </Class>
    <Class Collapsed="true">
      <AbsoluteBounds X="0.75" Y="2.5" Height="0.45" Width="1.5" />
      <TypeIdentifier>
        <FullName>DGDemo.XComboBoxColumn</FullName>
        <FileName>XComboBoxColumn.cs</FileName>
        <HashCode>AAAABBgAAAAAEQAEAQAAAQAiAAAAAAAAAAIAAACBAAA=</HashCode>
      </TypeIdentifier>
    </Class>
    <Class Collapsed="true">
      <AbsoluteBounds X="3.5" Y="0.75" Height="0.45" Width="1.5" />
      <TypeIdentifier>
        <FullName>DGDemo.XTextBoxColumn</FullName>
        <FileName>XTextBoxColumn.cs</FileName>
        <HashCode>AQAAABAAAAAAAQAAAAAACAAiAAAAAAAAAAAAAAAAAAA=</HashCode>
      </TypeIdentifier>
    </Class>
  </View>
</Diagram>
图 4 类图的屏幕截图

3. C# Windows 应用程序中程序“main”入口与主窗体类的分离
在 C# Windows 应用程序项目中,Visual Studio.NET 2005 在一个静态的“Program”类中定义了程序的静态入口“main”函数,将其从主“Form”类中移除了。静态“Program”类通常保存在 Program.cs 文件中。这是一个全新的功能,使得代码更加有组织、清晰、高效且易于维护。在新的“Program”类内部,IDE 会自动为应用程序生成一些新的(默认)应用程序属性,例如“EnableVisualStyles”和“EnableRTLMirroring”。“EnableVisualStyles”为应用程序启用 Windows XP 可视样式。“EnableRTLMirroring”自动激活应用程序的镜像功能。下面的代码显示了 VS.NET 2003 和 VS.NET 2005 Beta 1 创建的源代码中“main”入口的区别。
//(VS.NET 2003 code)

namespace DGDemo
{
    public class DGDemo : System.Windows.Forms.Form
    {
            ………
            ………
            ………
        [STAThread]
        static void Main()
        {
            Application.Run(new DGDemo());
        }
    }
}
//(VS.NET 2005 Beta 1 code)
namespace WindowsApplication1
{
static class Program
{
[STAThread]
static void Main()
{
Application.EnableVisualStyles();
Application.EnableRTLMirroring();
Application.Run(new Form1());
}
}
}
4. C# 中的部分类定义和 C# Windows 项目中的 XXX.Design.cs 文件
C# 类定义中的“partial”关键字在之前的 Visual Studio.NET 2002/2003 中并不存在。这种新的类定义可以将一个类(或结构、或接口)的定义分布在两个或多个源文件中。每个源文件包含类定义的一部分,并且在应用程序编译时,所有部分都会被组合在一起。程序员可以在大型项目中使用此新功能,将一个类分布在不同的文件中,允许多个程序员同时处理它。这将使团队协作更加高效,并且更容易调试。在使用自动生成的源代码时,可以在不重新创建源文件的情况下向类添加代码。Visual Studio 使用此方法创建 Windows 窗体、Web 服务包装器代码等。程序员可以编写使用这些类的代码,而无需编辑 Visual Studio 创建的文件。下面是关于“partial”关键字的示例代码。
namespace WindowsApplication1
{
    partial class Form1 : Form
    {
        public Form1()
        {
            InitializeComponent();
             }
    }
}
C# Windows 项目中另一个相关的新功能是用于 UI 设计布局的 xxx.design.cs 文件。在 Visual Studio.NET 2005 IDE 中,对于 C# Windows 应用程序,所有与 UI 设计布局相关的源代码都可以由 IDE 自动生成并放入 xxx.design.cs 文件中;xxx.design.cs 文件在 IDE 的项目解决方案资源管理器窗口中是隐藏的,并且 IDE 无法直接查看 xxx.design.cs 的源代码。以下是 VS.NET 2005 生成的 Form1.Designer.cs 的源代码。// The source code of Form1.Designer.cs
namespace WindowsApplication1
{
partial class Form1
{
/// <summary>
/// Required designer variable.
/// </summary>
private System.ComponentModel.IContainer components = null;
/// <summary>
/// Clean up any resources being used.
/// </summary>
protected override void Dispose(bool disposing)
{
if (disposing && (components != null))
{
components.Dispose();
}
base.Dispose(disposing);
}
this.leftRaftingContainer =
new System.Windows.Forms.RaftingContainer();
this.rightRaftingContainer =
new System.Windows.Forms.RaftingContainer();
this.topRaftingContainer =
new System.Windows.Forms.RaftingContainer();
this.bottomRaftingContainer =
new System.Windows.Forms.RaftingContainer();
this.dataGridView1 = new System.Windows.Forms.DataGridView();
this.dataGridViewTextBoxColumn1 =
new System.Windows.Forms.DataGridViewTextBoxColumn();
this.dataGridViewTextBoxColumn2 =
new System.Windows.Forms.DataGridViewTextBoxColumn();
this.dataGridViewCheckBoxColumn1 =
new System.Windows.Forms.DataGridViewCheckBoxColumn();
((System.ComponentModel.ISupportInitialize)(
this.leftRaftingContainer)).BeginInit();
((System.ComponentModel.ISupportInitialize)(
this.rightRaftingContainer)).BeginInit();
((System.ComponentModel.ISupportInitialize)(
this.topRaftingContainer)).BeginInit();
((System.ComponentModel.ISupportInitialize)(
this.bottomRaftingContainer)).BeginInit();
((System.ComponentModel.ISupportInitialize)(
this.dataGridView1)).BeginInit();
this.SuspendLayout();
//
// leftRaftingContainer
//
this.leftRaftingContainer.Dock =
System.Windows.Forms.DockStyle.Left;
this.leftRaftingContainer.Name = "leftRaftingContainer";
//
// rightRaftingContainer
//
this.rightRaftingContainer.Dock =
System.Windows.Forms.DockStyle.Right;
this.rightRaftingContainer.Name = "rightRaftingContainer";
//
// topRaftingContainer
//
this.topRaftingContainer.Dock =
System.Windows.Forms.DockStyle.Top;
this.topRaftingContainer.Name = "topRaftingContainer";
//
// bottomRaftingContainer
//
this.bottomRaftingContainer.Dock =
System.Windows.Forms.DockStyle.Bottom;
this.bottomRaftingContainer.Name = "bottomRaftingContainer";
//
// dataGridView1
//
this.dataGridView1.Columns.Add(this.dataGridViewTextBoxColumn1);
this.dataGridView1.Columns.Add(this.dataGridViewTextBoxColumn2);
this.dataGridView1.Columns.Add(this.dataGridViewCheckBoxColumn1);
this.dataGridView1.Dock = System.Windows.Forms.DockStyle.Fill;
this.dataGridView1.Location = new System.Drawing.Point(0, 0);
this.dataGridView1.Name = "dataGridView1";
this.dataGridView1.Size = new System.Drawing.Size(388, 145);
this.dataGridView1.TabIndex = 16;
//
// dataGridViewTextBoxColumn1
//
this.dataGridViewTextBoxColumn1.HeaderText = "First Name";
this.dataGridViewTextBoxColumn1.Name = "FName";
//
// dataGridViewTextBoxColumn2
//
this.dataGridViewTextBoxColumn2.HeaderText = "Last Name";
this.dataGridViewTextBoxColumn2.Name = "LName";
//
// dataGridViewCheckBoxColumn1
//
dataGridViewCellStyle1.Alignment =
System.Windows.Forms.DataGridViewContentAlignment.MiddleCenter;
this.dataGridViewCheckBoxColumn1.DefaultCellStyle =
dataGridViewCellStyle1;
this.dataGridViewCheckBoxColumn1.HeaderText = "Hired";
this.dataGridViewCheckBoxColumn1.Name = "Hired";
//
// Form1
//
this.AutoScaleBaseSize = new System.Drawing.Size(5, 13);
this.ClientSize = new System.Drawing.Size(388, 145);
this.Controls.Add(this.dataGridView1);
this.Controls.Add(this.leftRaftingContainer);
this.Controls.Add(this.rightRaftingContainer);
this.Controls.Add(this.topRaftingContainer);
this.Controls.Add(this.bottomRaftingContainer);
this.Name = "Form1";
this.Text = "Form1";
this.Load += new System.EventHandler(this.Form1_Load);
((System.ComponentModel.ISupportInitialize)(
this.leftRaftingContainer)).EndInit();
((System.ComponentModel.ISupportInitialize)(
this.rightRaftingContainer)).EndInit();
((System.ComponentModel.ISupportInitialize)(
this.topRaftingContainer)).EndInit();
((System.ComponentModel.ISupportInitialize)(
this.bottomRaftingContainer)).EndInit();
((System.ComponentModel.ISupportInitialize)(
this.dataGridView1)).EndInit();
this.ResumeLayout(false);
this.PerformLayout();
}
#endregion
private System.Windows.Forms.RaftingContainer leftRaftingContainer;
private System.Windows.Forms.RaftingContainer rightRaftingContainer;
private System.Windows.Forms.RaftingContainer topRaftingContainer;
private System.Windows.Forms.RaftingContainer bottomRaftingContainer;
private System.Windows.Forms.DataGridView dataGridView1;
private System.Windows.Forms.DataGridViewTextBoxColumn
dataGridViewTextBoxColumn1;
private System.Windows.Forms.DataGridViewTextBoxColumn
dataGridViewTextBoxColumn2;
private System.Windows.Forms.DataGridViewCheckBoxColumn
dataGridViewCheckBoxColumn1;
}
}
5. DataGridView 组件
DataGridView 是 Visual Studio.NET 2005 中引入的一个全新的控件,它使得在 C# Windows 应用程序中实现数据表显示功能变得更加容易。在之前的 Visual Studio.NET 2002/2003 中,DataGrid 控件在 C# Windows 应用程序中的使用并不方便,带有复杂 UI 功能的 DataGrid 控件对象必须在窗体源代码中手动创建。下面的代码显示了在 Visual Studio.NET 2003 中创建的窗体中,带有编辑和下拉列表功能的 datagrid 对象源代码。//
// The Datagid demo sample code created with VS.NET 2003
//
public class DGDemo : System.Windows.Forms.Form
{
private System.Windows.Forms.DataGrid MydataGrid;
private System.Data.DataSet MyDataSet;
private System.Windows.Forms.DataGridTableStyle MyDGStyle;
---
---
public DGDemo()
{
---
---
createDataGrid();
}
---
---
private void CreateDataGrid()
{
MyDataSet = new DataSet("MyDataSet");
// Create DataTable.
DataTable myTable = new DataTable("PetInfo");
// Create two columns, and add them to the table.
DataColumn cFirst = new DataColumn("First Name", typeof(string));
DataColumn cLast = new DataColumn("Last Name", typeof(string));
myTable.Columns.Add(cFirst);
myTable.Columns.Add(cLast);
// Add the table to the DataSet.
MyDataSet.Tables.Add(myTable);
// Populate the tables.
DataRow newRow1;
newRow1 = myTable.NewRow();
newRow1["First Name"] = "Black1";
newRow1["Last Name"] = "Bear1";
myTable.Rows.Add(newRow1);
DataRow newRow2;
newRow2 = myTable.NewRow();
newRow2["First Name"] = "Black2";
newRow2["Last Name"] = "Bear2";
myTable.Rows.Add(newRow2);
DataRow newRow3;
newRow3 = myTable.NewRow();
newRow3["First Name"] = "Black3";
newRow3["Last Name"] = "Bear2";
myTable.Rows.Add(newRow3);
DataGridColumnStyle GridFNameColumn;
DataGridColumnStyle GridLNameColumn;
MyDGStyle = new DataGridTableStyle();
MyDGStyle.MappingName = "PetInfo";
CurrencyManager curMgr =
(CurrencyManager)this.BindingContext[MyDataSet, "PetInfo"];
GridFNameColumn = new XTextBoxColumn();
((XTextBoxColumn)GridFNameColumn).Initialize();
GridFNameColumn.MappingName = "First Name";
GridFNameColumn.HeaderText = "First Name";
GridFNameColumn.Width = 140;
MyDGStyle.GridColumnStyles.Add(GridFNameColumn);
GridLNameColumn = new XComboBoxColumn();
//((XComboBoxColumn)GridLNameColumn).Initialize();
((XComboBoxColumn)GridLNameColumn).AddItemString("BigBear");
((XComboBoxColumn)GridLNameColumn).AddItemString("SmallBear");
((XComboBoxColumn)GridLNameColumn).AddItemString("BearBoy");
((XComboBoxColumn)GridLNameColumn).AddItemString("BearGril");
((XComboBoxColumn)GridLNameColumn).AddItemString("BearBaby");
((XComboBoxColumn)GridLNameColumn).AddItemString("BearSister");
((XComboBoxColumn)GridLNameColumn).Initialize();
GridLNameColumn.MappingName = "Last Name";
GridLNameColumn.HeaderText = "Last Name";
GridLNameColumn.Width = 140;
MyDGStyle.GridColumnStyles.Add(GridLNameColumn);
MyDGStyle.AllowSorting = true;
MyDGStyle.RowHeadersVisible = true;
MydataGrid.TableStyles.Add(MyDGStyle);
MydataGrid.SetDataBinding(MyDataSet,"PetInfo");
((XComboBoxColumn)GridLNameColumn).AttachParentObject(MydataGrid, curMgr);
}
在新的 VS.NET 2005 中,DataGridView 控件提供了一个可视化的表格布局来显示数据。所有 datagridview 控件的创建工作只需将其从工具箱拖放到 IDE 设计布局窗口即可。图 5 从工具箱拖放 Datagridview 控件的屏幕截图。

Datagridview 控件添加列的屏幕截图
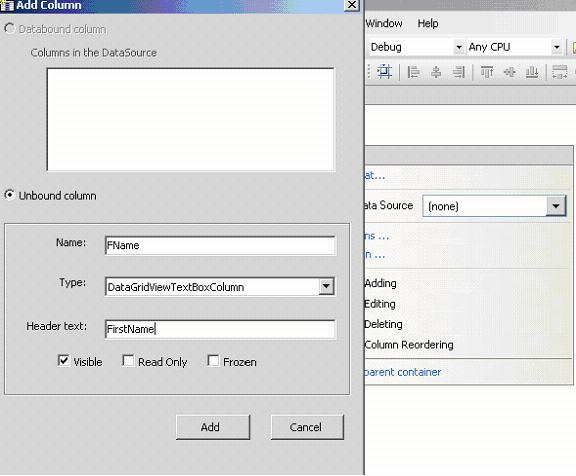
Datagridview 控件的列类型的屏幕截图


6. 其他一些新的 UI 控件
MaskedTextBox这个新控件可以在没有自定义验证逻辑的情况下验证用户的输入,并可用于决定接受还是拒绝用户的输入。Menustrip此控件为窗体定义菜单系统。FlowLayoutPanel和TableLayoutPanel在 VS.NET 2005 Beta 1 中,Panel 控件被分解为FlowLayoutPanel和TableLayoutPanel两个独立的部分。FlowLayoutPanel控件可以按流向定义其内容,或者您可以使用TableLayoutPanel控件按表格方向定义其内容,即一个由行和列组成的网格。DataConnector此控件将提供数据连接到数据源的功能。DataNavigator这是一个数据导航控件,可以放置在窗体界面上。SoundPlayer此控件可以播放 .wav 文件中的声音。ActiveDocumentHost此控件可以托管活动文档,例如 MS Word 文档、Excel 工作表、声音、视觉绘图、媒体剪辑、视频剪辑、MS Photo 编辑器、MS PowerPoint、WordPad 等。PropertyGrid此控件提供了一个用户界面来浏览对象的属性。WebBrowser此控件可以浏览网页或提供集成的基于 HTML 的用户帮助。