
Android 资源组织/访问初学者指南
4.65/5 (6投票s)
Android 资源组织/访问初学者指南,附清晰简要的解释
引言
在本文中,我们将一起了解不同的 Android 资源、它们的类型、定义,并通过示例描述如何使用和访问这些资源。[文章 #6]
Android 资源类型
首先您需要知道的是,所有资源都包含在您项目中的 /res 文件夹内。

导航到 /res 文件夹,您将找到以下文件夹:
- drawable-hdpi
- drawable-ldpi
- drawable-mdpi
- drawable-xhdpi
- layout
- 菜单
- 值
- color (手动添加)
让我们讨论一下每种资源的作用。
/Res/drawables
1. drawable-hdpi
您可以放置位图/PNG 图像以适应高分辨率屏幕 (640dp X 480dp)。
2. drawable-ldpi
您可以放置位图/PNG 图像以适应低分辨率屏幕 (240dp X 320dp)。
3. drawable-mdpi
您可以放置位图/PNG 图像以适应中分辨率屏幕 (320dp X 480dp)。
4. drawable-xhdpi
您可以放置位图/PNG 图像以适应超大分辨率屏幕 (640dp X 960dp)。
好的!我们了解了这 4 个不同文件夹之间的区别,但可能还有一些疑问:
问题 1 - 我必须将相同图片以 4 种不同尺寸添加到 4 个 drawable 文件夹中吗?
不,您不必这样做。您只需放置 1 个或多个版本的图片,在运行时应用程序会选择最合适的资源版本。假设设备是 hdpi,而您的 hdpi 文件夹中没有图片,那么它会从 mdpi 文件夹中选择;如果只有 1 个版本的此资源存在,那么它将为所有设备选择它,但这并非正确的解决方案,因为图片会自动拉伸或收缩,您将无法控制它。
问题 2 - 我必须设计不同尺寸的图标以适应所有屏幕吗?
您可以这样做,但还有另一种解决方案,称为 9-patch。
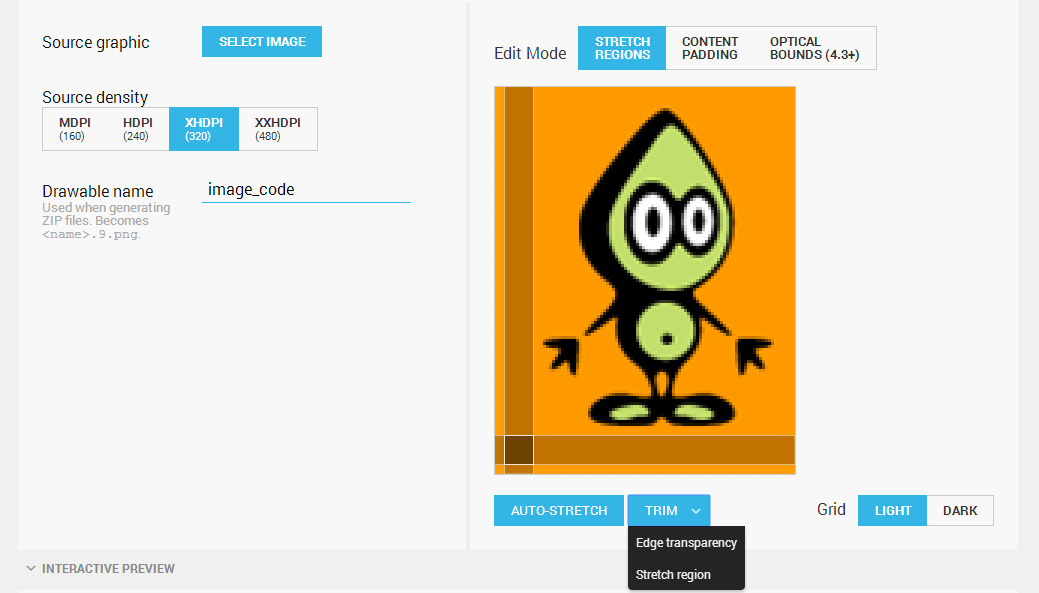
9-patch 位图
它是一个围绕位图的 1 像素透明边框,通过在位图顶部和左侧绘制黑色像素,您可以定义图像的哪些部分允许拉伸。
您可以使用此在线生成器实现 9-patch 位图:在线 9-patch 生成器

1. 选择源图像和源密度。

别忘了查看交互式预览以查看实现的结果。

2. 点击“Auto Stretch”来决定图像中可以拉伸的部分,然后点击“trim->stretch region”,再点击“auto stretch”。

3. 点击“trim->stretch region”,再点击“auto stretch”。
4. 对位图的另一个左下角执行相同的操作,并查看结果位图。

5. 下载 .zip 文件并在您的项目中使用它们。

6. 解压下载的文件后,您会找到 4 个文件夹,里面是我们 4 个 drawable 文件夹以及每个文件夹中相应的 9-patch 位图。

7. 将 4 个位图按如下方式包含到您的项目中:

您可以通过 .XML 布局使用 @drawable/位图名称 访问此 res/drawable。
//Added ImageView to display our drawable
<RelativeLayout xmlns:android="http://schemas.android.com/apk/res/android"
    xmlns:tools="http://schemas.android.com/tools"
    android:layout_width="match_parent"
    android:layout_height="match_parent"
    android:paddingBottom="@dimen/activity_vertical_margin"
    android:paddingLeft="@dimen/activity_horizontal_margin"
    android:paddingRight="@dimen/activity_horizontal_margin"
    android:paddingTop="@dimen/activity_vertical_margin"
    tools:context=".MainActivity" >

    <ImageView
        android:id="@+id/imgView"
        android:layout_width="wrap_content"
        android:layout_height="wrap_content"
        android:src="@drawable/image_code"/>

</RelativeLayout>
或者通过代码使用 .setImageResource(R.drawable.图片名称) 访问。
protected void onCreate(Bundle savedInstanceState) {
    super.onCreate(savedInstanceState);
    setContentView(R.layout.activity_main);

    ImageView imgView = (ImageView)findViewById(R.id.imgView);
    imgView.setImageResource(R.drawable.image_code);
}
您可以对任何想要添加到项目中的图片或 drawable 执行相同的上述步骤。
/Res/Layout
您使用此资源文件夹来保存所有布局文件(表示您的 activity 的设计)。
如您在之前的文章中看到,或者您可以查看我关于设计布局的文章:设计我的 Android 布局,我们将所有需要的布局创建在此文件夹中,并通过代码访问它。
注意:您可以将相同的布局多次用于不同的 activity。
您可以通过代码设置 activity 应将其哪个布局作为默认布局,如下所示:
//Inside onCreate function, you can setContentView and access the layout from R.layout.layoutname
protected void onCreate(Bundle savedInstanceState) {
    super.onCreate(savedInstanceState);
    setContentView(R.layout.activity_main);

    ImageView imgView = (ImageView)findViewById(R.id.imgView);
    imgView.setImageResource(R.drawable.image_code);
}
/Res/menu
我们来到了与之前同样重要的资源文件夹之一。通过导航到自动创建的代码,您将看到以下代码:

当用户在使用此 activity 时点击菜单按钮时,此代码会显示一个菜单,您可以通过 R.menu.菜单名称 访问您的菜单。
正如我们在下面的代码中看到的,我们有一个名为 main.xml 的菜单,它包含 1 个项目。
<menu xmlns:android="http://schemas.android.com/apk/res/android" >

    <item
        android:id="@+id/action_settings"
        android:orderInCategory="100"
        android:showAsAction="never"
        android:title="@string/action_settings"/>

</menu>
我们可以添加不同的菜单项,只需按如下方式添加一个新项:
<menu xmlns:android="http://schemas.android.com/apk/res/android" >

    <item
        android:id="@+id/action_settings"
        android:orderInCategory="100"
        android:showAsAction="never"
        android:title="@string/action_settings"/>

    <item
        android:id="@+id/action_help"
        android:orderInCategory="100"
        android:showAsAction="never"
        android:title="Help"/>

</menu>
我添加了另一个名为 Help 的菜单项,当点击模拟器上的菜单按钮时,菜单会出现在底部。

问题 3 - 它总是出现在底部吗?
不,这取决于您运行的机器、API 级别以及您正在使用的主题。
问题 4 - 好的!现在我有了菜单,如何访问这些项目以便在用户点击时执行某些操作?
我们只能通过代码执行此操作,您需要重写一个为此类操作存在的默认函数,该函数名为 onOptionsItemSelected。
您需要根据菜单项 ID 创建一个 switch,并为每种情况执行一些操作,如以下代码所示:
@Override
public boolean onOptionsItemSelected(MenuItem item) {
  // TODO Auto-generated method stub
  switch (item.getItemId()) {
    //Case Settings Clicked
    case R.id.action_settings:
      Toast toast = Toast.makeText(this.getApplicationContext(), "Settings clicked!", Toast.LENGTH_LONG);
      toast.show();
      return true;

    //Case Help Clicked
    case R.id.action_help:
      Toast toast_Help = Toast.makeText(this.getApplicationContext(), "Help clicked!", Toast.LENGTH_LONG);
      toast_Help.show();
      return true;

    default:
      return super.onOptionsItemSelected(item);
  }
}

问题 5 - 我必须为我的 activity 添加菜单吗?
不,这是可选的。如果您不想显示菜单,请从您的 activity 中删除这两个函数(如果存在):onCreateOptionsMenu 和 onOptionsItemSelected。
/Res/values
谈论 values 文件夹就是谈论其子目录:
- dimens.xml
- strings.xml
- styles.xml
- colors.xml
1.dimens.xml
您使用此 xml 文件添加您想要在应用程序中多次使用的一些尺寸。例如,您可以为所有应用程序布局的“Margin Top”创建一个尺寸。
好处:当您需要更改所有 activity 的顶部边距时,您只需更改一次值,它就会应用于所有 activity,而不是遍历所有 activity 并更改值,而且可能您会忘记更改一个或多个值。
您可以按如下方式添加新的 dimen 值:
<dimen name="activity_margin_top">20dp</dimen>
完整代码如下:
<resources>

    <!-- Default screen margins, per the Android Design guidelines. -->
    <dimen name="activity_horizontal_margin">16dp</dimen>
    <dimen name="activity_vertical_margin">16dp</dimen>

    <dimen name="activity_margin_top">20dp</dimen>
</resources>
您可以通过 @dimen/尺寸名称 在您的 .XML 布局中使用创建的 dimen 值。
<RelativeLayout xmlns:android="http://schemas.android.com/apk/res/android"
    xmlns:tools="http://schemas.android.com/tools"
    android:layout_width="match_parent"
    android:layout_height="match_parent"
    android:layout_marginTop="@dimen/activity_margin_top"
    tools:context=".MainActivity" >

</RelativeLayout>
问题 6 - 我还可以用此 .XML 文件做什么?
您可以设置所有表示尺寸的常量参数,如边距、内边距和字体大小。
2.strings.xml
顾名思义,我们用它来保存常量字符串,如应用程序名称或任何我们将在应用程序中大量使用的常量名称。
默认情况下,您会在 .XML 中找到这些值:
<?xml version="1.0" encoding="utf-8"?>
<resources>

    <string name="app_name">HelloWorld</string>
    <string name="action_settings">Settings</string>
    <string name="hello_world">Hello world!</string>
    <string name="TextViewHint">Enter Your Name!</string>
    <string name="ButtonSubmit">Submit</string>

</resources>
您可以通过 @string/字符串名称 在您的 xml 布局中访问这些值。
<menu xmlns:android="http://schemas.android.com/apk/res/android" >

    <item
        android:id="@+id/action_settings"
        android:orderInCategory="100"
        android:showAsAction="never"
        android:title="@string/action_settings"/>

</menu>
3.styles.xml
如果您想为您的应用程序创建自定义主题,那么您的代码将从这个 .XML 文件开始,我更喜欢从提供的代码中解释此文件并查看注释:
<resources>
    //Here this your Base Theme that inherets from android:Theme.Light provided by Google
    //You can apply any changes you want to add to all your application
    <style name="AppBaseTheme" parent="android:Theme.Light">

    </style>

    //If you want to customize a theme or some specific items for a particular item  simply
    // inheret from AppBaseTheme
    // and do any customizations inside this new style and make your application get
    // from this style
    <!-- Application theme. -->
    <style name="AppTheme" parent="AppBaseTheme">
        <!-- All customizations that are NOT specific to a particular API-level can go here. -->
    </style>

</resources>
您从 AndroidManifest.xml 中选择您的默认样式。
1. 打开您的 AndroidManifest.xml。
2. 查找此代码:
    <application
        android:allowBackup="true"
        android:icon="@drawable/ic_launcher"
        android:label="@string/app_name"
        android:theme="@style/AppTheme" >
3. 更改 android:theme ="@style/样式名称">
另外一个更改我们所有应用程序背景的例子,我们可以将默认背景设置在我们的样式中:
    <!-- Application theme. -->
    <style name="AppTheme" parent="AppBaseTheme">
        <!-- All customizations that are NOT specific to a particular API-level can go here. -->
        <item name="android:background">#FF0000</item>
    </style>

注意:要访问其他要更改的值而不是背景颜色,只需输入名称 android:,您将找到所有可能的值。
4.colors.xml
您可以添加另一个 .XML 文件来保存您需要的一些默认颜色。
1. 创建一个新的 XML 文件。

2. 插入颜色作为名称并选择资源(您的唯一选项)。

3. 点击完成。
4. 您可以按如下方式添加新项:
<?xml version="1.0" encoding="utf-8"?>
<resources>
    <color name="light_green">#c5f16b</color>
</resources>
您可以通过 @color/颜色名称 访问您的颜色。
    <!-- Application theme. -->
    <style name="AppTheme" parent="AppBaseTheme">
        <!-- All customizations that are NOT specific to a particular API-level can go here. -->
        <item name="android:background">@color/light_green</item>
    </style>
问题 7 - 我必须添加所有颜色才能使用它们,还是有一些默认颜色?
是的,当然,有一些默认颜色,您可以使用 @android:color/选择一种颜色 来使用它们。
结论
我希望我详细解释了所有资源及其各自的优点,以及每种资源的最佳实践。
尽力而为,随心所欲,将一些数据放入错误的位置等等……直到您找到万物的最佳位置,永远不要忘记“动手编码”!