
文章 5 - 通过实际示例了解 Android 用户交互性和传感器
4.76/5 (14投票s)
了解 Android 传感器和触摸界面的基础知识。
下载 MyTouchAndSensorHandler.zip
1. 背景
在上一篇文章中,我们学习了如何管理资源、菜单和布局管理的原理及其最佳实践,并构建了 ImageList 应用。该应用还演示了与资源的 数据绑定。现在,我们希望进一步利用传感器来构建一个更具交互性的系统。我想在此重申,我们正试图从头开始构建一个类似于 DreamCurtains 的应用。
那么,本教程将做什么呢?
1) 我们将开发一个基于触摸的矩形覆盖控件:此控件应可通过触摸移动。
2) 我们将了解我们应用程序的多点触控原理
3) 然后,我们将使用传感器并为我们的应用程序添加一些酷炫的功能。
在继续之前,请 下载 MyImageList 应用程序的完整源代码 ,并将包名重构为 com.grasshoppernetwork.mytouchandsensorhandler 。当然,您也可以使用自己的包名来开发您的应用程序。
首先,让我们看看我们在这里的目标。这使得学习过程更加有趣。在上一篇教程中,我们在 ImageView 中显示了选定的窗帘。但现在,我们想在主窗口中显示一个矩形控件。该控件应在四个角上有四个球。我们应该能够通过按住并移动左上角的矩形来拖动并更改控件的位置。我们应该能够通过移动右下角的圆来更改控件的大小。此外,我们还将放置两个这样的控件。在此过程中,我们将理解:
1) 如何处理触摸
2) 如何解释特定于不同控件的触摸点。
3) 我们还将尝试理解简单的手势原理

2. 创建自定义视图
要开发控件,首先需要一个圆圈 PNG 图像。正如我们所学到的,某些资源需要是 PNG 格式,以避免周期性调用代码来使图像透明。

下载圆圈 PNG 图像并将其上传到您的 drawable-xhdpi 文件夹。现在,查看窗口控件图像,可以清楚地看出我们希望向用户呈现一个自定义视图。没有任何 Android 工具能在矩形的四个角上带有四个圆圈。因此,我们必须从头开始构建此工具,然后将其与我们的表单一起使用。通过创建一个扩展 android.view.View 的类,然后覆盖从 View 类继承的方法以提供控件的自定义行为,您可以创建具有其自身独立行为的自定义显示项。
好的,在 src/yourpackage 文件夹内创建一个名为 DrawView 的类,该类扩展 View。创建类后,它将触发未实现的代码错误。左键单击错误,它将为您提供实现构造函数的提示。实现提示中显示的所有三个构造函数。因此,我们的 DrawView 类将如下所示:
package com.grasshoppernetwork.mytouchandsensorhandler;

import android.content.Context;
import android.graphics.Canvas;
import android.graphics.Paint;
import android.util.AttributeSet;
import android.view.View;

public class DrawView extends View
{

    public DrawView(Context context) {
        super(context);


    }

    public DrawView(Context context, AttributeSet attrs, int defStyle) {
        super(context, attrs, defStyle);

    }

    public DrawView(Context context, AttributeSet attrs) {
        super(context, attrs);

    }

}
由于 DrawView 类将使用四个圆圈,每个圆圈都有自己的属性集,让我们也定义一个名为 colorball 的类,并为其提供表示圆圈所需的属性。每个 ColorBall 对象将具有一个 id、在其上绘制的绘图上下文、宽度和高度属性。 在您的应用程序的源文件夹内创建 ColorBall 类。
package com.grasshoppernetwork.mytouchandsensorhandler;

import android.content.Context;
import android.graphics.Bitmap;
import android.graphics.BitmapFactory;
import android.graphics.Point;

public  class ColorBall {

    Bitmap bitmap;
    Context mContext;
    Point point;
    int id;
     int count = 0;
     public int SIZE=64;
public void Rescale()
{  bitmap= Bitmap.createScaledBitmap(bitmap, SIZE, SIZE, false);

}
    public ColorBall(Context context, int resourceId, Point point) {
        this.id = count++;
        bitmap = BitmapFactory.decodeResource(context.getResources(),
                resourceId);
      bitmap= Bitmap.createScaledBitmap(bitmap, SIZE, SIZE, false);
       // Bitmap b = BitmapFactory.decodeByteArray(imageAsBytes, 0, imageAsBytes.length)
        //        profileImage.setImageBitmap(Bitmap.createScaledBitmap(b, 120, 120, false));
        mContext = context;
        this.point = point;
    }

    public int getWidthOfBall() {
        return bitmap.getWidth();
    }

    public int getHeightOfBall() {
        return bitmap.getHeight();
    }

    public Bitmap getBitmap() {
        return bitmap;
    }

    public int getX() {
        return point.x;
    }

    public int getY() {
        return point.y;
    }

    public int getID() {
        return id;
    }

    public void setX(double d) {
        point.x = (int)d;
    }

    public void setY(int y) {
        point.y = y;
    }
}
resourceId 必须是 drawable/circle 资源 id,它将被解码为 Android Bitmap 图像。必须将 Bitmap 缩放到您希望圆圈显示的任何大小!Point 是 dp 中的绝对点,它应该是圆圈的中心,context 将传递将要绘制它的 context,而这当然将是 DrawView 类的 context。
DrawView 类必须有四个点(对应于四个角)、一个 BitmapImage 来保存 ImageList 表单返回的窗帘图像。该类必须有一个矩形,连接这四个点或更确切地说连接这四个 ColorBalls。让我们定义 DrawView 类的成员。如果您想在显示窗帘和隐藏窗帘之间切换,可以使用一个名为 SHOW_CURTAIN 的布尔标志变量。如果您想改变窗帘图像的透明度,请使用一个变量来保存透明度,称之为 ALPHA。
     int groupId = -1;
    public int _color=Color.WHITE;
    public int ALPHA=220;
    public boolean SHOW_CURTAIN=true;
    public String curtainBmp=null;
    public ArrayList<ColorBall> colorballs = new ArrayList<ColorBall>();
    private int balID = 0;
    Paint paint;
    Canvas canvas;
    public Drawable drawable=null;
    public Rect myRect=null;
更新声明的构造函数以初始化 Paint 和 Canvas 的新实例。最重要的是,自定义视图将是第一个窗口中 ImageView 之上的覆盖层。因此,必须将触摸从第一个表单传递到 DrawView。只有当新视图可以获得焦点时,才会发生这种情况。通过设置 setFocusable(true) 可以确保这一点。
public Rect myRect=null;
    public DrawView(Context context) {
        super(context);
        paint = new Paint();
        setFocusable(true); // necessary for getting the touch events
        canvas = new Canvas();


    }

    public DrawView(Context context, AttributeSet attrs, int defStyle) {
        super(context, attrs, defStyle);
        paint = new Paint();
        setFocusable(true); // necessary for getting the touch events
        canvas = new Canvas();

    }

    public DrawView(Context context, AttributeSet attrs) {
        super(context, attrs);
        paint = new Paint();
        setFocusable(true); // necessary for getting the touch events
        canvas = new Canvas();

    }
DrawView 类中两个 “最重要” 的方法是 onDraw 和 onTouch 方法。不用说,它们都继承自 View 类,需要在 DrawView 类中被覆盖。首先,让我们讨论 onDraw 方法的实现。每当 DrawView 对象失效,或者 DrawView 的任何实体(如窗帘、ColorBall 的位置)发生更改时,都会调用 onDraw 方法。 这类似于 .Net GDI 程序员熟悉的 onPaint() 方法。
DrawView 将提供四个点。仅当用户操作了任何 ColorBalls 时,这些点才会更新,否则点将为 null。根据 ColorBall 点的操作,我们将定义 top(或 minY)、left(或 minX)、bottom(或 maxY)、right(或 maxX),它们将根据操作进行更新。每次操作都会触发 onDraw。此外,如果 SHOW_CURTAIN 标志设置为 true,则 onDraw 不需要绘制任何内容。这对于用户需要在设计和预览模式之间切换的应用程序特别有用。因此,逻辑在 onDraw 中实现,如下所示:
  if(!SHOW_CURTAIN)
       {
           return;
       }
        if(points[3]==null) //point4 null when user did not touch and move on screen.
            return;
        int left, top, right, bottom;
        left = points[0].x;
        top = points[0].y;
        right = points[0].x;
        bottom = points[0].y;
        for (int i = 1; i < points.length; i++) {
            left = left > points[i].x ? points[i].x:left;
            top = top > points[i].y ? points[i].y:top;
            right = right < points[i].x ? points[i].x:right;
            bottom = bottom < points[i].y ? points[i].y:bottom;
        }
现在,我们要在一个画布上绘制矩形和窗帘图像,该画布将代表 DrawView 类的视图。可以使用 Paint 对象在画布上绘制对象。由于要在画布上绘制许多不同的对象(ColorBall、Rectangle、Curtain),请将 Paint 对象的抗锯齿模式和抖动模式设置为 true。antiAliasing() 是一种图像过滤技术,可以消除在多个图像对象被采样(或绘制)在一个窗口上时发生的采样错误。抖动是一种向图像添加系统化噪声的技术,使得对象的边界不易被清晰地标记。因此,整个画布看起来像一个单一的实体,而不是一些独立视觉元素的混乱窗口。
 paint.setAntiAlias(true);
        paint.setDither(true);
        paint.setStrokeJoin(Paint.Join.ROUND);
        paint.setStrokeWidth(5);
paint.setAlpha(ALPHA);
        //draw stroke
        paint.setStyle(Paint.Style.STROKE);
        paint.setColor(_color);
        paint.setStrokeWidth(2);
        canvas.drawRect(
                    left + colorballs.get(0).getWidthOfBall() / 2,
                    top + colorballs.get(0).getWidthOfBall() / 2,
                    right + colorballs.get(2).getWidthOfBall() / 2,
                    bottom + colorballs.get(2).getWidthOfBall() / 2, paint);
一旦绘制了矩形,就可以用通过 CurtainListActivity 表单选择的窗帘位图图像填充矩形。回想一下,CurtainActivity 返回图像路径。但为了获得 Drawable 元素,我们需要找到 resourceId,然后用该 resourceId 创建一个 Drawable 对象。
一旦创建了 Drawable,就不应该直接绘制它,而应该在由 (left,top)、(right,bottom) 定义位置的矩形上绘制它。
   if(curtainBmp!=null)
        {
            Log.i("in Main Form New Curtain Resource name"," "+curtainBmp+" Pack name:"+getContext().getApplicationContext().getPackageName());
             //int imageResource = getContext().getApplicationContext().getResources().getIdentifier(curtainBmp, null, getContext().getApplicationContext().getPackageName());
            int imageResource = getResources().getIdentifier(curtainBmp, null,getContext().getApplicationContext().getPackageName());
             Log.i("in Main Form New Curtain Image="," "+imageResource);

             drawable = getContext().getResources().getDrawable(imageResource);
             Bitmap b=drawableToBitmap(drawable);
             drawable= new BitmapDrawable(getResources(),b);
             drawable.setAlpha(ALPHA);


            myRect=new Rect(left + colorballs.get(0).getWidthOfBall() / 2,
                top + colorballs.get(0).getWidthOfBall() / 2,
                right + colorballs.get(2).getWidthOfBall() / 2,
                bottom + colorballs.get(2).getWidthOfBall() / 2);
                 drawable.setBounds(myRect);
                drawable.draw(canvas);

}
现在矩形已绘制,并且 CurtainImage 也已绘制,是时候在 onDraw 方法中绘制 ColorBalls 了。
for (int i =0; i < colorballs.size(); i ++) {
            ColorBall ball = colorballs.get(i);

            canvas.drawBitmap(ball.getBitmap(), ball.getX(), ball.getY(),
                    paint);

        //    canvas.drawText("" + (i+1), ball.getX(), ball.getY(), paint);
        }
在我们理解触摸处理程序的本质(这当然是本教程的主要收获)之前,我们想检查窗帘是否按计划出现在第一个表单上。我们还将在第一个表单中使用两个 DrawView 对象,以便能够显示两个窗帘。
让我们修改 activity_main.xml ,它代表我们的第一个表单。
<RelativeLayout xmlns:android="http://schemas.android.com/apk/res/android"
    xmlns:tools="http://schemas.android.com/tools"
    android:layout_width="match_parent"
    android:layout_height="match_parent"
    android:paddingBottom="@dimen/activity_vertical_margin"
    android:paddingLeft="@dimen/activity_horizontal_margin"
    android:paddingRight="@dimen/activity_horizontal_margin"
    android:paddingTop="@dimen/activity_vertical_margin"
    tools:context=".MainActivity" >

    <ImageView
        android:id="@+id/Image1"
         android:layout_width="fill_parent"
        android:layout_height="fill_parent"
        android:layout_alignParentTop="true"
        android:adjustViewBounds="true"
        android:layout_gravity="left"
        android:layout_marginBottom="2dp"
        android:layout_marginLeft="2dp"
        android:layout_marginRight="2dp"
        android:layout_marginTop="2dp"
        android:scaleType="matrix"
        />
    <com.grasshoppernetwork.mytouchandsensorhandler.DrawView
    android:id="@+id/Rect2"
    android:layout_width="match_parent"
            android:layout_height="match_parent"
    />
<com.grasshoppernetwork.mytouchandsensorhandler.DrawView
    android:id="@+id/Rect1"
    android:layout_width="match_parent"
            android:layout_height="match_parent"
    />

<Switch
    android:id="@+id/switch1"
    android:layout_width="wrap_content"
    android:layout_height="wrap_content"
    android:layout_alignParentRight="true"
    android:layout_alignParentTop="true"
    android:text="Control"
    android:checked="true" />

</RelativeLayout>
它现在有两个名为 Rect1 和 Rect2 的控件,它们都是 DrawView 类的实例。
如果一切顺利,您将看到主表单的图形布局场景,如下所示:

您无法识别 Rect1 或 Rect2 控件,因为它们仅在运行时创建和实例化。因此,让我们转到 activity_main 的代码后端,即 MainActivity.java。在这里,我们需要声明两个与两个 DrawView 控件关联的对象。我们还需要更新处理意图返回值的代码,即 onActivityResult,现在将返回的图像加载到 DrawViw 类的 Bitmap 对象中,并通过使它们失效来为两个对象触发 DrawView 类的 onDraw。
这是 DrawView 对象的声明和初始化:
DrawView dv,dv1;
       dv=(DrawView)findViewById(R.id.Rect1);
        dv.setVisibility(View.INVISIBLE);
        dv.points=new Point[4];
        dv.points[2]=new Point(30,30);
        dv.points[1]=new Point(width/4,30);
        dv.points[0]=new Point(30,(int)(((float)height)*.75));
        dv.points[3]=new Point(width/4,(int)(((float)height)*.75));
        dv.colorballs=new ArrayList<ColorBall>();
        dv.setOnTouchListener(this);

        dv.colorballs.add(new ColorBall(dv.getContext(), R.drawable.circle, dv.points[0]));
        dv.colorballs.add(new ColorBall(dv.getContext(), R.drawable.circle, dv.points[1]));
        dv.colorballs.add(new ColorBall(dv.getContext(), R.drawable.circle, dv.points[2]));
        dv.colorballs.add(new ColorBall(dv.getContext(), R.drawable.circle, dv.points[3]));
        dv.setTag("dv");
        dv1=(DrawView)findViewById(R.id.Rect2);

        dv1.points=new Point[4];
         dv1.points[2]=new Point((int)(((float)width)*.65),30);//880 30
        dv1.points[1]=new Point((int)(((float)width)*.92),30);//1180 30
        dv1.points[0]=new Point((int)(((float)width)*.65),(int)(((float)height)*.75));//880 560
        dv1.points[3]=new Point((int)(((float)width)*.92),(int)(((float)height)*.75));
        dv1.colorballs=new ArrayList<ColorBall>();

        dv1.colorballs.add(new ColorBall(dv1.getContext(), R.drawable.circle, dv1.points[0]));
        dv1.colorballs.add(new ColorBall(dv1.getContext(), R.drawable.circle, dv1.points[1]));
        dv1.colorballs.add(new ColorBall(dv1.getContext(), R.drawable.circle, dv1.points[2]));
        dv1.colorballs.add(new ColorBall(dv1.getContext(), R.drawable.circle, dv1.points[3]));


        dv.curtainBmp="drawable/"+"photo0";
        dv1.curtainBmp="drawable/"+"photo0";
可以看到,我们已将 bothe 对象初始化为最初显示 curtain photo0。宽度和高度是设备宽度和高度。我们将在下一个子部分介绍其重要性和计算。假设设备的显示规格为 1200x700(高度x宽度),您能通过查看第一张照片找到对应两个 DrawView 对象的八个彩色球的绝对点吗?根据计算,这些值是设备宽度和高度的比例。现在,对于不同的设备,这些值会自动调整。
以下是更改后的主页面的样子:

现在,当您选择“窗帘选择”表单并选择任何窗帘时,您将获得类似于以下屏幕的结果。您是否看到我们窗帘控件背后的选定窗帘?嗯,这完全是因为我们没有将返回的图像分配给 DrawView 对象的 Bitmap。现在我们将进行此更改。

让我们更新 MainActivity 的 onActivityResult 方法中的 FABRIC_SELECTION 情况:
case FABRIC_SELECTION:
            try{
            if(resultCode==RESULT_OK)
            {
            Bundle res = imageReturnedIntent.getExtras();
            //ad.setMessage(res.getString("icon"));
        //    ad.show();
            try{
            dv.curtainBmp="drawable/"+res.getString("icon");
            dv.curtainBmp=dv.curtainBmp.split(".jpg")[0];
            dv1.curtainBmp=dv.curtainBmp.split(".jpg")[0];
            Log.i("In setting curtain:",dv.curtainBmp);
            }catch(Exception ex)
            {

            }
            dv.invalidate();
            dv1.invalidate();
            }
            }catch(Exception ex)
            {}
            break;
这真的很简单,不是吗?您所要做的就是将这两个 DrawView 对象中的 icon 返回变量的 cutainBmp String 变量分配给。由于图标将是 photo0.jpg 形式,请删除 .jpg 并获取绝对可绘制资源。
然后使两个对象失效,这会强制对象调用 onDraw 方法,从而在定义的矩形上重绘新的 curtainImages。请看下图。我们现在可以根据我们的选择更改窗帘图像。

窗帘出现在白色背景上,不太合适。因此,让我们将背景图像更改为窗口图像,以便窗帘出现在窗口上。下载下面的 firstImage.jpg 并将其粘贴到 drawable-xhdpi 中。从 activity_main 中将 Image1 的源更改为此图像。

当您查看设计器时,它看起来像这样:
不用说,由于纵向布局,图像的一部分消失了。但是,当您运行应用程序时,在任何布局中,结果都不会太令人满意。原因是图像没有完全适应面板。
为了使图像适合面板,我们需要在代码中分配图像并将 ScaleType 设置为 ScaleType.FIT_XY;因此,通过在 MainActivity 的 onCreate 方法中添加以下代码块(在 Image imgView1 和 dv 初始化之间)来更新代码:
 Uri selectedImage =  Uri.parse("android.resource://"+this.getPackageName()+"/drawable/firstimage");;

         InputStream imageStream;
        try {
            imageStream = getContentResolver().openInputStream(selectedImage);

             Bitmap si = BitmapFactory.decodeStream(imageStream);

             imgView1.setImageBitmap(si);

             imgView1.setScaleType(ScaleType.FIT_XY);
        } catch (FileNotFoundException e) {
            // TODO Auto-generated catch block
            e.printStackTrace();
        }
现在,当您运行应用程序时,您将获得所需的结果: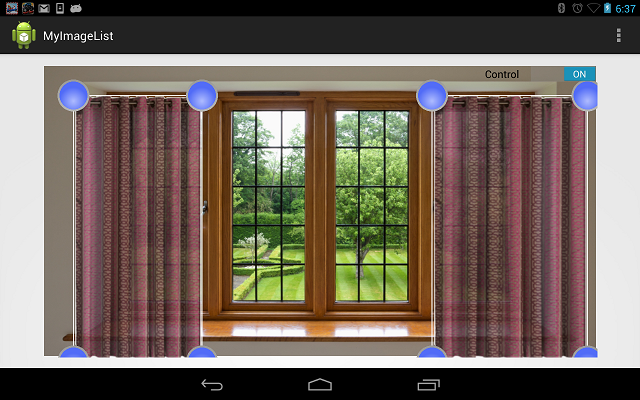
仍然存在一个小问题。如您所见,窗帘是根据四个点的坐标放置的。这些坐标是根据固定的宽度和高度(宽度=1150,高度=750)计算的。然而,这些值肯定会因设备而异。因此,获取设备的宽度和高度分量是有意义的。在 Android 中,可以使用 DisplayMatrix 轻松获得此信息。
DisplayMetrics displaymetrics = new DisplayMetrics();
        getWindowManager().getDefaultDisplay().getMetrics(displaymetrics);
        int height = displaymetrics.heightPixels;
        int width = displaymetrics.widthPixels;
3. 处理触摸
说实话,要理解触摸是如何工作的,您实际上并不需要任何外部视图和我们为实现目标所做的复杂工作流程。但触摸具有一些引人入胜的功能,事件可以是分层的:即,它可以从一个视图传递到另一个视图或视图组。因此,一个触摸可以对不同视图产生不同影响的示例是理解其行为的重要一步。
现在,为了处理触摸事件,您只需让 Activity 类实现 OnTouchListener,然后覆盖 onTouch 方法。
在我们的例子中,我们有兴趣将事件传递给 DrawView 类的两个对象:dv 和 dv1。
@Override
    public boolean onTouch(View v, MotionEvent event) {
        // TODO Auto-generated method stub
        Log.i("ok","ok");

        dv1.onTouchEvent(event);
        dv.onTouchEvent(event);
        return true;
    }
当然,我们将详细地在 DrawView 类中使用该事件,但在此之前,快速说明一下:event 变量在这里保存 MotionEvent。event.getX() 和 event.getY() 返回当前的触摸位置。请注意,Android 没有高级手势事件处理程序,您必须根据先前和当前的触摸点的导数来计算手势。event.getDownTime() 返回用户按住触摸的时间。这对于找出拖动等手势非常重要。我们很快就会看到如何更有效地使用触摸。
在我们的例子中,我们将触摸事件传递给另一个视图。为了成功实现这一点,视图也必须订阅相同的触摸事件。这可以通过将当前实例传递给两个 DrawView 对象的 touchListener 来简单地完成。
dv1.setOnTouchListener(this);
dv.setOnTouchListener(this);
现在,当您用手指在应用程序上滑动时,将调用 DrawView 的 onTouch 方法。让我们先看看 onTouch 事件处理程序的完整实现,然后再逐一理解。
 public boolean onTouchEvent(MotionEvent event) {
        int eventaction = event.getAction();
   Log.i("routed",this.getTag().toString());
        int X = (int) event.getX();
        int Y = (int) event.getY();

        switch (eventaction) {

        case MotionEvent.ACTION_DOWN: // touch down so check if the finger is on
            startTime = System.currentTimeMillis();
            clickCount++;
            double radCircle1 = Math
                    .sqrt((double) (((points[2].x - X) * (points[2].x - X)) + (points[2].y - Y)
                            * (points[2].y - Y)));

            if (radCircle1 < colorballs.get(0).getWidthOfBall())
            {
                isPosChange=true;
                firstX=X;
                firstY=Y;
            }
            // a ball
            if (points[0] == null) {
                //initialize rectangle.
                points[0] = new Point();
                points[0].x = X;
                points[0].y = Y;

                points[1] = new Point();
                points[1].x = X;
                points[1].y = Y + 30;

                points[2] = new Point();
                points[2].x = X + 30;
                points[2].y = Y + 30;

                points[3] = new Point();
                points[3].x = X +30;
                points[3].y = Y;

                balID = 2;
                groupId = 1;
                 // declare each ball with the ColorBall class
                for (Point pt : points) {
                     colorballs.add(new ColorBall(getContext(), R.drawable.circle, pt));
                }
            } else {
                //resize rectangle
                balID = -1;
                groupId = -1;
                for (int i = colorballs.size()-1; i>=0; i--) {
                    ColorBall ball = colorballs.get(i);
                    // check if inside the bounds of the ball (circle)
                    // get the center for the ball
                    int centerX = ball.getX() + ball.getWidthOfBall();
                    int centerY = ball.getY() + ball.getHeightOfBall();
                    paint.setColor(Color.CYAN);
                    // calculate the radius from the touch to the center of the
                    // ball
                    double radCircle = Math
                            .sqrt((double) (((centerX - X) * (centerX - X)) + (centerY - Y)
                                    * (centerY - Y)));

                    if (radCircle < ball.getWidthOfBall()) {

                        balID = ball.getID();
                        if (balID == 1 || balID == 3) {
                            groupId = 2;
                        } else {
                            groupId = 1;
                        }
                        invalidate();
                        break;
                    }
                    invalidate();
                }
            }
            break;

        case MotionEvent.ACTION_MOVE: // touch drag with the ball

            if (balID > -1) {
                if(!isPosChange)
                {
                // move the balls the same as the finger
                colorballs.get(balID).setX(X);
                colorballs.get(balID).setY(Y);

                paint.setColor(Color.CYAN);
                if (groupId == 1) {
                    colorballs.get(1).setX(colorballs.get(0).getX());
                    colorballs.get(1).setY(colorballs.get(2).getY());
                    colorballs.get(3).setX(colorballs.get(2).getX());
                    colorballs.get(3).setY(colorballs.get(0).getY());
                } else {
                    colorballs.get(0).setX(colorballs.get(1).getX());
                    colorballs.get(0).setY(colorballs.get(3).getY());
                    colorballs.get(2).setX(colorballs.get(3).getX());
                    colorballs.get(2).setY(colorballs.get(1).getY());
                }
                }
                else
                {
                    double diffX=X-firstX;
                    double diffY=Y-firstY;
                    firstX=X;
                    firstY=Y;
                      for (int i = colorballs.size()-1; i>=0; i--)
                      {
                          ColorBall ball = colorballs.get(i);
                          ball.setX(ball.getX()+(int)diffX);
                          ball.setY(ball.getY()+(int)diffY);
                      }

                }

                invalidate();
            }

            break;

        case MotionEvent.ACTION_UP:
            // touch drop - just do things here after dropping
isPosChange=false;
firstX=-1;
firstY=-1;
            long time = System.currentTimeMillis() - startTime;
            duration=  duration + time;
            if(clickCount == 2)
            {
                if(duration<= MAX_DURATION)
                {
                    Log.i("Double tap",this,getTag();
                }
                clickCount = 0;
                duration = 0;
                break;
            }

            break;
        }
        // redraw the canvas
        invalidate();
        return true;

    }
在进入逻辑之前,为什么不检查一下结果呢?您可能会遇到应用程序崩溃。查找是相同触摸事件被处理的任何一个对象。因此,很难调试当前是哪个对象的触摸监听器正在工作。因此,我们使用了一个调试选项。
Log.i("routed",this.getTag().toString());
然而,对象上没有标签。这就是为什么您必须为正在处理触摸的视图添加标签。
将以下两行添加到您的 MainActivity 将解决问题。
 dv1.setTag("dv1");
 dv.setTag("dv");
您也将能够跟踪特定于对象的独立触摸点。一旦运行正常,您可以按住左上角的圆圈移动窗帘,您可以按住底部的圆圈调整窗帘大小。

现在让我们深入研究逻辑:
您一定注意到,所有操作都发生在触摸按下时。一旦您抬起手指,就不会发生任何事件。因此,触摸处理程序必须找出触摸是否按下。如果是,则执行其余逻辑。
event.getAction() 返回与当前触摸操作对应的枚举代码。您可以根据 touchAction 切换您的逻辑。我们将把逻辑放在 MotionEvent.ACTION_DOWN case 中。
我们将把逻辑放在 case 语句中。
接下来,我们需要根据触摸重新定位我们的窗帘。我们将找到触摸点与左上角 ColorBall 的接近程度。距离使用欧氏距离计算。T=如果触摸点在 ToLeft ColorBall 上,则重新定位该球,计算偏差,并相应地重新定位其余的球。在此之前,请获取鼠标按下时的当前位置。
        int X = (int) event.getX();
        int Y = (int) event.getY();
距离公式和测量与左上角彩色球的触摸点距离的计算如下:
double radCircle1 = Math
                    .sqrt((double) (((points[2].x - X) * (points[2].x - X)) + (points[2].y - Y)
                            * (points[2].y - Y)));

            if (radCircle1 < colorballs.get(0).getWidthOfBall())
            {
                isPosChange=true;
                firstX=X;
                firstY=Y;
            }
isPosChange 如果设置为 true,将在 MOVE 操作期间强制更新控件的位置。假设您的触摸在按下设备时位于 ToLeft ColorBall 之外,然后您移动了手指,这也触碰到了那个球,那么窗口也不会移动。因此,**ACTION_DOWN** 事件可用于在全面的鼠标移动逻辑之前执行初步工作。
在 ACTION_MOVE case 中,可能发生两件事:如果 positionChange 为 true,则需要更新球的位置和 DrawView 对象的位置;否则,右下角的球必须根据当前点移动,但第三个球的 y 必须改变,第二个球的 x 必须改变。您可以尝试窗帘来测试这种情况。
 if(!isPosChange)
                {
                // move the balls the same as the finger
                colorballs.get(balID).setX(X);
                colorballs.get(balID).setY(Y);


                if (groupId == 1) {
                    colorballs.get(1).setX(colorballs.get(0).getX());
                    colorballs.get(1).setY(colorballs.get(2).getY());
                    colorballs.get(3).setX(colorballs.get(2).getX());
                    colorballs.get(3).setY(colorballs.get(0).getY());
                } else {
                    colorballs.get(0).setX(colorballs.get(1).getX());
                    colorballs.get(0).setY(colorballs.get(3).getY());
                    colorballs.get(2).setX(colorballs.get(3).getX());
                    colorballs.get(2).setY(colorballs.get(1).getY());
                }
                }
这里的代码很简单。ball 1 的 x 必须根据 ball 0 的位置改变,ball 3 的 y 必须根据 ball 0 的位置改变。我们没有使用其他球的移动,所以 else 部分永远不会执行。您可以将运动选项也用于另外两个球来利用它。
那么,如何处理用户移动左上角球时窗帘的移动呢?很简单,首先计算该球的总偏差,然后将相同的偏差量应用于其他球。
                    double diffX=X-firstX;
                    double diffY=Y-firstY;
                    firstX=X;
                    firstY=Y;
                      for (int i = colorballs.size()-1; i>=0; i--)
                      {
                          ColorBall ball = colorballs.get(i);
                          ball.setX(ball.getX()+(int)diffX);
                          ball.setY(ball.getY()+(int)diffY);
                      }
ACTION_UP 事件对于计算双击等手势特别有用。虽然我们没有做任何逻辑上的事情,但我保留了这个方法供您探索。请记住,startTime 是为 ACTION_DOWN 计算的。我们也计算了 clickPoints。如果 ACTION_DOWN 快速连续调用两次(在双击的情况下),则 click count 将为 2,第一次触摸和最后一次触摸之间的总延迟将非常低。您还可以计算第一次 ACTION_DOWN 到最后一次 ACTION_UP 时的点之间的距离。如果点是 CLOSE_IN_TIME 和 CLOSE_IN_DISTANCE,则为双击事件。当您运行应用程序并在任一窗帘区域双击时,它将打印有关哪个窗帘被双击的调试信息。
 long time = System.currentTimeMillis() - startTime;
            duration=  duration + time;
            if(clickCount == 2)
            {
                if(duration<= MAX_DURATION)
                {
                    Log.i("Double tap",this,getTag();
                }
                clickCount = 0;
                duration = 0;
                break;
            }
如果您想在主表单中使用这些逻辑,那么与其将事件路由到 DrawView,不如在主 Activity 表单的 onTouch 方法中以相同的方式处理事件。
您还可以编写手势识别方法,如捏合和缩放手势、缩放和旋转手势等。
4. 处理多点触控事件
您可以通过检查来找出用户是否使用了多点触控手势:
if (event.getPointerCount() > 1){

Log.i("MOUSE EVENT=","MULTI TOUCH ");

}
在多点触控手势的情况下,有多个触摸点。您可以通过以下方式提取所有触摸点:
for(int i=0;i<event.getPointerCount();i++){

int  xPos = (int)MotionEventCompat.getX(event, i);
int yPos = (int)MotionEventCompat.getY(event, i);

Log.i("FOR touch point "+i+" (x,y)=","x="+xPos+" y="+yPos;


}
您还可以使用 event.getTouchMajor() 和 event.getTouchMinor() 来获取主要和次要触摸点,您可以使用它们进行手势识别。
此外,您不仅可以将触摸事件路由到其他视图,还可以在主表单上执行某些操作。
5. 使用传感器
Android 设备配备了各种传感器,包括:陀螺仪、加速度计、环境光传感器、指南针、GPS、摄像头等。要使用任何传感器,我们首先需要通过 Manifest 允许应用程序使用该特定硬件。
我们将广泛讨论使用摄像头的方法,因为我们绝对想为我们的窗口拍摄真实快照并查看上面的窗帘。然后,我们将作为结束语讨论其他传感器。
5.1 使用摄像头
要启动摄像头(或者任何其他传感器),请双击 AndroidManifest 文件,转到 Permissions 选项卡,然后添加“Uses Permission”。添加 android.permission.CAMERA。现在,您应该知道一件非常重要的事情。如果您在应用程序中使用 uses permission,在 Google Play 发布后,只有带有摄像头的设备才能看到您的应用程序。其他人则无法发现您的应用程序。但如果您不使用此权限,所有设备都可以发现该应用程序。例如,我的 Google Nexus 在使用 CAMERA 权限发布 DreamCurtains 时无法发现它,但如果您从 Android 环境安装 apk,它仍然可以与该应用程序一起使用。因此,使用权限可以更安全地确保没有这些功能的设备无法访问这些服务。
我们还希望在 main_activity 中添加一个菜单选项以方便使用摄像头。
继续将以下行添加到您的 /res/menu/ 中
main.xml
<item android:id="@+id/menuCapture" android:title="Take Snapshot"/>
现在,您需要添加一个 case 来处理此菜单选项。但在那之前,让我们明确一点,为了处理摄像头流,我们将使用另一个 Intent。当您有另一个 Intent 时,请为该 Intent 定义单独的请求和响应代码。此外,Camera Intent 将在捕获后返回一个临时图像 URI。定义一个变量来保存数据。在 MainActivity 类中声明以下成员:
    public static final int MEDIA_TYPE_IMAGE = 1;
    private static final int CAPTURE_IMAGE_ACTIVITY_REQUEST_CODE = 2;
    Uri fileUri=null;
现在更新 onOptionsItemSelected 并添加新的 case 来处理 camera intent。
case R.id.menuCapture:
                try{
                Intent captureI = new Intent(MediaStore.ACTION_IMAGE_CAPTURE);

                fileUri = getOutputMediaFileUri(MEDIA_TYPE_IMAGE);
                captureI.putExtra(MediaStore.EXTRA_OUTPUT, fileUri); // set the image file name

                startActivityForResult(captureI, CAPTURE_IMAGE_ACTIVITY_REQUEST_CODE);
                }catch(Exception ex)
                {

                }
                break;
您可以观察到我们正在为结果启动 intent。因此,我们还必须更新 onActivityResult 方法并为 camera instance 添加一个处理程序。
因此,在 camera Intent 返回一个值后,将返回的文件 Uri 分配给 MainActivity 表单中 ImageView 的 ImageUri。
 case CAPTURE_IMAGE_ACTIVITY_REQUEST_CODE:
            try{
            if(resultCode==RESULT_OK)
            {
                   imgView1.setImageURI(fileUri);
                imgView1.setDrawingCacheEnabled(true);
                imgView1.setScaleType(ScaleType.FIT_XY);


            }
            }catch(Exception ex)
            {

            }
            break;
现在,当您通过单击菜单启动相机选项时,您将在新表单中看到真实的摄像头流。

在您选择“确定”选项后,您将获得所需的结果。

5.2 使用其他传感器
您可以通过从您的 Activity 表单实现 SensorEventListener 来使用 Android 传感器。 可以从以下主要传感器类型访问 SensorManager:
Sensor.TYPE_GYROSCOPE
Sensor.TYPE_ORIENTATION
Sensor.TYPE_ACCELEROMETER
在您的 Activity 类中定义一个 SensorManager 对象。
private SensorManager sensorManager=null;
在 onCreate 方法中初始化传感器对象。
sensorManager = (SensorManager) getSystemService(SENSOR_SERVICE);
         sensorManager.registerListener(this, sensorManager.getDefaultSensor(Sensor.TYPE_ORIENTATION),sensorManager.SENSOR_DELAY_NORMAL);
您可以改用 ORIENTATION 传感器,也可以使用其他传感器。
最后,您可以在 onSensorValueChanged 方法中编写您的编码逻辑。
@Override
    public void onSensorChanged(SensorEvent arg0)
    {
        // TODO Auto-generated method stub
        Log.i("SENSOR TYpe=",""+arg0.sensor.getType());
        Log.i("SENSOR VALUE=","x="+arg0.values[0]+" y="+arg0.values[0]+" z="+arg0.values[0]);


    }
传感器的 Values 方法将包含 x、y 和 z 值(根据适用情况)。
6. 结论
这项工作是为了以简单的方式向初学者和中级 Android 爱好者教授如何开始使用传感器,尤其是触摸。我们使用了一个示例应用程序来理解本教程的基础知识,而不是举一个简单的例子。我们还理解了触摸和多点触控事件的应用以及如何调试它们。希望您已欣赏本教程,并能够掌握所涵盖的主题。