
多线程之旅
面向初学者的多线程教程和示例。
引言
众所周知,免费午餐已经结束。下一代应用程序旨在利用处理器的强大功能。 现在的挑战是构建软件,使其能够尽可能快地响应用户的活动,从而提供丰富的用户体验,同时进行必要的计算,以便尽快向用户呈现数据。 这是多线程有用的一个例子。 在其他情况下,多线程也很有用,例如
- 执行需要很长时间的操作。
- 当任务具有不同的优先级时。将线程设置为高优先级来执行时间关键任务,低优先级线程执行其他任务。
- 当您想要持续监视某些资源时。
因此,开发人员编写利用多线程的应用程序有很多好处。 众所周知,线程是一个广阔的主题,无法在一篇文章中涵盖。 我正在考虑撰写一系列文章来描述与多线程相关的各种主题。 截至目前,这些主题尚未确定。 所以放松一下,我们即将开始构建多线程应用程序之旅。
创建一个新线程
可以使用以下方法创建一个线程
Thread thread = new Thread(FunctionName);
首先,让我们创建一个控制台应用程序。 这是一个自我记录的代码片段
class Program
    {
        static void Main(string[] args)
        {
            //Main Thread of the application is Named as "Main Thread"
            Thread.CurrentThread.Name = "Main Thread";
            Console.WriteLine("From Main() function\n");
            //printing Main thread name and ID.
            //One can get the ID of the thread by enquiring
            //"Thread.CurrentThread.ManagedThreadId"
            Console.WriteLine("Thread Name:{0}\nThread ID:{1}\n",
		Thread.CurrentThread.Name,Thread.CurrentThread.ManagedThreadId);

            //Create an Object of the class Compute,
            //through which we can access Instance Method.
            Compute compute = new Compute();
            Thread Th1 = new Thread(Compute.StaticMethod); //new thread Th1
					//is created by passing static method.
            Th1.Name = "Th1"; //Let's Name the thread as Th1.
            Th1.Start(); // Let's start the Thread.

            Thread Th2 = new Thread(compute.InstanceMethod);
            Th2.Name = "Th2";
            Th2.Start();

            Console.ReadLine();
        }
    }

    class Compute
    {
        public Compute()
        {
            Console.WriteLine("Initialized the Compute class");
            Console.WriteLine("Thread ID:{0}\nThread Name:{1}\n",
		Thread.CurrentThread.ManagedThreadId, Thread.CurrentThread.Name);
        }

        public static void StaticMethod()
        {
            Console.WriteLine("From the Static Method in the Compute class");
            Console.WriteLine("Thread ID:{0}\nThread Name:{1}\n",
		Thread.CurrentThread.ManagedThreadId,Thread.CurrentThread.Name);
            Thread.Sleep(200); // thread which is now running
			// Static method is made to sleep for 200 micro Seconds.
        }

        public void InstanceMethod()
        {
            Console.WriteLine("From the Instance Method in the Compute class");
            Console.WriteLine("Thread ID:{0}\nThread Name:{1}\n",
		Thread.CurrentThread.ManagedThreadId, Thread.CurrentThread.Name);
            Thread.Sleep(200);
        }

        public void DataMethod(object Message)
        {
            Console.WriteLine("From the Instance Data Method in the Compute class");
            string s = Message as string;

            if (s != null)
            {
                Console.WriteLine("Data Received :{0}", s);
                Console.WriteLine("Thread ID:{0}\nThread Name:{1}\n",
		Thread.CurrentThread.ManagedThreadId, Thread.CurrentThread.Name);
            }
        }
    }
线程构造函数已重载,线程类具有采用 ThreadStart 委托或 ParameterizedThreadStart 委托的构造函数;该委托包装了您调用 Start 方法时由新线程调用的方法。 这是一个代码片段,仅显示使用 ThreadStart 委托创建线程。 Compute 类保持不变。
class Program
    {
        static void Main(string[] args)
        {
            Thread.CurrentThread.Name = "Main Thread";
            Console.WriteLine("From Main() function\n");

            //Create a ThreadStart Delegate object and pass the function.
            ThreadStart tStartStatic = new ThreadStart(Compute.StaticMethod);
            //Create the thread
            Thread Th1 = new Thread(tStartStatic);
            Th1.Name = "Th1"; 	//Set Name.
            Th1.Start(); 		//Start the thread.

            Compute compute = new Compute();
            ThreadStart tStartInstance = new ThreadStart(compute.InstanceMethod);
            Thread Th2 = new Thread(tStartInstance);

            Th2.Start();
            Th2.Name = "Th2"; 	// Note: Named the thread after Thread start.
				// will Name be set to Th2 ?
            Console.ReadLine();
        }
    }
这是使用“ParameterizedThreadStart”创建线程的代码片段。
class Program
    {
        static void Main(string[] args)
        {
            Thread.CurrentThread.Name = "Main Thread";
            Console.WriteLine("From Main() function\n");

            Compute compute = new Compute();
            //Delegate object is created and is pointed to a function.
            ParameterizedThreadStart pThreadStart =
		new ParameterizedThreadStart(compute.DataMethod);

            // A new thread is created with the delegate.
            Thread thread = new Thread(pThreadStart);
            thread.Name = "Parameterized Thread"; // set the Name for the thread.
            thread.Start("Hello World"); //Pass the arguments  to thread.start function.
            Console.ReadLine();
        }
    }
让我们有一个回调委托,当线程完成其工作时触发。 这是一个代码片段
namespace ConAppThreadingEx2
{
    class Program
    {
        static void Main()
        {
            //Name the thread.
            Thread.CurrentThread.Name = "Main Thread";
            Console.WriteLine("Thread Name:{0}\nThread ID:{1}\n",
		Thread.CurrentThread.Name, Thread.CurrentThread.ManagedThreadId);

            //Create an object of CallBackDelegate type and point to
            //ResultFromThread function.
            CallBackDelegate cb = new CallBackDelegate(ResultFromThread);
            //Create an object of type Compute, look at delegate object
            //is used in constructor.
            Compute compute = new Compute(50, cb);
            //Create a thread. No difference, just a one more variation.
            Thread t = new Thread(new ThreadStart(compute.ThreadPro));
            t.Name = "ThreadPro"; //set the name for the thread.
            t.Start(); // Start the thread.
            Console.Read();
        }

        //this function is called when thread completes its work.
        static void ResultFromThread(int i)
        {
            Console.WriteLine
	    ("Thread just returned from the ThreadPro method performing:{0} Tasks", i);
        }
    }

    public delegate void  CallBackDelegate(int i);

    class Compute
    {
        int numberOfTasks;
        CallBackDelegate CallBackDlg;

        public Compute(int Tasks, CallBackDelegate cb)
        {
            numberOfTasks = Tasks;
            CallBackDlg = cb;
        }

        //Thread is pointed to this function. Delegate is called
        //at the end of the function.
        //Which triggers the ResultFromThread function.
        public void ThreadPro()
        {
            Console.WriteLine("From ThreadPro Method in Compute Class");
            Console.WriteLine("Thread Name:{0}\nThread ID:{1}\n",
		Thread.CurrentThread.Name,Thread.CurrentThread.ManagedThreadId);
            Thread.Sleep(2000); // simulating numberOfTasks
            //check for CallBackDlg and trigger.
            if (CallBackDlg != null)
                CallBackDlg(numberOfTasks);
        }
    }
}
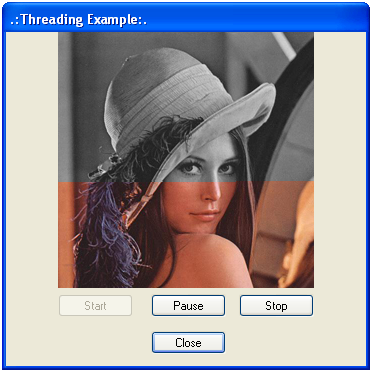
让我们把所有这些学习应用到一个更大的例子中——我们使用一个 GUI 应用程序来演示线程的创建、启动、暂停、恢复和停止。 在这里,创建一个新线程来绘制图像。 这是一个将彩色图像转换为灰度图像的示例; 这里转换有意放慢速度,因为主要目的是演示线程——并且用户可以直观地看到线程的暂停、恢复和停止。 应用程序有趣的部分是线程挂起和线程恢复,以及使用 this.Invoke() 在线程和 UI 线程之间的通信。
按钮、文本框、标签等控件由 UI 线程创建。 创建一个新线程并且在新线程上工作流程期间,新线程将无法控制 UI 上的这些控件对象,因为这些控件是由 UI 线程创建的。 对于工作线程可以在控件上调用 Invoke() 函数的情况,有一种解决方案,该函数反过来通过委托触发该函数。 应用程序的下一个有趣的部分是线程的挂起、恢复和中止。 当线程正在运行时(检查 ThreadState 的状态),中止线程非常简单。 但是,当线程挂起或请求挂起是线程状态时,在这种情况下,线程中止可能会导致崩溃。
CLR 不会中止挂起的线程,但它会将线程置于垃圾收集器可以回收内存的状态。 因此,最好的解决方案是恢复挂起的线程并中止该线程。
看看 ThreadingA 源代码。
历史
- 版本 1.0.0.0