
使用 .NET MVC 和 AngularJS 的单页应用程序
4.69/5 (15投票s)
主内容页面使用 AngularJS 显示,MVC .NET 授权用于用户验证
引言
此项目是使用 AngularJs 和 .net MVC 框架的代码。主要功能是显示电话列表和电话详情。
此功能来自 AngularJs 主页上的 phoneCat 教程。 我添加了带有 AngularJS 的用户管理模块。 通常,AngularJS 用于单页应用程序,但如果我们一起使用 MVC,则有很多优势。 例如,我们可以减少 AngularJS 中用户身份验证和授权模块的工作量。
我们可以将用户身份验证模块移动到服务器端,这使得管理安全性、菜单管理等变得非常容易。您可以在这里看到演示站点。
背景
所有背景都非常常见,所以您可以在 codeproject 站点上搜索并找到它。如果您不熟悉 AngularJS,请访问 AngularJS 站点。
连接字符串配置
从 MVC4 开始,用户管理模块使用 DefaultConnection 来存储用户数据。 在此示例项目中,我将使用 SpaContext 命名作为数据库连接。
我想在一个数据库中管理所有数据,所以首先,我为连接字符串配置了 Web.Config,并将 Models\IdentityModels.cs 中的连接字符串从 DefaultConnection 更改为 SpaContext
<connectionStrings>
  <add name="SpaContext"
       connectionString="Data Source=(LocalDb)\v11.0;AttachDbFilename=|DataDirectory|\SinglePageApp.Web.mdf;Initial Catalog=SinglePageApp.Web;Integrated Security=True" providerName="System.Data.SqlClient" />
</connectionStrings>
public class ApplicationDbContext : IdentityDbContext
  {
      public ApplicationDbContext()
          : base("SpaContext")
      {
      }
  }
DI 配置
对于依赖注入配置,我在 DependencyResolution\IoC.cs 文件中获取了代码片段
public static class IoC {
    public static IContainer Initialize() {

        var container = new Container(x =>
            {
                x.Scan(scan =>
                {
                    scan.TheCallingAssembly();
                    scan.WithDefaultConventions();
                });
                //                x.For().Use();
                x.For(typeof(IRepository<>)).Use(typeof(Repository<>));
                x.For().Use();
            });

        return container;
    }
}
身份验证设置
在此示例中,我将禁止用户访问电话详细信息页面。 只有登录的用户才能访问电话详细信息页面。
所以,打开 App_Start/Startup.Auth.cs 文件,将重定向 URL 从 /Account/Login 更改为 /Account/LoginPartial。 在 View 解释中,我将解释为什么我创建了另一个登录 View。
// Enable the application to use a cookie to store information for the signed in user
app.UseCookieAuthentication(new CookieAuthenticationOptions
{
    AuthenticationType = DefaultAuthenticationTypes.ApplicationCookie,
    LoginPath = new PathString("/Account/LoginPartial")
});
控制器
从 HomeController 中,我为 AngularJS 服务添加了两个 Actions,PhoneList 和 PhoneDetila。 正如我所说,PhoneDetail Controller 具有 Authorize Attribute 来限制用户访问。
public class HomeController : Controller
{
    public ActionResult Index()
    {
        return View();
    }

    public ActionResult About()
    {
        ViewBag.Message = "Your application description page.";

        return View();
    }

    public ActionResult Contact()
    {
        ViewBag.Message = "Your contact page.";

        return View();
    }

    public ActionResult PhoneList()
    {
        return View();
    }

    [Authorize]
    public ActionResult PhoneDetail()
    {
        return View();
    }
}
第二个 Controller,PhoneController,用于 AngularJS RESTful 服务。 在此示例中,我没有任何用户身份验证逻辑,但这取决于开发人员的编码风格。 下一篇文章,我将向您展示如何限制从 AngularJS 访问 RESTful 服务。
public class PhoneController : ApiController
{
    private IUnitOfWork unitOfWork;
    private IRepository phoneRepository;

    public PhoneController(IUnitOfWork unitOfWork)
    {
        this.unitOfWork = unitOfWork;
        phoneRepository = this.unitOfWork.Repository();
    }

    // GET api/
    public IEnumerable Get()
    {
        return phoneRepository.GetAll();
    }

    // GET api//5
    public PhoneDetailDTO Get(string id)
    {
        return JsonConvert.DeserializeObject(phoneRepository.GetById(id).PhoneDetail.Json);
    }

}
在 AccountController 中,我添加了两个 Actions,LoginPartial 和 RegisterPartial。 如果用户尝试访问 PhoneDetail Controller,框架将重定向到 /Account/Login 操作。 因此,ng-view 标签将具有包含 _Layout.chtml 母版页的整个页面。结果屏幕截图如下所示。
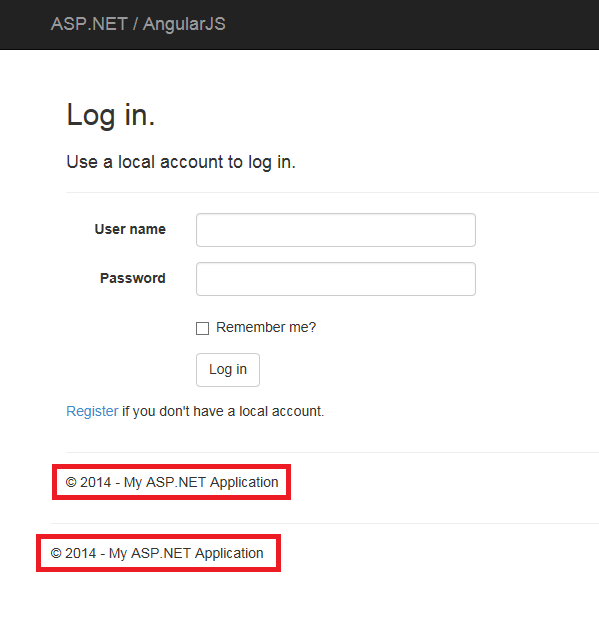
正如您所看到的,有两个页脚。 其他内容由它们自己分层。 您可以使用 F12 开发人员模式源视图来检查这一点。 为了避免这个问题,我添加了两个不包含 Layout.chtml 母版页的部分 View。
[AllowAnonymous]
public ActionResult LoginPartial()
{
    return View();
}

[AllowAnonymous]
public ActionResult RegisterPartial()
{
    return View();
}
数据传输对象
因为 PhoneDetail 数据以完整字符串的形式存储在数据库中,所以我们需要为 RESTful 服务定义 DTO。
public class PhoneDetailDTO
{
    public string additionalFeatures { get; set; }
    public Android android { get; set; }
    public List availability { get; set; }
    public Battery battery { get; set; }
    public Camera camera { get; set; }
    public Connectivity connectivity { get; set; }
    public string description { get; set; }
    public Display display { get; set; }
    public Hardware hardware { get; set; }
    public string id { get; set; }
    public List images { get; set; }
    public string name { get; set; }
    public SizeAndWeight sizeAndWeight { get; set; }
    public Storage storage { get; set; }
}

public class Android
{
    public string os { get; set; }
    public string ui { get; set; }
}

public class Battery
{
    public string standbyTime { get; set; }
    public string talkTime { get; set; }
    public string type { get; set; }
}

public class Camera
{
    public List features { get; set; }
    public string primary { get; set; }
}

public class Connectivity
{
    public string bluetooth { get; set; }
    public string cell { get; set; }
    public bool gps { get; set; }
    public bool infrared { get; set; }
    public string wifi { get; set; }
}

public class Display
{
    public string screenResolution { get; set; }
    public string screenSize { get; set; }
    public bool touchScreen { get; set; }
}

public class Hardware
{
    public bool accelerometer { get; set; }
    public string audioJack { get; set; }
    public string cpu { get; set; }
    public bool fmRadio { get; set; }
    public bool physicalKeyboard { get; set; }
    public string usb { get; set; }
}

public class SizeAndWeight
{
    public List dimensions { get; set; }
    public string weight { get; set; }
}

public class Storage
{
    public string flash { get; set; }
    public string ram { get; set; }
}
视图
在创建部分视图之前,我将脚本和 css 文件添加到 Bundle 文件
public static void RegisterBundles(BundleCollection bundles)
{
    bundles.Add(new ScriptBundle("~/bundles/jquery").Include(
                "~/Scripts/jquery-{version}.js"));

    bundles.Add(new ScriptBundle("~/bundles/jqueryval").Include(
                "~/Scripts/jquery.validate*"));

    bundles.Add(new ScriptBundle("~/bundles/angularjs").Include(
                "~/app/components/angular/angular.js",
                "~/app/components/angular-route/angular-route.js",
                "~/app/components/angular-resource/angular-resource.js",
                "~/js/app.js",
                "~/js/controllers.js",
                "~/js/filters.js",
                "~/js/services.js"));

    // Use the development version of Modernizr to develop with and learn from. Then, when you're
    // ready for production, use the build tool at http://modernizr.com to pick only the tests you need.
    bundles.Add(new ScriptBundle("~/bundles/modernizr").Include(
                "~/Scripts/modernizr-*"));

    bundles.Add(new ScriptBundle("~/bundles/bootstrap").Include(
              "~/Scripts/bootstrap.js",
              "~/Scripts/respond.js"));

    bundles.Add(new StyleBundle("~/Content/css").Include(
              "~/Content/bootstrap.css",
              "~/Content/site.css",
              "~/Content/app.css"));
}
这是主布局的 Layout.chtml。
<!DOCTYPE html>
<html ng-app="phonecatApp" lang="en">
<head>
    <meta charset="utf-8" />
    <meta name="viewport" content="width=device-width, initial-scale=1.0">
    <title>@ViewBag.Title - My ASP.NET / AngularJS Application</title>
    @Styles.Render("~/Content/css")
    @Scripts.Render("~/bundles/modernizr")

</head>
<body>
    <div class="navbar navbar-inverse navbar-fixed-top">
        <div class="container">
            <div class="navbar-header">
                <button type="button" class="navbar-toggle" data-toggle="collapse" data-target=".navbar-collapse">
                    <span class="icon-bar"></span>
                    <span class="icon-bar"></span>
                    <span class="icon-bar"></span>
                </button>
                @Html.ActionLink("ASP.NET / AngularJS", "Index", "Home", null, new { @class = "navbar-brand" })
            </div>
            <div class="navbar-collapse collapse">

                @Html.Partial("_LoginPartial")
            </div>
        </div>
    </div>
    <div class="container body-content">

        @RenderBody()

        <hr />
        <footer>
            <p>© @DateTime.Now.Year - My ASP.NET Application</p>
        </footer>
    </div>

    @Scripts.Render("~/bundles/jquery")
    @Scripts.Render("~/bundles/bootstrap")
    @Scripts.Render("~/bundles/angularjs")
    @RenderSection("scripts", required: false)
</body>
</html>
这是 Home/Index 视图来显示主页。 主页是 PhoneList。 它只有带有 ng-view 指令的 div 标签。
@{
    Layout = "~/Views/Shared/_Layout.cshtml";
    ViewBag.Title = "Home Page";
}

<div ng-view></div>
这是 PhoneList View 页面。 您可以在 AngularJS 页面上看到有关指令的详细说明。
@{
    Layout = null;
}

<img ng-src="{{mainImageUrl}}" class="phone">

<h1>{{phone.name}}</h1>

<p>{{phone.description}}</p>

<ul class="phone-thumbs">
    <li ng-repeat="img in phone.images">
        <img ng-src="{{img}}" ng-click="setImage(img)">
    </li>
</ul>

<ul class="specs">
    <li>
        <span>Availability and Networks</span>
        <dl>
            <dt>Availability</dt>
            <dd ng-repeat="availability in phone.availability">{{availability}}</dd>
        </dl>
    </li>
    <li>
        <span>Battery</span>
        <dl>
            <dt>Type</dt>
            <dd>{{phone.battery.type}}</dd>
            <dt>Talk Time</dt>
            <dd>{{phone.battery.talkTime}}</dd>
            <dt>Standby time (max)</dt>
            <dd>{{phone.battery.standbyTime}}</dd>
        </dl>
    </li>
    <li>
        <span>Storage and Memory</span>
        <dl>
            <dt>RAM</dt>
            <dd>{{phone.storage.ram}}</dd>
            <dt>Internal Storage</dt>
            <dd>{{phone.storage.flash}}</dd>
        </dl>
    </li>
    <li>
        <span>Connectivity</span>
        <dl>
            <dt>Network Support</dt>
            <dd>{{phone.connectivity.cell}}</dd>
            <dt>WiFi</dt>
            <dd>{{phone.connectivity.wifi}}</dd>
            <dt>Bluetooth</dt>
            <dd>{{phone.connectivity.bluetooth}}</dd>
            <dt>Infrared</dt>
            <dd>{{phone.connectivity.infrared | checkmark}}</dd>
            <dt>GPS</dt>
            <dd>{{phone.connectivity.gps | checkmark}}</dd>
        </dl>
    </li>
    <li>
        <span>Android</span>
        <dl>
            <dt>OS Version</dt>
            <dd>{{phone.android.os}}</dd>
            <dt>UI</dt>
            <dd>{{phone.android.ui}}</dd>
        </dl>
    </li>
    <li>
        <span>Size and Weight</span>
        <dl>
            <dt>Dimensions</dt>
            <dd ng-repeat="dim in phone.sizeAndWeight.dimensions">{{dim}}</dd>
            <dt>Weight</dt>
            <dd>{{phone.sizeAndWeight.weight}}</dd>
        </dl>
    </li>
    <li>
        <span>Display</span>
        <dl>
            <dt>Screen size</dt>
            <dd>{{phone.display.screenSize}}</dd>
            <dt>Screen resolution</dt>
            <dd>{{phone.display.screenResolution}}</dd>
            <dt>Touch screen</dt>
            <dd>{{phone.display.touchScreen | checkmark}}</dd>
        </dl>
    </li>
    <li>
        <span>Hardware</span>
        <dl>
            <dt>CPU</dt>
            <dd>{{phone.hardware.cpu}}</dd>
            <dt>USB</dt>
            <dd>{{phone.hardware.usb}}</dd>
            <dt>Audio / headphone jack</dt>
            <dd>{{phone.hardware.audioJack}}</dd>
            <dt>FM Radio</dt>
            <dd>{{phone.hardware.fmRadio | checkmark}}</dd>
            <dt>Accelerometer</dt>
            <dd>{{phone.hardware.accelerometer | checkmark}}</dd>
        </dl>
    </li>
    <li>
        <span>Camera</span>
        <dl>
            <dt>Primary</dt>
            <dd>{{phone.camera.primary}}</dd>
            <dt>Features</dt>
            <dd>{{phone.camera.features.join(', ')}}</dd>
        </dl>
    </li>
    <li>
        <span>Additional Features</span>
        <dd>{{phone.additionalFeatures}}</dd>
    </li>
</ul>
这是 PhoneDetail View 页面。 您可以在 AngularJS 页面上看到有关指令的详细说明。
@{
    Layout = null;
}

<div class="container-fluid">
    <div class="row">
        <div class="col-md-2">
            <!--Sidebar content-->
            Search: <input ng-model="query">
            Sort by:
            <select ng-model="orderProp">
                <option value="name">Alphabetical</option>
                <option value="age">Newest</option>
            </select>

        </div>
        <div class="col-md-10">
            <!--Body content-->

            <ul class="phones">
                <li ng-repeat="phone in phones | filter:query | orderBy:orderProp" class="thumbnail">
                    <a href="#/phones/{{phone.id}}" class="thumb"><img ng-src="{{phone.imageUrl}}"></a>
                    <a href="#/phones/{{phone.id}}">{{phone.name}}</a>
                    <p>{{phone.snippet}}</p>
                </li>
            </ul>

        </div>
    </div>
</div>
这是此项目中的关键点 View。 当用户在没有身份验证的情况下单击 Phone Detail 链接时,MVC 框架会将用户重定向到 Login Action。 (/Account/LoginPartial)
如果您成功登录,LoginPartial Action 将根据 ReturnUrl 参数将用户重定向到电话详细信息。
因为 returnUrl 参数是从框架自动设置的,并且 returnUrl 将是 /Home/PhoneDetail action
这就是问题所在。 当用户重定向到 /Home/PhoneDetail 时,用户将看到 html 标签,而不是电话详细信息
所以,我在提交页面时使用 Javascript 函数添加了 returnUrl 参数。 如果在 /Home/PhoneDetail 页面上添加了 returnUrl 参数,returnUrl 参数也将被重定向。
结果,您可以看到 phonedetail 页面。
如果您想查看在没有 returnUrl 的情况下提交页面会发生什么,只需删除 Javascript 函数中的 '?returnUrl=' + encodeURIComponent(returnUrl) 这部分。
@model SinglePageApp.Web.Models.LoginViewModel
@{
    ViewBag.Title = "Log in";
    Layout = null;
}


<h2>@ViewBag.Title.</h2>

<div class="row">
    <div class="col-md-8">
        <section id="loginForm">
            @using (Html.BeginForm("Login", "Account", new { ReturnUrl = ViewBag.ReturnUrl }, FormMethod.Post, new { @class = "form-horizontal", role = "form" }))
            {
                @Html.AntiForgeryToken()
                <h4>Use a local account to log in.</h4>
                <hr />
                @Html.ValidationSummary(true)
                <div class="form-group">
                    @Html.LabelFor(m => m.UserName, new { @class = "col-md-2 control-label" })
                    <div class="col-md-10">
                        @Html.TextBoxFor(m => m.UserName, new { @class = "form-control" })
                        @Html.ValidationMessageFor(m => m.UserName)
                    </div>
                </div>
                <div class="form-group">
                    @Html.LabelFor(m => m.Password, new { @class = "col-md-2 control-label" })
                    <div class="col-md-10">
                        @Html.PasswordFor(m => m.Password, new { @class = "form-control" })
                        @Html.ValidationMessageFor(m => m.Password)
                    </div>
                </div>
                <div class="form-group">
                    <div class="col-md-offset-2 col-md-10">
                        <div class="checkbox">
                            @Html.CheckBoxFor(m => m.RememberMe)
                            @Html.LabelFor(m => m.RememberMe)
                        </div>
                    </div>
                </div>
                <div class="form-group">
                    <div class="col-md-offset-2 col-md-10">
                        <input id="loginButton" type="submit" value="Log in" class="btn btn-default" />
                    </div>
                </div>
                <p>
                    @Html.ActionLink("Register", "Register") if you don't have a local account.
                </p>
            }
        </section>
    </div>
    <div class="col-md-4">
        <section id="socialLoginForm">
            @Html.Partial("_ExternalLoginsListPartial", new { Action = "ExternalLogin", ReturnUrl = ViewBag.ReturnUrl })
        </section>
    </div>
</div>
@section Scripts {
    @Scripts.Render("~/bundles/jqueryval")
}

<script type="text/javascript">

    $(document).ready(function () {
        $("#loginButton").click(function (e) {
            e.preventDefault();
            var returnUrl = $(location).attr('pathname') + $(location).attr('hash');
            var formAction = $("form").attr("action") + '?returnUrl=' + encodeURIComponent(returnUrl);
            $("form").attr("action", formAction);
            $("form").submit();
        });
    });

</script>
这是 RegisterPartialView 代码。 它是从 RegisterView 复制的。
@model SinglePageApp.Web.Models.RegisterViewModel
@{
    ViewBag.Title = "Register";
    Layout = null;
}

<h2>@ViewBag.Title.</h2>

@using (Html.BeginForm("Register", "Account", FormMethod.Post, new { @class = "form-horizontal", role = "form" }))
{
    @Html.AntiForgeryToken()
    <h4>Create a new account.</h4>
    <hr />
    @Html.ValidationSummary()
    <div class="form-group">
        @Html.LabelFor(m => m.UserName, new { @class = "col-md-2 control-label" })
        <div class="col-md-10">
            @Html.TextBoxFor(m => m.UserName, new { @class = "form-control" })
        </div>
    </div>
    <div class="form-group">
        @Html.LabelFor(m => m.Password, new { @class = "col-md-2 control-label" })
        <div class="col-md-10">
            @Html.PasswordFor(m => m.Password, new { @class = "form-control" })
        </div>
    </div>
    <div class="form-group">
        @Html.LabelFor(m => m.ConfirmPassword, new { @class = "col-md-2 control-label" })
        <div class="col-md-10">
            @Html.PasswordFor(m => m.ConfirmPassword, new { @class = "form-control" })
        </div>
    </div>
    <div class="form-group">
        <div class="col-md-offset-2 col-md-10">
            <input type="submit" class="btn btn-default" value="Register" />
        </div>
    </div>
}

@section Scripts {
    @Scripts.Render("~/bundles/jqueryval")
}
历史
2014 年 9 月 11 日 - 初始发布
2014 年 9 月 14 日 - 损坏的演示链接更新